background image

5

Before you start

Things to check before you start 

To avoid the risks that are always present when you use an electrical 

appliance

,

 it is important that this appliance is installed correctly and that 

you read the safety instructions carefully to avoid misuse and hazards. 

Please keep this instruction 

manual

 for future reference and 

to 

pass it on 

to any future owners. After unpacking the appliance please check that it 

is not damaged. If in doubt, do not use the appliance

,

 but contact 

the 

c

ustomer 

s

ervices 

team 

on 

+353 (0)1 4136444

Check the package and make sure 

that 

you have all of the parts listed.

Decide on the appropriate location for your product.

If this product contains glass please take care when fitting or handling

,

 to 

prevent personal injury or damage to the product.

The specifications plate is available on this appliance. This plate displays 

all the necessary identification information for ordering replacement parts.

If you sell the appliance, give it away, or leave it behind when you move 

house, make sure 

that 

you also pass on this 

instruction 

manual

,

 so that 

the new owner can become familiar with the appliance and its safety 

warnings.

You will need

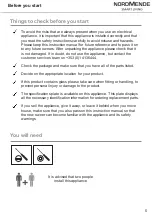
It is

 advise

d


that two people


install


this appliance

Summary of Contents for DOI414IX

Page 1: ...DOU414IX DOI414IX WARNING Read the instructions before using this appliance BUILT IN ELECTRIC DOUBLE OVEN ...

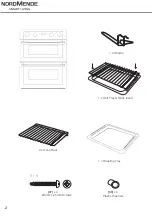
Page 2: ...1 x Handle 1 x Grill Tray Rack Insert 2 x Oven Rack 1 1 07 x 4 Ø4mm x 25mm Screws 1 x Roasting Tray 2 06 x 4 Plastic Washers ...

Page 3: ... Please read this manual carefully The instructions that it contains will enable you to use the appliance correctly and to its best advantage This manual will provide you with all of the instructions that you will require to ensure its safe installation use and maintenance Always keep this owner s manual close to hand since you may need to refer to it in the future ...

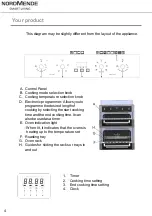
Page 4: ...lowsyouto programmethedesiredlengthof cookingby selectingthe start cooking time andtheend cookingtime Itcan alsobe usedasa timer E Oven indication light When lit it indicates that the ovens is heating up to the temperature set F Roasting tray G Oven rack H Guides for sliding the racks or trays in and out 1 Timer 2 Cooking time setting 3 End cooking time setting 4 Clock Your product ...

Page 5: ...eam on 353 0 1 4136444 Check the package and make sure that you have all of the parts listed Decide on the appropriate location for your product If this product contains glass please take care when fitting or handling to prevent personal injury or damage to the product The specifications plate is available on this appliance This plate displays all the necessary identification information for order...

Page 6: ... caught under or in the appliance and avoid damage to the power cable Do not remove the plug in the presence of flammable gas Do not install the appliance outdoors in a damp place or in an area which may be prone to water leaks such as under or near a sink unit In the event of a water leak allow the machine to dry naturally Please dispose of the packing material carefully Do not use flammable spra...

Page 7: ...ncorrect installation of this appliance Danger of burns During use the appliance becomes hot Care should be taken to avoid touching heating elements inside the oven Warning Accessible parts may become hot during use Children should be kept away Warning If the door or door seals are damaged the oven must not be operated until it has been repaired by a competent person Do not lean on the door or pla...

Page 8: ...possible Keep the appliance and its cord out of reach of children If an extension cord is used its capacity needs to be suitable for the power consumed by the appliance Do not operate the appliance with wet hands or while standing on a wet floor Do not touch the power plug with wet hands Disconnect the power plug from the electrical outlet when not in use and before cleaning Always turn the applia...

Page 9: ...is designed specifically for heating or cooking food The use of corrosive chemicals in heating or cleaning will damage the unit and may cause injury Should any food inside the oven catch fire keep the door closed Switch the oven off and disconnect the power supply Always exercise caution when opening the door Move to the side open the door slowly to vent the hot air and or steam Make sure your fac...

Page 10: ...hest temperature Keep the oven door closed and leave the appliance on for 30 minutes with nothing in it Ensure adequate ventilation during this process by opening any doors and windows in the room Any odours created during this operation will occur due to the evaporation of substances used to protect the appliance during storage prior to installation Note Place the grill pan provided on the bottom...

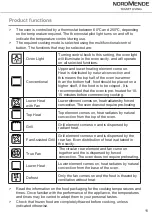
Page 11: ...eat with Fan Lower element comes on heat radiates by forced convection The oven does not require pre heating Top Heat Top element comes on heat radiates by natural convection from the top of the oven Grill Grill element comes on and is dispersed by radiant heat Fan Assisted Grill Grill element comes on and is dispersed by the rear fan Even distribution of heat is attained in the cavity True Fan Th...

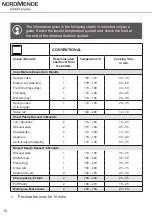
Page 12: ...ruit cake tray Flan base Biscuits tray 170 190 2 20 20 Sponge cake 3 to 6 eggs 170 190 1 20 35 Swiss roll 180 200 1 12 16 Short Pastry Dessert in Moulds 170 190 2 15 20 170 190 2 45 55 170 190 2 10 20 170 190 1 90 90 Tart flan base Streusel cake Cheesecake Apple pie Apricot tart with topping 170 190 1 55 75 Raised Dough Dessert in Moulds Streusel cake 170 190 1 35 45 White bread 180 200 1 40 50 Pi...

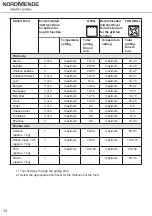
Page 13: ... kg 1 180 200 120 150 Ham joint approx 1 kg 1 200 220 60 70 Meat loaf approx 1 kg 1 190 210 70 80 Veal approx 1 5 kg 1 190 210 100 120 Leg of lamb approx 1 5 kg 1 220 220 90 120 Rack of lamb approx 1 5 1 190 210 50 60 Poultry 0 8 1 kg 1 190 210 60 70 Poultry approx 2 kg 1 190 210 90 110 Poultry stuffed approx 2 1 190 210 110 130 Poultry approx 4 kg 1 180 200 150 180 Fish whole approx 1 5 kg 1 190 ...

Page 14: ...3 or 4 maximum 10 15 maximum 9 13 Fish fillet 3 or 4 maximum 12 16 maximum 13 18 Trout 3 or 4 maximum 16 20 maximum 20 25 Toast 3 or 4 maximum 2 4 maximum 3 6 Cheese toast 3 or 4 maximum 7 9 maximum 5 8 Tomatoes 3 or 4 maximum 6 8 maximum 8 10 Peaches 2 maximum 6 8 maximum 15 20 Thicker cuts Chicken approx 1 kg 1 maximum 50 60 maximum 60 85 Rolled meat 7 cm approx 1 kg 1 maximum 75 85 maximum 100 ...

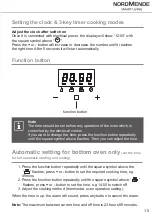
Page 15: ...e press the function button repeatedly until the square symbol above flashes Then you can adjust the time Automatic setting for bottom oven only set the time for full automatic starting and ending 1 Press the function button repeatedly until the square symbol above the flashes press or button to set the required cooking time eg 45mins 2 Press the function button repeatedly until the square symbol ...

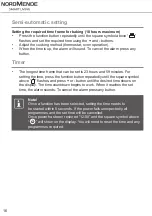
Page 16: ...inutes For setting the time press the function button repeatedly until the square symbol above flashes and press or button until the desired time shows on the display The time countdown begins to work When it reaches the set time the alarm sounds To cancel the alarm press any button Note Once a function has been selected setting the time needs to be started within 5 seconds If the power fails unex...

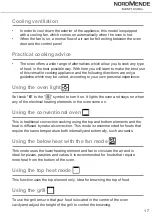
Page 17: ...rn it on It lights the oven and stays on when any of the electrical heating elements in the oven come on Using the conventional oven This is traditional convection cooking using the top and bottom elements and the heat is diffused by natural convection This mode is recommended for foods that require the same temperature both internally and externally such as roasts Using the below heat with the fa...

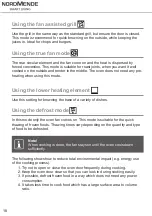
Page 18: ...e this setting for browning the base of a variety of dishes Using the defrost mode In this mode only the oven fan comes on This mode is suitable for the quick thawing of frozen foods Thawing times vary depending on the quantity and type of food to be defrosted Note When cooking is done the fan stays on until the oven cools down sufficiently The following shows how to reduce total environmental imp...

Page 19: ... surfaces Remember stainless steel could tarnish and restoring these surfaces can be difficult Specialist stainless steel cleaners are available from major supermarkets After cleaning these surfaces should be wiped with a clean cloth and lukewarm water to remove any traces of detergent The inside of the oven should ideally be cleaned when the oven is still warm using a damp cloth and the minimum p...

Page 20: ...urrounding the oven opening which guarantees its perfect functioning Check the condition of this seal on a regular basis If necessary clean it and avoid using abrasive products or objects to do so Should it become damaged please contact the service centre to order a replacement We recommend you avoid using the oven until it has been repaired Never line the oven bottom with aluminium foil as the bu...

Page 21: ...o the full extent 2 Open the lever A completely on the left right hinges A B 3 Open the door to the angle as shown in the image below 4 Close the door until on both sides levers A are hooked to part B of the door as shown in the diagram of step 2 C 5 Withdraw the hinge hooks from their To replace the door reverse the above procedure position following arrow C ...

Page 22: ... unscrewing the 2 screws A 2 Gently pull out the inner panel of glass Clean the glass with an appropriate cleaner Dry thoroughly and place on a soft surface Now you can also clean the inside of the outer glass To replace the glass reverse the procedure above A A ...

Page 23: ...er right rear corner of the oven cavity Remove the glass cover of the lamp holder by unscrewing it Unscrew the old light bulb and dispose of it safely and ecologically replace it with a high heat resistant light bulb 300 with the following specifications o Voltage 220 240V o Wattage 25W o Type E 14 90 WARNING Disconnect the appliance from the electricity supply beforereplacingthelamp ...

Page 24: ... been set the oven does not heat up There may be problems with the internal electrical connections Call your the service centre What should I do if the time display is blinking There was a power failure Set the clock see section Setting the clock What should I do if the oven light does not illuminate The oven light is faulty Replace the oven light bulb see section Replacing the oven lamp What shou...

Page 25: ...ssible negative consequences for the environment and public health which could occur if this product is not handled correctly To receive more detailed information about recycling this product contact your local government domestic waste disposal services or the outlet where the product was purchased Technical and legal information Technical information Power supply Power consumption 220 240V 50 60...

Page 26: ...retain your original proof of purchase to secure your warranty guarantee Excludes Microwaves Which Carry a 1 Year Parts Labour Warranty To receive your Free 3rd Year of additional warranty please register your product online or contact our customer service team Republic of Ireland Phone 00353 01 4136 444 Website www nordmende ie Great Britain Phone 0044 084 4847 7641 Website www nordmende co North...

Page 27: ...thorised NordMende service engineer Any appliance or part replaced becomes property of KAL Group Ltd Your NordMende warranty does not cover Damage or service calls as a result of transportation improper use or neglect Replacement of any light bulbs Replacement of any removable parts of glass or plastic Replacement of any accessories such as oven trays Replacement of any cosmetic parts including ce...

Page 28: ...ork is undertaken Installation Fitting under the worktop between two units a 600mm wide gap is required for this installation Installation of Built under Double Oven This product can only be fitted under the work surface and to ensure that the built in appliance functions correctly it should be installed using one of the two methods shown below Installation method 1 600mm Existing or new 600mm cab...

Page 29: ...29 Installation Unit modifications Remove the both upper shelf A and cross member support B on the oven housing unit Cut the bottom panel C of the oven housing as shown DOU414IX ...

Page 30: ...ial In particular the adhesive that bonds the plastic laminate to the furniture must be able to withstand temperatures of not less than 150 C to avoid delamination The appliance must be housed in heat resistant cabinets 560 877 570 594 21 560 17 888 547 871 15min 15min DOI414IX ...

Page 31: ...ithin the sides of the metal casing of the oven and secure with the 4 screws 07 provided Also ensure that you adjust the furniture doors adjacent to the sides of the oven so that there is a 4 6mm gap between them otherwise heat displaced from the oven might damage the furniture door 06 x 4 07x 4 Note If the supply cord is damaged it must be replaced by the manufacturer its service agent or similar...

Page 32: ...ed in an accessable position Direct Connection If the appliance is being connected directly to the mains an omnipolar circuit breaker must be installed with a minimum opening of 3mm between contacts If the cable is damaged or to be replaced the operation must be carried out the by a qualified electrician with dedicated tools to avoid any accidents The installer must ensure that the correct electri...

Page 33: ...tact gap on each connector For UK and Ireland only A Switched Fused Connection Unit to BS 1363 Part 4 is recommended The fuse must be rated at 30 Amps The wires in the mains lead are coloured in accordance with the following code Brown L Live Blue N Neutral Green and Yellow Earth The connection point must be placed in a position adjacent to the appliance so as to be readily accessible for an engin...

Page 34: ...r cavity electric final energy EC electric cavity Top oven 0 58 bottom oven 0 92 kWh cycle Energy consumption required to heat a standardised load in a cavity of an electric heated oven during a cycle in fan forced mode per cavity electric final energy EC electric cavity Top oven N A bottom oven 0 78 kWh cycle Energy Efficiency Index per cavity EEI cavity Top oven 85 3 bottom oven 98 7 Energy effi...

Page 35: ...cavity electric final energy EC electric cavity Top oven 0 58 bottom oven 0 75 kWh cycle Energy consumption required to heat a standardised load in a cavity of an electric heated oven during a cycle in fan forced mode per cavity electric final energy EC electric cavity Top oven N A bottom oven 0 70 kWh cycle Energy Efficiency Index per cavity EEI cavity Top oven 85 3 bottom oven 95 9 Energy effici...

Page 36: ...NORDMENDE SMART LIVING ...

Reviews: