background image

15

HOW TO USE PRESET PROGRAMS

The console offers twenty-six preset programs. Each
preset program automatically controls the grade and
speed of the hiker to simulate a hiking trail as it guides
you through an effective workout. You can choose a
moderate, challenging, or extreme program. Follow the
steps below to use a preset program.

Insert the key fully into the console.

See GETTING STARTED on page 12. 

Put on the heart rate monitor if desired.

See HOW TO PUT ON THE HEART RATE
MONITOR on page 8.

Enter your age and a target heart rate if desired.

See step 3 on page 13.

Select the desired preset program.

When the key is inserted, the manual mode will be
selected. To select a preset program, press the
Moderate, Challenging, or Extreme button repeat-
edly. Refer to the
trail display. The
three trails in the
display are di-
vided into sec-
tions; each sec-
tion represents a
different preset
program. For ex-
ample, the mod-
erate trail (the Delta Lake Trail) is divided into
seven sections. As you press the Moderate,
Challenging, or Extreme button repeatedly, indica-
tors will flash in the trail display to show which trail
section you have selected. You may choose to
complete all sections of a trail in sequence (one
section each day you exercise) or you may
choose to complete sections at random. Note: If
you are completing sections of a trail in sequence,
when the Moderate, Challenging, or Extreme but-
ton is pressed, the most recently completed sec-
tion of the trail will light and the next section to be
completed will flash. 

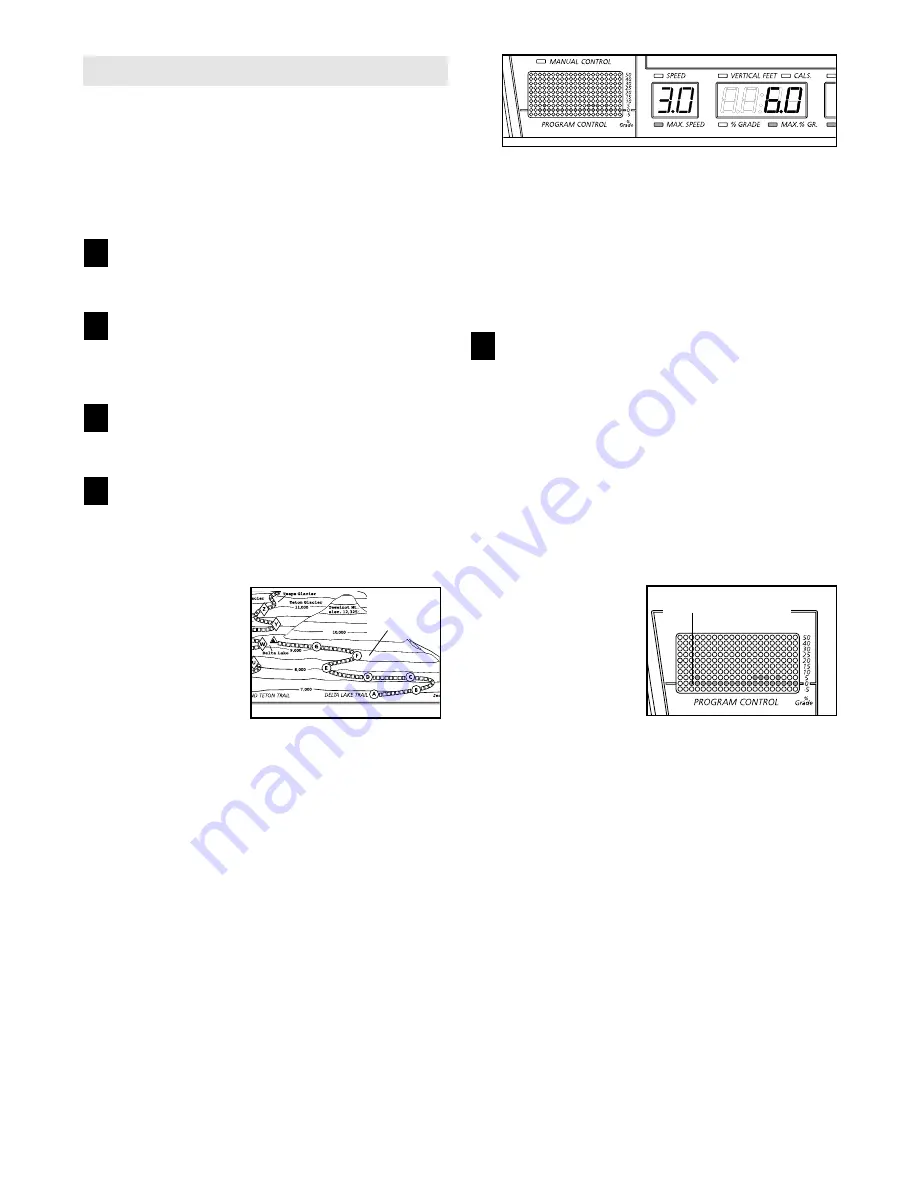
When a preset program is selected, the matrix will
show the grade settings for the program. The
Speed display will show the maximum speed set-
ting for the program and the Vertical Feet/Cals./
Grade display will show the maximum grade set-
ting for the program.

For example, if you select section A of the Delta
Lake Trail, the matrix will show that the grade set-
tings for the program are low. The Speed display
will show that the hiker will reach a maximum
speed of 3 miles per hour during the program and
the Vertical Feet/Cals./Grade display will show
that the hiker will reach a maximum grade of 6%
during the program. 

Press the Start button or the Speed + button to
start the program.

A moment after the button is pressed, the hiker
will automatically adjust to the first grade and
speed settings for the program. Hold the handrails
and begin walking. 

Each program is divided into several time seg-
ments of different lengths. The Distance/Time dis-
play shows both the time remaining in the program
and the time remaining in the current segment of
the program. One grade setting and one speed
setting are pro-
grammed for each
segment. The
grade setting for
the first segment is
shown in the flash-
ing Current
Segment column
of the matrix. (The
speed settings are
not shown in the matrix.) The grade settings for
upcoming segments are shown in the columns to
the right.

When only three seconds remain in the first seg-
ment of the program, both the Current Segment
column and the column to the right will flash and a
series of tones will sound. In addition, the Speed
display will flash three times if the speed is about
to change and the Vertical Feet/Cals./Grade display
will flash if the grade is about to change. When the
first segment is completed, all grade settings will
move one column to the left. The grade setting for
the second segment will then be shown in the
flashing Current Segment column and the hiker
will automatically adjust to the grade and speed
settings for the second segment. 

5

4

3

2

1

Trail

Display

Current Segment

Summary of Contents for NTHK22490

Page 1: ...om new products prizes fitness tips and much more QUESTIONS As a manufacturer we are com mitted to providing complete customer satisfaction If you have questions or if there are missing parts we will...

Page 2: ...ON AND ADJUSTMENT 10 HOW TO MOVE THE HIKER 23 TROUBLE SHOOTING 24 CONDITIONING GUIDELINES 26 LIMITED WARRANTY Back Cover Note An EXPLODED DRAWING a PART LIST and instructions for ORDERING REPLACEMENT...

Page 3: ...ther appliance should be on the same circuit Do not use an extension cord 13 Use only a single outlet surge suppressor that is UL 1449 listed as a transient voltage surge suppressor TVSS The surge sup...

Page 4: ...mediately after use before cleaning the hiker and before performing the mainte nance and adjustment procedures described in this manual Never remove the motor cover unless instructed to do so by an au...

Page 5: ...gh Friday 6 a m until 6 p m Mountain Time ex cluding holidays To help us assist you please note the product model number and serial number before calling The product model number is NTHK22490 The seri...

Page 6: ...right Upright 65 which has the Upright Wire Harness 63 inside of it Slide an Upright Collar 48 onto the Upright 63 48 65 1 2 While a second person holds the right Upright 65 con nect the Upright Wire...

Page 7: ...ht Wire Harness 63 and insert both Wire Harnesses into the right Upright 65 Hold a Metal Spacer 122 inside the right Upright 65 and align it with the first hole in the Upright Insert a Handrail Bolt 5...

Page 8: ...nction when posi tioned as described try moving it slightly lower or higher on your chest Make sure that the logo on the sensor unit is facing forwards and is right side up Each time you use the heart...

Page 9: ...ver and turn it clockwise to close it HEART RATE MONITOR CARE AND MAINTENANCE Thoroughly dry the heart rate monitor after each use The heart rate monitor is activated when the electrode areas are wett...

Page 10: ...nding plug Plug the power cord into a surge suppressor and plug the surge suppressor into an appropriate outlet that is properly installed and grounded in accordance with all local codes and ordinance...

Page 11: ...er and play special iFit com CD programs CD s are available separately IFit com CD programs automatically control the grade and speed of the hiker as a personal trainer walks you through every step of...

Page 12: ...splay Press the arrow buttons to enter your age the buttons can be held down to enter your age quickly When your age is shown press the Enter button again Your age will be stored in memory Note The ag...

Page 13: ...ash To restart the walking belt press the Start button or the Speed button Change the grade of the hiker as desired To change the grade of the hiker press the Grade and buttons Each time a button is p...

Page 14: ...art rate monitor is worn If you have entered your age and a target heart rate into the console since the key was in serted see step 3 on page 13 the Heart Rate display will also show whether your hear...

Page 15: ...gram and the Vertical Feet Cals Grade display will show the maximum grade set ting for the program For example if you select section A of the Delta Lake Trail the matrix will show that the grade set t...

Page 16: ...s will pause and the Distance Time display will begin to flash To restart the pro gram press the Start button or the Speed but ton To end the program press the Stop button re move the key and then re...

Page 17: ...electronics stores Plug the Y adapter into the PHONES jack on your CD player Plug your head phones into the other side of the Y adapter HOW TO CONNECT YOUR PORTABLE STEREO Note If your stereo has an...

Page 18: ...RCA Y adapter Plug the RCA Y adapter into the LINE OUT jack on your stereo HOW TO CONNECT YOUR COMPUTER Note If your computer has a 3 5mm LINE OUT jack see instruction A If your computer has only a P...

Page 19: ...R OR COMPUTER on page 17 Note To purchase iFit com CD s or videocas settes call toll free 1 800 735 0768 Follow the steps below to use an iFit com CD or video program Insert the key fully into the con...

Page 20: ...of the CD or video program Pressing the Stop button on your CD player or VCR will also stop the program When the CD or video program is completed the walking belt will stop and the Distance Time disp...

Page 21: ...ram an on screen count down will begin Return to the hiker and stand on the foot rails Find the clip attached to the key and slide the clip onto the waistband of your clothing When the on screen count...

Page 22: ...ber of hours that the hiker has been used IMPORTANT Make sure that there is not a letter d in the Heart Rate dis play If a d appears in the display the console is in the demo mode This mode is intende...

Page 23: ...it rolls freely on the wheels The help of a second person may be helpful when tipping the hiker Carefully move the hiker to the desired location Never move the hiker without tipping it back To re duc...

Page 24: ...five minutes and then press the switch back in d Check the on off switch located on the hiker near the power cord The switch must be in the on position PROBLEM The power turns off during use SOLUTION...

Page 25: ...emove the key and UNPLUG THE POWER CORD Using the allen wrench turn each of the front roller adjustment bolts 1 4 of a turn in the direction shown Be careful not to over tighten the walking belt Plug...

Page 26: ...rengthen your cardiovascular sys tem your exercise must be aerobic Aerobic exercise is activity that requires large amounts of oxygen for prolonged periods of time This increases the demand on the hea...

Page 27: ...lles Stretch With one leg in front of the other reach forward and place your hands against a wall Keep your back leg straight and your back foot flat on the floor Bend your front leg lean forward and...

Page 28: ...Harness 64 1 Base Endcap 65 2 Upright 66 7 Base Pad 67 15 Base Pad Screw Reed Switch Screw 68 1 Electronics Bracket 69 2 Controller Screw 70 1 Controller 71 1 Power Cord 72 1 Power Cord Grommet 73 1 P...

Page 29: ...7 87 88 67 66 86 90 83 84 85 22 91 92 47 47 84 78 67 46 12 11 47 65 79 81 78 80 77 76 79 81 75 68 64 49 64 74 72 71 73 69 53 65 70 52 53 52 54 51 39 56 58 59 59 61 59 63 51 62 60 55 57 57 57 57 48 47...

Page 30: ...ering parts please be prepared to give the following information The MODEL NUMBER OF THE PRODUCT NTHK22490 The NAME OF THE PRODUCT NordicTrack TETON hiker The SERIAL NUMBER OF THE PRODUCT see the fron...

Page 31: ...is VERY IMPORTANT THAT YOU READ THE MANUAL before operating the Product Remember to do the periodic maintenance requirements specified in the Manual to assure proper operation and your continued satis...

Reviews: