background image

13

HOW TO USE A TARGET MUSCLE WORKOUT

1. Touch the screen or press the ON/RESET 

button to turn on the console.

See step 1 on page 11.

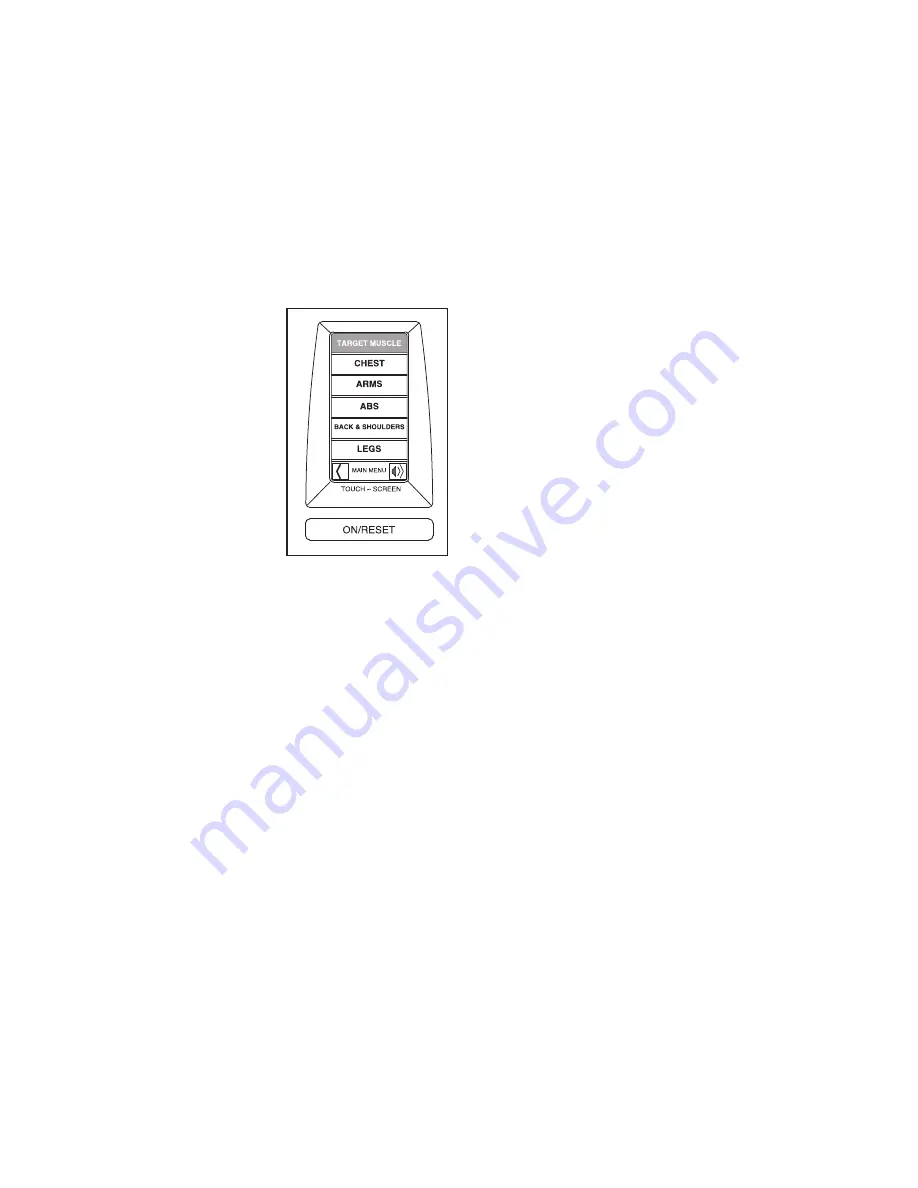
2. Access the target muscle workout menu.

Touch the TARGET MUSCLE button to access the
target muscle workout menu.

3. Select the desired target muscle workout.

The target muscle
workout menu allows
you to choose among
five target muscle work-
outs. To select a target
muscle workout, touch
the name of the desired
workout on the screen.

If desired, touch the
BACK button or the
MAIN MENU button to
return to the main
menu. Touch the
AUDIO button to
change the audio settings.

Note: The voice of a personal trainer will guide you
through the workout. To adjust the volume or select
an audio setting for your personal trainer, touch the
AUDIO button and see HOW TO ADJUST THE
AUDIO SETTINGS on page 16. During the workout,
you can touch the AUDIO button and change the
audio settings any time the AUDIO button appears
on a screen. 

4. Select the desired target exercise.

When you select a target muscle workout, a target
exercise menu will appear on the screen. To select
a target exercise, touch the name of the desired
target exercise on the screen. If necessary, touch
the SCROLL UP/DOWN buttons or press the up
and down buttons next to the iFIT slot to view all
the target exercises on the menu.

If desired, touch the BACK button to return to the
target muscle workout menu. Touch the MAIN
MENU button to return to the main menu. Touch
the AUDIO button to change the audio settings.

5. Perform the target exercise.

When you select a target exercise, the voice of a
personal trainer will begin explaining the exercise.
The name of the exercise and an animation of the
exercise will then appear on the screen. Touch the
READY button at any time during the explanation to
begin the exercise. If desired, touch the BACK but-
ton to return to the target exercise menu.

Perform repetitions of the exercise as described by
the personal trainer. Exercise with a slow, steady
motion. The personal trainer and the display will
count the repetitions as you perform them. At the
end of a set, rest for the amount of time shown in
the display. Then, resume performing repetitions
and sets as indicated in the display.

If desired, touch the BACK button to return to the
exercise explanation. Touch the FORWARD button
to return to the target exercise menu. Touch the
MAIN MENU button to return to the main menu. 

6. Continue the target muscle workout.

When you have performed a target exercise, the
name of that exercise will appear crossed out on
the target exercise menu. 

Continue selecting and performing target exercises
as described in steps 4 and 5 in this section. 

When you have performed all the target exercises
in a target muscle workout, the words WORKOUT
COMPLETE will appear on the screen.

If desired, press the ON/RESET button to return to
the main menu.

Note: If you touch the BACK button or the MAIN
MENU button to return to the target muscle work-
out menu or the main menu at any time during a
target muscle workout, the console will be reset
and the record of target exercises you have com-
pleted will be lost.

7. Follow your progress with the display.

See step 5 on page 11.

8. When you are finished exercising, the console

will turn off automatically.

See step 7 on page 11.

Summary of Contents for NTCCSY9897.0

Page 1: ...number in the space above for future reference QUESTIONS As a manufacturer we are com mitted to providing complete customer satisfaction If you have questions or if parts are damaged or missing PLEAS...

Page 2: ...WING 19 ORDERING REPLACEMENT PARTS Back Cover LIMITED WARRANTY Back Cover NordicTrack is a registered trademark of ICON IP Inc TABLE OF CONTENTS The decals shown here have been applied in the location...

Page 3: ...rotect the floor or carpet Make sure that there is enough clearance around the resistance system to mount dismount and use it 6 Inspect and properly tighten all parts regular ly Replace any worn parts...

Page 4: ...he body Whether your goal is to tone your body build dramatic muscle size and strength or improve your cardiovascular system the resistance system will help you to achieve the specific results you wan...

Page 5: ...crew 72 M6 Washer 82 PART IDENTIFICATION CHART See the drawings below to identify small parts used in assembly The number in parentheses below each draw ing is the key number of the part from the PART...

Page 6: ...o adjustable wrenches one Phillips screwdriver Assembly will be more convenient if you have a socket set a set of open end or closed end wrenches or a set of ratchet wrenches Make Assembly Easier Ever...

Page 7: ...M6 Washers 82 Press the Upright Cap 33 into the top of the Base 1 23 82 82 68 39 41 42 68 3 33 1 4 2 Attach the Base Plate 3 to the Base Legs 2 with eight M6 x 20mm Screws 67 and eight M6 Large Washe...

Page 8: ...sistance system ADJUSTING THE SEAT The Seat 24 can be attached at either of two heights To raise or lower the Seat lift it off the pins on the Base 1 and set it on a different set of pins For exercise...

Page 9: ...en the Adjustment Handle is in the desired position release it Push the Adjustment Handle forward or backward slightly to make sure that it is fully engaged 9 7 34 11 6 Screws Link 38 TIGHTENING THE C...

Page 10: ...and tone workouts for the upper and lower body During each build and tone workout the voice of a personal trainer will prompt you to perform a series of strength exercises The console also features th...

Page 11: ...fault settings 4 Perform exercises Perform repetitions of the exercise of your choice with a slow steady motion The voice of the con sole and the display will count the repetitions as you perform them...

Page 12: ...ing the first exer cise The name of the exercise and an animation of the exercise will then appear on the screen Touch the READY button at any time during the explana tion to begin the exercise Perfor...

Page 13: ...you select a target exercise the voice of a personal trainer will begin explaining the exercise The name of the exercise and an animation of the exercise will then appear on the screen Touch the READY...

Page 14: ...in explaining the first exercise The name of the exercise and an ani mation of the exercise will then appear on the screen Touch the READY button at any time during the explanation to begin the exerci...

Page 15: ...ce down and are fac ing the slot When the iFIT Card is properly insert ed the indicator next to the slot will light and an iFIT menu will appear on the screen Next select the desired workout on the iF...

Page 16: ...ttings and exit the display settings screen Note The LCD backlight setting will not be saved in memory for the next time you turn on the console HOW TO ADJUST THE AUDIO SETTINGS When you touch the AUD...

Page 17: ...measurements at the end of every month THE BASIC TYPES OF STRENGTH WORKOUTS Note See the accompanying DVD to learn the correct form for a variety of exercises that can be performed with the resistance...

Page 18: ...Console Wire Harness 42 1 3 pin Wire Harness 43 4 Arm Bushing 44 4 Pulley Bushing 45 4 Barrel Nut 46 2 Pivot Pulley Bearing 47 1 Handle Spring 48 2 Arm Cap 49 2 Weight Clip 50 1 Left Retainer Clip 51...

Page 19: ...43 43 44 44 45 50 46 48 51 52 73 68 59 59 74 82 68 19 85 85 65 65 85 58 85 80 80 56 65 85 79 88 75 85 81 81 58 9 9 10 10 70 61 61 70 60 85 64 8 12 13 14 15 16 17 31 35 49 47 39 55 66 83 77 76 69 71 8...

Page 20: ...t damage abuse misuse improper or abnormal usage or repairs not provided by an ICON authorized service center products used for commercial or rental purposes or products used as store display models N...

Reviews: