


19
10
1
2
3
4
5
6
7
SPEAKERS
The configuration and arrangement of a
surround sound system's speakers is critical.
For maximum listening enjoyment, refer to the
Arrangement of Speakers section in this manual
prior to connecting speakers.
Surround Sound Speakers
Front or main right and left speakers;
center speaker
These three speakers provide extensive
sound imaging and augment the dynamic effect
of the audio. A movie's principal dialogue comes
through these speakers.
Rear or surround sound speakers
These two speakers provide 3-D dynamic
sound effects, and create an enveloping
atmosphere, as they add background sounds.
.
Subwoofer speaker
Provides rich and powerful bass, adding a
powerful dimension of realism.
Note
: Audio recorded for the center speaker and
subwoofer will be assigned to the front and 3-D
rear speakers to obtain the optimum 3-D
surround sound effect.
The ideal surround sound speaker
configuration may vary according to room size
and wall material. The figure below illustrates
a typical arrangement.
Hints:
Front or main speakers and central speaker
should be placed at the same level and in a way
that sound is oriented toward the listener's ears.
3D surround sound or rear speakers should
be placed 3' higher than the height of listener's
ears.
Subwoofer speaker may be placed anywhere
within the room, as its location produces little
effect on a listener's sensation to sound. To
obtain the optimum bass effect, a subwoofer is
recommended in home theater systems.
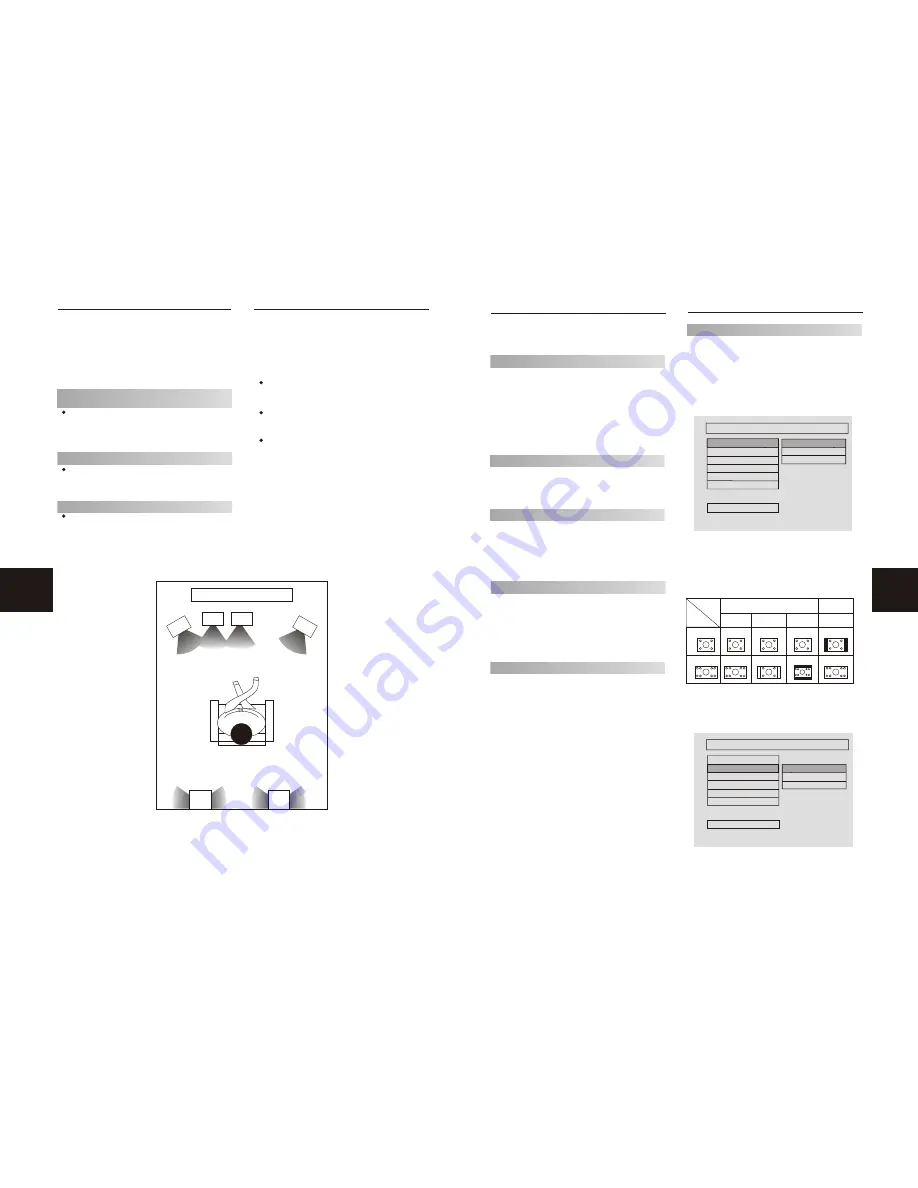
ARRANGEMENT OF SPEAKERS
1.TV set or screen
2. Front or main left speaker
3.Subwoofer
4.Center speaker
5.Front or main right speaker
6.3-D surround sound left speaker
7.3-D surround sound right speaker
8.Viewer's location
The repeat mode changes each time the REPEAT
key is pressed (i.e., from title repeat to chapter
repeat, etc.)
Zoom
A picture may be enlarged up to four times
during either playback or slow motion through
the unit's zoom function. Press the ZOOM key
once and it enlarges the image 1.5x; press a
second time and the image enlarges 2x; while
a third pressing enlarges the image 4x. To
return to normal-size playback, press the
ZOOM key a fourth time. Enlargement takes
place in the center of the picture.
L/R
When a DVD disc is played, the active
language will be displayed. When a CD disc is
played, the left or right track, or stereo will be
displayed accordingly.
Volume and Mute
The volume on this Norcent DVD receiver is
easily controlled with the remote control by
pressing either the VOL + key to raise the volume
or the VOL- key to lower it. By pressing the
MUTE key, no audio will be heard. To reinstate
the audio, press the MUTE key again.
Program
Pressing the PBC button followed by pressing
the PROG button, the program status of a playing
DVD will appear. When a CD is playing, by
pressing the PBC button followed by the PROG
button allows you to program specific tracks in
a desired order of play. To exit the Programmed
play mode, press the PBC button again.
DVD Menu Setup
By pressing the SETUP key on the remote
control, the main setup menu appears. You will
be asked to enter the Personal Identification
Number (PIN), which is “0000”. From the
setup menu, you may choose the following
options: general setup, speaker setup, audio
setup, and preferences setup.
1. After accessing the setup menu, press the
scroll key for up or down movement to select a
desired item. Once an item is selected, press
the PLAY key to confirm your entry and to move
to the sub-entry.
2. Use the left or right scroll key to move the
pointer and the up or down scroll key to select
the desired option. Once an item is selected,
press the PLAY key to confirm your selection.
This completes the setup of the selected function.
3. To end the setup, press the SETUP button
again.
FUNCTIONS
SYSTEM SETUP
GENERAL SETUP
This option is used to set up the TV-screen
format, video functions, and DVD functions with
options of TV display, TV type, video output,
angle mark, OSD lang., and captions.
TV Display
Follow the instructions above in DVD Menu
Setup in combination with the desired option
from graphic below.
TV DISPLAY
TV DISPLAY
TV TYPE
VIDEO OUTPUT
ANGLE MARK
OSD LANG
CAPTIONS
MAIN PAGE
NORMAL/PS
NORMAL/LB
WIDE SCREEN16:9
GENERAL
Note:
Regardless of what screen format is
chosen, if the screen displays in 4:3 format, the
picture can only be shown in that format. With
DVDs, the screen format is convertible. If the
screen displays only in 4:3 format, when a DVD
with 16:9 display format is used, the picture will
be flattened.
TV
screen
Film
format
Normal
4:3
4:3
16:9
16:9
Full view
Mailbox
Wide screen
SCREEN LANGUAGE
TV SYSTEM
TV DISPLAY
VIDEO OUTPUT
ANGLE MARK
OSD LANG
CAPTIONS
TV TYPE
MAIN PAGE
MULTI
NTSC
PAL
GENERAL
TV Type
Follow the instructions above in DVD Menu
Setup in combination with the desired option
from graphic below.


