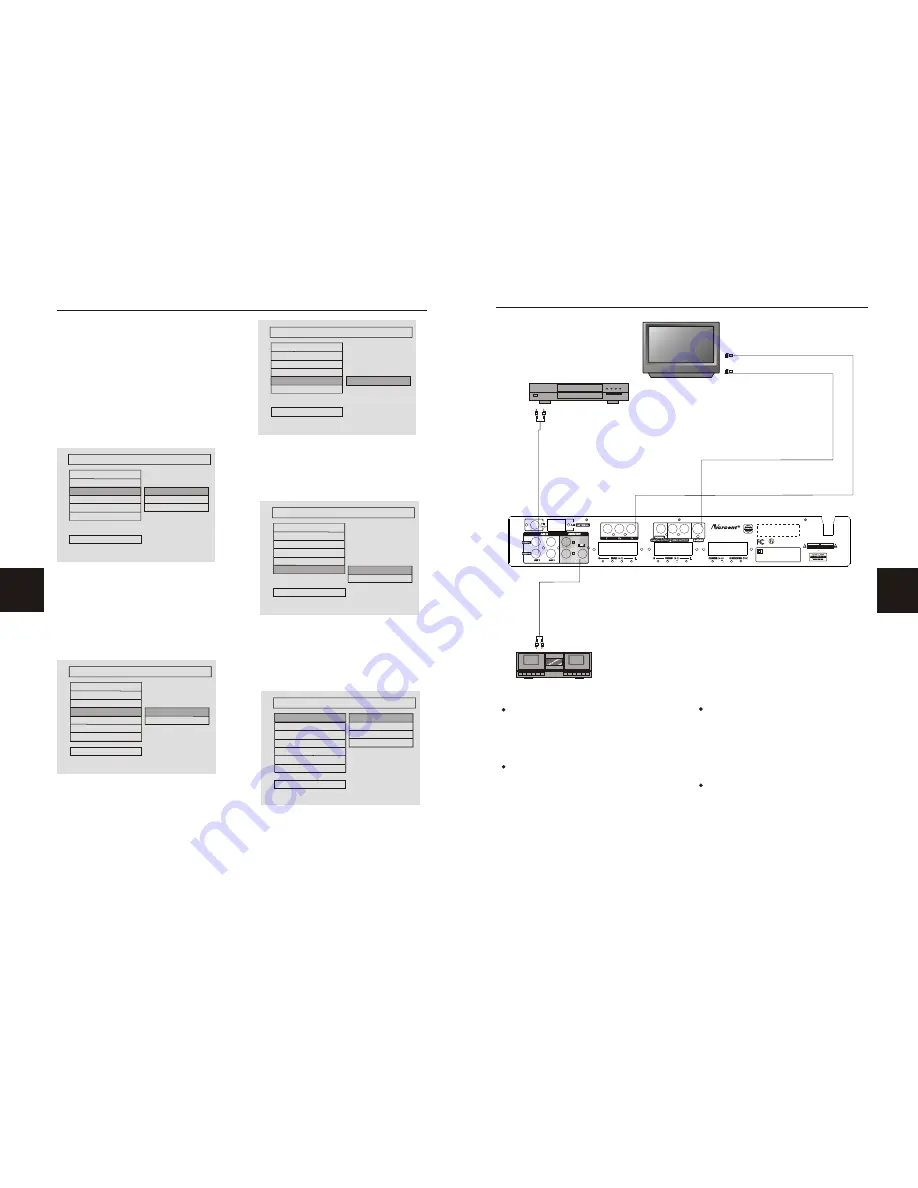
Norcent DP1800 Operating Instructions Manual Download Page 10

9

20

AMPLIFIER

CD

CONNECTING  DEVICES

       Connection terminals for this DVD receiver 
       are found on the rear panel. Read carefully 
       and follow the manufacturers' instructions 
       of any video and audio device being 
       connected to this unit.
 
       Do not connect the power until all connec-
       tions have been properly completed.
    

       Red terminal (marked R) is for connecting
       the right channel. The white terminal (ma-
       rked L) is for connecting the left channel. 
      The yellow terminal is for video connection.
       Make sure all connections are securely 
      made. Improper connections may cause 
      noise, poor performance, or cause damage
      to the equipment.
       Do not tie the AV cord with any other cords, 
       such as the power cord or speaker wires, as 
       it may result in poor picture and/or sound 
       quality.

110V~60Hz

110V~60Hz

C                US

LISTED

Audio/Video Apparatus

E

2 2 1 3 3 8

5 8 W J

WARNING: SHOCK HAZARD- DO NOT OPEN

AVIS: RISQUE DE CHOC ELECTRIQUE- NE PAS OUVRIR

CAUTION

RISK OF ELECTRIC SHOCK

DO NOT OPEN

ATTENTION

RISQUE D ELECTROCUTION

NE PAS OUVRIR

50X15mm

1

Used by North 
America only!

DOUBLE INSULATION-
WHEN SERVICING USE ONLY
IDENTICAL REPLACEMENT PARTS.

HongPu International Development(Shanghai) Co., Ltd.

Plant 25, No.30 FuTeDongSan RD

WaiGaoQiao Free Trade Zone PuDong Shanghai.P.R.C. 

Model No.:

MADE IN CHINA

DP1800

SYSTEM SETUP


This Norcent DVD player supports output

of various systems, including auto, NTSC, and
PAL. If the TV set has only NTSC or PALsyst-
ems, the picture will blink and become colorless 
when the wrong system is selected.If this oc-
curs, press the SYS button on the remote 
control to return to the normal screen. 
Remember to always select the correct system.
     For more information on output format, refer
 to the TV set's manufacturer's instructions.


Video Output

      Follow the instructions above in DVD 
Menu Setup in combination with the desired 
option from graphic below.


There are three video output choices: 

Use the CVBS output if the S-Video output jack 
has been selected; use the RGB output if the 
RGB output jack has been selected; or use the 
YUV output if the component output jack has 
been selected.


Angle Mark

     Follow the instructions above in DVD Menu 
Setup in combination with the desired option
from graphic below.


When a DVD with multiple angles is played, 

a particular camera angle may be selected by 
the viewer.


OSD Lang

.

      Follow the instructions above in DVD Menu 
Setup in combination with the desired option 
from graphic below.

VIDEO OUTPUT

CVBS 


GENERAL

TV DISPLAY
TV TYPE

ANGLE MARK
OSD LANG
CAPTIONS

VIDEO OUTPUT

MAIN PAGE

RGB
YUV             

ANGLE MARK

ON


OFF

GENERAL

MAIN PAGE

TV DISPLAY
TV TYPE
VIDEO OUTPUT

OSD LANG
AUDIO OUTPUT
CAPTIONS

ANGLE MARK

This is used to set the language of the setup 
menu and screen display.

Captions

      Follow the instructions above in DVD 
Menu Setup in combination with the desired 
option from graphic below.

SCREEN LANGUAGE

ENGLISH

GENERAL

MAIN PAGE

TV DISPLAY
TV TYPE
VIDEO OUTPUT
ANGLE MARK

CAPTIONS

OSD LANG

ON

OFF

GENERAL

CAPTIONS

MAIN PAGE

TV DISPLAY
TV TYPE
VIDEO OUTPUT
ANGLE MARK
OSD LANG

CAPTIONS

 SPEAKER SETUP

      This submenu option includes downmix mode, 
center, rear, subwoofer, center delay, rear delay, 
test, and main.
Downmix Mode
      Follow the instructions above in DVD Menu 
Setup in combination with the desired option 
from graphic below.

LT/RT
STEREO 
VSS
5.1CH

SPEAKER SETUP

DOWNMIX

CETR
REAR
SUB WOOFER
CETR DELAY
REAR DELAY
TEST TONE

MAIN               PAGE

DOWNMIX

Center Speaker

      Follow the instructions above in DVD Menu 
Setup in combination with the desired option 
from graphic below.

Summary of Contents for DP1800

Page 1: ...y dust pro of and anti shock design as well as augmented error correction and better stability Fully functional DVD operating system offers many favorite functions and user friendly operation Integrat...

Page 2: ...s equipment INDUSTRY CANADA REQUIREMENT This Class B digital apparatus meets all requirements of the Canadian Interference Causing Equipment Regulations THE REGION CODE FOR THIS UNIT IS 1 FCC NOTICE T...

Page 3: ...r ated only from the type of power source indicated on the marking label If you are not sure of the type of power supply to your home consult yourproduct dealer or local power company For products int...

Page 4: ...Audio Output Coaxial Connections CVBS S Video 2 Channel Output FM Tuner Tuning Range 87 5 108MHz 100kHz Space S N Ratio 46dB Monophonic 46dB Stereo 50dB DIN Selectance 50dB THD Monophonic 2 Stereo 3...

Page 5: ...the picture CD disc Once the disc tray is closed the machine will automatically search for the information on the disc and display the main menu on the TV screen 2 Press the directional scroll buttons...

Page 6: ...ow Select NO MENU if playing an MP3 or picture CD without a menu or select MENU if playing an MP3 or picture CD with a menu CHANGE PIN EDITION PREFERENCES SETUP AUDIO SUBTITLE DISC MENU LOCALE PARENTA...

Page 7: ...ISK OF ELECTRIC SHOCK DO NOT OPEN ATTENTION RISQUE D ELECTROCUTION NE PAS OUVRIR 50X15mm 1 Used by North America only DOUBLE INSULATION WHEN SERVICING USE ONLY IDENTICAL REPLACEMENT PARTS HongPu Inter...

Page 8: ...here is no DTS decoder If you play a DTS encoded disc set the output to either SPDIF RAW or SPDIF PCM status This will output the digital audio signal through the optical coaxial mode OP Mode Follow t...

Page 9: ...dicated in the lower left corner of the screen ON OFF SPEAKER SETUP TEST TONE DOWNMIX CETR REAR SUB WOOFER CETR DELAY REAR DELAY MAIN PAGE TEST TONE SYSTEM SETUP Subwoofer Follow the instructions abov...

Page 10: ...on on output format refer to the TV set s manufacturer s instructions Video Output Follow the instructions above in DVD Menu Setup in combination with the desired option from graphic below There are t...

Page 11: ...the left or right track or stereo will be displayed accordingly Volume and Mute The volume on this Norcent DVD receiver is easily controlled with the remote control by pressing either the VOL key to r...

Page 12: ...disc being played Press the TIME button for the following 1 Press once the number of titles and chapters in each title appears 2 Press again the time of a selected title appears Pressing the TIME but...

Page 13: ...TITLE key until they disappear Note The disc being played must be multi subtitle encoded SUBTITLE OFF SUBTITLE 02 08 ENGLISH SUBTITLE Camera Angle The ability to change the camera angle allows viewer...

Page 14: ...mply press the FWD key or REV key on the remote control The speed changes each time the key is pressed To resume normal playback press the PLAY key Memory Playback This unit allows the viewer to stop...

Page 15: ...button 4 Stations in the memory function may also be accessed by pressing the UP or DOWN button 15 NO DISC DISC LOADING POWER If there is no disc NO DISC shown on screen OPEN OPEN CLOSE Once the unit...

Reviews: