background image

Chapter 4. Configuring the Seehau Software

10

Preliminary EMUL–IP2K–PC User Guide

Note

You do not need the hardware connected at this time

Configuring the Communications Interface

Connect Tab

The graphical user interface for this tab is divided into four regions. Do the following in each
region:

1.


Region 1—

Communications Interface

:

Displays the USB-SPI communications interface for the IP2K pod.

2.


Region 2—

Select Emulator Connection

:

No action required. Default is 

Universal Serial Bus

.

3.


Region 3—

Select Processor

:

No action required. Default is 

POD–IP2022

.

4.


Region 4—

What is your Trace Type?

:

No action required. Default is 

None

.

5.


Click 

Next

. The 

Hdw Config

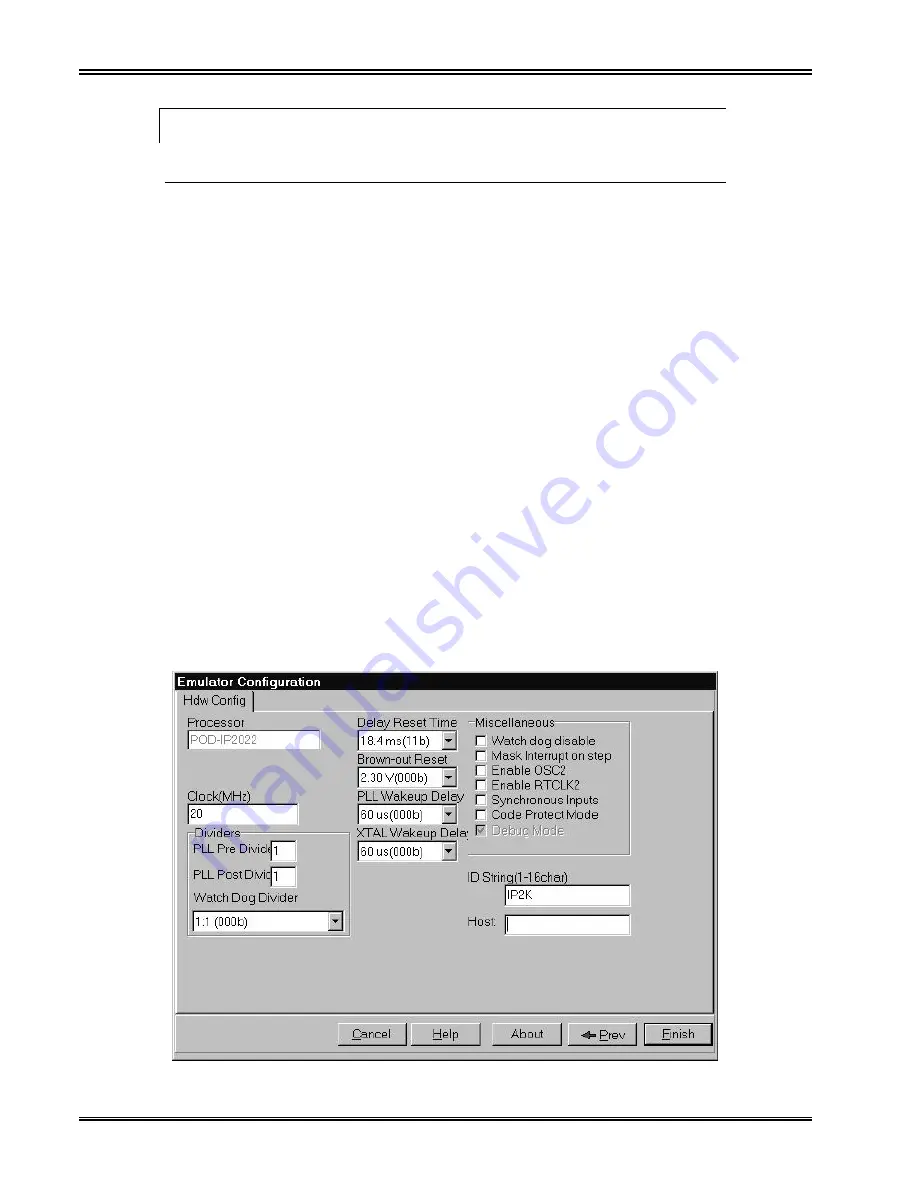
 tab opens (Figure 4).

Figure 4. Emulator Configuration Window Displaying the Hdw Config Tab

Summary of Contents for EMUL-IP2K-PC

Page 1: ...EMUL IP2K PC User Guide Edition 1 July 13 2001 2001 Nohau Corporation All rights reserved worldwide ...

Page 2: ...alling the Seehau Software 7 Installing the Seehau Software From the CD 7 Downloading and Installing the Seehau Software From the Internet 7 Configuring the Seehau Software 9 Selecting to Automatically Start the Seehau Configuration Program 9 Configuring the Communications Interface 10 Connect Tab 10 Hardware Configuration Tab 11 Configuring the Emulator Options From Within Seehau 14 Hdw Config Ta...

Page 3: ...g a Workspace 24 Saving a Workspace 24 Working with Projects 24 Adding a New Project 24 Removing a Project 25 Adding a File to the Project 25 Removing a File from the Project 25 Changing the Workplace Settings 25 Changing the File Settings 26 Building a Project 27 Building a Single Project 27 Building All Projects 27 Forcing a Build of a Single Project 27 Forcing a Build of All Projects 27 Forcing...

Page 4: ...software is sold with no warranty but upgrades can be obtained to all customers at the Nohua Web site http www nohau com Nohau makes no other warranties express or implied including but not limited to the implied warranties of merchantability and fitness for a particular purpose In no event will Noahu be liable for consequential damages Third party software sold by Nohau carries the manufacturer s...

Page 5: ... table under the pod cable and the connected processor board The ground plane shall have a low impedance ground connection to the host computer frame The insulation sheet between the ground plane and circuit boards shall not exceed 1mm of thickness System Requirements CAUTION Like all Windows applications the Seehau software requires a minimum amount of free operating system resources The recommen...

Page 6: ... sure the target adapter is correctly oriented Failing to do so can cause damage to your target When using the pod with a target disable all pod resources that are duplicated on the target Failure to disable the pod s resources can damage the pod or the target or both When installing a controller into a pod never press on the chip body Press only on the carrier or cover Pressing on the chip might ...

Page 7: ...intended for both novice and advanced users This guide introduces the following tasks Installing and configuring the Seehau software Installing the pod board Starting the pod board and Seehau software Shutting down Seehau Creating Macros Troubleshooting To download an electronic version of this guide do the following 1 Open Nohau s home page at www nohau com 2 Click Publications Documents 3 Click ...

Page 8: ... occur if programmed with these selections The debugger is configured and operated by the Seehau IP2K user interface Seehau is a high level language user interface that allows you to perform many useful tasks for example Loading Flash RAM running and stopping programs based on the open source GNUpro C compiler and linker platform not supplied by Nohau Corporation The GNUPro tools and docu mentatio...

Page 9: ...Chapter 1 Overview of the EMUL IP2K PC Emulator System 2 Preliminary EMUL IP2K PC User Guide ...

Page 10: ...s also located in the Seehau IP2K subdirec tory on your hard drive C Nohau SeehauIP2K The system software should find and load the USB driver without your intervention If your system does not find the driver it should prompt you for the path if the software does not find the driver on the CD Power Supply The EMUL IP2K PC USB JTAG uses power supplied by the USB cable and the target board The amount...

Page 11: ...rget serial input 9 Vdd Power 10 TSO Target serial output Installation Instructions Refer to Figure 2 for a diagram of the connectors while following the installation instructions 1 Make sure your target is powered off 2 Plug the 10 pin EMUL IP2K PC USB JTAG BERG connector into your target s pro gramming interface This connector supplies the signals needed to communicate with the EMUL IP2K PC USB ...

Page 12: ...EMUL IP2K PC User Guide Edition 1 July 2001 Nohau Corporation 5 Figure 2 EMUL IP2K PC USB JTAG with BERG Connector ...

Page 13: ...Chapter 2 Installing the EMUL IP2K PC USB JTAG 6 Preliminary EMUL IP2K PC User Guide ...

Page 14: ... symbol while running Windows Explorer and select AutoPlay to start the installation process From the taskbar select Start then Settings Click on Control Panel then Add Remove Pro grams and then Install The installation process will start when you select the correct path to the CD Downloading and Installing the Seehau Software From the Internet 1 Go to the Nohau web site http www nohau com Click D...

Page 15: ...ad site The Nohau Software Updates page opens 10 Click the EMUL IP2K PC link 11 Click the ip2k exe link The application will start downloading Remember which directory has this downloaded file 12 Following the download go to the directory which has the downloaded file Click the Ip2k exe file and follow the installation instructions After installing the Seehau software the Setup Complete dialog box...

Page 16: ...n pro gram Do the following steps before starting Seehau 1 From the Setup Complete dialog box select Launch Seehau IP2K Configuration 2 Click Finish If you do not select to automatically start the Seehau Configuration Program do the following From the Start menu selct Programs Select Seehau IP2K Then click Config to open the Emulator Configuration window displaying the Connet tab Figure 3 Figure 3...

Page 17: ...e following in each region 1 Region 1 Communications Interface Displays the USB SPI communications interface for the IP2K pod 2 Region 2 Select Emulator Connection No action required Default is Universal Serial Bus 3 Region 3 Select Processor No action required Default is POD IP2022 4 Region 4 What is your Trace Type No action required Default is None 5 Click Next The Hdw Config tab opens Figure 4...

Page 18: ...e box to load the application program for the configuration parameters to be sent to the chip If you want to load the default chip parameters select the CFG button on the Speedbar after loading the Startup bas file You can also choose to upload the current configuration parameters from the chip at any time using the Speedbar CFG button If you save the settings after loading the parameters from the...

Page 19: ...ce only A 2 bit field in the FUSEx register can be used to spec ify the Delay Reset Timer timeout period that results in an automatic wake up from the power down mode 60 ms 00b 960 ms 01b 0 06 ms 10b 18 4 ms 11b Brown out Reset BOR Shown for reference only Sets the Brown Out Reset threshold voltage de tects low Vdd condition BOR timeout period 2 30 V 000b 2 25 V 001b 2 20 V 010b 2 15 V 011b 2 10 V...

Page 20: ...o the internal clock Code Protect Mode Shown for reference only Select to enable security to protect your code Debug Mode Shown for reference only Select this option to enable the debug feature When de bug mode is enabled Seehau merges the user and debug monitor code and then writes this code into the chip Seehau disables the watchdog and sets the oscillator to the external clock to make sure the ...

Page 21: ...en the Emulator Configuration window Select the Config menu and click Emulator The Emulator Configuration window opens displaying the Hdw Config tab Figure 5 Hdw Config Tab Processor Shown for reference only This is the selected processor Clock MHz Shown for reference only Enables you to change the clock speed Dividers PLL Pre Divider Shown for reference only 1 000b 2 001b 3 010b 4 011b 5 100b 6 1...

Page 22: ...A 2 bit field in the FUSEx register can be used to spec ify the Delay Reset Timer timeout period that results in an automatic wake up from the power down mode 60 ms 00b 960 ms 01b 0 06 ms 10b 18 4 ms 11b Brown out Reset BOR Shown for reference only Sets the Brown Out Reset threshold voltage de tects low Vdd condition BOR timeout period 2 30 V 000b 2 25 V 001b 2 20 V 010b 2 15 V 011b 2 10 V 100b 2 ...

Page 23: ...ty to protect your code Debug Mode Shown for reference only Select this option to enable the debug feature When de bug mode is enabled Seehau merges the user and debug monitor code and then writes this code into the chip Seehau disables the watchdog and sets the oscillator to the external clock to make sure the target is in debug mode Debug mode also requires that some memory be set aside for the ...

Page 24: ...f the chip only allows for 1000 erase cycles In the newer version of this processor there will be 100 000 erase cycles Multiple Breakpoints in Flash This option is connected with the Always Use Bulk Erase option To use this option you need the newer version of the processor Software breakpoints work by the break instruction Software is executed until it hits the first break When you program load t...

Page 25: ...g Seehau Demo Mode After you configure the Seehau software you have the option of starting Seehau Click Yes to start Seehau After Seehau is loaded a box with the message This is a Demo version of Seehau This Demo is not a simulator opens This demo offers limited simulation Aftr clicking OK you need to load code Non Demo Mode To start Seehau in the non demo mode double click the Seehau IP2K icon Th...

Page 26: ...EMUL IP2K PC User Guide Edition 1 July 2001 Nohau Corporation 19 Figure 7 Seehau for EMUL IP2K PC ...

Page 27: ...Chapter 4 Configuring the Seehau Software 20 Preliminary EMUL IP2K PC User Guide ...

Page 28: ...ter window manually set the PC to zero before stepping into the C programs Once you have done this step into the C source code by pressing the Source Step Into button on the Seehau Speedbar Start Seehau by following the instructions in the Starting Seehau section in Chapter 4 Then do the following to run the test program 1 Resize the windows on your screen but do not add the Watch window 2 From th...

Page 29: ...e in source only Figure 9 4 To single step in mixed mode click the Assembly Step Into or Step Over button You will seethe assembly code mixed in with the associated source lines Figure 10 5 To single step in source only mode first click the Source window Select the time c tab Right click to verify that mixed mode is cleared Then point to the Setting sub menu item and select Lock Tabs Figure 10 Pro...

Page 30: ... as a group or individually Test the project settings Open the source file in the Seehau Source Window Accessing the Nohau Project Manager Accessing the Nohau Project Manager can be done in one of the following ways Start the Windows Explorer utility and go to C Nohau SeehauIP2K Double click NPrjMngr exe Within Seehau from the Tools menu select Open Project Manager The Nohau Project Manager window...

Page 31: ...ce You can also click the Save Workspace button on the toolbar This opens the Select Directory dialog box 2 When you have placed your workspace file where you want it click OK to save the file and exit the dialog box Working with Projects Adding a New Project 1 Click on the workspace name in the left side of the Nohau Project Manager window In Figure 11 the example is My Workspace 2 From the File ...

Page 32: ...hlight the file name In Figure 11 the example is C Nohau SeehauIP2K Examples C Timer time c 2 From the File menu select Remove File from Project You can also click the Remove File from Project button on the toolbar 3 A message box opens asking you Do you want to remove file file name Click Yes to remove the selected file or Cancel to close this box Changing the Workplace Settings 1 From the Settin...

Page 33: ...n Figure 12 the example is C Nohau SeehauIP2K Examples C Timer time c 2 From the Settings menu select File Settings You can also click the File Settings button on the toolbar This opens the File Settings dialog box Figure 12 You can now choose the functions you wish to perform such as entering post parameters creating an executable path to process the file creating an output file name and a report...

Page 34: ...nked output file into the emulator Building a Project Building a Single Project 1 Select highlight the project 2 From the Build menu select Build Selected Project Make You can also click the Build Selected Project Make button on the toolbar Building All Projects From the Build menu select Build All Projects Make You can also click the Build All button on the toolbar Forcing a Build of a Single Pro...

Page 35: ...Chapter 6 Using the Nohau Project Manager 28 Preliminary EMUL IP2K PC User Guide ...

Page 36: ...EMUL IP2K PC User Guide Edition 1 July 2001 Nohau Corporation 29 ...

Reviews: