background image

15

until the stabilo is fold. The wing will lose speed, stabilos behind, and 
then recover speed before stabilizing. With this method, the sink rate is 
around 5-6m/s.
We recommend you to always use the speed bar while using this 
technique. You can control your trajectory the same way you would with 
classic ears (weight shift). The first sensation will be a reduction of the 
relative wind and a light back inclination, as if you were going backward.
To get out of this maneuver, you only have to release the lines as 
you would with the classic method. The wing will shoot a bit before 
returning to its normal sink rate. This is a very comfortable quick descent 
technique that allows to avoid cravat risks while allowing easy turns.  We 
recommend you to try this maneuver for the first time in calm conditions 
at a high height.
This new quick descent technique offers control and safety and does not 
require a big training to be correctly performed.

5.3 SPIRAL DIVE

This is a more effective way to rapidly lose altitude. Beware that the wing 
will experience and be subjected to a tremendous amount of descending 
and rotating speed (g-force), which can cause a loss of orientation and 
consciousness (blackout). This manoeuvre must therefore be done 
gradually to increase one’s capacity to resist the g-force exerted on 
the body. With practise, you will fully appreciate and understand it. 
Only practise this manoeuvre at high altitude and with enough ground 
clearance.

To start the manoeuvre, first weight shift and pull the brake handle 
located on the inner side of the turn. The intensity of the turn can be 
controlled by braking slightly using the outer brake handle.

A paraglider flying at its maximum rotating speed can reach –20 m/s, or 
the equivalent of a 70 km/h vertical descent, and will stabilise in a spiral 
dive from 15m/s onwards. 

Good enough reasons to familiarise yourself with the manoeuvre and 
understand how to exit it.

To exit this manoeuvre, the inner brake handle (down side of the turn) 
must progressively be relaxed while momentarily applying tension to the 
outer brake handle opposite to the turn. The pilot must also weight shift 
and lean towards the opposite side of the turn at the same time.

The exit should be performed gradually and smoothly so that the 
changes in pressure and speed can be noted.
When exiting the spiral, the glider will briefly experience an asymmetrical 
acceleration and dive, depending on how the manoeuvre was carried out.

Practise these manoeuvres at sufficient altitude and carefully.

5.5 SLOW DESCENT TECHNIQUE

This technique allows descent without straining the wing or taxing the 
pilot. Glide normally while searching for descending air and begin to turn 
as if climbing in a thermal, but with the intention to sink.

Common sense has to be used to avoid dangerous areas of rotor when 
looking for descending air. Safety first!

Summary of Contents for KLIMBER 2 P

Page 1: ...KLIMBER 2 P User s manual...

Page 2: ...enjoy flying this glider and will soon discover the meaning of our motto The importance of small details This is the user manual and we recommend you read it carefully The Niviuk Team USER S MANUAL T...

Page 3: ...TROL AND TAKE OFF 9 3 6 LANDING 9 3 7 PACKING 9 4 IN FLIGHT 10 4 1 FLYING IN TURBULENCE 10 4 2 POSSIBLE CONFIGURATIONS 11 4 3 ACCELERATED FLIGHT 12 4 4 FLYING WITHOUT BRAKE LINES 12 4 5 KNOT S IN FLIG...

Page 4: ...ulted in the following certification for all sizes EN D LTF D We recommend that only pilots who are familiar with gliders of this certification or above fly this paraglider Only the aeronautical autho...

Page 5: ...ogy and accessories available to improve pilot comfort whilst increasing safety and performance In the design of all Niviuk products the team aims to ensure development and continuous improvement The...

Page 6: ...volved a lot over the years significantly affecting the leading edge The application of this innovation in conjunction with the 3DL is key to converting the perfect shape from 2D to 3D 3DL 3D Leading...

Page 7: ...culated depending on the workload and aims to achieve the required best performance with the least drag The lines are semi automatically cut to length and all the sewing is completed under the supervi...

Page 8: ...ting in the case of a violent asymmetric collapse 2 5 SPEED BAR The speed bar is a means of temporary acceleration by changing the flow over the profile The speed system comes pre installed on the ris...

Page 9: ...which is very useful for some models of harnesses 2 6 INSPECTION AND WING INFLATION ON THE GROUND After your gear has been thoroughly checked and the weather conditions deemed favourable for flying i...

Page 10: ...mits we recommend a reverse launch as this allows a better visual inspection of the wing during inflation In strong winds the KLIMBER 2 P is especially easy to control using this launch technique Wind...

Page 11: ...the correct flying speed 4 2 POSSIBLE CONFIGURATIONS To become familiar with the possible incidents described below we recommend practising within the environment of a licensed training outfit You mu...

Page 12: ...ines although the canopy appears to be fully inflated To regain normal air speed release brake line tension symmetrically and manually push on the A lines or weight shift your body to any side WITHOUT...

Page 13: ...the angle of attack It is NOT recommended to accelerate near obstacles or in very turbulent conditions If necessary constantly adjust the movements and pressure on the speed bar whilst doing the same...

Page 14: ...ease of drag is more pronounced than on wings with a less pronounced arc The KLIMBER 2 P is designed with little chord which is good in normal flight conditions However this same damping is what can c...

Page 15: ...you will fully appreciate and understand it Only practise this manoeuvre at high altitude and with enough ground clearance To start the manoeuvre first weight shift and pull the brake handle located o...

Page 16: ...gs are equipped with the latest technological advances gained from the experience of our R D team Careful maintenance of your equipment will ensure continued top performance Apart from the general che...

Page 17: ...aranteed and their resistance to UV is one of the highest in this type of lines However one of the obligations derived from the use of these lines is the need to maintain the trim of your KLIMBER 2 P...

Page 18: ...sult from participating in this sport You must not use this equipment if you have not been properly trained to use it Do not take advice or accept any informal training from anyone who is not properly...

Page 19: ...19...

Page 20: ...2 1 3 2 1 3 2 1 3 2 1 A A B A A B A A B mm 150 150 160 Kg 60 78 75 93 88 105 Kg 2 67 2 78 2 9 D D D 10 TECHNICAL DATA 10 1 TECHNICAL DATA 20 CELLS Number ASPECT RATIO Flat AREA Flat Projected SPAN Fla...

Page 21: ...GERMANY UPPER CASCADES A 8000 U 50 EDELRID GERMANY UPPER CASCADES A 8000 U 70 EDELRID GERMANY MIDDLE CASCADES DC 35 LIROS GMHB GERMANY MIDDLE CASCADES A 8000 U 50 EDELRID GERMANY MIDDLE CASCADES A 80...

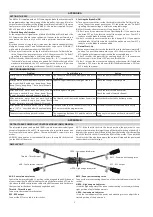
Page 22: ...10 3 RISERS PLAN 22...

Page 23: ...10 4 SUSPENSION PLAN 23...

Page 24: ...0 340 400 500 A B C D br 1 7422 7384 7377 7489 7631 2 7387 7346 7340 7456 7465 3 7359 7319 7309 7422 7355 4 7374 7337 7324 7429 7418 5 7295 7260 7252 7382 7205 6 7251 7215 7207 7345 6998 7 7175 7141 7...

Page 25: ...642 7513 6 7499 7461 7453 7605 7300 7 7419 7384 7377 7517 7216 8 7412 7380 7376 7502 7291 9 7244 7229 7354 7119 10 7186 7172 7303 7011 11 7054 7050 7148 6968 12 7034 7037 7132 7011 13 7037 7040 14 684...

Page 26: ...A 6 A 7 A 8 A 9 B 10 C 11 A 12 A 13 B 14 C 15 A 16 A 17 A 18 B 19 0 20 B 21 A 22 A 23 0 Classification D In accordance with standards EN 926 1 2015 EN 926 2 2013 and LTF NFL II 91 09 PG_1795 2021 Dat...

Page 27: ...t kg 88 Speed range using brakes km h 14 Glider s weight kg 2 9 Total speed range with accessories km h 37 Number of risers 2 Range of trimmers cm 0 Projected area m2 19 6 Harness used for testing max...

Page 28: ...niviuk com...

Reviews: