21
20
ninjakitchen.com
To order additional parts and accessories, visit ninjaaccessories.com or contact
Customer Service at
1-877-646-5288
. We ask that you register your product online at
registeryourninja.com
and have the product on hand when you call, so we may better
assist you.
REPLACEMENT PARTS
•
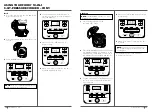
For consistent browning, make sure ingredients are arranged in an even layer in the
Cook & Crisp
TM
Plate or cooking pot with no overlapping. If ingredients are overlapping,
make sure to shake them halfway through the set cook time.
•
For smaller ingredients that could fall through the broil rack, we recommend first placing
them on parchment paper or foil.
•
When switching from pressure cooking to using the crisping lid, we recommend emptying
the pot of any remaining liquid for best crisping results.
•
Press and hold down the TIME up or down arrow to get to your desired time faster.
•
Use the Keep Warm mode to keep food at a warm, food-safe temperature after cooking.
To prevent food from drying out, we recommend keeping the pressure lid closed and
using this function just before serving. To reheat cold food, use the Air Crisp function.
HELPFUL TIPS
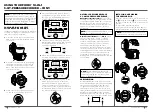
Cleaning: Dishwasher & Hand-Washing
The unit should be cleaned thoroughly
after every use.
1
Unplug the unit from the wall outlet
before cleaning.
2
NEVER
put the cooker base in the
dishwasher, or immerse it in water
or any other liquid.
3
To clean the cooker base and the
control panel, wipe them clean with
a damp cloth.
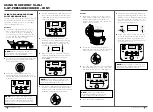
4
The cooking pot, pressure lid, silicone
ring, and Cook & Crisp™ Plate can be
washed in the dishwasher.
5
The broil rack is hand-wash
ONLY.
6
The pressure lid, including the pressure
release valve and anti-clog cap, can
be washed with water and dish soap.
DO NOT
take apart the pressure release
valve or float valve assembly.
7
To clean the crisping lid, wipe it down
with a wet cloth or paper towel after the
heat shield cools.
8
If food residue is stuck on the cooking
pot or Cook & Crisp Plate, fill the pot
with water and allow to soak before
cleaning.
DO NOT
use scouring pads.
If scrubbing is necessary, use a non-
abrasive cleanser or liquid dish soap
with a nylon pad or brush.
9
Air-dry all parts after each use.
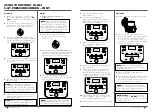
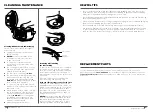
Removing & Reinstalling
the Silicone Ring
To remove the silicone ring, pull it outward,
section by section, from the silicone ring
rack. The silicone ring is reversible and can
be installed with either side facing up. To
reinstall, press it down into the rack section
by section.
After use, remove any food debris from
the silicone ring and anti-clog cap.
Keep the silicone ring clean to avoid odor.
Washing it in warm, soapy water or in the
dishwasher can remove odor. However, it is
normal for it to absorb the smell of certain
acidic foods. It is recommended to have
more than one silicone ring on hand. You
can purchase additional silicone rings on
ninjaaccessories.com.
NEVER
pull out the silicone ring with excessive
force, as that may deform it and the rack
and affect the pressure-sealing function.
A silicone ring with cracks, cuts, or other
damage should be replaced immediately.
CLEANING & MAINTENANCE
Silicone Ring
Silicone
Ring Rack
ninjakitchen.com


