background image

14

15

ninjakitchen.com

ninjakitchen.com

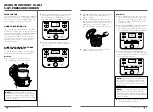
USING YOUR FOODI® 10–IN–1 

5-QT. PRESSURE COOKER – CONT.

NATURAL PRESSURE RELEASE  
VS. QUICK PRESSURE RELEASE 

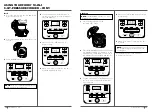
Natural Pressure Release: 

Once pressure 

cooking is complete, the pressure will start 
to naturally release as the unit cools down. 
During this time, the unit will switch to 
Keep Warm mode. When natural pressure 
release is complete, the float valve will 
drop down. 

Quick Pressure Release: 

Use 

ONLY

 when 

called for in a recipe. When cooking is 
complete, the unit will switch to Keep 
Warm mode. Turn the pressure release 
valve to the VENT position to instantly 
release pressure through the valve. 
When quick pressure release is complete 
the float valve will drop down. Even after 
releasing pressure, some steam will remain 
in the unit and will escape when the lid 
is opened. Lift and tilt it away from you, 
making sure no condensation drips into the 
cooker base.

NOTE:

 At any time during the natural 

release process, you can switch to quick 
release by turning the pressure release 
valve to the VENT position.

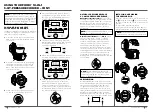
PRESSURIZING

As pressure builds in the unit, the control 
panel will display progress bar. Pressurizing 
time varies, depending on the amount 
of ingredients and liquid in the pot. As 
the unit pressurizes, the lid will lock as a 
safety measure, and it will not unlock until 
pressure is released. Once the unit has 
reached full pressure. The cooking cycle will 
begin and the timer will start counting down.

FAMILIARIZING YOURSELF  
WITH PRESSURE COOKING

In order to familiarize yourself with pressure 
cooking, it is highly recommended for first-
time users to do an initial run.  

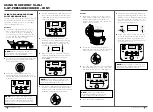
1    

Place the pot in the cooker base and 
add 2 cups room-temperature water 
to the pot.

2    

Assemble the pressure lid by aligning 
the arrow on the front of the lid with  
the arrow on the front of the cooker 
base. Then turn the lid clockwise until  
it locks into place.

3    

Make sure the pressure release valve 
on the lid is in the SEAL position.

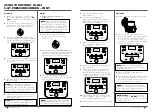
4    

Press the PRESSURE button, the unit  
will default to high (Hi) pressure. Set  
the time to 2 minutes and press the 
START/STOP button to begin.

5    

The unit will begin building pressure, 
indicated by the progress bar. The unit 
will begin counting down when it  
is fully pressurized.

6  

When the countdown is finished, the unit 
will beep, automatically switch to Keep 
Warm mode, and begin counting up.

7  

Turn the pressure release valve to the 
VENT position to quick release the 
pressurized steam. A quick burst of 
steam will spurt out of the pressure 
release valve. When steam is completely 
released and the float valve drops down, 
the unit will be ready to open.

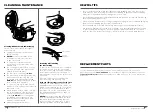
INSTALLING & REMOVING  
THE PRESSURE LID

Place the pressure lid on top of the unit with 
the   on the lid and the   on the base lined 
up evenly. Turn the lid clockwise until it locks 
in place. 
To unlock the pressure lid, turn it 
counterclockwise. Lift the lid at an angle to 
prevent splatter. Do not lift the lid straight up. 

NOTE: 

The pressure lid will not unlock 

until the unit is completely depressurized.

NOTE: 

 Press the KEEP WARM button if you 

would like to turn Keep Warm mode off.

NOTE: 

 To reduce the risk of injury from

unintended contact with hot foods, liquids 
and steam when pressure cooking, you must 
review and follow all warnings on pages 2-5. 
Failure to follow these safeguards increases 
your risk of experiencing a burn.

Summary of Contents for FD100 Series

Page 1: ...FOODI 10 IN 1 5 QT PRESSURE COOKER ninjakitchen com FD100 Series OWNER S GUIDE ...

Page 2: ...lease vs Quick Pressure Release 15 Pressurizing 15 Installing Removing the Pressure Lid 15 Using the Cooking Functions with the Pressure Lid 16 Pressure 16 Steam 17 Slow Cook 18 Yogurt 18 Sear Sauté 19 Additional Accessories Available for Purchase 20 Cleaning Maintenance 21 Cleaning Dishwasher Hand Washing 21 Removing Reinstalling the Silicone Ring 21 Troubleshooting Guide 22 Helpful Tips 24 Repla...

Page 3: ... silicone ring before using 17 Before placing removable cooking pot into the cooker base ensure pot and cooker base are clean and dry by wiping with a soft cloth 18 This appliance is for household use only DO NOT use this appliance for anything other than its intended use DO NOT use in moving vehicles or boats DO NOT use outdoors Misuse may cause injury 19 Intended for worktop use only Ensure the ...

Page 4: ...Spilled food can cause serious burns Keep appliance and cord away from children DO NOT let cord hang over edge of tables or counters or touch hot surfaces 45 Serious burns can result from the steam and hot foods inside the inner pot ALWAYS keep hands face and other body parts away from the pressure release valve prior to or during pressure release and when removing the pressure lid after cooking 4...

Page 5: ...5 Quart Removable Cooking Pot D Crisping Lid E Heat Shield F Control Panel G Cooker Base power cord not shown H Pressure Lid I Pressure Release Valve J Float Valve K Silicone Ring L Anti Clog Cap M Air Outlet Vent N Condensation Collector A C B D E F G K L Underside of Pressure Lid M N H I J ...

Page 6: ... the unit will automatically switch to Keep Warm mode and start counting up Keep Warm will stay on for 12 hours or you may press KEEP WARM to turn it off Keep Warm mode is not intended to reheat food but to keep it warm at a food safe temperature OPERATING BUTTONS TEMP arrows Use the up and down TEMP arrows to adjust the cook temperature and or pressure level TIME arrows Use the up and down TIME a...

Page 7: ...e the Cook Crisp Plate into the pot 2 Press the AIR CRISP button The default temperature setting will display Use the up and down TEMP arrows to set a temperature between 300 F and 400 F 3 Use the up and down TIME arrows to set the cook time in minute increments up to 1 hour NOTE It is recommended to let the unit preheat for 5 minutes before adding ingredients If preheating before step 4 close the...

Page 8: ...the up and down TIME arrows to set the cook time in 15 minute increments up to 12 hours NOTE The DEHYDRATE function is not included on all models Broil 1 Place the broil rack in the pot and follow directions per recipe 2 Place ingredients on the rack then close the lid 3 Press the BROIL button NOTE There is no temperature adjustment when using the Broil function NOTE For five levels of capacity us...

Page 9: ...commended for first time users to do an initial run 1 Place the pot in the cooker base and add 2 cups room temperature water to the pot 2 Assemble the pressure lid by aligning the arrow on the front of the lid with the arrow on the front of the cooker base Then turn the lid clockwise until it locks into place 3 Make sure the pressure release valve on the lid is in the SEAL position 4 Press the PRE...

Page 10: ...n TEMP arrows to select either Hi or Lo NOTE When cooking rice beans or other ingredients that expand do not fill the pot more than halfway NOTE After cooking is complete you may press the KEEP WARM button to turn the Keep Warm mode off NOTE If running for less than 1 hour the clock will count down by minutes and seconds If running for more than an hour the clock will count down by minutes only US...

Page 11: ...r to install pressure lid Turn the pressure release valve to the VENT position 3 Press the SLOW COOK button The default temperature setting will display Use the up and down TEMP arrows to select either Slow Cook HIGH or LOW 4 Use the up and down TIME arrows to set the cook time in 15 minute increments up to 12 hours 5 Press the START STOP button to begin cooking 6 When cook time is complete the un...

Page 12: ...loth 4 The cooking pot pressure lid silicone ring and Cook Crisp Plate can be washed in the dishwasher 5 The broil rack is hand wash ONLY 6 The pressure lid including the pressure release valve and anti clog cap can be washed with water and dish soap DO NOT take apart the pressure release valve or float valve assembly 7 To clean the crisping lid wipe it down with a wet cloth or paper towel after t...

Page 13: ... this and still hear a loud hissing noise it may indicate your silicone seal is not fully in place Press START STOP to stop cooking VENT as necessary and remove the pressure lid Press down on the silicone ring ensuring it is fully inserted and lies flat under the ring rack Once fully installed you should be able to tug lightly on the ring to rotate it The unit is counting up rather than down The c...

Page 14: ...perly while in use under normal household conditions within the warranty period visit ninjakitchen com support for product care and maintenance self help Our Customer Service Specialists are also available at 1 877 646 5288 to assist with product support and warranty service options So we may better assist you please register your product online at registeryourninja com and have the product on han...

Page 15: ... therefore the specifications contained herein are subject to change without notice FOODI and NINJA are registered trademarks of SharkNinja Operating LLC COOK CRISP and TENDERCRISP are trademarks of SharkNinja Operating LLC For SharkNinja U S patent information visit sharkninja com uspatents 2020 SharkNinja Operating LLC PRINTED IN CHINA FD100Series IB MP Mv3 ninjakitchen ...

Reviews: