Reference: Connecting to a Computer, Printer, or TV/Connecting to a Computer
55
Connecting to a Computer, Printer, or TV
Connecting to a Computer
The camera can be connected to a computer using the supplied USB cable. The supplied
PictureProject software can then be used to copy photographs to the computer, where
they can be organized, retouched, and printed.
Before Connecting the Camera
Install PictureProject from the supplied installer CD. To ensure that data transfer is not inter-
rupted, be sure the camera battery is fully charged. If in doubt, charge the battery before
connecting the camera or use an optional EH-5 AC adapter and EP-5 AC adapter connector
( 103).
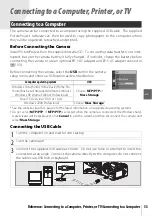
Before connecting the camera, select the
USB
item in the camera
setup menu and choose a USB option as described below.
* See the websites listed on page x for the latest information on supported operating systems.
† Do
NOT
select
MTP/PTP
. If
MTP/PTP
is selected when the camera is connected, the Windows hard-
ware wizard will be displayed. Click
Cancel
to exit the wizard, and then disconnect the camera and
select
Mass Storage
.
Connecting the USB Cable
Computer operating system
*
USB
Windows Vista (32-bit Home Basic/Home Pre-
mium/Business/Enterprise/Ultimate editions)
Windows XP (Home Edition/Professional)
Choose
MTP/PTP
or
Mass Storage
Mac OS X version 10.3.9 or 10.4.x
Windows 2000 Professional
Choose
Mass Storage
†
1
Turn the computer on and wait for it to start up.
2
Turn the camera off.
3
Connect the supplied USB cable as shown. Do not use force or attempt to insert the
connectors at an angle. Connect the camera directly to the computer; do not connect
the cable via a USB hub or keyboard.
Summary of Contents for D40X
Page 1: ... N 4 2 4HE IKON UIDE TO IGITAL 0HOTOGRAPHY WITH THE ...
Page 138: ...126 ...

