background image

In both  

   or  

   mode, one of the most important options for your pictures is the combination of Image quality 

setting (image compression ratio) and Image size setting that you select. There are four available Image quality settings and 
six Image size settings.  


Image quality  

To reduce memory requirements, images are compressed using JPEG compression. At higher compression ratios, the block 
pattern becomes more visible and there may be noticeable loss of detail. The actual effect depends on the size of the image 

when reproduced on a monitor or printer and on the type of subject.  
 

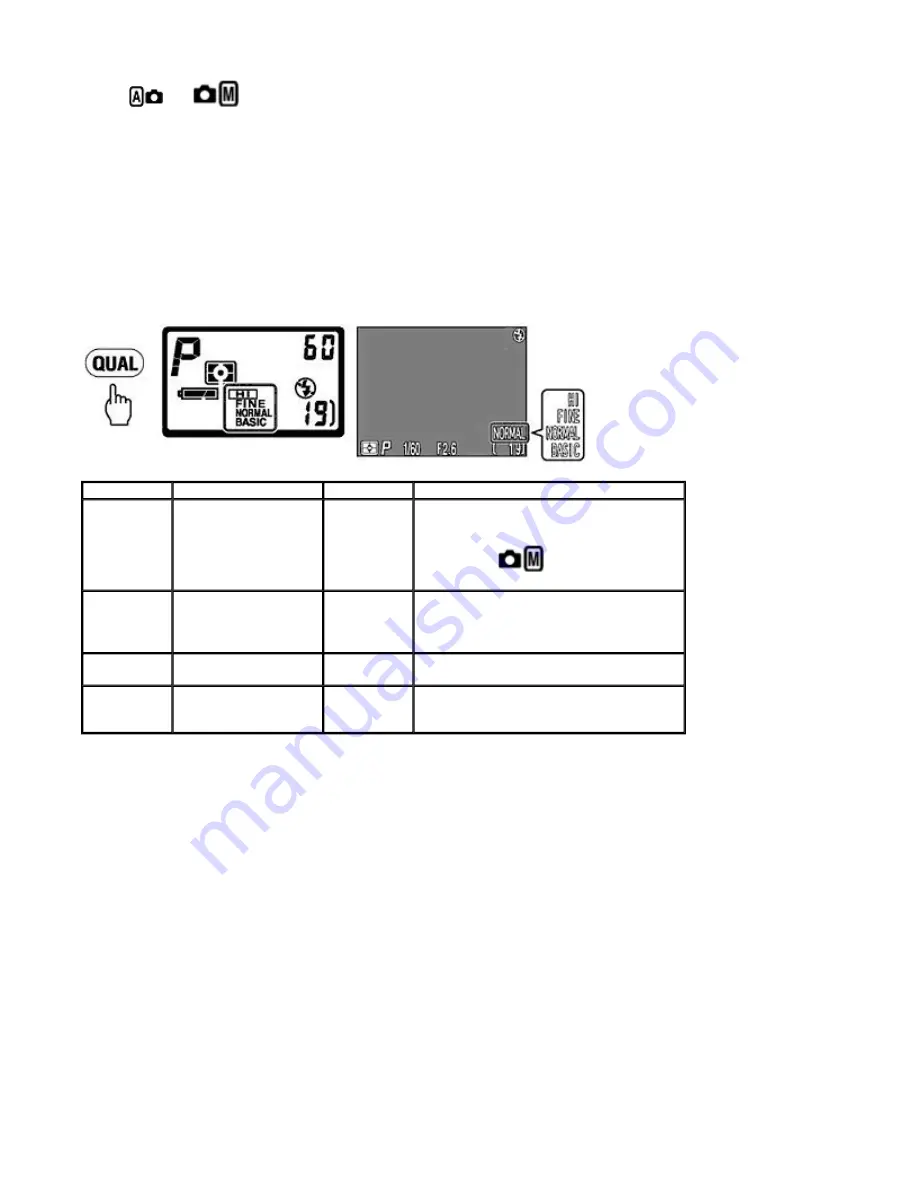
To set the Image quality, press the 

QUAL


(Image quality) button repeatedly until the desired Image quality setting is 

displayed. 


Check point


The selected Image quality and size settings remain in the camera's memory even when the power is turned off.  


Image size  

The Image size setting determines the maximum size at which the image can be printed. If the print size is too large, the 
individual pixels will be visible to the naked eye, giving the image a rough, uneven appearance. As a rule of thumb, for printing, 

about 200 pixels per inch are required. For display on a computer monitor, about 80 pixels per inch are recommended.  
 

Rotate the


COMMAND


dial while pressing the 

QUAL


button until the desired Image size is displayed.


Setting 

Compression ratio 

File format 

Application 

HI 

No compression 

TIFF 

Best-quality image, with no compression. 

Use when quality or authenticity is of 
paramount importance. (Available in 

FULL


or 3:2 size in  

   mode only.)  

FINE 

Approx. 1/4 

JPEG 

Quality virtually identical to uncompressed 
HI mode: for use where Image quality is 

important, for example when the image will 
be cropped and enlarged. 

NORMAL 

Approx. 1/8 

JPEG 

For use in most general situations where the 

image will not be significantly enlarged. 

BASIC 

Approx. 1/16 

JPEG 

For situations such as sending image data 

via E-mail where small file size is more 
important than Image quality. 

Page 45 of 136

Nikon COOLPIX995 Digital Camera

3/15/2002

http://www.livemanuals.com/packages/products/NK002/2136/manual/fullmanual.html

Summary of Contents for COOLPIX 995

Page 1: ...ore use Warning This symbol is used to mark warnings that should be read before use to prevent possible injury Caution This symbol indicates where caution should be exercised to avoid damaging your Nikon product Warnings To prevent injury observe the following warnings when using your Nikon product Do not look at the sun through the Viewfinder Viewing the sun or other strong light source through t...

Page 2: ...battery z Do not expose the battery to flame or to excessive heat z Do not immerse in or expose to water z Do not transport or store with metal objects such as necklaces or hairpins z The battery is prone to leakage when fully discharged To avoid damage to the product be sure to remove the battery when no charge remains z When the battery is not in use attach the terminal cover and store in a cool...

Page 3: ...r while images are being recorded or deleted from memory Forcibly cutting power to the product in these circumstances could result in loss of data or in damage to the internal circuitry or memory To prevent an accidental interruption of power avoid carrying the product from one location to another while the AC adapter is connected Do not drop The product may malfunction if subjected to strong shoc...

Page 4: ...se limits are designed to provide reasonable protection against harmful interference in a residential installation This equipment generates uses and can radiate radio frequency energy and if not installed and used in accordance with the instructions may cause harmful interference to radio communications However there is no guarantee that interference will not occur in a particular installation If ...

Page 5: ...erning the Manuals Provided with This Product z Reproduction in whole or in part of any of the manuals provided with your Nikon product requires prior permission from Nikon z The information contained in these manuals is subject to change without notice z While Nikon has made every effort to produce perfect manuals we appreciate any opportunity for improvement Should you find any mistakes we would...

Page 6: ... of Nikon s Life Long Learning commitment to ongoing product support and education continually updated information is available on line at the following sites z For users in the U S A http www nikonusa com z For users in Europe http www nikon euro com z For users in Asia Oceania the Middle East and Africa http www nikon asia com Visit these sites to keep up to date with the latest product informat...

Page 7: ...0 FLASH MODE SENSITIVITY THUMBNAIL button 21 IMAGE QUALITY IMAGE SIZE button 22 Monitor 23 Focus area Multi selector Inside memory card slot cover Advanced Operations This section provides complete descriptions of advanced camera operations Using the Camera Menus This section gives detailed explanations of menu items in the Shooting and Playback modes Connections This section describes connection ...

Page 8: ...Inside video output connector USB connector cover Speedlight up Page 8 of 136 Nikon COOLPIX995 Digital Camera 3 15 2002 http www livemanuals com packages products NK002 2136 manual fullmanual html ...

Page 9: ... different modes Refer to the figure in Nomenclature for the location of each button z Functions of buttons 19 20 and 21 differ in Shooting mode and Playback mode these buttons are indicated as follows in this manual 4 5 6 12 14 23 MONITOR button QUICK review button MENU button COMMAND Dial Zoom buttons Multi selector Page 9 of 136 Nikon COOLPIX995 Digital Camera 3 15 2002 http www livemanuals com...

Page 10: ...2 Image size 13 Battery status indicator 14 Metering mode z Displays numerical values such as shutter speed in Shutter Priority Auto Manual Exposure mode aperture in Aperture Priority Auto Manual Exposure mode Exposure Compensation value when Exposure Compensation is enabled focus distance when using Manual focus or sensitivity depending upon the functions used Viewfinder LED 1 Parallax compensati...

Page 11: ... Spot exposure metering area AF area 16 Image sharpening 17 White balance 18 Sensitivity adjustment 19 Image adjustment Black and white 20 Image size 21 Image quality 22 Metering mode 23 Exposure mode 24 Shutter speed 25 Exposure meter 26 Aperture On Flashing rapid Flashing slow Flash ready Flash recommended Flash charging On Flashing rapid In focus ready for shooting Focus cannot be achieved in a...

Page 12: ...splayed when User Setting Number 1 is set 2 Flashes when date time setting is not set 3 Not displayed when folder name is set to NIKON 4 Not displayed when battery power is sufficient Quick Guide This section will rapidly guide you through the first steps from setting up the camera to taking your first picture 1 Set the MODE dial to OFF and insert the battery 2 Insert the CF memory card Page 12 of...

Page 13: ...ry power When lights up or flashes charge the supplied battery using the supplied battery charger Date time setting The date and time for your country or location should be set before use The correct date and time at which each picture is taken is then automatically recorded with the image and can be checked on the camera monitor or computer after transfer See Setting Date Time Image quality and I...

Page 14: ...n the camera cannot autofocus 6 Use the built in Speedlight if there is insufficient light to illuminate the subject This condition is indicated by the Red LED flashing rapidly when the SHUTTER RELEASE button is half pressed Slide the Speedlight lock release lever to release the built in Speedlight 7 Slowly and fully depress the SHUTTER RELEASE button to take the picture A single beep sound indica...

Page 15: ...o hidden parts of the picture 9 Set the MODE dial to when you have finished taking photographs Deleting images You can delete the image in the Full screen review mode See step 6 of Basic Operation Auto mode Menu Guide Menu Guide Shooting Mode Press the Multi selector to switch between Shooting menu 1 and 2 Press MENU button to select Shooting Menu 1 WHITE BALANCE Page 15 of 136 Nikon COOLPIX995 Di...

Page 16: ...lect Shooting mode BEST SHOT SELECTOR Turn best shot selection on or off IMAGE ADJUSTMENT Adjust brightness or contrast of image SATURATION CONTROL Adjust the saturation to Page 16 of 136 Nikon COOLPIX995 Digital Camera 3 15 2002 http www livemanuals com packages products NK002 2136 manual fullmanual html ...

Page 17: ...o select black and white photographs LENS Select type of optional lens converter or Slide Copy Adapter USER SETTING Select User Setting 1 2 3 EXPOSURE OPTIONS Turn AE Lock and Auto Bracketing on or off set exposure compensation Page 17 of 136 Nikon COOLPIX995 Digital Camera 3 15 2002 http www livemanuals com packages products NK002 2136 manual fullmanual html ...

Page 18: ... of image sharpening to be performed AUTO BRACKETING Set Auto Bracketing on or off or White Balance Bracketing NOISE REDUCTION Turn Noise Reduction on or off Off On RESET ALL Reset all settings to default values Page 18 of 136 Nikon COOLPIX995 Digital Camera 3 15 2002 http www livemanuals com packages products NK002 2136 manual fullmanual html ...

Page 19: ...1 FOLDERS Create new folders rename or delete existing folders choose folder for recording MONITOR OPTIONS Adjust monitor brightness and hue CONTROLS Set camera to remember settings in Page 19 of 136 Nikon COOLPIX995 Digital Camera 3 15 2002 http www livemanuals com packages products NK002 2136 manual fullmanual html ...

Page 20: ... start up position AUTO OFF Set time delay for Auto Power Off function 30 S 1 M 5 M 30 M SEQ NUMBERS Reset Seq Number function turn file numbering on or off On Off Reset CF CARD FORMAT Format CF memory card Page 20 of 136 Nikon COOLPIX995 Digital Camera 3 15 2002 http www livemanuals com packages products NK002 2136 manual fullmanual html ...

Page 21: ... on or off On Off DATE Set camera s data and time Year Month Day Hour Minute Display order INFO TXT Turns recording of text data on or off Off On VIDEO MODE Select video standard for NTSC Page 21 of 136 Nikon COOLPIX995 Digital Camera 3 15 2002 http www livemanuals com packages products NK002 2136 manual fullmanual html ...

Page 22: ...lect your region for playback on television screen PAL LANGUAGE Select language for menu and message display D E F J S DISABLE DELETE Disable enable deletion of all image files at a single command On Off Page 22 of 136 Nikon COOLPIX995 Digital Camera 3 15 2002 http www livemanuals com packages products NK002 2136 manual fullmanual html ...

Page 23: ...me or delete existing folders choose folder for recording SLIDE SHOW Start slide show of images contained in single folder set frame interval from 2s 3s 5s 10s PROTECT Protect selected images using thumbnail display HIDE IMAGE Page 23 of 136 Nikon COOLPIX995 Digital Camera 3 15 2002 http www livemanuals com packages products NK002 2136 manual fullmanual html ...

Page 24: ...g thumbnail display AUTO TRANSFER Automatically transfer selected images or all images to a connected computer MONITOR OPTIONS Adjust monitor brightness and hue Page 24 of 136 Nikon COOLPIX995 Digital Camera 3 15 2002 http www livemanuals com packages products NK002 2136 manual fullmanual html ...

Page 25: ...rmat CF memory card DATE Set camera s data and time Year Month Day Hour Minute Display order VIDEO MODE Select video standard for your region for playback on television screen NTSC PAL LANGUAGE D E Page 25 of 136 Nikon COOLPIX995 Digital Camera 3 15 2002 http www livemanuals com packages products NK002 2136 manual fullmanual html ...

Page 26: ...tery chamber cover latch toward to open the cover 2 Insert the battery with the and ends positioned as indicated inside the battery chamber then firmly close the cover Select language for menu and message display F J S 1 Nikon COOLPIX995 Digital Camera 2 Strap 3 Li ion Rechargeable Battery 4 Battery Charger with AC power cord 5 Video Cable 6 CompactFlash CF Memory Card 7 USB Cable for connection t...

Page 27: ...The supplied Li ion Rechargeable Battery is not fully charged at shipment We recommend that you charge the battery before first use Please see the instruction manual supplied with the charger for details Precautions on battery use and handling z Be sure to follow the warnings and cautions in For Your Safety when installing handling the battery z The battery cannot be replaced when a tripod or opti...

Page 28: ... year month day hour and minute Pressing UP on the Multi selector increases the number and pressing DOWN decreases the number After setting a number pressing RIGHT moves the selection on Year Month Day Hour Minute Date display sequence The year display can be set between 1970 to 2037 4 Set the date display order Press UP DOWN on the Multi selector to change the date display order as followings Pag...

Page 29: ...ra has been stored with the main battery removed for a long period of time the clock may need to be reset Once the main battery has been reinserted the clock battery will recharge in several hours during which time the main battery should be left in the camera Selecting a Language The language in which menus and messages are displayed can be selected using the Language sub menu 1 Turn the MODE dia...

Page 30: ...s RIGHT to select When the Language is set the display returns to the SET UP menu The languages available in the Language sub menu are D German Deutsch E English F French Francais J Japanese S Spanish Espanol Inserting CF Memory Card The COOLPIX995 uses a CompactFlash CF memory card to store images and movies Page 30 of 136 Nikon COOLPIX995 Digital Camera 3 15 2002 http www livemanuals com package...

Page 31: ...en inserting the CF memory 2 Return the eject lever to its original position after fully inserting the CF memory card and make sure to completely close the card slot cover Removing the Memory Card 1 Turn the MODE dial to OFF open the card slot cover fold out the eject lever and press it in to release the CF memory card NOTE Removing the CF memory card Make sure that the MODE dial is set to OFF whe...

Page 32: ... of the card are permanently deleted 1 Insert the CF memory card into the COOLPIX995 2 Turn the MODE dial to CF memory cards can also be formatted in or mode 3 Press the MENU button The SET UP menu is displayed in the Monitor 4 Select CF Card Format Press UP DOWN on the Multi selector to highlight CF Card Format and select it by pressing RIGHT Page 32 of 136 Nikon COOLPIX995 Digital Camera 3 15 20...

Page 33: ...sing the MENU button to immediately exit the menu Alternatively select No with UP DOWN on the Multi selector and return to the SET UP menu by pressing LEFT RIGHT NOTE Formatting Selecting Format by pressing RIGHT on the Multi selector starts formatting immediately At this point formatting cannot be stopped Formatting permanently deletes all the data recorded on the CF memory card Do not remove the...

Page 34: ...R RELEASE button slowly and gently Photographs can be framed in the Monitor or the Viewfinder Check point The lens section of this camera rotates so the subject can be seen easily on the Monitor and or Viewfinder Rotate the camera so that it can be held securely Frame photographs in the Monitor z When you are using Macro close up z When you are using Digital zoom z When you are using a lens conver...

Page 35: ...amera Pressing the Shutter Release Button Frame photographs in the Monitor z When you want to save power by turning the Monitor off z When bright ambient lighting conditions make it difficult to see the display in the Monitor DIOPTER ADJUSTMENT dial If the images in the Viewfinder appear blurred even when the subject is in focus set the diopter adjustment for your particular eyesight by rotating t...

Page 36: ...sult in picture blur Make sure to press the SHUTTER RELEASE button slowly Mode Dial and Multi Selector Mode Dial Use the MODE dial to select the Shooting mode or Playback mode Shooting mode There are two modes for taking pictures z In Auto mode the camera controls the exposure and other settings for simple easy operation z In Manual mode camera settings such as exposure white balance image adjustm...

Page 37: ...stment settings to ensure that the overall appearance of the picture is well balanced and correctly exposed z Other functions that are also preset are described below When the Monitor is off Single AF the camera only focuses when the shutter is half pressed is selected Basic Operation Auto Mode Position Operation Press UP DOWN to move vertically selecting an item by highlighting it Once an item ha...

Page 38: ...ect in the center of the picture as the focus target NOTE Composing using image in Viewfinder When composing a picture using the image in the Viewfinder the actual image recorded is shifted slightly due to a phenomenon known as parallax compared to the image in the Viewfinder Especially when shooting close ups the effect of parallax becomes more pronounced and the edges of the image seen in the Vi...

Page 39: ...tor is on the camera continues to attempt to focus Continuous AF The shutter can be released without focus being achieved Check the focus status of the image in the Monitor before releasing the shutter Focus Lock When the subject is in focus while you are lightly pressing the SHUTTER RELEASE button the focus is locked and the Green LED lights up without flashing When the main subject is not center...

Page 40: ... NOTE Recording on CF Memory Cards The Green LED flashing at intermediate speed indicates that the image is being written to the CF memory card Do not remove the card battery or AC Adapter until the Green LED has gone out or image data may be damaged or not recorded Built in Speedlight Use the built in Speedlight if there is insufficient light to illuminate the subject This condition is indicated ...

Page 41: ...ssing the SHUTTER RELEASE button in either Quick review or Full screen review resets the camera to normal Shooting mode and more shots can be taken Recorded images can be played back in Full frame playback by rotating the MODE dial to 6 Press the DELETE button in Full screen review mode and select Yes with the Multi selector to delete a single image Using the Multi selector choose the image to be ...

Page 42: ...he timer The Self timer lamp pulses for 1 second before the shutter is released and then lights steadily for the final 1 second The remaining time is visible as a count down on the Monitor In Shooting mode Self timer operation using Manual focus is possible To cancel Self timer after activation of the timer pause then press the FOCUS MODE button so disappears or else turn the power off Check point...

Page 43: ...y four Thumbnail images The Thumbnail image can be selected with the Multi selector and displayed Full frame Deleting Photographs in Full Frame Playback See Deleting photographs 1 Press the DELETE button in Full frame playback The delete confirmation dialog is displayed You can delete an image after confirming with the confirmation dialog Other Functions By connecting the camera to your TV set or ...

Page 44: ... to your computer To connect the camera to the computer you will need the supplied USB cable and Nikon View 4 CD ROM z For details of operation refer to the CD ROM instruction manual for Nikon View 4 z To connect the COOLPIX995 to a computer see Connecting to a Computer Detailed Operations Overview This section describes detailed operations in or mode z Setting Image Quality and Size z How Much Sp...

Page 45: ...t size is too large the individual pixels will be visible to the naked eye giving the image a rough uneven appearance As a rule of thumb for printing about 200 pixels per inch are required For display on a computer monitor about 80 pixels per inch are recommended Rotate the COMMAND dial while pressing the QUAL button until the desired Image size is displayed Setting Compression ratio File format A...

Page 46: ...onal no indication treatment UXGA 1600 x 1200 For printing at about A5 or large photo album size SXGA 1280 x 960 For smaller postcard sized prints XGA 1024 x 768 For display on a 17 inch computer monitor or small prints for example to be included in a report VGA 640 x 480 For output on a 13 inch monitor sending image data via E mail or posting a picture on an Internet homepage 3 2 2048 x 1360 This...

Page 47: ...tton repeatedly until the indication for the desired Focus mode or Self timer is shown Note that an indication is not displayed in the Autofocus mode FULL no indication 1 6 10 40 19 78 37 151 UXGA Not available 16 65 31 126 59 236 SXGA Not available 24 100 47 190 86 347 XGA Not available 37 151 69 278 121 488 VGA Not available 86 347 144 578 229 918 3 2 1 7 11 45 22 88 42 169 Focus mode Indication...

Page 48: ...Self timer lamp pulses until 1 sec before SHUTTER RELEASE and the Self timer V lamp lights steadily for the final 1 sec The remaining time is visible as a count down on the Monitor z To cancel the Self timer after initiation pause the timer and then press the FOCUS MODE button so disappears or turn the power off Monitor AF mode Characteristics On 1 Continuous AF Autofocus operation is activated co...

Page 49: ...es as you zoom in with the Digital zoom function z Digital zoom cannot be used in HI Image quality Multi shot 16 Ultra HS Movie or Black and White mode z The Digital zoom function zooms into the middle part of the image in the Monitor and the actual recording area differs from the Viewfinder image Make sure to confirm the image in the Monitor Setting the Exposure Mode Shooting Mode To create a var...

Page 50: ... maintaining correct exposure With this function you can shoot in Programmed Auto as though shooting in Shutter Priority Auto or Aperture Priority Auto appears when Flexible Program is set To cancel the Flexible Program rotate the COMMAND dial until disappears change the Exposure mode or set the MODE dial to other than Exposure mode Display Shooting situation Programmed Auto P Camera controls shut...

Page 51: ...riate shutter speed 8 to 1 2300 sec to ensure correct exposure z Turning the COMMAND dial after setting Aperture Priority Auto Exposure mode changes the aperture in 1 3 steps NOTE Control range of the camera When the subject is too dark or too bright beyond the control range of the camera and the SHUTTER RELEASE button is lightly pressed the selected aperture display pulses If this occurs change t...

Page 52: ...ured by the camera is displayed in the Exposure condition and the Exposure meter display except in long time exposure Check point If the shutter speed is displayed in red when 1 2000 sec shutter speed is selected stop down aperture while confirming exposure on the Exposure meter in the Monitor Exposure status Conrol panel Monitor Correct exposure 1 EV under 2 EV over Page 52 of 136 Nikon COOLPIX99...

Page 53: ...oting Mode Four Flash modes are available for use in various flash shooting situations Condition in which Flash mode can be set Flash mode can only be set when the built in Speedlight is raised The Flash Cancel indication displayed in the Control panel and Monitor when the built in Speedlight is stowed 1 1 Slide the Speedlight release lever to release the built in Speedlight NOTE If flash does not...

Page 54: ...lash mode can be set to remain in the memory even when the power is turned off this setting can be changed with the Memorize setting Setting the Exposure Compensation Value Shooting Mode Exposure Compensation can be employed to deliberately offset the exposure from the measured value Twelve Exposure Setting Indication Characteristics AUTO flash Speedlight automatically fires when the subject is da...

Page 55: ...morize setting z Other functions can be set to be selected with the EXPOSURE COMPENSATION button with FUNC 2 In this case Exposure Compensation cannot be set with the EXPOSURE COMPENSATION button Adjusting Sensitivity Shooting Mode Sensitivity increases the use that the camera makes of available light allowing faster shutter speeds to be employed However as sensitivity is increased the picture may...

Page 56: ...the Image Sharpening in Shooting menu Playback Playback Mode Playback Playback mode is used for reviewing pictures that are saved on the CF memory card starting with the most recent first 1 Set the MODE dial to Setting Shooting sensitivity 100 Standard sensitivity equivalent to ISO 100 z Recommended except for shooting in dark conditions or with fast moving subjects 200 Equivalent to ISO 200 400 E...

Page 57: ... modes Taking a closer look zooming in You can see more detail in the image by zooming into the desired area of the image Previous photograph Next photograph Selecting a photograph Rapid Scroll To scroll rapidly between photographs simply press and hold the Multi selector The frame count will increment or decrement depending on the scroll direction Release the Multi selector to view the selected f...

Page 58: ...possible at any time to select one Thumbnail for Full frame playback or deleting 1 Set the MODE dial to 2 Press the THUMBNAIL button once to display nine Thumbnail images or twice to display four Thumbnail images If there are fewer than nine or four recorded images they are displayed from the top left An image that has been displayed in Full frame playback is highlighted by a yellow frame Thumbnai...

Page 59: ...The delete operation is confirmed with a dialog after which the next photograph is displayed To cancel delete press LEFT on the Multi selector or select No by pressing UP DOWN then press RIGHT to return to Full frame playback without deleting the photograph Deleting individual photographs in thumbnail playback 1 Highlight the image to be deleted using the Multi selector The selected image is marke...

Page 60: ...a a feature called Autofocus lock can be used to maintain focus on the subject Autofocus is locked by half pressing the shutter with the subject in the focus target area At the same time exposure for the main subject is memorized by the camera Auto exposure lock This function is convenient when the exposure should be defined by the subject 1 Center the main subject between the Autofocus brackets a...

Page 61: ...e is known or in situations where Autofocus may not work as expected To select Manual Focus rotate the COMMAND dial while pressing the FOCUS MODE button M FOCUS indication appears in the Control panel as confirmation Keeping the FOCUS MODE button pressed rotate the COMMAND dial again to display the shooting distance both on the Control panel and Monitor z The shooting distance can be set in 49 ste...

Page 62: ...se Autofocus lock then recompose and shoot 2 Conflicting or confusing subject detail Scenes with subjects located at different distances from the camera Fast moving subjects In these instances the following alternative focus method is suggested Focus on a different subject located at the same distance and that has the same brightness use Autofocus lock then recompose and shoot NOTE Focus lock When...

Page 63: ...e When the first frame is displayed as a still image Start movie After completing the playback the final frame is displayed for one second and then returns to the still image of the first frame While movie is in progress Pause movie The movie stops and a still image of the frame when the button was pressed is displayed While the movie is paused still image display except the first frame Resume mov...

Page 64: ...or 20 seconds after which the image is saved to the memory card and the display returns to the normal shooting display z The displayed image can also be saved as any time by pressing the FLASH MODE button while the indication is displayed To cancel press the DELETE button The delete confirmation dialog appears from which is it possible to delete the image Quick Review Mode Full Screen Review Mode ...

Page 65: ...ly set Shooting mode conditions Exposure value Autofocus White balance Auto are memorized in Quick review mode Completing the quick review mode z The following operations end the Quick review mode and return the camera to Shooting mode Lightly pressing the SHUTTER RELEASE button Pressing the MENU button Setting the MODE dial to another position When the camera s power is turned off automatically b...

Page 66: ...gram display 5 Focus confirmation display The contents of the image information displayed are as follows 1 Basic display screen 2 Detailed information display 1 Display Description 100 Nikon Folder name 0025 gif File number the last 4 numbers and file type Battery indication displayed only when battery power is insufficient Print order selection icon displayed on the print ordered image Protect ic...

Page 67: ...n when in Manual focus Display Description SPEEDLIGHT ON Flash status IMG ADJUST AUTO Image adjustment SENSITIVITY AUTO Sensitivity ISO equivalency WHITEBAL AUTO White balance SATURATION 1 Saturation control SHARPNESS AUTO Image sharpening DIGITAL TELE X1 00 Digital zoom ratio CONVERTER OFF Lens converter status FILE SIZE 713KB File size kilobytes Display Description Thumbnail image Highlighted pa...

Page 68: ...00 and optional Speedlights please refer to the instruction manuals supplied with each accessory Check point With the Speedlight Opt Int Flash Off in Shooting SET UP menu it is possible to set the built in Speedlight so that it does not fire and to fire the external Speedlight only NOTE Flash Units Made by Manufacturers other than Nikon Use only Nikon Speedlights Other units may damage the camera ...

Page 69: ...tion control and Noise reduction The Shooting menu contains two pages of advanced shooting options SHOOTING MENU 1 Menu Function Mode Shooting Advanced Shooting options e g White Balance Metering Continuous SET UP Basic camera setup e g formatting CF memory cards setting date time SET UP menus for the and modes are accessible from the Shooting and Playback menus respectively The options available ...

Page 70: ...tings apply as soon as the selection is made NOTE In the and Shooting modes pressing the SHUTTER button will cause the camera to quit the MENU and return to Shooting mode for as long as the shutter is lightly pressed LENS USER SETTING EXP EXPOSURE OPTIONS FOCUS FOCUS OPTIONS IMAGE SHARPENING AUTO BRACKETING NR NOISE REDUCTION C RESET ALL Page 70 of 136 Nikon COOLPIX995 Digital Camera 3 15 2002 htt...

Page 71: ...ht the desired option then press RIGHT to display further options for the selected option 3 Set the option Press UP DOWN to highlight the option then press RIGHT to confirm The Monitor then returns to the Shooting menu 4 Complete the setting by pressing the MENU button The Monitor then returns to Shooting mode Check points Moving from page to page Page 71 of 136 Nikon COOLPIX995 Digital Camera 3 1...

Page 72: ...elect an option quickly by rotating the COMMAND dial instead of using the Multi selector 1 Select the menu item with the Multi selector 2 Rotate the COMMAND dial to display the icon for the desired option Complete the setting by pressing the MENU button twice in SHOOTING MENU 1 or once in SHOOTING MENU 2 White balance Human vision compensates for variations in the color of normal ambient lighting ...

Page 73: ...ial A negative adjustment tends to make the image reddish while a positive adjustment tends to make the image bluish Press RIGHT on the Multi selector to set the adjustment 2 You can select FL1 FL2 or FL3 for different types of fluorescent light such as warm daylight neutral etc by rotating the COMMAND dial Page 73 of 136 Nikon COOLPIX995 Digital Camera 3 15 2002 http www livemanuals com packages ...

Page 74: ...e white balance to its most recent setting The lens also returns to its previous position Measure To measure the color temperature select Measure and then place a flat neutral object such as a piece of gray card in the same lighting as the intended subject Then press RIGHT on the Multi selector to take a sample image The camera measures the color temperature and the recalibrates the white balance ...

Page 75: ... there is a pronounced contrast in the frame such that exposure should be based on a just a small area of the frame Center weighted Exposure is calculated based on the central 1 4 of the entire frame contributing 80 percent of the exposure calculation When you use the Digital zoom Center Weighted Metering is automatically selected Useful when you want to base the exposure measurement on the center...

Page 76: ...t 16 When you press the SHUTTER RELEASE button fully 16 consecutive images are recorded and combined into a single image collage FULL 2048 x 1536 Other than HI VGA Sequence Records images continuously at high speed for as long as the SHUTTER RELEASE button is kept fully depressed Because the images are small compared to the buffer capacity you can continue to record image until the CF memory card ...

Page 77: ...en saved on the CF memory card which takes longer The indication is displayed while the camera is saving images to the CF Memory z The Continuous menu settings other than Single are indicated by an icon on the Control panel and on the Monitor N__ created every time an Ultra HS sequence Is recorded All 70 images are saved in this folder Movie Records a movie up to approx 40 sec in length when you p...

Page 78: ...ot Selector Auto Bracketing functions are set to off in Ultra HS mode NOTE Speedlight z When a Continuous mode other than Single is selected the built in Speedlight does not fire even when the Speedlight is raised It is recommended that you close the Speedlight since underexposure may occur z Multiple flash operation with more than one Speedlight can be used in Single Continuous Multi shot 16 and ...

Page 79: ...h the camera automatically compensates for optical brightness and contrast before recording the photograph on the CF memory card The Image Adjustment menu gives you control over this image compensation Off Best Shot Selector off BSS On Best Shot Selector on Off Best Shot Selector is off and the regular Shooting mode is used BSS On Holding down the SHUTTER RELEASE button fully records up to 10 imag...

Page 80: ...erence between light and dark areas This is useful when shooting landscapes and foggy or cloudy scenes Less Contrast The image is processed to reduce the difference between light and dark areas This is useful in conditions where the light is very bright with strong shadows cast on the subject Lighten Image Increases the brightness of mid tones in the image without affecting detail in the highlight...

Page 81: ...o 2 B W Sets image to black and white Option Description 1 Maximum Increases the color saturation of the image Suitable for direct printing where a photo print effect is required 0 Normal 1 Moderate 2 Minimum Sets the saturation control level to normal Saturation can be decreased to normal to 1 moderate or 2 minimum Suitable for images intended for subsequent retouching or manipulation on a comput...

Page 82: ...k The Swivel Lock function prevents the lens section of the camera from being unintentionally swiveled beyond the horizontal position by the weight of an optional lens converter Slide the Swivel Lock lever in the direction of the arrow to activate the Swivel Lock function and lock the lens section of the camera so that it cannot be rotated more than 90 forward vertical position Slide Copy Adapter ...

Page 83: ...or Slide Copy Adptr The Flash Cancel indication is displayed on the Control panel and Monitor z Refer to the instruction manual for the optional lens converter or Slide Copy Adapter for details The Lens setting indication is displayed on the Monitor when a Lens setting other than Normal is selected When Fisheye 1 is selected the Infinity and Center Weighted Metering indications are also displayed ...

Page 84: ...tor and then press LEFT RIGHT to select Then set the desired menu item from the Shooting menu The icon for the selected menu item is displayed in orange When menu item option is changed in each User Setting number the new setting is stored in memory The User Setting number is displayed in the upper left corner of the Monitor when User Setting 2 or 3 is selected Exposure options In certain cases yo...

Page 85: ...able for Exposure Compensation from 2EV to 2EV in 1 3 EV steps AE Lock Setting Exposure Lock EXP Setting Exposure Compensation Exposure mode Setting Exposure mode Off Off Exposure Lock is canceled and normal exposure control is resumed On Exposure control aperture shutter speed sensitivity and white balance are locked to the settings for the first image recorded after On setting z The flash is can...

Page 86: ...E is assigned to either the FUNC 1 or FUNC 2 button in the Controls setting in the Shooting SET UP menu See Setting the Exposure mode for the characteristics of the Exposure modes and details on using them Check point Set the shutter speed in the S exposure mode or the aperture in the A exposure mode by rotating the COMMAND dial as described in Setting the Exposure mode However in M exposure mode ...

Page 87: ...focus pictures The automatically selected AF Area is identified by the indicator that glows red on the Monitor when the SHUTTER RELEASE button is pressed lightly Manual Focusing is targeted on one of five AF Areas selected on the Monitor Press UP DOWN LEFT RIGHT on the Multi selector to select the desired AF Area The selected AF Area is indicated in red on the Monitor This is useful in situations ...

Page 88: ...tails and borders of objects making the picture appear sharper and bolder Single AF Autofocus is only enabled when the SHUTTER RELEASE button is pressed lightly regardless of the Monitor status MF In MF Manual Focus mode the outline of the in focus area of the image is emphasized in the Monitor as an aid to focus On In all Focusing modes the outline of the in focus area of the image is emphasized ...

Page 89: ...es In WB Bracketing the white balance is bracketed in three shots Auto The camera automatically sharpens the image for optional results Normal The same standard sharpness is set for all images High The image is processed to increase the sharpness effect above the normal level giving the edges of objects more emphasis and making details more distinct Low The images processed to decreasesharpness be...

Page 90: ...ensated EV value offset from the automatically metered exposure The Shutter speed is bracketed in P R or M Exposure modes and the aperture is bracketed in S Exposure mode WB Bracketing The White Balance is bracketed when you press the SHUTTER RELEASE button fully giving 3 shots made up of one with the selected white balance a reddish image and a bluish image z The time required to save bracketed i...

Page 91: ... RELEASE button fully giving three shots made up of one shot with the selected white balance one reddish image and one bluish image z When you select White Balance Bracketing the White Balance Bracketing indication appears on the Monitor NOTE Auto Bracketing and White Balance Bracketing z Bracketing cannot be set in Multi shot 16 Ultra HS Movie Best Shot Selector AE Lock or Noise Reduction mode z ...

Page 92: ... When you perform Reset All the camera settings are reset to the defaults shown below Shooting menu On The effect of noise on the recorded image is minimized Off Noise reduction is canceled and normal exposure control is used No Exit menu without changing the settings Yes Restore the settings to their default values White Balance Auto 1 Focus Options AF Area Mode Auto Auto Focus Mode Focus Confirm...

Page 93: ...Lock Off Exposure Compensation Exposure Mode Off 0 Not cleared Folders NIKON info txt Off Monitor Options Display Mode Brightness Hue On 3 6 Auto Off 30 S Seq Numbers Not cleared Date Not cleared Shutter Sound On Video Mode Not cleared Controls Memorize Func 1 2 Cleared Not cleared Language Not cleared Zoom Options Digital Tele Startup Position Fixed Aperture On Last Position Off Speedlight Option...

Page 94: ...he Shooting menu Use LEFT on the Multi selector to select the Tab S 1 or 2 Pressing LEFT in Shooting menu display turns the tab at the left of the display orange 2 Select the S tab with UP DOWN to display SET UP 1 and press RIGHT SET UP 1 appears at the top of the display when you press UP DOWN to select the S tab at the left Press RIGHT once to enable selection of the SET UP items SET UP 1 SET UP...

Page 95: ... item Press UP DOWN on the Multi selector to highlight the desired item and press RIGHT to display options for the selected item 2 Select the option for the selected item Folders Monitor Options Controls Zoom Options Auto Off Seq Numbers CF Card Format Speedlight Opt Shutter Sound Date info txt Video Mode Language Disable delete Page 95 of 136 Nikon COOLPIX995 Digital Camera 3 15 2002 http www liv...

Page 96: ...select new folders to help you organize your pictures on the camera for shooting and image playback This feature allows you to create rename and delete folders z The NIKON folder is automatically created Newly created folders are displayed below the NIKON folder Opti ons Press UP DOWN on the Multi selector to select Options and then press RIGHT to display the Options Menu Options Options for folde...

Page 97: ... folder name Press RIGHT to create new folder The Monitor returns to the SET UP menu 3 Press the MENU button to complete the setting Folder name is shown on the Monitor when a folder other than NIKON is selected Rename Use this option to rename folder other than the NIKON folder New Creates a new folder Rename Renames a folder Delete Deletes a folder Page 97 of 136 Nikon COOLPIX995 Digital Camera ...

Page 98: ...e step 2 of New Press RIGHT to rename existing folder The Monitor returns to the SET UP menu 4 Press the MENU button to complete the setting Delete This option enables you to delete folders other than the NIKON folder 1 Select Delete in Options and press RIGHT on the Multi selector to display the folder list Page 98 of 136 Nikon COOLPIX995 Digital Camera 3 15 2002 http www livemanuals com packages...

Page 99: ...ains hidden or protected images the folder will not be deleted Any images it contains that are neither hidden or protected will however be deleted Selecting a folder Once additional folders have been created you can select the folder that will be used for playback or to store photographs in and mode Until a new folder is selected all subsequent images will be stored in this folder which will also ...

Page 100: ...nly Turns the Monitor and Preview mode On Off Brightness Adjusts the brightness of the Monitor Hue Adjusts the hue of the Monitor Monitor On When the MODE dial is set to the Monitor turns On Review Only In mode the Monitor is normally Off but the recorded image is displayed after you release the shutter Preview Only In mode the Monitor is normally On but the recorded image is not displayed after y...

Page 101: ...Once you have adjusted hue to your satisfaction press RIGHT to complete the hue setting and to return to the SET UP menu Press the MENU button to complete the setting Selecting Brightness and Hue settings The Brightness and Hue settings become effective as the arrow moves allowing instant visual feedback on the changes in color and brightness Check point The adjusted Brightness and Hue are applied...

Page 102: ...001 gif it is possible to allocate On Turns the beep on Off Turns the beep off Beeps once to confirm z Power is turned on in Shooting Mode z SHUTTER RELEASE button is fully depressed and the shutter is released z Completion of the following settings and preparations Lens Manual Focus CF Card Format Delete Protect Hide Image Print Set Auto Transfer and Shutter Sound On Beeps twice to warn z Image c...

Page 103: ...mbers are assigned sequentially even when you switch folders or CF memory cards ensuring that image files are not created with duplicate numbers This makes it easier for you to manage your files in situations such as when you are downloading all your files to a computer Check point When an image file number is greater than 9999 or the current folder contains more than 999 images a new folder with ...

Page 104: ...ols setting to specify whether individual functions are retained in the camera or cleared from the camera s memory when you turn the camera off Various alternative functions can be selected and assigned to the FUNC 1 EXPOSURE MODE button and FUNC 2 EXPOSURE COMPENSATION button Memorize The Memorize determines what settings remain in effect when the camera is turned off Any items that are not check...

Page 105: ...in mode Check point Memorizes the flash mode setting Memorizes the Focus mode setting MODE Memorizes the Exposure mode setting Memorizes the Exposure Compensation setting Done Completes the setting Mode Assigns Exposure mode operation Assigns Focus mode including Self timer and Manual focus operation Assigns Flash mode and ISO sensitivity operation White Balance Assigns White Balance operation Ass...

Page 106: ...URE MODE button or Exposure Compensation button Operation after FUNC 1 or 2 setting Zoom options You can use the Zoom Options to determine various functions that relate to the initial set up of the lens and the aperture variations relative to the Zoom position Digital Tele The Digital zoom function digitally enlarges the center of the image so that it fill the entire frame The Digital Zoom only Ex...

Page 107: ...then starts up automatically and the image in the Monitor is zoomed by up to 4 0x Off Digital zoom function does not operate Last Position When you turn the camera on the lens moves to its Zoom position at the time the camera was last turned off Wide When you turn the camera on the lens zooms in to the wide angle setting Tele When you turn the camera on the lens zooms up to the telephoto setting O...

Page 108: ...an optional external Speedlight When this setting is selected the built in Speedlight flash is suppressed and only the optional external Speedlight s fire In this situation the flash modes for the optional Speedlights can be selected using the FLASH MODE button on the COOLPIX995 when the built in Speedlight is raised On In Aperture Priority Auto or Manual Exposure mode the camera memorizes apertur...

Page 109: ...ed eye reduction Self timer lamp next to lens lights each time a single picture is taken as a shot confirmation lamp z The Shot Confirm Lamp setting becomes effective when a setting is selected by pressing UP DOWN on the Multi selector Lightly pressing the SHUTTER RELEASE button activates the normal shooting display and the Monitor returns to the SET UP menu when the shutter is released Press the ...

Page 110: ...mera z For more information see Selecting a Language Disable delete You can use this option to disable the function that deletes all image files at a single command Off Turns off the recording of text data On Turns on the recording of text data NTSC Use when connecting to NTSC devices PAL Use when connecting to PAL devices D German E English F French J Japanese S Spanish Page 110 of 136 Nikon COOL...

Page 111: ...how the pictures in a sequence as a slide show Slide Show and prepare photographs for printing Print Set The Nikon View 4 software which allows you to copy images from your camera or CompactFlash card to a computer can be set to transfer an image based on Protect or Auto Transfer being either set or not Displaying the playback menu Set the MODE dial to and press the MENU button to display the Play...

Page 112: ...ress RIGHT to display either the confirmation dialog detailed option menu or thumbnails to be selected depending on the particular item 3 Set the option Press UP DOWN to highlight the option and press RIGHT to confirm The Monitor then returns to the Playback menu Press the MENU button to complete the operation Protect Hide Image Print Set Auto Transfer Page 112 of 136 Nikon COOLPIX995 Digital Came...

Page 113: ...tographs choose Selected Images from the Delete sub menu 1 Press LEFT RIGHT on the Multi selector to highlight with the orange frame the desired images to be deleted 2 Press UP DOWN to select the images to be deleted the delete icon appears To cancel the selection and make the Delete icon disappear press UP DOWN on the selected image again Continue selecting images and then confirm your selection ...

Page 114: ...NIKON folder is automatically created Newly created folders are displayed below the NIKON folder z For Folders Options see Folders z Select a folder to be played back from All Folders NIKON or from a newly created folder z The All Folders option enables you to view images in all folders without having to select individual folders Playback of photos taken in Ultra HS mode Photos taken in the Ultra ...

Page 115: ...RIGHT to display the Frame Intvl option Frame Intvl Press UP DOWN on the Multi selector to select Frame Intvl from the Slide Show sub menu or from the Pause screen then press RIGHT to start or restart the slide show with the selected interval z The display interval is the minimum length of time for which each image is fully displayed The defaultsetting of the display interval is 3 seconds Selectab...

Page 116: ... Playback menu Cancel protection on images 1 Press LEFT RIGHT on the Multi selector to highlight the thumbnail of the image for which you want to cancel protection Press UP DOWN to cancel protection of the selected image 2 Press the QUAL button to implement the setting Hide Image When creating a slide show or showing photographs to an audience you may want to use the Hide Image option to hide some...

Page 117: ...button to complete the operation Print set The Digital Print Order Format DPOF allows images to be marked for printing at a Lab Print Shop or on a desktop Printer that can read the DPOF information As well as the instruction to print the image the DPOF system also allows the number of prints to be specified and whether or not the image date and or other information should appear This Digital Print...

Page 118: ...n all selected photographs Cancel print order on images 1 Press LEFT RIGHT on the Multi selector to highlight the Thumbnail for which you want to cancel the print order Press DOWN to cancel the print order on the selected image Pressing DOWN on the image with the Print icon decreases the number of prints By pressing DOWN when the number of prints is 1 the print order is canceled 2 Press the QUAL b...

Page 119: ...he operation Canceling auto transfer 1 Press LEFT RIGHT on the Multi selector to highlight with orange frame the thumbnail image for which you want to cancel auto transfer Press UP DOWN to cancel the Auto Transfer setting The Auto transfer setting is canceled and disappears 2 Press the QUAL button to complete the operation Transferring all images To set all image files to be transferred select All...

Page 120: ...left 2 Press UP DOWN to select the S tab SET UP is displayed at the top and press RIGHT to activate the Playback SET UP menu Choosing from the playback SET UP menu example Monitor Options 1 Select the Playback SET UP menu item Press UP DOWN on the Multi selector to highlight the desired menu item then press RIGHT to display options for the item Monitor Options Shutter Sound Auto Off CF Card Format...

Page 121: ...ion then press RIGHT to set The display returns to the Playback SET UP menu Press the MENU button to complete the operation Playback SET UP Menu items Monitor options The hue overall color and brightness of the Monitor can be adjusted to improve visibility Page 121 of 136 Nikon COOLPIX995 Digital Camera 3 15 2002 http www livemanuals com packages products NK002 2136 manual fullmanual html ...

Page 122: ...ng shutter sound see Shutter Sound in Shooting SET UP Auto off To extend battery life the camera turns off after a preset time of inactivity This time is set with the Auto Off menu Brightness Adjusts Monitor brightness Hue Adjusts overall Monitor color On Turns on the beep Off Turns off the beep 30S The Monitor automatically turns off after 30 sec Page 122 of 136 Nikon COOLPIX995 Digital Camera 3 ...

Page 123: ...setting are saved with each picture The Date and Time menu allows the date and time to be set to your local time zone z For information on Setting Date Time see Setting Date Time Video mode The COOLPIX995 supports the two principal worldwide TV standards You can choose either the NTSC or PAL standard for video output 1M The Monitor automatically turns off after 1 minute 5M The Monitor automaticall...

Page 124: ... available separately to a computer and to a television or videocassette recorder VCR Connecting to an AC Adapter Optional The camera can be powered from AC electrical outlets rated at 100 240 V 50 60Hz using the EH 21 AC adapter battery charger 8 4V 1 3A NTSC Selects the NTSC standard Japan USA PAL Selects the PAL standard Europe Oceania D German E English F French J Japanese S Spanish Page 124 o...

Page 125: ...21 AC adapter battery charger z The camera and the AC adapter may become warm when plugged in for a long time This is not a malfunction z When taking pictures with the AC adapter connected make sure that the adapter cord does not get in front of the lens Speedlight or the flash sync sensor Connecting to a Television or VCR You can connect the COOLPIX995 to a television or VCR to display images on ...

Page 126: ...favorite imaging application create a valuable store of photographs on your hard disk and share them by E mail or on the Internet The COOLPIX995 is equipped with a Universal Serial Bus USB for Windows 2000 Me and 98 98SE and Macintosh OS 8 6 9 operating systems that is capable of direct connection to your computer via a USB cable Alternatively you can insert the CF memory card in a PC card slot or...

Page 127: ...a and the computer is in progress indicated by the progress bar in Nikon View 4 on your computer screen Failure to observe this precaution might result in unexpected problems such as software malfunction damage to the copied picture or camera malfunction Check point When you connect your camera to a computer the computer must complete a process called registration in order to know how to communica...

Page 128: ...er CF card reader etc of your computer For details on insertion read the instruction manuals provided with the computer or card reader The steps involved in connecting a card drive and inserting CF memory cards are covered in the instruction manual for the computer or operating system 2 Nikon View 4 will by default automatically begin and allow image files on the CF memory card to be checked and c...

Page 129: ...factor of 0 21X The picture angle extends to become 183 degrees making the image spherical The combined focal length becomes 1 7mm 35mm 135 format equivalent to approx 8mm The combined f number becomes f 2 6 Telephoto Converter TC E3ED When the TC E3ED is attached to the COOLPIX995 the focal length is extended by a factor of approximately 3X The combined focal length becomes 96mm 35mm 135 format e...

Page 130: ...anufacturers has also been certified For detailed functions and operations with the above CF memory cards please contact the manufacturer z The COOLPIX995 is physically and electrically compatible with all CF Type I and Type II memory cards However the demands placed on the memory cards by a digital camera are very high due to the large volume of data and the speed at which pictures are copied Som...

Page 131: ...volatile cleaners Storage Windows Computer PC AT compatible CPU MMX Pentium or greater OS Windows 98 98SE Windows Millennium Edition Me Windows 2000 or later pre installed model 1 RAM 32MB or more 64MB or more recommended 2 Hard Disk Space 15MB for installation and twice the memory size of the CF memory card 2 Video Resolution 640 x 480 pixels or greater with 16 bit RGB or more 800 x 600 pixels or...

Page 132: ...right sunlight or other high intensity light is falling on the Monitor Use the Viewfinder or move to a location where there is less light z The Monitor has become dirty and should be cleaned Photos not in focus z The subject is low contrast or not suitable for autofocus systems Try Manual focus The Speedlight does not fire z The Speedlight is stowed z Int Flash Off setting is On z Continuous mode ...

Page 133: ...atible with the COOLPIX995 z CF memory card may be physically damaged Check that there is no dirt or foreign matter in the connector Contact authorized Nikon dealer or service center z Folder may contain some hidden or protected image file file incompatible with COOLPIX995 z Folder may contain photos taken with camera other than COOLPIX995 or image file edited with software z Cancel Protect or Hid...

Page 134: ... with focus confirmation indication available Focus range 30cm 11 8 in to infinity 2cm 0 8 in at middle Zoom position to infinity in macro mode Manual focus Viewfinder Real image zoom viewfinder with LED indication diopter adjustment 2 to 1m 1 Monitor 1 8 in 110 000 dot low temp polysilicon TFT LCD brightness adjustment 5 levels hue adjustment 11 steps frame coverage approx 97 Storage File system ...

Page 135: ...c terminal Sync terminal connects to external Nikon Speedlight SB 28 28DX 26 25 24 22 22s through the Multi Flash Bracket Unit SK E900 up to 5 flash units when using AS 10 and SC 18 19 Auto power off Automatically turns off after 30 seconds or a duration selected from 0 5 1 5 30 min after last camera operation Playback Menu Full frame playback Movie Quick review Full screen review Thumbnail 4 9 se...

Page 136: ...ut 1 Control panel Monitor During Video output 1 Automatically turns off after selected time 0 5 1 5 30 min when other camera controls are not operated Shooting menu will disappear after 3 min 2 Automatically turns Video output off after selected time 0 5 1 5 30 min when other camera controls are not operated Shooting menu will disappear after 3 min Automatically turns off after selected time 0 5 ...

Reviews: