background image

36

Function Guide

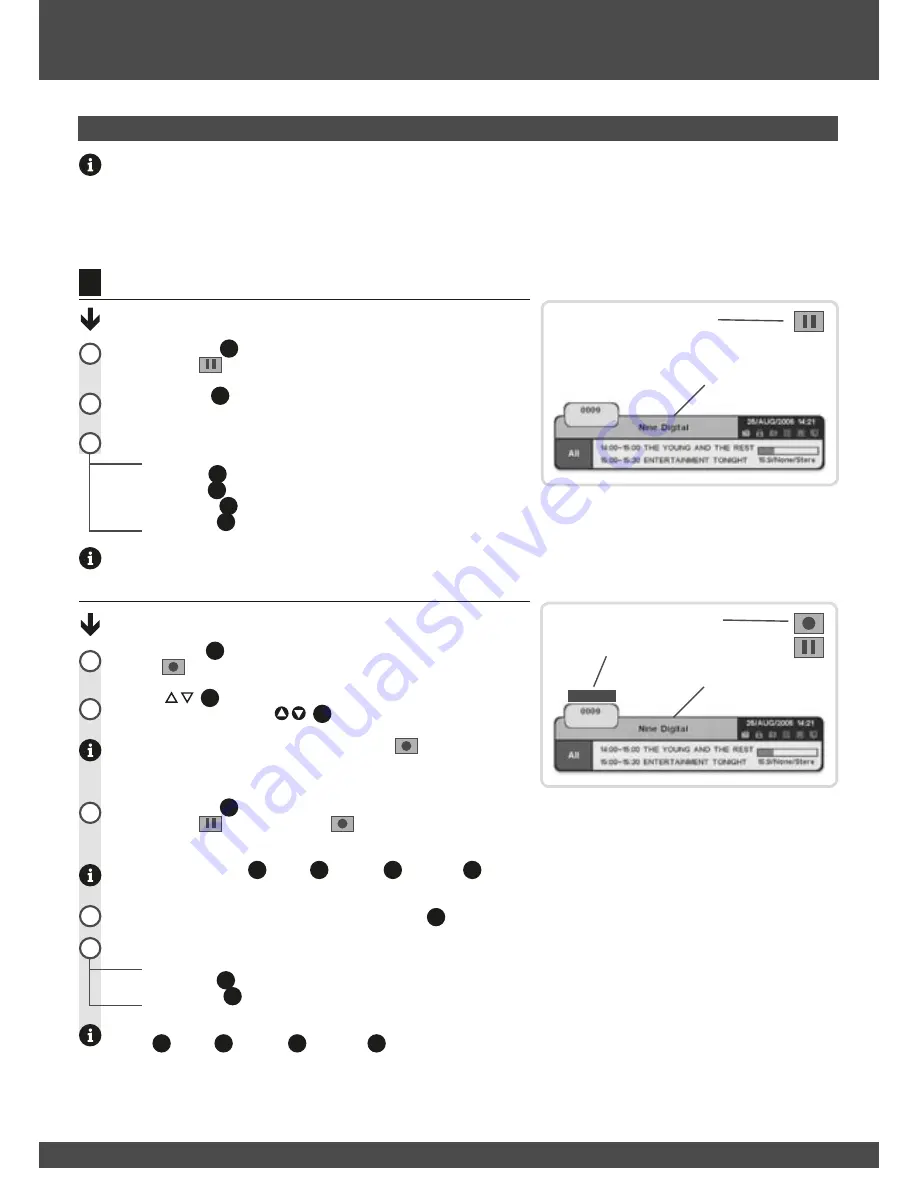
Timeshifting allows you to pause live TV for up to an hour and resume at a 

later time.  

The timeshifted playback can be fast forwarded, rewound, or played in 

slow motion.  Once timshifting has been activated, even if you fastforward 

and catch up with the real time program, you will be able to rewind up to 

an hour of the program.

Timeshifting is deactivated when you change channels.  

Timeshifting (pause live TV):

Press the 

PAUSE

 (

1

55

) button to timeshift (pause) the current program. The 

pause symbol 

 appears at the top right of the screen.

Press the 

PLAY

 (

1

54

) button to resume watching the timeshifted program 

from where you paused it. 

During timeshifting:

Press the 

REW

 (

1

49

) button to rewind.   

Press the 

FWD

 (

1

50

) button to fast forward.   

Press the 

R.SKIP

 (

1

48

) button to skip backward by the configured interval. 

Press the 

F.SKIP

 (

1

51

) button to skip forward by the configured interval.  

After you have changed channels the recording symbol will pop up at the 

top right of the screen to remind you that you are recording.  The iplate will 

also display the channel being recorded.  

Timeshifting one channel while recording another channel:

Press the 

REC

 (

1

52

) button to record the current program. The recording 

symbol 

 appears at the top right of the screen.

Use the 


 (

1

37

) buttons to change channels. 

Alternatively, use the 

CH/PG 

   (

1

31

) buttons to change channels.

When you change channels the recording symbol 

 will pop up at the 

top right of the screen to remind you that you are recording.  The iplate will 

also display the channel being recorded. 

Press the 

PAUSE

 (

1

55

) button to timeshift (pause) the current program. The 

pause symbol 

 and record symbol 

 appear at the top right of the 

screen.

You may use the 

REW

 (

1

49

), 

FWD

 (

1

50

), 

R.SKIP

 (

1

48

) & 

F.SKIP

 (

1

51

) buttons 

to control the playback of the timeshifted program.

To stop recording the original program, press the 

STOP

 (

1

53

) button.

The confirm sub-menu is displayed.  

  Press the 

RED

 (

1

40

) button to confirm or  

  Press the 

BLUE

 (

1

43

) button to cancel.

Timeshifting of the current program still continues and you may the  

REW

 (

1

49

), 

FWD

 (

1

50

), 

R.SKIP

 (

1

48

) & 

F.SKIP

 (

1

51

) buttons to control the 

playback of the timeshifted program.

!

1

2

Channel being recorded

Channel being timeshifted

Ch7-Rec

Channel being timeshifted

Timeshifting

1

2

3

3

5

4

Pause Symbol displayed

Recording Symbol displayed

Summary of Contents for PVR-3690

Page 1: ...Twin Tuner SDTV Personal Video Recorder PVR 3690 Please read these operating instructions before using the product Operating Instructions ...

Page 2: ...unlight Do not connect or modify cables when the STB is plugged in Do not cover the STB or place it on a unit that emits heat WARNING RISK OF ELECTRIC SHOCK DO NOT OPEN TO REDUCE THE RISK OF ELECTRIC SHOCK DO NOT REMOVE COVER OR BACK NO USER SERVICEABLE PARTS INSIDE REFER SERVICING TO QUALIFIED SERVICE PERSONNEL This symbol indicates dangerous voltage inside the product that presents a risk of ele...

Page 3: ...n Sub menu 18 Auto Search 18 Fast Search 18 Manual Search 19 Scan Complete Menu 19 Antenna Power 20 Initialise STB 20 Edit Channels 21 Favourite Group 22 PVR Manager Sub menu 23 Timer List 23 Recording 24 Timeshift 24 Skip Time 25 Bookmark Image 25 HDD Format 25 System Settings 26 Video Settings 26 Clock Settings 27 Language Settings 28 Lock Settings 29 System Information 30 Program Guide 30 Utili...

Page 4: ... included items contact your retailer Electronic copies of the operating instructions and quick start guide are also available for download from the support section of www nextwave digital com Included within package Depending on your particular audio visual setup certain third party products may need to be purchased such as SCART Component lead Optical Digital interconnects USB cable RF Flyleads ...

Page 5: ...tton on the remote control to activate YPbPr output First Time Boot Procedure When turned on for the first time the PVR will boot up to standby mode Press the Power Button on the remote control to go from standby to run mode The PVR will scan for broadcasts Total Available Recording Time The total recording time available to the PVR will vary as broadcasters vary the bandwidth and therefore space u...

Page 6: ...e timeshift live TV b Pressing PAUSE button again restarts the program c Top right hand corner of TV screen will show duration of timeshift d Pressing F FWD enables you to catch up to live TV Timeshifting will stop if the channel is changed 4 Record a channel time shift another a Press the record button to begin recording current channel b Change channels c Press PAUSE button to pause timeshift li...

Page 7: ...e not supplied BASIC SETUP ADVANCED SETUP Personal Video Recorder PVR3690 80GB 120GB ide Copyright 2005 nationwide Antenna Systems fore using your NextWave PVR3690 Connect to VCR with SCART to RCA composite video audio L R cable not supplied Connect to standard TV with supplied RCA composite video audio L R cable This setup allows you to record a second channel onto the VCR DVD R so that you can r...

Page 8: ...ereo Output for connection to a Hi Fi system or TV set 1 9 TV SCART Component YPbPr RGB CVBS video output for connection to Plasma LCD TV 1 10 VCR SCART CVBS Composite video output Connect to DVD R VCR 1 11 S PDIF Optical TOSLINK TOSLINK Optical Audio Output Connect to AV Processor or Audio Amplifier 1 12 RS232 Data Port For Software Upgrades 1 13 USB 2 0 Connector For connection to media centre or...

Page 9: ...l analogue programming you may use the RF LOOP OUT 2 output signal to connect your VCR or TV receiver to it This signal carries the same signal that is received by the antenna and is not processed by the STB Basic Set Up Standard TV N1334 CAUTION RISK OF ELECTRICAL SHOCK DO NOT OPEN RS232 90 250V 50 60Hz 40Wmax ON OFF TV VCR S PDIF USB VIDEO TV OUT RF LOOP IN ANT 2 ANT 1 RF LOOP OUT 1 RF LOOP OUT ...

Page 10: ...OWER 12 00 POWER 12 00 Y Pb Pr Audio Video ANT 1 Plasma LCD Component video capable display Connecting the Antenna Connect the coaxial cable from the VHF UHF Antenna to the RF IN 1 7 socket on the rear panel of the STB N1334 CAUTION RISK OF ELECTRICAL SHOCK DO NOT OPEN RS232 90 250V 50 60Hz 40Wmax ON OFF TV VCR S PDIF USB VIDEO TV OUT RF LOOP IN ANT 2 ANT 1 RF LOOP OUT 1 RF LOOP OUT 2 AUDIO MADE I...

Page 11: ... 2 AUDIO MADE IN KOREA DC 5V 35mA max Audio POWER Y Pb Pr Audio Video ANT 1 Component video capable display AV Processor or Digital Capable HiFi Connecting the Antenna Connect the coaxial cable from the VHF UHF Antenna to the RF IN 1 7 socket on the rear panel of the STB N1334 CAUTION RISK OF ELECTRICAL SHOCK DO NOT OPEN RS232 90 250V 50 60Hz 40Wmax ON OFF TV VCR S PDIF S PDIF USB VIDEO TV OUT RF ...

Page 12: ... TV POWER 12 00 POWER 12 00 Y Pb Pr Audio eo POWER POWER INPUT ANT 1 Connection Options Loop through function using VCR SCART If you have limited inputs on your TV this function is ideal as it allows video and audio signals to be looped through via the VCR SCART 1 10 connector 1 If you are using SCART to SCART cable use the TV SAT 1 24 button to activate loop through function 2 For composite S vid...

Page 13: ... and right through the main menu Channel list and EPG 1 20 1 Change channels up and down 2 Navigate up and down through the main menu Channel list and EPG 1 21 REC LED It shows GREEN LED when a program is being recorded 1 22 4 Digit Display Displays channel number 1 28 Standby LED It shows Red LED when the power is off Front Panel Front Panel 1 21 1 22 1 23 1 16 1 17 1 18 1 19 1 20 ...

Page 14: ...he remote control handset Please read this section to help your understanding of each function Remote Control 1 47 1 43 1 51 1 55 1 59 1 44 1 40 1 48 1 52 1 56 1 45 1 41 1 49 1 53 1 57 1 46 1 42 1 50 1 54 1 58 1 39 1 37 1 35 1 33 1 32 1 29 1 26 1 24 1 25 1 27 1 28 1 31 1 34 1 38 1 30 1 36 ...

Page 15: ...L VOL 1 increase or decrease the volume 2 Navigate left and right the main menu Channel list and EPG 1 38 BACK Return to the previous menu status or channel 1 39 EXIT Cancel the user selection 1 40 AUDIO Select audio options 1 41 SUBT Display closed captions 1 42 TEXT Display Teletext 1 43 SLEEP Configure the Sleep timer 1 44 OPTION Switch between aspect ratios 16 9 4 3 4 3 Letter 1 45 F LIST Displ...

Page 16: ...38 button to return to the previous level menu Press EXIT 1 39 button to exit the main menu and return to your program 6 4 3 5 2 1 Press MENU 1 17 button to access the main menu Press 1 19 1 20 buttons to move the highlight upward or downward Press OK 1 18 button to confirm a selection or OK a sub menu Within a sub menu use 1 19 1 20 to navigate Press OK 1 18 button to activate the selected menu it...

Page 17: ...ch Fast Search Manual Search Antenna Power Initialise STB Channel Edit System Settings Video Settings Clock Settings Language Settings Lock Settings System information Utility Calendar Tetris Captured Image USB Manager PVR Manager Timer List Recording Timeshift Skip Time Bookmark Image HDD Format Program Guide Menu Structure ...

Page 18: ...rch will automatically scan all available frequecies for TV and digital radio Auto Search Navigate page 16 to the Installation sub menu and highlight Auto Search Press OK 1 36 to open Auto Search sub menu Use the 1 37 buttons to select the search mode Options ALL TV and Digital Radio stations Press the RED 1 40 button to begin auto search Press the BLUE 1 43 button to cancel auto search The Scanni...

Page 19: ... channel slot for scanning Press the RED 1 40 button to open the manual search sub menu Use 1 37 buttons to highlight a parameter Use 1 37 buttons to edit the parameter When you have entered all of the desired parameters for that channel slot Press the RED 1 40 button to begin the manual search To manually scan multiple channel slots Use 1 37 buttons to highlight an available channel Press OK 1 36...

Page 20: ...Press OK 1 36 to open the Antenna Power sub menu Use 1 37 buttons to select off or on Press the RED 1 40 button to accept the change or press the BLUE 1 43 button to cancel 2 1 3 Initialise STB Initialising the PVR will wipe all of the channels and user settings restoring the set top to a factory default state Initialising The STB Navigate page 16 to the Installation sub menu and highlight Initial...

Page 21: ...to lock the highlighted channel To exit the Edit Channels menu press the EXIT 1 39 button Rename a channel Use 1 37 buttons to highlight an available channel Press the YELLOW 1 42 button to rename the highlighted channel The Channel Rename sub menu is displayed Within the Channel Rename sub menu Use 1 37 buttons to highlight a letter Press the RED 1 40 button to select a letter Press the GREEN 1 4...

Page 22: ...41 button to register the selected channel To exit the Favourite Group menu press the EXIT 1 39 button Rename Favourite Group Press the YELLOW 1 42 button to rename the selected Favourite Group Within the Favourite Rename sub menu Use 1 37 buttons to highlight a letter Press the RED 1 40 button to select a letter Press the GREEN 1 41 button to backspace Press the YELLOW 1 42 button to cancel and r...

Page 23: ...tons to directly enter the date and time Press the RED 1 40 button to accept the edit Press the BLUE 1 43 button to cancel and return to the Timer List Press the MENU 1 35 or EXIT 1 39 button to return to your program Delete a Reservation Use 1 37 buttons to highlight an available slot Press the OK 1 36 button to select the highlighted slot and display the Edit sub menu Within the Edit sub menu Us...

Page 24: ... press the EXIT 1 39 button Recording 2 1 Timeshift This sub menu enables or disables continuous timeshift mode If continuous timeshift is in the ON mode the unit will continuously cache 30min of whatever is being watched The unit automatically starts storing programs temporarily as soon as you change channel You will be able to rewind the program and fast forward to catch up to the live broadcast...

Page 25: ...or more than a second will automatically increase the Skip Time interval to 15min for jumping quickly through a recorded prgram Setting the Skip Time Navigate page 16 to the PVR Manager sub menu and highlight Skip Time Press OK 1 36 to open the Skip Time sub menu Use the 1 37 buttons to select the skip time interval Options 10 20 30 seconds 1 2 3 5 10 15 minutes Press the RED 1 40 button to accept...

Page 26: ...ed setting Press the BACK 1 38 button to save the new settings and return to the Main Menu To exit the Video Settings menu and return to viewing press the EXIT 1 39 button TV Output Signal Options S VIDEO CVBS RGB YPbPr TV Screen Format Options 16 9 4 3 Display Format Options Pan Scan Letterbox RF Channel Options 28 69 RF Modulator Type Options PAL B G PAL I PAL D K OSD Transparency Options 0 40 I...

Page 27: ... new settings and return to the Main Menu To exit the Clock Settings menu and return to viewing press the EXIT 1 39 button Time Mode Options AUTO MANUAL User Setting Options default MUX Ch ALL Summer Time Options ON OFF Time Zone Options GMT 12 00 GMT 12 00 default GMT 10 On Timer The On Timer sets the PVR to turn itself on at a particular time Use 1 37 buttons to move the cursor within the field U...

Page 28: ... 38 button to save the new settings and return to the Main Menu To exit the Language Settings menu and return to viewing press the EXIT 1 39 button Menu Language Set the language to be used for the on screen display OSD such as the main menu and iplate Options English Deutsch Francais Italiano Espanol Turkce Cesky Audio Menu Language Set the main audio language for broadcasts that support multiple...

Page 29: ...Settings menu and return to viewing press the EXIT 1 39 button System Lock Control access to the System Settings sub menu to prevent unauthorized changes Options OFF ON Channel Manager Lock Control access to the Edit Channels menu to prevent unauthorized editing of channels and favourites Options OFF ON Installation Lock Control access to the Installation sub menu to prevent unauthorized changes O...

Page 30: ...hannel Press the OK 1 36 button to change to that channel Press the RED 1 40 button to view the now information for that channel Press the GREEN 1 41 button to view the next information for that channel Alternatively press the 1 37 buttons to view the current next programs Press the YELLOW 1 42 button to view the seven day schedule Press the BLUE 1 43 button to reserve the currently highlighted pr...

Page 31: ...g Use 1 37 button to rotate the brick Use 1 37 buttons to move the bricks left and right Use OK 1 36 button to drop the brick to the bottom of the screen Press the BLUE 1 43 button once to stop playing Press the BLUE 1 43 button a second time to return to the Utility sub menu 1 3 2 Captured image The Captured Image menu allows you to view and delete images captured by pressing the CAPTURE 1 36 but...

Page 32: ...ebsite Connect PVR to USB Manager Navigate page 16 to the Utility sub menu and highlight USB Manager Press OK 1 36 to open the USB Manager sub menu Connect a USB not supplied to the USB 2 0 1 13 connector on the rear panel of the PVR Press the RED 1 40 button to return to scan the port for a connecrtion If the connection is successful the USB Manager sub menu will display connected To exit the USB...

Page 33: ...utton a second time 1 iplate Displays the currently selected Favourite Group Now Next information Progress Bar Aspect Ratio Audio settings Displays the current date time Channel Name The Logical Channel number Technical inofrmation about the current channel Program summary Change Favourite Groups Press the FAV 1 33 buttons to change the selected Favourite Group View multipage program summaries Pre...

Page 34: ... the CH PG 1 31 buttons to change channels 1 2 Function Guide TV Radio Press TV R 1 29 to switch to radio mode Use the 1 37 buttons to change stations To return to viewing TV press TV R 1 29 again 1 2 Raise and lower the volume Use the 1 37 buttons to raise and lower the volume Alternatively use the VOL 1 32 buttons to raise and lower the volume 1 2 Volume Control Changing Channels Switch between ...

Page 35: ...eing recorded Playback a file while recording Press the REC 1 52 button to record the current program The recording symbol appears at the top right of the screen Press the F LIST 1 45 button to open the Playback List Use 1 37 buttons to highlight a recorded program Press the OK 1 36 button to play the highlighted program Both a recording symbol and a Playback symbol will pop up at the top right of ...

Page 36: ...he channel being recorded Timeshifting one channel while recording another channel Press the REC 1 52 button to record the current program The recording symbol appears at the top right of the screen Use the 1 37 buttons to change channels Alternatively use the CH PG 1 31 buttons to change channels When you change channels the recording symbol will pop up at the top right of the screen to remind yo...

Page 37: ...a recorded program Press the OPT 1 44 button the File Rename sub menu is displayed Within the File Rename sub menu Use 1 37 buttons to highlight a letter Press the RED 1 40 button to select a letter Press the GREEN 1 41 button to backspace Press the YELLOW 1 42 button to cancel and return to Edit Channels Press the BLUE 1 43 button to save the new file name and return to Playback List menu To exit ...

Page 38: ...e F SKIP 1 51 button to skip forward through playback by the interval configured in Skip Time Hold down the F SKIP 1 51 button to skip forward rapidly by 15min intervals Skip Backward R SKIP Press the R SKIP 1 48 button to skip backward through playback by the interval configured in Skip Time Hold down the R SKIP 1 48 button to skip backward rapidly by 15min intervals Slow Motion Press the PAUSE 1 5...

Page 39: ...fting Press the INFO 1 34 button to display the Playback iplate Press the EXIT 1 39 button to return to viewing or press the INFO 1 34 button again to display the regular iplate While timeshifting the Playback iplate is constantly updating as live TV is recorded Playback iplate 1 2 2 Bookmark Image Playback speed Playback Marker Live TV Time Start Time Function Guide ...

Page 40: ...Use the 1 37 buttons to highlight None press the the OK 1 36 button To exit the Playback iplate press the EXIT 1 39 button Repeat Bookmarks Bookmarks provide an easy way to skip through large recordings to your favourite parts Simply press one button while watching a playback to add a new bookmark It is then easy to jump between your bookmarks Setting a bookmark While watching a playback press the...

Page 41: ...ons subtitles Press the SUBT 1 41 to display closed captions The subtitle sub menu is displayed Use 1 37 buttons to select the subtitle language eng Press the RED 1 40 button to accept the changes Press the BLUE 1 43 button to cancel the changes 1 3 2 4 Closed Captions subtitles Teletext Function Guide Setting zoom levels Press the ZOOM 1 47 button to zoom into the screen Use 1 37 buttons to pan a...

Page 42: ...ignal strength may be low Check the signal strength and adjust the antenna location and direction Normal picture but no sound Make sure AC3 is not selected available via digital output Check volume levels Make sure the TV is not muted Check the STB is connected properly Picture is distorted Make sure the proper format is slected Make sure the proper aspect ratio is slected Make sure the video outp...

Page 43: ... Video Audio L R Audio Output 2x RCA Compsite Video 1x RCA S PDIF 1x TOSLINK optical Dolby bitstream out available USB USB 2 0 Compatible Device B type RF Modulator UHF I O IEC male female CH 21 CH 69 PAL B G I D K RS232 9 Pin D Sub RS232C serial port General Characteristics Supply Voltage 100 250 VAC 50 60 Hz Power Consumption Max 40W LED Display 4 digits Yellow Green Weight 3 75 Kg Dimensions 35...

Page 44: ...Activities other than copying distribution and modification are not covered by this License they are outside its scope The act of running the Program is not restricted and the output from the Program is covered only if its contents constitute a work based on the Program independent of having been made by running the Program Whether that is true depends on what the Program does 1 You may copy and d...

Page 45: ...tion is held invalid or unenforceable under any particular circumstance the balance of the section is intended to apply and the section as a whole is intended to apply in other circumstances It is not the purpose of this section to induce you to infringe any patents or other property right claims or to contest validity of any such claims this section has the sole purpose of protecting the integrit...

Page 46: ...eo signals available via the D SUB output STB Set Top Box Standard Definition Television SDTV SDTV is a high quality Digital TV signal with greater quality than traditional analogue TV signals Users will require a Digital Set Top Box or a TV that supoprts SDTV signals to receive the new broadcast signal S PDIF Sony Philips Digital Interface Digital audio available via optical and coaxial connection...

Page 47: ...the control of any Authorised Service Centre or to any product installed repaired adjusted rebuilt modified changed or converted by any person including the Purchaser other than Authorised installers or Service Centres and any Product on which the serial number has been changed tampered with or removed This warranty shall not apply to batteries or any other parts of a limited natural life Where the...

Page 48: ...NOTES ...

Page 49: ...NOTES ...

Page 50: ...NWM 3690 1 3 06 09 2005 NASDTP ...

Reviews: