background image

PHOTO MODE

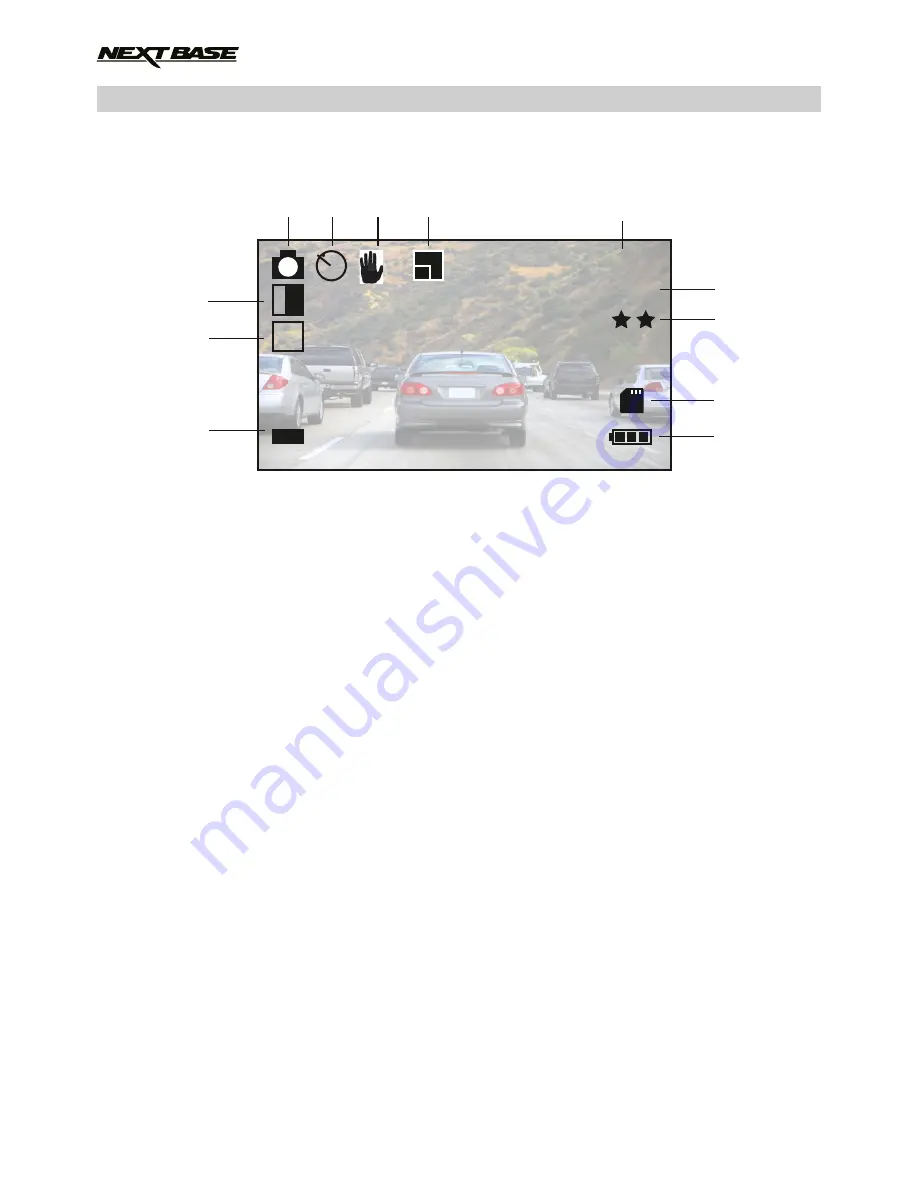
1.   Photo Mode Icon: Indicates the iN-CAR CAM is in Photo mode.
2.   Capture Mode Icon: Displayed on screen when Capture Mode (timer) is selected from within the 
      Photo menu. 
3.   Anti-Shaking Icon: Displayed on screen when the Anti-Shaking enhancement has been enabled
      from within the Photo menu.
4.   Sequence Icon: Displayed on screen when the Sequence function has been selected from within 
      the Photo menu, the iN-CAR CAM will automatically take five pictures when OK is pressed.
5.   Image Count: Displays number of images that can be stored on the memory card based on 
      current image quality settings.
6.   Resolution: Displays the current resolution as set within the Photo menu.
7.   Quality: Displays the current image quality as set within the Photo menu.
8.   Memory Card Icon: Icon will be marked with a red cross when there is no memory card inserted.
9.   Battery Indicator: Displays battery level, it is recommended to keep the car adaptor plugged in 
      during use, the indicator will flash during charging.
10. ISO Icon: Displays the current ISO setting as selected within the Photo menu.
11. White Balance Icon: Displays the current White Balance setting as selected within the Photo 
      menu.
12. Exposure Icon: Displays current exposure setting as selected from within the Photo menu.

The Photo menu is accessed by using the MENU button located on the rear of the iN-CAR CAM, use
the UP and DOWN buttons to navigate through the Menu and press the OK button to enter the 
options screen. Select the required setting and press OK to confirm, press MENU once more to exit 
the Photo Menu.

The default settings within the iN-CAR CAM have been set to allow you to use the iN-CAR CAM 
without the need to change any settings, however it is recommended that you explore these settings 
to familiarise yourself with the product and it’s capabilities.

Note:

- Within the SETUP menu which is accessed from within any mode by pressing the MENU button 
  twice, there is a ‘Default Setting’ option to allow you to reset the iN-CAR CAM to the factory defaults 
  if required.

The key below explains the various information displayed on the screen when your iN-CAR CAM is in 
Photo mode, some icons will only be displayed once the relevant function has been selected within 
the Photo menu, as described further down this page. 

01234

5M

ISO

AUTO

0

+

-

AWB

2

2

))

12

5

2

6

11

10

1

3

4

7

8

9

12

Summary of Contents for NBDVR202

Page 1: ...Instruction Manual...

Page 2: ......

Page 3: ...E INSTALLATION VIDEO MODE PHOTO MODE PLAYBACK MODE VIDEO PLAYBACK PHOTO PLAYBACK MENUS AND SETTINGS VIDEO MODE PHOTO MODE PLAYBACK MODE SETUP MENU PC CONNECTION VIDEO AUDIO OUTPUT HIGH DEFINITION OUTP...

Page 4: ...es or States Please adhere to these laws 10 Whilst driving do not adjust the controls of your device as this is a distraction to driving PRECAUTIONS CAUTION LCD DO NOT ATTEMPT TO SERVICE THE UNIT BY Y...

Page 5: ...w 2A Output 5Vdc 1M Pixel 1 000 000 Pixel 4G 120 F2 0 1920 x 1080 25fps 1280 x 720 30fps AVI 2 7 16 9 960 W X 240 H pixels x RGB Full Size SDHC Class 6 10 32GB 8 32GB Class 10 30mb s branded not suppl...

Page 6: ...er Select how long you would like the device to continue recording once power has been removed Built in Microphone Speaker Record audio to compliment the video recordings Automatic Start Stop Technolo...

Page 7: ...unt here 7 MINI USB 2 0 SOCKET Connect car power cable USB cable here 8 MEMORY CARD SLOT Insert memory card here Compatible with SDHC 32GB Class 6 10 Note Full sized SD Card is recommended 9 MODE Pres...

Page 8: ...ct File 13 MICROPHONE Turn on off within Setup menu to enable audio recording 14 SCREEN 15 AV OUT SOCKET located under dust cover For use with AV Cable sold separately 16 HD OUT SOCKET located under d...

Page 9: ...loth to achieve good contact between the glass and mount while pushing the suction cup onto the glass turn the locking wheel clockwise to secure the mount to the windscreen Note Choose a smooth glass...

Page 10: ...R CAM also applying some moisture to the suction cup may be beneficial to ensure absolute adhesion It is recommended NOT to operate the iN CAR CAM whilst driving The automatic Start Stop technology in...

Page 11: ...dicator Displays battery level it is recommended to keep the car adaptor plugged in during use the indicator will flash during charging 10 Time Displays current time as set within the Setup menu 11 Da...

Page 12: ...menu 11 White Balance Icon Displays the current White Balance setting as selected within the Photo menu 12 Exposure Icon Displays current exposure setting as selected from within the Photo menu The P...

Page 13: ...ber Displays current file number 4 Resolution Displays the resolution that current video was recorded in 5 Control Buttons To scroll through the saved files use the UP and DOWN buttons to view a chose...

Page 14: ...e Playback mode 2 Protected File Icon Displayed when a photo file has been protected by selecting Protect from within the playback menu 3 File Number Displays current file number 4 Resolution Displays...

Page 15: ...In the event of an incident you will always have the latest video footage for play back later and in a manageable file size Each bite sized chunk can be set to either 2 3 or 5 minutes long Default Se...

Page 16: ...the sharpness of the recorded image Default Setting Normal 2 6 White Balance Adjust the white balance for different light conditions Default Setting Auto 2 7 Colour Adjust the colour effect of the rec...

Page 17: ...y becoming fully dis charged the date will reset to 01 01 2012 4 2 Auto Power Off Adjust the timing of the Auto Power Off function this can be used to continue recording in event of loss of power with...

Page 18: ...50Hz 4 9 Format Format the inserted memory card this will delete all content This is a good practice monthly to ensure your SD card performs to it s full potential 4 10 Default Setting Reset the devic...

Page 19: ...or Card Reader built in to your PC Note The iN CAR CAM is only compatible with the following Windows based operating systems XP VISTA Windows 7 and Windows 8 VIDEO AUDIO OUTPUT High Definition Output...

Page 20: ...ill only work with Windows PC s Restart the PC as this may be required for the necessary driver to be loaded correctly Disconnect and reconnect the In CAR CAM Contact NEXTBASE for the required driver...

Page 21: ...Size is not compatible Simply use the MENU SETUP option to re format the SD card from within the iN CAR CAM Remove the SD Card and slide the locking tab away from the Lock position The iN CAR CAM will...

Page 22: ...NOTES 22...

Page 23: ......

Page 24: ...NBDVR202 IM ENG R04 www nextbase co uk...

Reviews: