background image

-  Installation instructions for supplementary outriggers  -

Via Mediterraneo, 6 - 42022 - Boretto - Reggio Emilia - Italy

Tel. +39 - 0522-96 30 08  -  Fax +39 - 0522-96 30 39

[email protected]

- 25 -


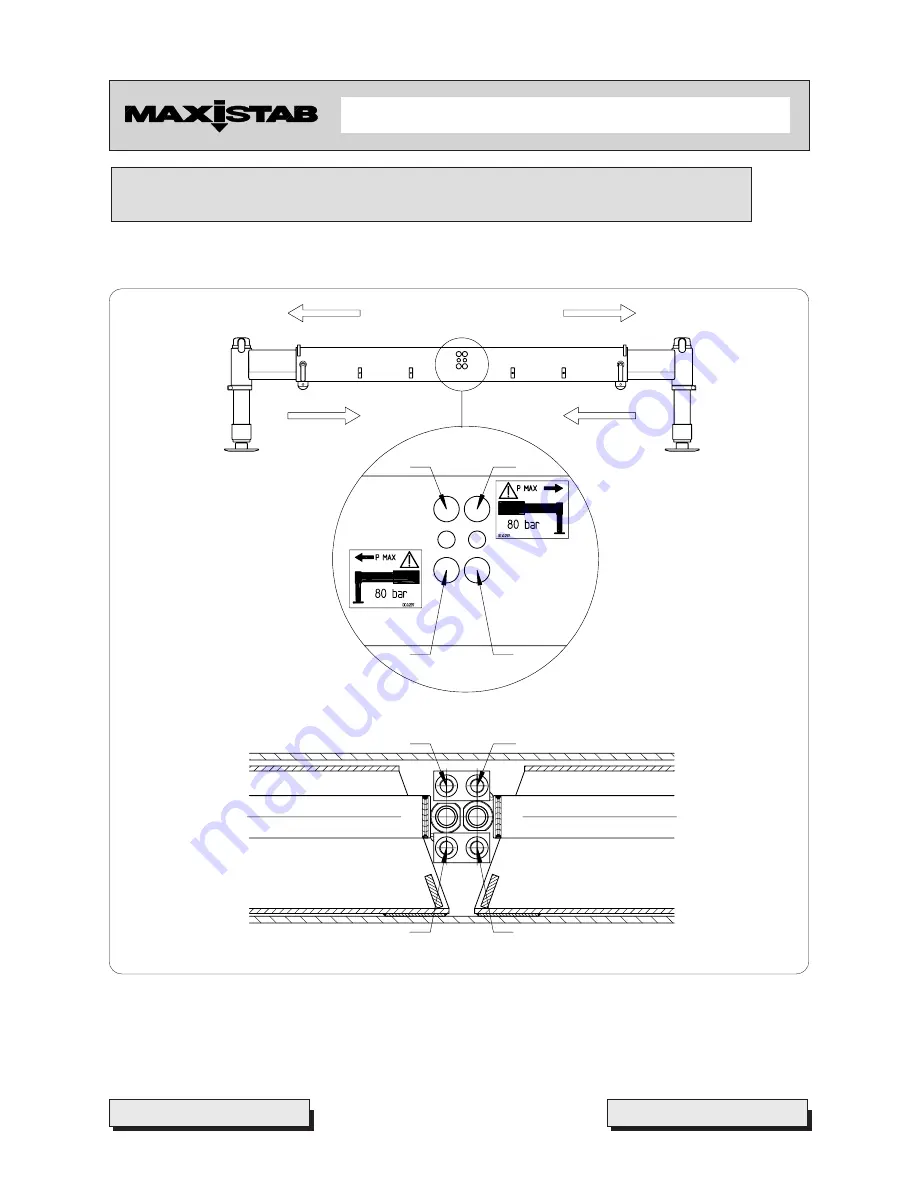
13  - HYDRAULIC CONNECTION OF THE ROD EXTENSION CYLINDERS

    FOR MODELS “1 EHO” – “2 EHO”

In picture 27 are shown the connection inlets for the rod extension cylinders, in order to make the
correct mounting easier.

Pict. 27

B

A

C

D

D

B

C

A

B

A

C

D

Summary of Contents for MAXISTAB

Page 1: ...INSTRUCTIONS INSTALLATION INSTRUCTIONS INSTALLATION INSTRUCTIONS USE AND MAINTENANCE MANUAL USE AND MAINTENANCE MANUAL USE AND MAINTENANCE MANUAL USE AND MAINTENANCE MANUAL USE AND MAINTENANCE MANUAL...

Page 2: ......

Page 3: ...ylinders 18 12 2 Connection piping 18 12 3 Prescriptions for MAXISTAB hydraulic system 18 12 3 1 Double on line relief valve 19 12 4 Hydraulic scheme for manual extendable stabilizers c w one valve ba...

Page 4: ...2 2 Hydraulic stabilizer 33 18 2 3 Manually tilting hydraulic stabilizer 33 18 2 4 Automatically tilting hydraulic stabilizer 34 18 3 Regular checks 35 18 3 1 For all the models 35 18 3 2 Stabilizer m...

Page 5: ...on the base structures of MAXISTAB stabilizers shall have to be agreed with and approved by Next Hydraulics Technical Department Always reed carefully this manual and the Installation Instructions of...

Page 6: ...Directive s provisions concerning design building safety in functioning and use He must keep all of this recorded in the Technical Dossier he is compelled to draw up After making sure by proper tests...

Page 7: ...ents see Pict 1 1 Main beam 2 Extendable rod 3 Cylinder sleeve 4 Stabilizer cylinder 5 Foot plate 6 Rod extension cylinder 7 Lock valve 8 Lock assembly for rods 2 CYLINDERS FIXING SYSTEMS Fixing syste...

Page 8: ...30 39 info maxiliftcrane com 4 Fixing system by stop ring Series 4 see Pict 4 1 Stop ring stop round bar 2 Cylinder sleeve 3 Slit 4 Cylinder groove 5 Hooking hole 6 Security dowel Fixing system by spa...

Page 9: ...stallation as main stabilizer near to cranes aerial platforms or for other employments in order to guarantee the stability of the vehicle the installer has to calculate the stability of the system and...

Page 10: ...3 Maximum dynamic moment of the crane stated by its manufacturer daNm Filing up the two equations in pict 7 with the above data the maximum force allowed on the cylinder is drawn Compare such data wi...

Page 11: ...6 EXPHA 19000 41800 1 EHA 6150 13550 7 EXPHA 25000 55000 2 F 8250 18150 8 EXPHA 28000 61600 2 EMO 9000 19800 2 EHO 9000 19800 2 EMA 9000 19800 2 EHA 9000 19800 ATTENTION Please remember that the rate...

Page 12: ...ix adequately the counter frame and the stabilizer to the vehicle chassis by side plates and fixing screws see Pict 8 Under the vehicle chassis In this case the stabilizer is to be fixed to the chassi...

Page 13: ...standard or long stabilizer cylinders Only in exceptional cases you will have to choose the S versions with short cylinders From series ML 0 up to series 3 The stabilizers in K version from series ML...

Page 14: ...d moves the cylinders 200mm downwards in models EXHA EXPHA in comparison to the corresponding standard version For models 5 EHA 5 ELHA the AR option to be always originally ordered moves the stabilize...

Page 15: ...ew the lock nut 1 Pict 12 of the fall and slewing preventing system therefore it is necessary to pay attention to the accidental and uncontrolled descent of the cylinder itself which may cause limbs c...

Page 16: ...dangers 1 The non respect of tightening torques puts at risk stabilizer s safety Before tightening check that the screw and its threaded hole made in the collar are degreased and clean 2 Check that in...

Page 17: ...information required 8 ASSEMBLING AND DISASSEMBLING OUTRIGGER CYLINDERS SERIES 4 STANDARD OR P VERSION WITH SYSTEM BY STOP RING Assembly see Pict 16 17 STEPS 1 Take the new stop round bar 1 and bend i...

Page 18: ...icone from the A and B areas 3 Unscrew the dowel 2 in order to release the cylinder 4 Insert the lever 3 for the disassembly make the cylinder turn until the end of the stop round bar 1 comes in corre...

Page 19: ...e spacer 1 placed between the lower surface of the cylinder sleeve 2 and the beat made on the cylinder collar 3 In case of installation under the chassis P version the force is developed from the dire...

Page 20: ...is not completely flat It can be requested as optional also on series ML 0 1 11 3 Cylinders rod extensions Such optionals are used in case you realize that the fully extended stabilizer cylinders are...

Page 21: ...nal run of the hoses can be modified There are 3 available types of dual side controls kits A for stabilizers c w hydraulically extendable side by side rods B for stabilizers c w hydraulically extenda...

Page 22: ...d extensions cylinders for MAXISTAB models 1 EHO and 2 EHO We hereby recall some information and warnings 12 1 Lock valves on outrigger cylinders All stabilizers starting from series 2 inclusive onwar...

Page 23: ...pressure in these sides will be limited to a value factory pre set of 80 bar When required according to TABLE 2 this value may be raised to 150 bar by tightening the screws on the cartridges Whilst do...

Page 24: ...info maxiliftcrane com 20 12 4 Hydraulic scheme for manual extendable stabilizers c w one valve bank function and T connection between crane and additional stabilizers 1 Control valve bank 2 Lock val...

Page 25: ...iftcrane com 21 Pict 23 Alternative manually operated lock valve 5 3 2 2 5 2 1 3 2 4 Additional stabilizer Main crane stabilizer V max 150 bar 12 5 Hydraulic scheme for manual extendable stabilizers c...

Page 26: ...bank function and two 5 ways 4 pos diverters 1 Control valve bank 2 Crane stabilizer diverter 3 Crane stabilizer cylinder 4 Lock valve 5 Crane stabilizer extension cylinder Pict 24 6 Additional stabil...

Page 27: ...ons valve banks one for the crane and one for the additional stabilizers 1 Crane stabilizer cylinder 2 Lock valve 3 Crane stabilizer valve bank 4 Crane stabilizer extension cylinder 5 Additional stabi...

Page 28: ...24 12 8 Hydraulic scheme for manual extendable stabilizers c w two independent 2 functions valve banks 1 Crane stabilizer cylinder 2 Lock valve 3 Crane stabilizer valve bank 4 Additional stabilizer va...

Page 29: ...aly Tel 39 0522 96 30 08 Fax 39 0522 96 30 39 info maxiliftcrane com 25 13 HYDRAULIC CONNECTION OF THE ROD EXTENSION CYLINDERS FOR MODELS 1 EHO 2 EHO In picture 27 are shown the connection inlets for...

Page 30: ...MPONENTS Pict 29 Place the plate 1 on the centreline of the main beam on the vertical wall Then fix it with two small welds through holes 3 Following the contour of the plate 1 apply a silicone bead t...

Page 31: ...holding the decals and the safety warnings required Such decal kit must be applied to the stabilizer after its final painting as shown in pict 30 When delivering the stabilizer to the end customer al...

Page 32: ...n putting into service for the first time due to the sticking of the seals of rods valves cursors etc for long inactivity CAUTIONS TO OBSERVE As a simple and not exhaustive example we hereby report so...

Page 33: ...rom people and things 3 the stabilizers could be not symmetrically balanced as far as the distributions of their weights is concerned especially if you need to rotate them in order to overturn them Th...

Page 34: ...of a final paint as mentioned in the warning decal applied to each stabilizer In order to prevent future rust dripping from the slits of the demountable parts connections for instance cylinder sleeve...

Page 35: ...e turn again the manual lock 1 of 180 degrees in this way its spring operated pin will engage and lock the lateral extension when fully extended in working position marked by a vertical yellow stripe...

Page 36: ...he crane and the vehicle itself to the stabilizers only When tilting stabilizers are supplied check that these are in vertical position and that their safety pins are in their housing and well secured...

Page 37: ...le acting lock valves 18 2 3 Manually tilting hydraulic stabilizer In case of tilting stabilizer legs before operating the lock valve make sure that the cylinders are in vertical position with foot pl...

Page 38: ...in this position by proper means Place the extracted profile beside the external one with the fulcrum eyelet in correspondence of relevant fork and paying attention that both of them are lined up to t...

Page 39: ...ers did not move upwards or that with cylinders in transport position there is no clearance between the locking collar and the sleeve in case one of the above situations occurs have screw tightening c...

Page 40: ......

Page 41: ...Via MEDITERRANEO 6 42022 BORETTO REGGIO Emilia Italy Tel 0522 96 30 08 Fax 0522 96 30 39 info maxiliftcrane com MD 0 157 GB...

Reviews: