background image

42

6.5 

Stopping the Motor

To stop the motor, follow the steps below:
1.  Move the accelerator lever on the speed controller to the neutral 

position.

2. 

Press the On/Off button on the speed controller.

3.  Remove the emergency kill switch.

6.6 

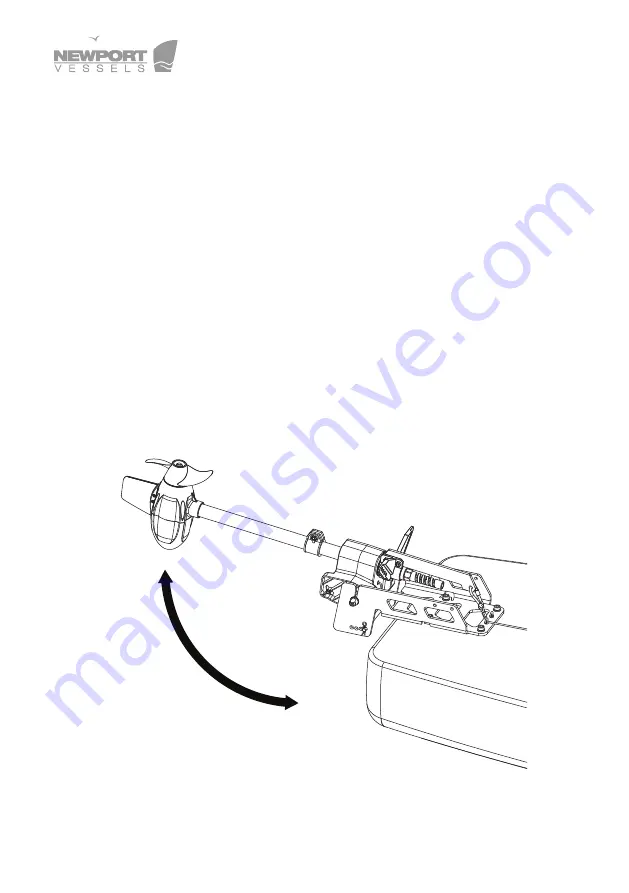
Tilting the Motor

When needed, the motor can be tilted up to stow away or to avoid 

underwater obstacles. To do this, pull the cord on the swing arm 

shown in the figure below until the motor pulls out of the water and 

secure the cord in the forward position, keeping the motor out of 

water. Make sure you secure the cord so that the motor will not drop 

down when you let go.

Summary of Contents for NK-180S

Page 1: ...Kayak Motor NK 180S User s Manual Please read and retain this manual before using product ...

Page 2: ...Critical Safety Information 11 3 2 Before Use 13 3 3 During Use 13 3 4 After Use 14 4 Installation 14 4 1 Installation of the Bracket 14 4 1 1 Installation Using Existing Threaded Inserts 14 4 1 2 Installation With Drilling Holes Using a Template 15 4 1 3 Installation With an Adapting Plate 16 4 2 Installation of the Motor Propeller 17 4 3 Setting up Your Steering 18 4 3 1 Setup With Control Cords...

Page 3: ...etup 27 4 5 Using External Steering System 28 4 6 Adjust the Motor Trim Angle 29 4 7 Connect to the Speed Controller 30 4 8 Connect to the Battery 30 5 Controller Display 31 5 1 Overview of Multi Function Display 31 5 2 Battery Display 32 5 2 1 Estimated Percent of Remaining Battery Power 32 5 2 2 Switching Between Battery Types 33 5 3 Error Status Display 34 5 4 Error Codes and Solutions 35 6 Ope...

Page 4: ...g the Trip 43 6 8 Stow and Park the Motor 43 6 9 Remove the Motor From the Kayak 44 7 Care and Service 45 7 1 Care of Motor Components 45 7 2 Corrosion Protection 45 7 3 Care of Battery Usage 45 7 4 Replacing the Fin 46 8 Customer Support 47 ...

Page 5: ...tionally it is significantly lighter than a conventional trolling motor making it the perfect upgrade for your kayak The Kayak Motor NK 180S is also compatible with conventional 24V deep cycle batteries 24V LFP lithium battery and 25 9V lithium cobalt oxide batteries The battery type can be changed at the press of a button 1 1 Product Identification Check the figure below to find the serial number...

Page 6: ... in Your Box Here is what should be included in your Kayak Motor NK 180S Please contact us directly if something is missing from this list of contents Items Qty Figure Motor Unit 1 pc Controller 1 pc Motor Mount 1 pc ...

Page 7: ...iangle 1 pc Clamp Ring 1 pc Cable Handle 2 pcs Emergency Stop Key 2 pcs Swing Arm 1 pc S Biner 2 pcs Stainless Biner 2 pcs Battery Extention Cable 1 set Nylon Cable 1 set Steering Cable 1 set Installation Kit 1 set User Manual 1 pc ...

Page 8: ... cord for lifting the motor S Biner and cord for reverse lock Handle Battery and control box connection Swing arm Steering triangle Motor supporting drum Clamping ring Motor shaft Propeller Fin Motor Aluminum bracket Quick release axle with handle Trim mechanism ...

Page 9: ...9 1 3 2 Speed Controller Accelerator lever Battery type selection button Power button Screen display Emergency stop key ...

Page 10: ...eep cycle marine battery 24V LFP Lithium battery 25 9V Lithium cobalt oxide battery Max Overall Efficiency 48 Max Propeller Rotational Speed 1800 rpm Package Dimension L W H 31 5 x 15 4 x 6 3 in 80 x 39 x 16 cm Total Weight 14 3 lbs 6 5kg Shaft Length 19 7 in 50 cm Steering Cable steering Control Method Digital control with accelerator lever Stow Method Cable lift Trim Angle 0 9 18 27 Propeller Di...

Page 11: ... the electronic components the speed controller touch the water There is a risk of explosion which could result in death serious injury or property damage due to the production of oxyhydrogen gas from the battery If the battery becomes submerged in water deeper than one meter for a short period of time do not attempt to recover the battery and refer to the safety instructions provided by the batte...

Page 12: ...d water conditions before a trip on the water and also familiarize yourself with a map of the area you ll be traversing Depending on the size of your boat make sure you bring any proper safety equipment Paddle s and a communication device are a must for any size of boat and if appropriate also bring an anchor and extra drive Always check your motor and system for any damage and ensure they are run...

Page 13: ...l battery charge Do not operate the motor outside of the water Do not modify the motor with non original parts 3 3 During Use Stop the motor immediately if someone is over board Propellers are dangerous use extra caution when operating the motor near areas where people may swim Always be alert and aware of your surroundings when operating the motor Do not exceed the recommended loading and power l...

Page 14: ...e next several pages will give you detailed instruction on how to install your motor one piece at a time Please read all instructions carefully and refer to the diagrams 4 1 Installation of the Bracket First remove the motor supporting drum from the bracket by opening the quick release lever and slightly loosening the bolt on the quick release axle 4 1 1 Installation Using Existing Threaded Insert...

Page 15: ... location on your boat to drill holes The typical suggested location is the end of the boat kayak 2 Drill holes 0 31in 8 mm in diameter 3 Place the bracket above the drilled holes align the holes on the bracket with the drilled holes 4 Place four M8 screws with washers over the holes and four washers with four nuts beneath the holes and tighten the screws to secure the bracket Make sure the screws...

Page 16: ...d easy to find and low cost 4 1 3 Installation With an Adapting Plate 1 Place the bracket above the adapting plate and align the holes on the adapting plate with the holes on the bracket 2 Place four M8 screws and four washers over the holes four washers and four nuts beneath the holes and tighten the screws to secure the bracket Make sure the screws are tight and the bracket is secure 3 Install t...

Page 17: ...n is seated correctly in the corresponding channel on the backside of the propeller 4 Place the washer on the motor shaft after the propeller 5 Place the M8 hex nut on the shaft and hand tighten it Once hand tight hold the propeller still and use a wrench to tighten the nut until snug then rotate the wrench 1 8th turn further 6 If you ve followed these steps it s not going anywhere Drive pin Prope...

Page 18: ...shaft Cables routed below deck will usually be routed through the back of the boat which requires you to mount the steering triangle below the motor supporting drum This mount is designed to work with either high or low routing setups on kayaks equipped with integrated cable routing For kayaks with cable routing requiring you to use the high position see section Setup with Control Cords at the Top...

Page 19: ... control cords setup 1 Assemble the swing arm and steering triangle as shown above then insert the screw washer and nut as shown and attach loosely don t tighten yet 2 Place the screw washer and nut on the clamping ring as figure shows connect them loosely and don t tighten yet M6 screw Washer M6 nut Clamping ring M6 screw Washer M6 nut Steering triangle Swing arm ...

Page 20: ...triangle is aligned with the direction of the motor If the triangle is an arrow it should point towards the front of the boat while the propeller should face back 7 Tighten the screws on the clamping ring and the steering triangle In this setup the steering triangle determines the depth of the motor Make sure the propeller can be at least 2 inches 5 cm below the water surface Motor supporting drum...

Page 21: ... cords setup 1 Assemble the swing arm and clamping ring as the figure shows then insert the screw washer and nut as shown Connect them loosely but don t tighten yet 2 Place the screw washer and nut on the steering triangle as the figure shows and connect them loosely but don t tighten yet M6 screw Washer M6 nut Steering triangle M6 screw Washer M6 nut Clamping ring Swing arm ...

Page 22: ...ds the front of the boat while the propeller should face back 7 Tighten the screws on the clamping ring and the steering triangle In this setup the clamping ring determines the depth of the motor so make sure the propeller can be at least 2 inches 5 cm below the water surface NOTE Before stowing the motor loosen the steering cord to give some extra length in the cord otherwise the cord S biner wil...

Page 23: ...ng drum into the bracket 3 Adjust the knob on the quick release axle so that the lever can be opened or closed with firm hand pressure This allows the motor apparatus to be installed and removed easily for travel 4 Close the handle on the quick release axle to secure the motor supporting drum on the bracket and make sure the drum is well secured Quick release axle ...

Page 24: ...he clamping ring or the steering triangle whichever you have on the top of the shaft NOTE Be aware the screw on the steering triangle or the clamping ring must be tightened well otherwise the motor may fall into the water 4 3 5 Connecting the Cords 4 3 5 1 Cables to Control the Direction 1 Secure the cable on one side of the stainless steel biner 2 Attach the stainless steel biner to the steering ...

Page 25: ... outermost holes 4 3 5 2 Cable to Perform Reverse Lock The reverse lock secures the motor when it is being used in reverse It needs to be activated when motor is used in reverse to keep the motor from rotating up and out of water 1 Tie the cable securely to one side of the S biner 2 Attach the S biner to the reverse lock cord as shown 3 Thread the cord through the cable guide on the bracket as sho...

Page 26: ...ayak steering accessories for more products 4 3 5 3 Cable to Lift the Motor 1 Tie the cable securely to one side of the S biner 2 Attach the S biner to the swing arm as shown 3 Thread the cord through the cable guide on the bracket this is necessary to ensure proper function of raise deploy function 4 Install the handle on the other end of the cable Cord to lift the motor Cable guide ...

Page 27: ...27 4 4 Complete the Cord Setup This is the overall setup of the motor after all control cables have been installed Reverse lock cord Cords to control the direction Motor lift cord ...

Page 28: ...as a paddle you can fix the motor direction with the following steps 1 Remove the cords on the steering triangle 2 Insert the fixing pin into the hole as shown 3 Find the premade hole for fixing pin align the hole with the fixing pin and push the fixing pin into the hole Make sure pin is fully inserted 4 Now the direction of the motor is fixed Fixing pin ...

Page 29: ... Remove the R shaped cotter pin from the trim rod and pull the trim rod out from the current trim position of the bracket 3 Adjust the motor to the desired angle 4 Reinsert the trim rod through one of the four positions on the bracket and insert the R shaped cotter pin to secure the trim rod NOTE Be careful of finger pinching You can use a flat head screw driver or needle nose pliers to help remov...

Page 30: ...tery package Please follow the steps below to complete the battery connection 1 Find the battery cables from the motor there should be a red and a black cable 2 Connect the red cable to the positive battery terminal and the black cable to the negative battery terminal 3 Make sure the battery cables are connected to the correct terminal The motor will not operate if battery cables are installed inc...

Page 31: ...reen features motor and battery information for the operator to monitor There are two buttons on the speed controller to control the motor Power input display Battery type selection button Power button Battery type display Battery percentage display Battery voltage display Throttle percentage display Batteries contain sulfuric acid which can cause severe burns Avoid contact with skin eyes and clot...

Page 32: ...he battery Battery percentage display 100 40 20 20 80 60 Do not overestimate the remaining battery range this could result in severe harm or even death Before you leave the dock know the area you are traveling how far you plan to go and make sure to have an alternate plan for safely getting back if anything goes wrong with your motor or battery Always bring a paddle Monitor the battery level indic...

Page 33: ...e battery You will need to select which type of battery you are using with your motor for accurate results on the LCD screen When the battery is connected to the motor press the MODE button to toggle between the Li Lithium Cobalt Oxide Battery or D Deep Cycle Battery or LFP Lithium Battery battery options Battery type display Battery type selection button ...

Page 34: ...nd keep flashing Please make sure the input voltage to the motor is correct 24V or 25 9V Ensure the correct battery option is selected D or Li Motor overheated If the motor driver PCB is over heated this icon will light up Motor stalled If the motor is stalled this icon will light up Please disconnect from the battery and check to see if the propeller has been tangled in weeds or fishing line thes...

Page 35: ...e motor and wait until the error code disappears then restart the motor If the error code still shows up contact customer support about repairs E 2 Drive PCB overheated for more than 5 mins Stop the motor and wait until the error code disappears then restart the motor If the error code still shows up contact customer support about repairs If the motor is not operating under normal condition the er...

Page 36: ...likely tangled by fishing lines weeds or other obstructions Disconnect from power check the propeller and remove obstructions E 6 Motor is stalled The motor is completely blocked by the obstructions Disconnect from power check the propeller and remove obstructions E 7 Controller is undervoltage This indicates the battery voltage is low Recharge the battery E 8 Controller is overvoltage The voltage...

Page 37: ...he motor please follow the steps below Magnetic emergency stop key Speed control handle When the battery is connected the screen will light up automatically If emergency stop key is removed the screen will have this display and continuously flash ...

Page 38: ...ton on the panel The screen should look like the display on the right 3 You can now begin to power your motor See the next page for forward and reverse controls When power button is off this throttle percentage display will be unavailable When power button is on this throttle percentage display will show current throttle percentage ...

Page 39: ... how to operate When switching to reverse please pull the reverse lock cable to lock the motor and prevent it from tilting up and out of the water If the motor tilts up briefly engage the forward throttle while pulling the reverse lock once the lock is engaged return throttle to reverse If the reverse lock is hard to achieve adjust your setup and try again Neutral Forward Reverse ...

Page 40: ...ing cords to control the kayak boat s direction To make the kayak boat turn left pull the left cord on the steering triangle To make the kayak boat turn right pull the right cord on the steering triangle Pull the left cable to turn left Pull the right cable to turn right ...

Page 41: ...e motor Move the accelerator lever on the speed controller to neutral to stop the motor If you want to restart the motor after the emergency kill switch is pulled off move the accelerator lever to the neutral position return the kill switch and power on Remove the magnetic emergency stop key Move the handle to the neutral position ...

Page 42: ...ove the emergency kill switch 6 6 Tilting the Motor When needed the motor can be tilted up to stow away or to avoid underwater obstacles To do this pull the cord on the swing arm shown in the figure below until the motor pulls out of the water and secure the cord in the forward position keeping the motor out of water Make sure you secure the cord so that the motor will not drop down when you let g...

Page 43: ... motor with fresh water This will help prevent corrosion and salt buildup Only wash the motor do not get the speed controller wet 6 8 Stow and Park the Motor When the motor needs to be stowed and parked tilt the motor up and use string or bungee cord to bind the motor on the bracket Please use the figure below for reference Premade holes for tightening motor in the stowed parked position ...

Page 44: ... the mount installed Follow the steps below 1 Move the accelerator lever to the neutral position and turn off the motor 2 Disconnect the motor from the speed controller and battery 3 Detach all the control cords from the motor 4 Release the lever on the quick release axle on the motor support drum and lift the motor from the bracket ...

Page 45: ...tain harmful propellants that can cause damage to various parts of your electric motor 7 2 Corrosion Protection After the motor is used in the saltwater flush the motor thoroughly with fresh water However do not get the speed controller wet Before storing the motor make sure the motor is completely dry and clean Keep cable connectors and plugs in good condition Use a wire brush to remove corrosion...

Page 46: ...eplace the fin component when it is damaged To do this follow the steps below 1 Release the two M3 screws and nuts 2 Remove the old fin component 3 Insert the new fin component 4 Insert two M3 screws and tighten them Fin M3 screw M3 nut ...

Page 47: ...this manual or your troubleshooting is not successful please contact Newport Vessels Our California based customer service team is standing by to assist you Customer Support Phone 866 721 0002 E mail support newportvessels com Hours 8 30am 4 30pm Pacific Time west coast ...

Reviews: