background image


11 

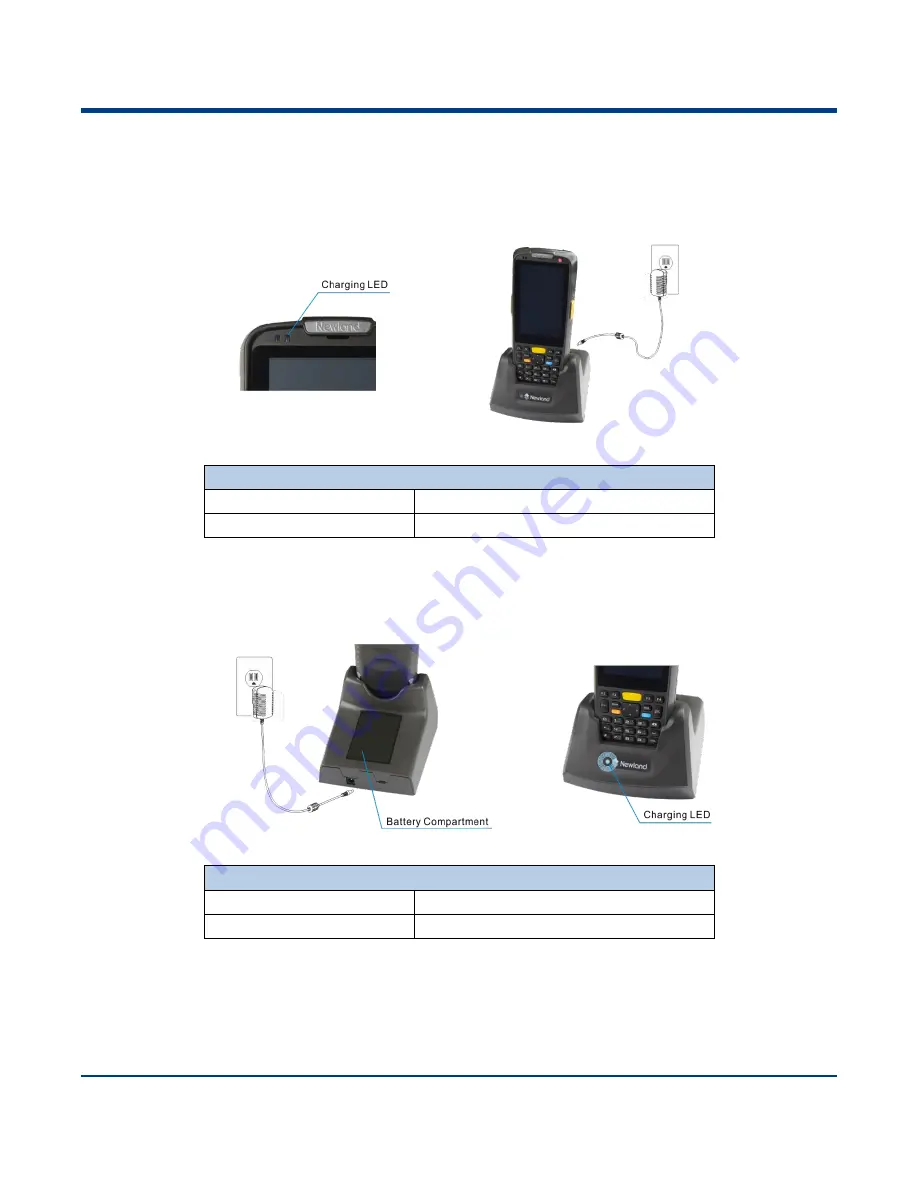
  Charge the battery with cradle


Method 1: Insert the PT60 into the charging slot on the cradle. Connect the cradle to a power outlet using the included 

AC adapter.


Charging LED on the PT60 

Red LED on 

Charging in progress 

Green LED on 

Fully charged 


Method 2: Insert the battery into the battery compartment on the cradle. Connect the cradle to a power outlet using the 

included AC adapter.


Charging LED on the cradle 

Red LED on 

Charging in progress 

Green LED on 

Fully charged 


Summary of Contents for NLS-PT60

Page 1: ...NLS PT60 Mobile Computer User Guide...

Page 2: ...tion or design at any time without notice The information contained herein is subject to change without prior notice The products depicted in this manual may include software copyrighted by Fujian New...

Page 3: ...Revision History Version Description Date V1 0 0 Initial release September 8 2017...

Page 4: ...4 Keypad 6 LEDs on the PT60 7 Cradle 8 Installing the Battery 9 Removing the Battery 9 Charging the Battery 10 Power On Suspend and Wake Up 12 Calibrating the Screen 13 Checking Battery Status 14 Ins...

Page 5: ...apter 4 Bluetooth 38 Chapter 5 WiFi 40 Connecting to a WiFi Network 40 WiFi Tool 42 Viewing WiFi Connection Details 42 Viewing WiFi Connection Status 43 Setting WiFi Parameters 43 Diagonising WiFi Con...

Page 6: ...Stacking Heavy Objects 46 Mounting Location 47 Wireless Functionalities 47 Use Maintenance 47 Battery Safety Guidelines 47 Troubleshooting 48...

Page 7: ...Utility Software User Guide Describes how to use Newland s WinCE utility software Chapter Descriptions Chapter 1 About This Guide Provides general description of this manual Chapter 2 Getting Started...

Page 8: ...udes A System hardware software version build time and serial number B WiFi Bluetooth MAC C The type and version of scan engine D The version of utility software To view the device information of the...

Page 9: ...arge the battery and get the PT60 up and running Unpacking Carefully remove all protective materials from the pack Verify that you received the following 1 x PT60 mobile computer 1 x USB cable 1 x AC...

Page 10: ...4 Getting Started The PT60 1 Left Scan Key 2 Cradle Connector 3 Keypad 4 Right Scan Key 5 Micro USB Port 6 Touch Screen 7 Power Key 8 Charging LED 9 Scan Decode Communication LED...

Page 11: ...5 10 Hand Strap 11 Stylus 12 Scan Window 13 Speaker 14 Stylus Tether 15 Battery Cover Latch...

Page 12: ...betic keypad is enabled Press it once The uppercase mode becomes enabled until any key on the keypad is pressed Press it twice quickly Caps Lock is turned ON Numbers Letters Switch Press it to switch...

Page 13: ...flashes once Good read if Good Read LED enabled Blue LED flashes constantly Bluetooth WiFi turned on Charging LED Red LED on Charging in progress Green LED on Fully charged Red LED flashes constantly...

Page 14: ...8 Cradle 1 Charging Slot 2 Charging LED 3 Battery Compartment 4 Power Jack 5 Micro USB Port...

Page 15: ...battery compartment with its metal contacts facing down and lining up with the metal contacts on the inside of the terminal Removing the Battery Step 1 Press and hold the Power key for 3 second to en...

Page 16: ...pty Charge the battery with AC adapter Connect the PT60 to a power outlet using the included AC adapter It takes 5 hours to fully charge the terminal The terminal is shut down or in sleep mode Chargin...

Page 17: ...ing the included AC adapter Charging LED on the PT60 Red LED on Charging in progress Green LED on Fully charged Method 2 Insert the battery into the battery compartment on the cradle Connect the cradl...

Page 18: ...g down the Power key for 3 seconds will suspend the terminal If no operation is performed on the terminal for some time it will go into the suspend mode when auto suspend is already enabled To set the...

Page 19: ...Recalibrate button Then the Calibration screen will be displayed Read the on screen instructions and carefully press and hold the tip of stylus on the center of each target that appears on the screen...

Page 20: ...ser operates on the keypad or taps the touch screen the system is in the running state After a preset period of inactivity the system enters the user idle state After being in the user idle state for...

Page 21: ...attery Slide the slot cover up and lift it Step 2 Insert the Micro SD card into the holder with its metal contacts facing down Step 3 Close the slot cover and slide it down until it clicks Note that t...

Page 22: ...a communication between the terminal and the PC Communicating with PC via Cradle Step 1 Connect the cradle to a power outlet using the included AC adapter and DC charging cable Step 2 Connect the crad...

Page 23: ...17 Adjusting the Hand Strap A hand strap can be attached to the terminal Adjust the hand strap to increase comfort when holding the terminal for extended periods of time...

Page 24: ...18 Chapter 3 Using the PT60 Introduction This chapter provides the basics of setting and using the PT60 Desktop Icons...

Page 25: ...oggle between numeric and alphabetic lowercase keypad Uppercase input Press the Shift key to toggle between uppercase and lowercase Caps Lock When alphabetic keypad is enabled double press the Shift k...

Page 26: ...connection to PC Memory storage management and configuration Use it with discretion Power properties battery schemes and device status settings Passwords power on password and screen saver password s...

Page 27: ...ngs Network and dial up connections configuration View system information including general information memory device name and copyrights Change your desktop background wallpaper View the certificates...

Page 28: ...setting tool System volume sounds control Turn WiFi Bluetooth on or off Barcode scanner configuration tool Redefine keyboard keys Configure the virtual keys Screen resolution 240 320 or 320 320 requir...

Page 29: ...ffective only when alphabetic keypad is enabled Press it once The uppercase mode becomes enabled until any key on the keypad is pressed Press it twice quickly Caps Lock is turned ON Numbers Letters Sw...

Page 30: ...comes unlocked after another keypress is made The Numbers Letters Switch and Fn key are independent from each other so they do not override each other The Shift key works only when the alphabetic keyp...

Page 31: ...n item with the stylus to view a list of actions available for that item Drag Hold the stylus on the screen and drag across the screen to select text Drag multiple items in a list to select them CAUTI...

Page 32: ...ule Power Control The program is designed for users to quickly turn Bluetooth WiFi module on or off Tap Start Settings Control Panel double tap to open the program Then turn Bluetooth WiFi on or off a...

Page 33: ...users to dim the screen to save power if no operation is performed on the screen and keyboard for a preset period of time switch timer There are 7 levels 0 6 of screen brightness for this mode Brightn...

Page 34: ...any change to it The program is a tool for managing the memory To open it tap Start Settings Control Panel double tap Format Format the selected memory the data in memory will be destroyed after memor...

Page 35: ...et the terminal will restore factory default settings and user data that is not in MicroSD card or flash disk will be lost You can use the backup restore tool to restore backup data Note Make sure tha...

Page 36: ...played Barcode Setting Screen Normal Settings Output Mode The PT60 provides three output modes Output via API Application uses the API to get the barcode data Output via keyboard Output the barcode da...

Page 37: ...tinuous mode Scan barcodes continuously until the scan mode is changed API mode Start stop scanning barcode by API software Timeout and Interval Timeout sets the maximum time decode session continues...

Page 38: ...it check Extraction enable For example if you want to output only DE in raw data ABCDE enter 3 in the Start field and 4 in the End field String Replace This feature allows you to replace characters i...

Page 39: ...e PT60 equipped with 2D barcode scanner When multiple barcodes are placed closely together you may specify the decoding area to narrow the scanner s field of view to make sure it reads only those barc...

Page 40: ...her barcode parameters as per your actual needs Supported symbologies may vary by product model Test You can use this feature to test your terminal s barcode scanning feature Tap the Test tab on the B...

Page 41: ...nning 1D Barcode Adjust the scan angle or the distance between the PT60 and the target barcode to ensure the length of laser beam is roughly 8mm greater than that of the barcode as shown below Correct...

Page 42: ...e PT60 and the target barcode to make them fall into the following ranges 1 Point the PT60 s focus lamp at the center of the barcode 2 Move the PT60 until you find the appropriate scan distance 3 Opti...

Page 43: ...cle Bin Turn it on default or off to show or hide its icon on the desktop Menu XX Turn it on default or off to show or hide XX in the Start menu Sys Shortcuts Tool When it is On default long pressing...

Page 44: ...e tap on the desktop or tap Start Settings Control Panel double tap to open the Peripheral Switch program On the PeripheralSwitch window turn Bluetooth on 2 Tap in the status bar and then select BT Ma...

Page 45: ...39...

Page 46: ...how to set WiFi parameters and how to diagnose WiFi connection problems Connecting to a WiFi Network 1 Double tap on the desktop or tap Start Settings Control Panel double tap to open the Peripheral S...

Page 47: ...hen the Wireless Information tab Select a network and tap Connect 4 Manually enter the wireless settings for the network you want to connect to Network name Encryption Authentication and Network key T...

Page 48: ...press or double press the TOOL key on the PT60 to open the Keyboard Shortcuts menu locate and then double tap Viewing WiFi Connection Details You can check network connection information such as IP a...

Page 49: ...ection SSID AP MAC address connection channel and signal strength here Setting WiFi Parameters You can turn WiFi on off set the power mode and WiFi protocol and manage roaming settings here You can al...

Page 50: ...44 Diagonising WiFi Connection Problems You can test network connectivity with ping and export diagnosis log here...

Page 51: ...rsion 4 5 or later is required when you want to synchronize data between the terminal and PC Installing ActiveSync on PC Download ActiveSync version 4 5 or later from the Microsoft website at http www...

Page 52: ...e or heat sources If there is unusual odor overheating or smoke during charging immediately cut off the power and disconnect the AC adapter and contact your dealer or Newland customer service center C...

Page 53: ...t tap the touch screen with sharp objects Doing so may damage the screen or cause internal short circuits Use only a dry soft cloth to clean the terminal Cleaning it with wet cloth or benzene thinner...

Page 54: ...s please contact the after sales service center LCD Screen No display 1 Ensure the terminal is switched on 2 If the terminal is in sleep mode press the Power key to wake it up 3 Check the battery leve...

Page 55: ...emont Blvd Fremont CA 94538 USA Tel 510 490 3888 Fax 510 490 3887 Email info newlandna com Web www newlandamerica com Newland Latin America Tel 1 239 598 0068 Fax 1 239 280 1238 Email info newlandla c...

Reviews: