Neural DSP Quad Cortex User Manual Download Page 80

80

Neural Capture

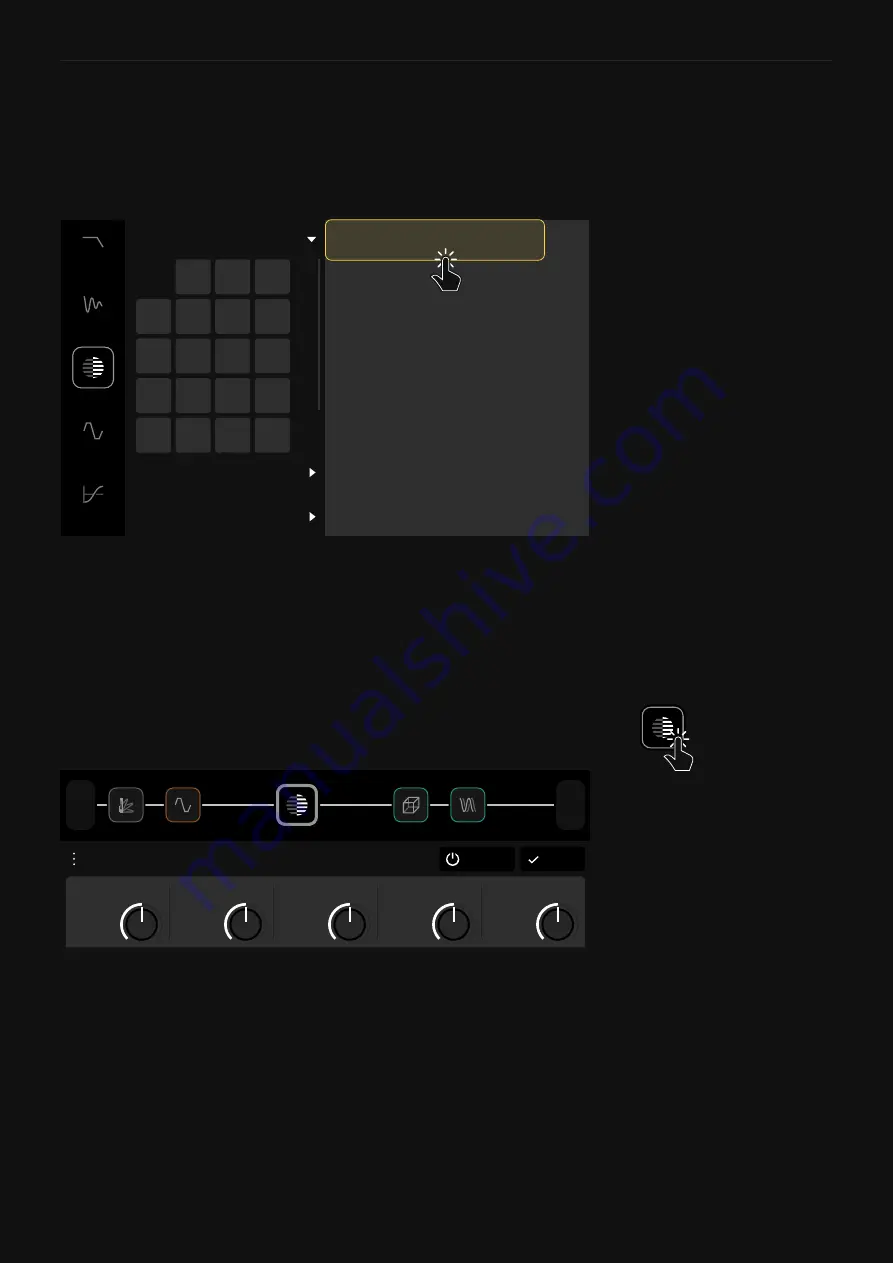
Captures can be used by loading a 

Neural Capture

 block on The 

Grid. Tap an empty space on The Grid and select “

Neural Capture

” 

in the Device Category list.

This will open the Virtual Device Library, where you can navigate 

through the different Neural Capture folders, “

My Captures

”, 

Factory Captures 1

”, and “

Factory Captures 2

”. Each folder has 

32 banks of 8 Capture slots. Tap a Neural Capture in a bank to add 

it to The Grid.

FACTORY CAPTURES 1

FACTORY CAPTURES 2

MY CAPTURES

2

1

3

4

5

6

7

8

9

10

11

12

13

14

15

16

17

18

19

20

1 LX65 57 Axis

2 LX65 57 Clean

3 FN 2187

8 HW 4X12

4 OD MAX Settings

5 2203 On Axis

6 Unknown Amp 01

7 Brit 57 Corner

After selecting a Neural Capture, it will be placed as a device block 

on The Grid. Tap on it to access its parameters.

Done

Bypass

Neural Capture

LX65 57 Axis

0.71

MID  

0.71

BASS  

0.71

TREBLE  

0.71

VOLUME  

0.71

GAIN  

1/2

Out

1

In

•  GAIN 

[dB]: Determines the gain in the preamp section of the 

model.

•  BASS 

[dB]: Affects the low-end of the signal.

•  MID 

[dB]: Affects the mid-range of the signal.

•  TREBLE 

[dB]: Affects the high-end of the signal.

•  VOLUME

 [dB]: Determines the output level of the model.

Using a Neural Capture

Summary of Contents for Quad Cortex

Page 1: ...Quad Cortex User Manual 1 4 CorOS version 1 4 0...

Page 2: ...r FRFR to Front of House 58 Combo Amplifier 60 Power Amp Cab FRFR Direct 61 Four Cable Method 4cm 62 Seven Cable Method 7cm 64 As FX Loop Only 66 As FX Processor pre only 67 Using external gear FX loo...

Page 3: ...sources than we could have ever imagined It forced us to level up at a dizzying pace and to overcome countless challenges Quad Cortex was as much engineered as it was willed into existence And none of...

Page 4: ...e order or routing in seconds or visualizing and controlling the settings of inputs and outputs with one swipe Quad Cortex comes in a gorgeous anodized aluminum unibody with laser engraved graphics th...

Page 5: ...5 Overview Overview 02 Quad Cortex weighs 1 95kg 4 2lbs and its dimensions are 29 x 19 x 4 9cm...

Page 6: ...Button 7 display Volume Wheel 11 stainless steel stomp rotary actuators Chassis made of anodized aluminum 1 2 3 4 5 Rear View Dimensions 29 x 4 9cm 11 4 x 1 9 Dual Combo Inputs TS TRS and XLR Dual FX...

Page 7: ...7 Setting up your Quad Cortex Setting up your Quad Cortex 03...

Page 8: ...nstrument to Input 1 Connect your studio monitors PA or FRFR cabinet to either XLR Outs 1 2 or TRS Outs 3 4 Alternatively if you want to use headphones connect them to the Headphones output Quick Star...

Page 9: ...et is saved Preset Tempo The tempo is saved when the Preset is saved Each Preset can have its own tempo LED Light switch Tap to activate deactivate the the Tempo LED light Double press the bottom righ...

Page 10: ...ds Gestures and Commands PRESET A Unsaved A 1 Out Multi 1 In Check the Power Functions section for more information To turn Quad Cortex off press the capacitive power button and select You can also re...

Page 11: ...The Grid section Double tap a block to bypass activate it x2 Tap on a parameter value to fine control Write a value with the numeric keyboard and tap to change it This also works in the I O Settings...

Page 12: ...edit and assign them to physical or virtual I Os 1 2 Out 1 2 Out 1 In These controls can be assigned to Scenes and Expression Pedals Color strips display on the Output block when MUTE and or SOLO are...

Page 13: ...own If you want to turn Quad Cortex on again press the power button REBOOT Quad Cortex will reboot Note that any unsaved changes will be lost if you change the power state STANDBY All audio outputs wi...

Page 14: ...rtex Any unsaved changes will be lost Restart Wi Fi settings Erases all stored Wi Fi networks Factory Reset Use this feature to erase everything on Quad Cortex and reset to factory settings MIDI setti...

Page 15: ...your account Creating a new account Don t have an account Register here LOGIN Swipe down from the top of The Grid to access the I O Settings screen Here you can visualize and control the settings of...

Page 16: ...ough TRS cables RET LEVEL KNOB dB Sets the input gain GROUND LIFT SWITCH Enable to help reduce or eliminate noise caused by ground loops in audio cables or other sources RET LEVEL Input signal meter E...

Page 17: ...u to connect Quad Cortex to stereo headphones All outputs that are being used on The Grid will display here allowing you to customize your headphone mix HP LEVEL KNOB Sets the output level OUT KNOBS S...

Page 18: ...Cortex it is important to understand the following The number of device blocks in a Preset has a great impact on CPU usage Rows 1 2 and Rows 3 4 on The Grid utilise different processor cores If all of...

Page 19: ...s allow you to create and save custom rigs signal chains for later use by using device blocks Quad Cortex Presets are organized in to Setlists which can contain 32 banks of 8 Presets 256 in total You...

Page 20: ...creen can be controlled by using gestures rotary actuators or dedicated commands You can start building your own rigs by tapping on The Grid to add your first block this will open the Device Category...

Page 21: ...nu Build a virtual rig from left to right While it s important to remember how you might approach building a signal chain with analog components dragging and dropping a block after you ve added it to...

Page 22: ...turns the device controls to their default values Set parameters as default Sets current control values as default Assign Expression Pedal Allows you to choose which parameters can be controlled by an...

Page 23: ...e Preset name on The Grid to open the Directory PRESET A D 3 Beast Lead 1 2 Out 1 In Done Directory New Setlist Search 1 2 3 4 5 6 7 8 9 10 11 12 13 14 15 16 17 18 19 20 21 22 23 24 25 26 27 28 BANK R...

Page 24: ...Neural Captures Shared with me Files stored on the Quad Cortex Device Directories Factory Library Presets made by Neural DSP 0 My Presets Default user Presets Setlist Presets downloaded from Cortex Cl...

Page 25: ...our modifications Factory Presets can also be modified and stored as new Presets in any of your Setlists by using the Save as feature Saving Presets Unsaved A 1 PRESET B In the save menu you can name...

Page 26: ...o change the active Setlist open the Directory navigate to the Setlist you d like to activate then load a Preset in it by tapping one of the banks then one of the Presets on the right To delete a Setl...

Page 27: ...Fuzz 6F Animals as Presidents BANK New Setlist Search 6C Best Machine Riff Delete Tap it to delete the Preset Edit Modify the Preset s name and tags Cut This action will cut the Preset and send it to...

Page 28: ...ameters Done Assign Expression Pedal 100 MAX RANGE 0 MIN RANGE 0 71 DRIVE ASSIGN MID FREQ ASSIGNED MIDDLE ASSIGN BASS ASSIGNED DRIVE ASSIGN GAIN ASSIGN MASTER ASSIGN BYPASS ASSIGN TREBLE Please choose...

Page 29: ...ED BYPASS BYPASS ON INVERT RANGE BYPASS DELAY Heel Toe Heel down the expression pedal to bypass the device block When INVERT RANGE is set to On the block can be bypassed at Toe position Switch Pressin...

Page 30: ...on The Grid tap the contextual menu then select Assign Expression Pedal Choose the Expression input 1 If the TRS connected to it corresponds to the heel toe sweep assign it to the parameter you want...

Page 31: ...ve Minimum value knob Polarity Reverse function What expression pedals are supported The EXP inputs assigned to a device block can be remembered by using the Set parameters as defaults option after as...

Page 32: ...ically Detailed parameters are available for Splitters and Mixers that allow for switching between types shortcut buttons for quick splits and an on off toggle 1 2 Out 1 In 1 In The Splitter sets the...

Page 33: ...o the Rows BALANCE KNOB Sets the signal mix between the Row and the Splitter Mixer path 0 50 by default We have designed two shortcuts for the most common path types Tap one to add it to The Grid Quic...

Page 34: ...lowing example LEVEL A KNOB Sets the row signal level PAN A KNOB Controls the panning of the row LEVEL B KNOB Sets the Splitter Mixer level PAN B KNOB Controls the panning of the Splitter Mixer path P...

Page 35: ...the signal is distributed to both rows equally The Mixer joins Row 1 before the EQ This Mixer receives input signal from both rows in order to use the Outputs 1 2 The Splitter is placed immediately af...

Page 36: ...cks Balance or A B Splitters work with similar results Muting LEVEL TO A or turning Balance all the way up will route the signal through the next row In order to chain Rows 2 and 3 tap the output bloc...

Page 37: ...to open its parameters Tap on the Impulse selector box to open the drop down menu Scroll down and tap Load IR Here you can find all the IR files you have in the Impulse Responses folder Impulse Respo...

Page 38: ...rtex footswitches already You can always use the touchscreen DUPLICATE Creates an overdub that is X times longer than your original loop allowing you to extend your original loop when recording an ove...

Page 39: ...arams Mode Use Params mode to access the Looper X settings The controls are organized in three pages and linked to the Quad Cortex upper encoders You can always use the touchscreen PLAYBACK LEVEL KNOB...

Page 40: ...wn DUPLICATE MODE SWITCH Determines whether the DUPLICATE function is synced or not to the current Tempo When synced the length of the loops will be fixed to the beat PUNCH MODE SWITCH Sets the PUNCH...

Page 41: ...cted by any Row assigned to these input blocks Ret1 2 Virtually places the looper in the Returns 1 2 The Looper X will receive input signal from both Returns 1 2 and its output will be affected by any...

Page 42: ...r is a dedicated device block Tap an empty space on The Grid select the Looper section then you will find the Looper X How do I find the Looper X You can record up to 4 minutes and 44 seconds How much...

Page 43: ...nteractive with all other amp parameters The lower the Master is set the less effect the other controls will have PRESENCE Boosts the upper midrange and treble frequencies DEPTH Boosts the lower midra...

Page 44: ...o the edge of the cone automatically disabled when using external IR files DISTANCE Controls the distance of the mic between close to the cab and far towards the room automatically disabled when using...

Page 45: ...AND TYPES Tap them to highlight the band circles accordingly Tap and hold on a band to change the type Peak Hi Pass Lo Pass Hi Shelf and Lo Shelf BAND CIRCLES Once a band is enabled you can drag it ar...

Page 46: ...ings providing faster rates DEPTH Sets the intensity of the modulation SYNC Allows you to sync effects to the current Quad Cortex Tempo The Sync Note value is constrained by the Tempo and the Speed pa...

Page 47: ...Cortex features three modes to give ultimate control over features and footswitch customization Stomp Mode Scene Mode and Preset Mode You will have access to further customization options depending o...

Page 48: ...T B Press the Up and Down footswitches to navigate through banks of Presets in your Setlist Navigating through Banks The bank number and Preset name will change immediately after you press the up or d...

Page 49: ...tive Scene as a letter block in the upper right corner Tap and hold a parameter to assign it to Scenes Scene parameter assignment changes can be performed regardless of the current active Mode Tap and...

Page 50: ...LEDs While using Scene mode press the Up and Down footswitches to navigate through Presets Press and hold either the Up or Down footswitch to navigate through banks The Preset name and active footswi...

Page 51: ...otswitches in the order they are added to The Grid Multiple devices can be assigned to one footswitch There is no limit to the number of devices bypass status that can be assigned to a single footswit...

Page 52: ...you have to assign the ones you want to control manually A E C F H Letter circles are not part of the actual Quad Cortex display While using Stomp mode press the Up and Down footswitches to navigate t...

Page 53: ...iew of the current Preset Gig View allows you to visualize what the footswitches are assigned to instantly This visualiation utilizes the entire screen Access Gig View by swiping up from the bottom of...

Page 54: ...54 Setup Examples Setup Examples 06 This section provides an overview of various ways to use Quad Cortex These diagrams and Preset examples represent just a few of the many ways to use the unit...

Page 55: ...e unit to keep things even simpler 1 Connect your instrument to Input 1 2 Connect your headphones to the Headphone output 3 Adjust the mix on the I O Settings screen EXP 2 EXP 1 IN 2 IN 1 OUT4 R OUT 3...

Page 56: ...at response system You can use the same I O setup to connect to an audio interface I O Setup 1 1 Connect your instrument to Input 1 1 Connect OUT1 L and OUT2 R if stereo to an FRFR system or an audio...

Page 57: ...57 Setup Examples I O Setup 2 EXP 2 EXP 1 IN 2 IN 1 OUT4 R OUT3 L OUT 1 OUT 2 MIDI IN MIDI OUT SEND 2 SEND 1 RET 2 RET 1 CAPTURE OUT IN 1 OUT 2 IN 2 R OUT 1 IN 1 L...

Page 58: ...of the stereo signal to a mixing console or another monitoring system 1 Connect your instrument to Input 1 2 Connect OUT1 L and OUT2 R to an FRFR system 3 Use The Grid to patch your signal chain to us...

Page 59: ...R to the other system mixing console 3 Use The Grid to patch your signal chain to Outputs 1 and 2 separately using an A B Splitter Using an A B splitter allows sending a custom amount of signal to th...

Page 60: ...onnect your instrument to Input 1 2 Use a 1 4 TS cable to connect Quad Cortex OUT3 L to the amplifier s input 3 Don t add a Cab block in your Preset If the Preset includes a Cab block bypass it EXP 2...

Page 61: ...lock to output 3 OUT3 L 3 Connect OUT1 L and OUT2 R if stereo to an FRFR system and connect the OUT3 L to the power amp cab setup EXP 2 EXP 1 IN 2 IN 1 OUT4 R OUT 3 OUT 2 OUT 1 OUT 2 IN 2 IN 1 OUT 2 O...

Page 62: ...llows you to place pre effects tools such as overdrives noise gates and pitch shifters before the amplifier Post effects such as reverbs and delays will sound after the amp You will need four TS cable...

Page 63: ...IN OUT3 L RET RET 1 SEND 3 Out 1 In FX Loop 1 Send 1 Return 1 PRESET A A 1 4CMv2 Preset Preset Grid 1 There are many FX Loop devices FX Loop 1 takes the signal from the row where it s placed and retur...

Page 64: ...n Rows 1 and 2 The one on the first row must be set to Send 1 Return 1 and the second one to Send 2 Return 2 5 Add post effects after the FX blocks Set the outputs of each row to Output 3 and 4 respec...

Page 65: ...up EXP 2 EXP 1 IN 2 IN 1 OUT 4 OUT 3 OUT 1 OUT 2 MIDI IN MIDI OUT SEND 2 SEND 1 RET 2 RET 1 CAPTURE OUT IN 1 SEND 1 IN OUT3 L RET RET 1 SEND OUT4 R RET SEND 2 IN RET 2 SEND 3 Out 1 In PRESET A A 1 7CM...

Page 66: ...nput of your amplifier 2 Connect an instrument cable from the Send of the FX Loop of the amplifier to Input 1 on Quad Cortex 3 On The Grid add all the post effects you want to the first row and set th...

Page 67: ...fects Grid rows built for this purpose will contain only pre effects blocks 1 Connect your instrument to Input 1 on the Quad Cortex 2 Place all the pre effects blocks you want on the first row of The...

Page 68: ...chain on The Grid then add an FX Loop device block set to FX Loop 1 where you want to insert the external effects Make sure the Mix parameter is set to 100 3 Connect a cable from Send 1 on the Quad C...

Page 69: ...ate outputs on Quad Cortex Use the balance Splitter 0 50 value to match the output volume on both cabs I O Setup EXP 2 EXP 1 IN 2 IN 1 OUT4 R OUT3 L OUT 1 OUT 2 MIDI IN MIDI OUT SEND 2 SEND 1 RET 2 RE...

Page 70: ...example shows each row going through a mono output however you can assign stereo outputs for both rows I O Setup EXP 2 EXP 1 IN 2 IN 1 OUT4 R OUT3 L OUT 1 OUT 2 MIDI IN MIDI OUT SEND 2 SEND 1 RET 2 R...

Page 71: ...To process more than two instruments you will need to use the Returns as instrument inputs I O Setup EXP 2 EXP 1 IN 2 IN 1 OUT 4 R OUT 3 OUT 1 OUT 2 MIDI IN MIDI OUT SEND 2 SEND 1 RET 2 RET 1 CAPTURE...

Page 72: ...72 Setup Examples In this example the bass is connected to the Return 1 input Each row uses a separate output 1 Out 1 In PRESET A A 1 Guitars Bass 3 Out 1 Ret 2 Out 2 In Preset Grid...

Page 73: ...lt using our proprietary biomimetic AI it can learn and replicate the sonic characteristics of any physical amplifier cabinet and overdrive pedal with unprecedented accuracy To create a Neural Capture...

Page 74: ...2 IN 1 OUT 4 R OUT3 L OUT 1 OUT 2 MIDI IN MIDI OUT SEND 2 SEND 1 RET 2 RET 1 CAPTURE OUT RET 1 Connecting the speaker output from a tube amplifier to the Quad Cortex could damage both units Ensure you...

Page 75: ...OUT 1 OUT 2 MIDI IN MIDI OUT SEND 2 SEND 1 RET 2 RET 1 CAPTURE OUT INSTRUMENT RET 1 OUT 1 OUT 2 3 Connect Capture Out to the input of the device being captured input EXP 2 EXP 1 IN 2 IN 1 OUT 4 R OUT...

Page 76: ...I IN MIDI OUT SEND 2 SEND 1 RET 2 RET 1 CAPTURE OUT RET 1 INSTRUMENT MONITORS OR HEADPHONES DEVICE BEING CAPTURED CAPTURE OUT IN 1 IN 1 D I OUT If you have an amplifier that has a D I Out you can opt...

Page 77: ...inputs Use Instrument if the device being captured is connected to Quad Cortex with a TS cable Use Mic if the device being captured is connected to Quad Cortex with an XLR cable PHANTOM SWITCH Enables...

Page 78: ...atency as low as possible Recording Signals Recording signals that will be used for modeling Sanity Check Training The core of Neural Capture Training a neural network to emulate the sound of your dev...

Page 79: ...r the Capture process your Neural Capture will be ready for testing Testing a Neural Capture Cancel Neural Capture START FROM SCRATCH SAVE Your Neural Capture is ready Switch between the reference and...

Page 80: ...MY CAPTURES 2 1 3 4 5 6 7 8 9 10 11 12 13 14 15 16 17 18 19 20 1 LX65 57 Axis 2 LX65 57 Clean 3 FN 2187 8 HW 4X12 4 OD MAX Settings 5 2203 On Axis 6 Unknown Amp 01 7 Brit 57 Corner After selecting a N...

Page 81: ...function as an audio interface by connecting it to your computer via USB For USB audio operation on Windows computers it is necessary to download and install the Quad Cortex ASIO driver from our webs...

Page 82: ...on by default C Program Files NeuralDSP USB Audio Device Driver USB Audio After connecting Quad Cortex to your Mac you are able to use it as a device for sound input and output Go to System Preference...

Page 83: ...Inputs 7 8 on your host to route signal from The Grid output USB Output 7 Input 8 USB Output 8 Output 1 Playback from the host through XLR Outputs non selectable on The Grid Select Outputs 1 2 on you...

Page 84: ...et Grid Routing Open your DAW and choose Quad Cortex as main audio device Create a mono audio track and set its input as Input 1 The track will receive the dry input signal coming from your instrument...

Page 85: ...device Create a mono audio track and set its input as Input 1 The track will receive the dry input signal coming from your instrument Then create a stereo audio track and set its input as Input 3 4 T...

Page 86: ...g to USB 3 Camera Adapter This feature allows using Quad Cortex with audio apps like GarageBand for recording purporses or simply using Quad Cortex as the main audio device for different apps Check th...

Page 87: ...r USB in the same way as via its MIDI Din connectors IMPORTANT For USB MIDI operation on Windows computers it is necessary to download and install the Quad Cortex ASIO driver available from our websit...

Page 88: ...ailable in the I O Settings as well The default value is OFF MIDI OVER USB SWITCH Enables or disables MIDI over USB The default value is ON Done Settings My Account Contact Us MIDI Settings Device Opt...

Page 89: ...annel command number min value and max value TYPE When available you can select the type of message that will be sent CC CC Toggle PC For expression pedals only CC messages are available CHANNEL Choos...

Page 90: ...e outgoing MIDI commands will be deactivated in PRESET Mode However any outgoing ON PRESET LOAD MIDI messages will be sent in PRESET mode Incoming MIDI Quad Cortex can receive CC and PC messages via M...

Page 91: ...Cortex Preset 68 9D in Setlist 9 then you would send the following PC message to the unit CC 0 value 0 CC 32 value 9 Program 67 Example 2 Important The last CC 0 value is remembered until you change...

Page 92: ...C Preset Stomp Scene Mode and Gig View CC 38 Value 0 127 Enable bypass Footswitch D Preset Stomp Scene Mode and Gig View CC 39 Value 0 127 Enable bypass Footswitch E Preset Stomp Scene Mode and Gig V...

Page 93: ...ub Stop Value 0 63 works as long as the parameter is set to momentary and value 0 63 is sent on MIDI controller footswitch release CC 54 Value 64 127 Play Stop CC 55 Value 64 127 Enable Disable Revers...

Page 94: ...94 Cortex Cloud Cortex Cloud 10 Once you log in to your Neural DSP account your Quad Cortex is ready to create Cloud Backups and share Presets Neural Captures and Impulse Responses...

Page 95: ...unt LOGIN To create a new account visit neuraldsp com register or scan the QR code Done Settings You are ready to send receive Presets Neural Captures use Cloud Directories and create Cloud backups Ba...

Page 96: ...tory Shared with me Adding friends High gain multiband NeuralDSP Uncle Jack NeuralDSP Heavy Slow Low NeuralDSP Moonlord NeuralDSP Exquisite preset NeuralDSP The nal frontier Georgie PRESETS NEURAL CAP...

Page 97: ...crafted one Created by Username Preset name Created by Username Clean_or_not Created by Username Presets Neural Captures Impulse Responses CLOUD DIRECTORIES STARRED AND SHARED WITH ME Presets Neural C...

Page 98: ...k on My Profile then check the Impulse Response section 4 Drag and drop impulse response files from your computer to the upload area Alternatively use the Browse button 5 Click on Save to finish IMPOR...

Page 99: ...ur file will instantly upload to Cortex Cloud and be available on your account 3 IRs will be downloaded to the Impulse Responses folder beneath Device Directories and will fill any available slots You...

Page 100: ...Uncle Jack Peter Heavy Slow Low Peter Jackson_Random Search Presets 9 41 To share a Preset or Neural Capture you first have to upload it to Cortex Cloud Once uploaded use the Cortex Mobile App for sh...

Page 101: ...for everyone to find download and star Using Cortex Mobile If you want your items to be easy to find make sure to add tags Adding a short description is ideal Mad bass Peter Uncle Jack Peter Heavy Slo...

Page 102: ...ubilee CA 1Star Clean 100W Normal Mesa Boogie Lone Star CA 1Star Clean 100W Tweed Mesa Boogie Lone Star CA 1Star Clean 50W Normal Mesa Boogie Lone Star CA 1Star Clean 50W Tweed Mesa Boogie Lone Star C...

Page 103: ...05 PV 505 Rhythm Peavey 6505 Rols Jazz CH120 Roland Jazz Chorus 120 Solo 100 Crunch Bright Soldano SLO 100 Solo 100 Crunch Normal Soldano SLO 100 Solo 100 Lead Soldano SLO 100 UK C15 Boost Vox AC15 UK...

Page 104: ...all Super Bass 50 Brit Bass 50 Patch Marshall Super Bass 50 CA 400 Ch1 Mesa Boogie Bass 400 CA 400 Ch2 Mesa Boogie Bass 400 G800K Gallien Krueger 800RB Watt Bass Mod Bright Hiwatt DR103 Mod Watt Bass...

Page 105: ...k IIC Cali Quad 290 Mesa Boogie Quad Preamp Mesa Boogie Stereo Simul Class 2 Ninety Cali Studio 290 Mesa Boogie Studio Preamp Mesa Boogie Stereo Simul Class 2 Ninety Cali 3Axe 290 Mesa Boogie Triaxis...

Page 106: ...2 Darkglass Microtubes 900 V2 Range AD200 Orange AD200 Bass MK3 SCity B120 Sound City B120 Warwitch ProF5 Warwick Pro Fet 5 1 Anima Fuzz Human Gear Animato Chief ODB3 Boss ODB 3 MX BassFuzzDLX MXR Bas...

Page 107: ...Straight with Celestion G12H30 drivers 212 CA Recto V30 98 Mesa Rectifier with Celestion Vintage 30 drivers 412 Range PPC V30 02 Orange PPC412 with Celestion Vintage 30 drivers 212 Rols Jazz 87 Roland...

Page 108: ...rad S UKV30 90s Mesa Traditional Straight with Celestion Vintage 30 drivers 412 CA Stand OS S V30 90s Mesa Standard OS Straight with Celestion Vintage 30 drivers 412 Range PPC V30 03 Orange PPC412 wit...

Page 109: ...ntaur No Bell OD1 Nobels ODR 1 OD250 DOD Overdrive Preamp 250 Rage Booster Dallas Rangemaster Red Drive Keeley Electronics Red Dirt Rodent Drive ProCo Rat Vemural Ray Vemuram Jan Ray Guitar Overdrive...

Page 110: ...reo Solid State Comp SSL Bus Solid State Comp Stereo SSL Bus VCA Comp VCA Comp Stereo Compressor Minivoicer Pitch Shifter Poly Octaver Electro Harmonix POG Wham Digitech Whammy Pitch Chief CE2W BOSS C...

Page 111: ...Bad Horsie Bass Wah Bubba Wah Dunlop Budda Budwah Crying Wah Dunlop Cry Baby GCB 95 Wah Env Filter Foog Moog Moogerfooger MF 101 Love Meat Lovetone Meatball Filter Morph Freeze Looper Looper X Dual Ch...

Page 112: ...ing an update you will need to reboot your Quad Cortex How do I update the firmware on my Quad Cortex FRFR means full range flat response It describes a neutral speaker or speaker system designed to r...

Page 113: ...This feature works by connecting Quad Cortex to external devices by using a modified instrument cable TRS and TS ends Connect the TRS tip to the Quad Cortex and the TS tip to the external device These...

Page 114: ...d After that take a look at The Grid Are the input and output blocks properly configured Are other Presets working Finally take a look at the I O Settings Maybe some of the GAIN knobs are all the way...

Page 115: ...ith Ground Lift Impedance 1M Max Input Gain 60 dB Connectors 2 XLR M with Ground Lift Impedance 560 Max Output Level 9 5dBu Connectors 2 TRS Impedance 560 Max Output Level 15 5dBu balanced 9 5dBu unba...

Page 116: ...teel stomp rotary actuators 1 volume knob Display 7 high brightness Dimensions 29 x 19 x 4 9cm Weight 1 95kg 4 2lbs Input Voltage 12VDC 3A negative polarity Typical Power Consumption 18W Operating Tem...

Page 117: ...TV technician for help This device complies with Industry Canada license exempt RSS standard s Operation is subject to the following two conditions 1 This device may not cause interference and 2 This...

Page 118: ...neuraldsp com...

Reviews: