NETGEAR Home RAIDiator 5.3 Software Manual Download Page 84

Backup and Recovery

84

ReadyNAS for Home RAIDiator 5.3 

Recover Data to Your ReadyNAS System

You can use Dashboard to create jobs to restore data that you previously backed up to 
another network-attached device to your ReadyNAS storage system. 

Before you can recover data, you must first back it up. For more information about backing up 
data that you store on your ReadyNAS system, see 

Back Up Data Stored On Your 

ReadyNAS System 

on page


80.

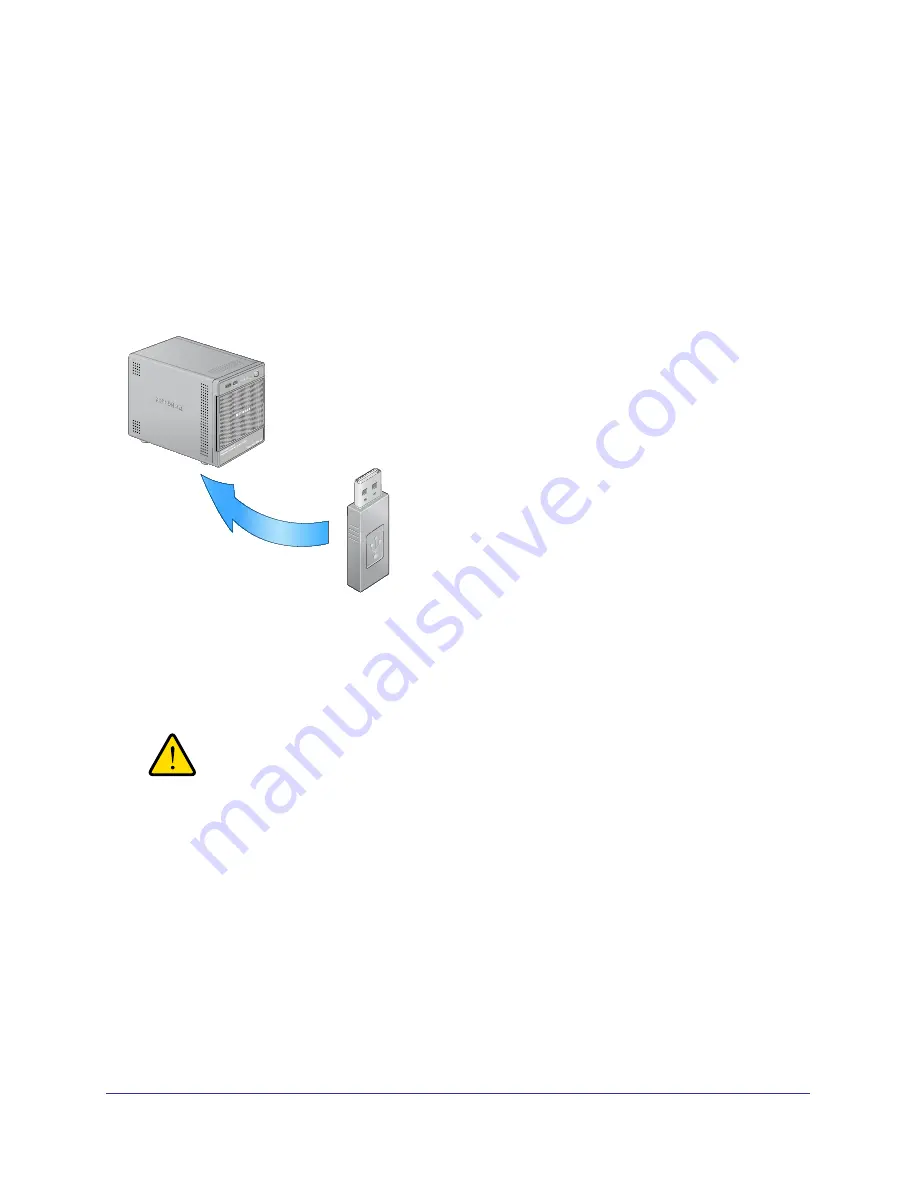
The following figure illustrates the recovery process described in this section

1

2

3

.

Figure 10. Restoring data from a USB drive to a ReadyNAS system

1. ReadyNAS system serving as recovery destination 
2. USB drive serving as recovery source 
3. Recovery process

WARNING!

Although this is a recovery procedure, your ReadyNAS system 
treats it like a backup job. This means that you use Dashboard 
screens labeled backup
 and you reverse the source and 
destination systems you used when you backed up the data that 
you are recovering. 

By default, all backup jobs are scheduled to automatically run every day. You can edit these 
settings after you create each backup job. For more information, see 

Edit a Backup Job 

on 

page


96.

Backup and recovery jobs using Time Machine require different procedures. For more 
information, see 

Time Machine 

on page


100.

Summary of Contents for Home RAIDiator 5.3

Page 1: ...350 East Plumeria Drive San Jose CA 95134 USA November 2011 202 10896 01 ReadyNAS for Home RAIDiator 5 3 Software Manual Models Duo v2 NV v2...

Page 2: ...8 NETGEAR Phone Other Countries See support information card Trademarks NETGEAR the NETGEAR logo and Connect with Innovation are trademarks and or registered trademarks of NETGEAR Inc and or its subsi...

Page 3: ...Volume 21 Change RAID Modes 22 Chapter 3 Shares Basic Share Concepts 30 Data Organization 30 File Sharing Protocols 31 Access Rights 31 File and Folder Names 31 Create Shares 32 Manage Shares 33 View...

Page 4: ...onfiguration 52 Clock 52 Alerts 53 Language 56 Administrator Password 57 System Shutdown 60 Network Settings 61 Ethernet 61 DNS 63 Host Name and Workgroup 64 Add Ons 66 Manage Add Ons 66 Find and Inst...

Page 5: ...er Data to Your ReadyNAS System 84 Back Up Data Stored on a Network Attached Device 88 Recover Data to a Network Attached Device 92 Manage Backup Jobs 96 Edit a Backup Job 96 Delete a Backup Job 97 Ma...

Page 6: ...relies on the following software applications RAIDar Use this setup utility to find your ReadyNAS system on your local area network and launch Dashboard Dashboard Use this browser based interface to c...

Page 7: ...person that you want to allow to access your ReadyNAS system 5 Basic Backup Concepts on page 77 You can back up the data you store on your ReadyNAS system and you can use your ReadyNAS system to back...

Page 8: ...several icons to help you determine the status of your system as shown in the following figure 1 2 3 4 5 6 Figure 1 RAIDar icons 1 Overall status 2 Volume status 3 Disk status 4 UPS status 5 Fan statu...

Page 9: ...launch Dashboard 1 Install the appropriate version of RAIDar on a computer that is connected to the same Iocal area network LAN as your ReadyNAS storage system 2 If you are using Windows XP before SP2...

Page 10: ...ddress In that case your system uses 192 168 168 168 If this happens you must make a direct connection between your storage system and your computer To establish this connection follow your operating...

Page 11: ...admin Default password password Both user name and password are case sensitive The first time you connect to your ReadyNAS system a Setup Wizard displays to guide you through initial configuration Th...

Page 12: ...a different language for the setup wizard click the language drop down list in the upper right corner Follow the wizard s prompts to configure the following settings Time and date For more information...

Page 13: ...When you complete the wizard Dashboard displays The following figure shows the Dashboard home screen Figure 3 Dashboard home screen Click the Configure button to access the screens that let you config...

Page 14: ...en helps you navigate through Dashboard To return to the Dashboard home screen click the Dashboard button The status bar at the bottom of the screen provides you with a quick overview of your system s...

Page 15: ...can register it using Dashboard or by accessing the NETGEAR Product Registration website directly To register your system using Dashboard 1 Click Configure System Hardware The Hardware screen displays...

Page 16: ...abel of your product 2 Using a browser visit http www NETGEAR com register The product registration web page displays If you have never registered a NETGEAR product click the Continue button If you ha...

Page 17: ...7 2 2 Disk Configuration This chapter describes how to configure the disks in your ReadyNAS storage system It contains the following sections Basic Disk Configuration Concepts Manage Disk Configuratio...

Page 18: ...other RAID level might increase storage space but also reduce system performance Your ReadyNAS storage system supports X RAID2TM a proprietary single volume RAID architecture that is easy to administe...

Page 19: ...d restore the data to the new RAID volume With X RAID2 none of those administrative tasks are required Instead with X RAID2 your volume automatically expands to accommodate additional disks or larger...

Page 20: ...ause it duplicates data across multiple disks In RAID 1 exactly the same data is stored on two or more disks at all times RAID 1 protects your data from loss if one disk fails RAID 1 requires a minimu...

Page 21: ...when the expansion process finishes For more information about alert notifications see Alerts on page 53 Expand an X RAID2 Volume To expand your X RAID2 volume add a disk to your ReadyNAS storage sys...

Page 22: ...that the fourth disk is used for data protection not storage capacity RAID 5 3 1 The new disk is added to the existing volume JBOD Any Any A new JBOD volume is created for each new disk Change RAID M...

Page 23: ...ompt to click the Setup button during this 10 minute time frame 3 Launch RAIDar highlight your storage system and click the Setup button The ReadyNAS Volume Setup screen displays If you do not select...

Page 24: ...D2 to Flex RAID 1 If any data is stored on your system back up your data For more information see the Back Up Data Stored On Your ReadyNAS System on page 80 2 Perform a factory reset reboot WARNING Se...

Page 25: ...not select a format within 10 minutes your system reboots in the same mode that it was previously using 4 Select the Flexible Volume Flex RAID radio button 5 Optional Click a More button to learn more...

Page 26: ...our ReadyNAS System on page 84 Change to a Different Flex RAID Format Flex RAID offers you several different disk formats depending on the number of disks installed in your ReadyNAS storage system For...

Page 27: ...system and click the Setup button The ReadyNAS Volume Setup screen displays If you do not select a format within 10 minutes your system reboots in the same mode that it was previously using 4 Select...

Page 28: ...disks RAID level automatically chosen 1 RAID 0 2 RAID 1 3 RAID 5 4 7 Click the Next button A dialog box displays prompting you to confirm the volume creation command 8 Click the OK button The volume i...

Page 29: ...hares This chapter describes how to create manage and access shares on your storage system This chapter includes the following sections Basic Share Concepts Create Shares Manage Shares Access Shares R...

Page 30: ...want to group your data by type for example Photos Music Videos Documents Another option is to group your data by user Tom Rick Mary Organizations might choose to group data by department Accounting S...

Page 31: ...le lists access rights options available to you Table 3 Access rights options Access right Description Read only The user with this permission can read files on this share but cannot edit or create fi...

Page 32: ...By default new shares have the SMB and AFP file sharing protocols enabled with read write access rights granted to everyone To create a share 1 Select Configure Shares The Shares screen displays 2 Cli...

Page 33: ...on characters for a share name Optional Description Enter a description for the new share Share descriptions can be a maximum of 255 characters You can use any characters for a share description 4 Cli...

Page 34: ...o that Off is visible to disable the file sharing protocols on this share If you disable these protocols no one will be able to remotely access this share using the SMB or AFP file sharing protocols f...

Page 35: ...to the share where you want to add a folder You can add a folder within another folder by navigating to the correct folder 3 Highlight the share or folder where you want to add a folder and click the...

Page 36: ...wse screen displays 2 Using the collapse and expand icons navigate to the share where you want to remove a folder You can remove a folder within another folder by navigating to the correct folder 3 Hi...

Page 37: ...a share permanently removes the data within that share To delete a share 1 Select Configure Shares The Shares screen displays 2 Highlight a share and click the Delete Share icon A dialog box displays...

Page 38: ...ar hostname is the name that you assigned to your ReadyNAS system or the default hostname if you did not change it You are prompted to log in to your ReadyNAS system 3 Enter a user ID and password You...

Page 39: ...your ReadyNAS system or the default host name if you did not change it 4 Click the Connect button You are prompted to log in to your ReadyNAS system 5 Enter a user ID and password You can log in with...

Page 40: ...ng a network attached Mac OS 9 device 1 Ensure that file sharing protocols are enabled for any share that you want to remotely access For more information see Fine Tune Share Access on page 34 2 In Fi...

Page 41: ...ork attached Linux or Unix device 1 Ensure that file sharing protocols are enabled for any share that you want to remotely access For more information see Fine Tune Share Access on page 34 2 Ensure th...

Page 42: ...S Remote uses an add on on your ReadyNAS system and a small software program for your Mac or PC For more information about installing and managing add ons on your ReadyNAS system see Add Ons on page 6...

Page 43: ...interface to grant users permission to access your ReadyNAS system with ReadyNAS Remote add on 7 Click the Apply Settings button 8 Click the here link in the ReadyNAS Remote description An online tuto...

Page 44: ...your computer 1 Install the ReadyNAS Remote client software A wizard guides you through the installation process When you complete the installation you are prompted to create a ReadyNAS Remote account...

Page 45: ...ure that file sharing protocols are enabled for any share that you want to remotely access For more information see Fine Tune Share Access on page 34 2 Launch the ReadyNAS Remote client software on yo...

Page 46: ...46 4 4 Users Accounts This chapter describes how to create and manage user accounts It contains the following sections Basic User Concepts User Accounts...

Page 47: ...ccess financial data stored on your system You might decide that all accounts can access photos and music stored on the system You can set the appropriate permissions for each user User Accounts Use D...

Page 48: ...red User names can have a maximum of 31 characters in most non Asian languages If you use Asian language characters the limit is significantly lower You can use most alpha numeric and punctuation char...

Page 49: ...screen displays If your system has only a few users they all display on the screen If your system has many users use the search field to find the user account you want to edit 2 In the left pane highl...

Page 50: ...its contents To delete a user 1 Select Configure Users The Users screen displays If your system has only a few users they all display on the screen If your system has many users use the search field t...

Page 51: ...chapter describes how to manage your ReadyNAS storage system s configuration network settings add ons and USB storage devices It contains the following sections System Configuration Network Settings...

Page 52: ...your ReadyNAS storage system Clock To enable your ReadyNAS system to correctly time stamp your files ensure that your ReadyNAS system s time and date settings are accurate To set system time and date...

Page 53: ...ime drop down lists dim and your system s date and time are synchronized with a NETGEAR NTP server Clear the Synchronize clock with an Internet server check box and use the time drop down lists and ca...

Page 54: ...tting works well in many corporate environments 4 Optional If your email service provider is not listed expand the Advanced Options section and customize the outgoing mail server STMP settings for you...

Page 55: ...vent settings 1 Select Configure System Alerts The Alerts screen displays 2 Select or clear any event check boxes You can clear any non dimmed events Dimmed events always trigger email alerts 3 Select...

Page 56: ...apanese names in Windows Explorer Note This setting does not control the language used in the Dashboard interface To change the language in Dashboard adjust your browser s language option To configure...

Page 57: ...your data Change the Administrator Password Be sure to choose an administrator password that is different from the default password and keep it in a safe place Anyone who obtains this password can cha...

Page 58: ...y button Your settings are saved Recover Your Administrator Password You can recover a lost or forgotten administrator password in two ways Using NETGEAR s password recovery tool This web based tool r...

Page 59: ...and email button NETGEAR resets your administrator password and sends an email message with the new password to you Recover Your Administrator Password Using an OS Reinstall Reboot This process does...

Page 60: ...ower down your system Restart Choose this option to gracefully power down your system and restart it A dialog box displays asking you to confirm your shut down or restart command 3 Optional Select the...

Page 61: ...t technology has a unique MAC media access control address that is used to identify the source device and the destination device MAC addresses are assigned when a device is manufactured Your ReadyNAS...

Page 62: ...utomatically set the IP address and network mask If you select the Obtain an IPv4 address automatically check box NETGEAR recommends that you set the lease time on the DHCP server or router to a value...

Page 63: ...ch the RAIDar utility click the Rescan button to locate the device and click the Setup button to reconnect 4 Click the Apply button Your settings are saved DNS DNS is short for Domain Name System Beca...

Page 64: ...and Workgroup Your ReadyNAS storage system uses the host name to advertise itself on your network When you review your network using RAIDar your PC your Mac or any other interface you can recognize yo...

Page 65: ...hyphens in your host name The host name you choose can have a maximum of 24 characters in most non Asian languages If you use Asian language characters the limit is significantly lower Your host name...

Page 66: ...stem ReadyNAS Remote Allows secure remote access to shares on your ReadyNAS without complicated router or VPN setup After you access your shares from a PC using Windows File Explorer or from a Mac usi...

Page 67: ...displays 4 Optional Use the links and buttons to manage the add on The buttons and links in the Add on Manager dialog box vary by add on Find and Install Add ons Using Dashboard You can use Dashboard...

Page 68: ...e Add ons Tab in Dashboard You download a standalone add on directly to a computer that is on the same LAN as your ReadyNAS system and then use Dashboard to install it To install a standalone add on 1...

Page 69: ...orage device 1 Connect a USB storage device to one of the USB ports on your ReadyNAS storage system For more information about the USB ports on your storage system see the ReadyNAS Duo v2 and NV v2 Ha...

Page 70: ...70 6 6 Monitor and Maintain This chapter describes how to monitor and maintain your ReadyNAS system It contains the following sections Monitor Maintain...

Page 71: ...tasks including a timestamp These logs are used primarily to troubleshoot problems If you call NETGEAR technical support the representative might ask you to send your system logs In addition to syste...

Page 72: ...re on your ReadyNAS system is called RAIDiator and your system uses the 5 3 version of RAIDiator Updates are numbered chronologically for example RAIDiator 5 3 1 RAIDiator 5 3 2 You can update the fir...

Page 73: ...e when the firmware update finishes Update Firmware Locally If you keep your ReadyNAS system in a location that does not have Internet access for example at a remote vacation cabin you must update you...

Page 74: ...The firmware file uploads to your ReadyNAS system After a few moments the Update Firmware dialog box refreshes with details about the new firmware 8 Click the Install button You are prompted to reboo...

Page 75: ...sends you an email alert message if the UPS status changes For example if a power failure forces the UPS into battery mode or when the battery is low you receive an email message When the battery is l...

Page 76: ...ta to comply with data retention regulations and to archive information before making major changes to their IT environments such as batch updates to databases Both home and business users should back...

Page 77: ...changed since your last backup process An incremental backup job takes much less time than a full backup job Note RAID configuration of disks is not a substitute for backing up data RAID configuration...

Page 78: ...d on a ReadyNAS system 1 ReadyNAS storage system serving as backup source and recovery destination 2 USB drive serving as backup destination and recovery source 3 Backup process 4 Recovery process The...

Page 79: ...3 4 Figure 8 Using a ReadyNAS system to back up and recover data stored on a laptop computer 1 Laptop computer serving as backup source and recovery destination 2 ReadyNAS storage system serving as b...

Page 80: ...fault all backup jobs are scheduled to automatically run every day You can edit these settings after you create each backup job For more information see Edit a Backup Job on page 96 Before trusting yo...

Page 81: ...he new backup job The name you choose can have a maximum of 255 characters 4 From the Source drop down list select a backup source from your ReadyNAS system Depending on how your ReadyNAS system is co...

Page 82: ...e s directory or enter a folder path to place the backed up data in a specific folder 7 Optional Click the Test Connection button to determine if your ReadyNAS system can access the remote destination...

Page 83: ...you have correctly identified your backup source and backup destination If you reverse them you might permanently delete your source files NETGEAR recommends not enabling this option unless your dest...

Page 84: ...estoring data from a USB drive to a ReadyNAS system 1 ReadyNAS system serving as recovery destination 2 USB drive serving as recovery source 3 Recovery process WARNING Although this is a recovery proc...

Page 85: ...he name you choose can have a maximum of 255 characters 4 From the Source drop down list select a recovery source that is not part of your ReadyNAS system Select a USB device that is attached to your...

Page 86: ...the top level of the USB device s directory or enter a folder path to place the backed up data in a specific folder 8 Optional Click the Test Connection button to determine if your ReadyNAS system ca...

Page 87: ...have correctly identified your backup source and backup destination If you reverse them you might permanently delete your source files NETGEAR recommends not enabling this option unless your destinati...

Page 88: ...process By default all backup jobs are scheduled to automatically run every day You can edit these settings after you create each backup job For more information see Edit a Backup Job on page 96 Befo...

Page 89: ...the Name field enter a name for the new backup job The name you choose can have a maximum of 255 characters 4 From the Source drop down list select a destination that is not part of your ReadyNAS sys...

Page 90: ...ata at the top level of the USB device s directory or enter a folder path to place the backed up data in a specific folder 7 Optional Click the Test Connection button to determine if your ReadyNAS sys...

Page 91: ...ARNING When using this option ensure that you have correctly identified your backup source and backup destination If you reverse them you might permanently delete your source files NETGEAR recommends...

Page 92: ...y destination 2 ReadyNAS system serving as recovery source 3 Recovery process WARNING Although this is a recovery procedure your ReadyNAS system treats it like a backup job This means that you use Das...

Page 93: ...b The name you choose can have a maximum of 255 characters 4 From the Source drop down list select a restore source on your ReadyNAS system Depending on how your ReadyNAS system is configured these op...

Page 94: ...ta at the top level of the USB device s directory or enter a folder path to place the backed up data in a specific folder 8 Optional Click the Test Connection button to determine if your ReadyNAS syst...

Page 95: ...p source and backup destination If you reverse them you might permanently delete your source files NETGEAR recommends not enabling this option unless your destination NETGEAR recommends not enabling t...

Page 96: ...you created earlier To edit a backup job 1 Select Configure Backup The Backup screen displays The backup jobs you previously created display in the left pane 2 Highlight the job you want to edit The r...

Page 97: ...adyNAS system To delete a backup job 1 Select Configure Backup The Backup screen displays The backup jobs you previously created display in the left pane 2 Highlight the job you want to delete 3 Click...

Page 98: ...ct Configure Backup The Backup screen displays 2 Click the Run button in the row for the backup job that you want to manually start The backup job starts View a Backup Log You can use Dashboard to vie...

Page 99: ...hen you press the Backup button the jobs are executed in the order that you specified in the backup schedule If no jobs are scheduled for the button pressing the Backup button backs up the content of...

Page 100: ...r Mac OS X Time Machine To back up data stored on your Time Machine to your ReadyNAS system 1 Select Configure Backup Time Machine The Time Machine screen displays 2 Move the slider to On 3 In the Cap...

Page 101: ...e disks including your ReadyNAS system 7 Select your ReadyNAS system and click the Use for Backup button A dialog box displays prompting you to provide login credentials 8 In the Name field enter Read...

Page 102: ...States FCC Information to User These products do not contain any user serviceable components and are to be used with approved antennas only Any product changes or modifications will invalidate all ap...

Page 103: ...e harmful interference to radio or television reception which can be determined by turning the equipment off and on the user is encouraged to try to correct the interference by one or more of the foll...

Page 104: ...ation 77 viewing logs 98 C CIFS 31 clock 52 compliance 102 D Dashboard launching 9 default login credentials 11 default password 11 default user name 11 DHCP 61 62 discovering your storage system 9 di...

Page 105: ...AIDar buttons 9 discovering your storage system 9 launching Dashboard 9 LED icons 8 ReadyNAS community website 7 ReadyNAS Remote 42 enabling 42 installing client software 44 recovery recovering data t...

Page 106: ...kly 62 incorrect IP address 62 IP address typo 62 lost administrator password 59 RAIDar does not detect ReadyNAS unit 10 reconnecting after losing static IP address 63 static IP address changed 63 wro...

Reviews: