background image

Net.DO 

Lighting Control Equipment Co.,Ltd                                     


http://www.netdo.com.cn


FOX1024s Moving Light Controller.                                                  

PAGE: 2


6.6.1 Parity selecting of fixtures ........................................................................ 20 
6.6.2 One by one control of fixtures .................................................................. 20 

6.7


FAN function .................................................................................................. 20


6.8


MODIFY function ........................................................................................... 20


6.9


Reference Fixture .......................................................................................... 20


6.9.1 Set “Reference Fixture”............................................................................ 21 

6.10


Attribute ALIGN function ............................................................................ 21


6.11


Lamp On / Lamp Off / Reset function......................................................... 21


7. PRESET

...................................................................................................................... 22 

7.1


Import PRESET.............................................................................................. 22


7.2


Call PRESET .................................................................................................. 22


7.3


Customize PRESET....................................................................................... 22


7.3.1 Record PRESET...................................................................................... 22 
7.3.2 Delete PRESET ....................................................................................... 22 
7.3.3 Copy PRESET ......................................................................................... 22 

8. SHAPE

........................................................................................................................ 23 

8.1


Edit and call SHAPE ...................................................................................... 23


8.2


Stop SHAPE ................................................................................................... 24


8.3


Check shape of “Reference Fixture” ........................................................... 24


8.4


Skill in using shape ....................................................................................... 24


9. Program

..................................................................................................................... 25 

9.1


HTP and LTP channel .................................................................................... 25


9.2


Empty LTP channel ....................................................................................... 25


9.3


Clear LTP remaining value in Playback ....................................................... 26


9.4


Record Program ............................................................................................ 26


9.4.1 “Single-Step Program” and “Multi-Step Program” .................................... 26 
9.4.2 Fast record “Program”.............................................................................. 26 

9.5  Edit Program.................................................................................................. 26


9.5.1 Copy Step ................................................................................................ 27 

9.6


Delete Program.............................................................................................. 27


9.7


Copy Program................................................................................................ 27


9.8


PLAYBACK of Program................................................................................. 28


9.8.1 Turn Pages of Playback ........................................................................... 28 
9.8.2 Playback Key ........................................................................................... 28 
9.8.3 Use “Playback Menu”...............................................................................28 
9.8.4 Connect “Multi-Step Program” ................................................................. 29 
9.8.5 Control “Multi-Step Program” ................................................................... 29 

9.9


Fader Time of Playback ................................................................................ 29


9.9.1 Edit Fader Time........................................................................................ 30 

9.10 Fader Synchronization of Playback.............................................................. 30


10. SCENE

...................................................................................................................... 31 

11. Synchronous Parallel Operation

............................................................................ 32 

12. Light Show (Auto Playback)

................................................................................... 32 

12.1 External Time Code (MIDI)............................................................................. 32


12.2 Internal Time Code (One Key Light Show)................................................... 33


Summary of Contents for FOX1024s

Page 1: ...FOX1024s MOVING LIGHT CONTROLLER User s Manual Net DO FOSHAN NETDO LIGHTING CONTROL EQUIPMENT CO LTD ...

Page 2: ...s and Master Faders 8 3 3 PLAYBACK Area 8 3 4 Function Key Fixture page 0 4 Group Preset Scene A B Show 9 3 5 SHAPE Control Area 10 3 6 Fixture Attribute Key 10 4 Quick Start 12 4 1 Examples 12 5 Setup Menu 13 5 1 Menu Operation 13 5 2 Library Setting 13 5 3 Fixture Setting 14 5 3 1 Fixture Patched 14 5 3 2 Invert attribute value 16 5 4 Data File 16 5 4 1 Save File 16 5 4 2 Read File 16 5 4 3 Dele...

Page 3: ...ference Fixture 24 8 4 Skill in using shape 24 9 Program 25 9 1 HTP and LTP channel 25 9 2 Empty LTP channel 25 9 3 Clear LTP remaining value in Playback 26 9 4 Record Program 26 9 4 1 Single Step Program and Multi Step Program 26 9 4 2 Fast record Program 26 9 5 Edit Program 26 9 5 1 Copy Step 27 9 6 Delete Program 27 9 7 Copy Program 27 9 8 PLAYBACK of Program 28 9 8 1 Turn Pages of Playback 28 ...

Page 4: ...Net DO Lighting Control Equipment Co Ltd http www netdo com cn FOX1024s Moving Light Controller PAGE 3 13 Priority Levels of Different Operations 33 14 Software Upgrade 34 15 Data Protection 34 ...

Page 5: ... symmetry are also supported Playback trigger mode selectable Auto1 Auto2 Music synchronous One key Light Show is achievable up to 20 light shows can be saved and used without PC MIDI ports are provided to connect consoles in parallel or receive MIDI code to run Light Show LCD display with backlight 12V operate light OPTIONAL USB port is provided for data backup and update by USB disk 1 2 Specific...

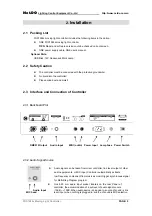
Page 6: ...Please mind dust and moist 2 3 Interface and Connection of Controller 2 3 1 Backboard Plot DMX512 Output Audio Input MIDI out in Power Input Lamp Fuse Power Switch 2 3 2 Audio Signal Source Audio signal can be taken from mixer controller line level output of other audio equipments or MIC input Controller automatically extracts low frequency component from music as music trigger synchronous signal ...

Page 7: ...own as follows 2 3 4 Power Interface This controller adopts wide range switch power supply AC100 240V 50 60Hz Please confirm voltage is suitable to controller before connection Power socket must be connected with protective groundwire to ensure safety If to replace fuse please disconnect power firstly and then operate to ensure safety 2 3 5 USB Interface This controller provides a standard USB int...

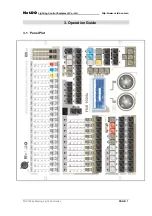
Page 8: ...Net DO Lighting Control Equipment Co Ltd http www netdo com cn FOX1024s Moving Light Controller PAGE 7 3 Operation Guide 3 1 Panel Plot ...

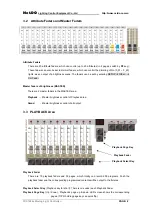
Page 9: ...ster faders of brightness MASTER There are 2 master faders in the MASTER area Playback Master brightness control of Playback area Grand Master brightness control of all output 3 3 PLAYBACK Area Playback Fader There are 10 playback faders and 30 pages which totally can record 300 programs Push the playback fader and the corresponding programmed contents will be output to the fixtures Playback Selec...

Page 10: ... Keys The fixture numbers correspond to Page 0 0_01 0_20 Page 1 1_01 1_20 Page 2 2_01 2_20 Page 3 3_01 3_20 Page 4 4_01 4_20 totally 100 fixture numbers TIPS When an indicator of Fixture Page Key is bright it means that page is selected when the indicator flashes slowly it means there are fixtures selected in that page GROUP Function Key Press GROUP key 1 20 Numeric Key will be used for group sele...

Page 11: ...ey modified by Wheel A B The 10 Attribute Keys correspond to the attribute names above Press P2 indicator bright to switch to Attribute Page 2 then the Attribute Keys will become No 11 20 Attribute Keys One Key controls 2 attributes so the console can control totally 40 attributes FAN Used to spread the attribute value of selected fixtures to gain the gradual change effect of attribute value among...

Page 12: ...he indicators of Numeric Key will show whether there is contents in Playback Group Preset Scene When the indicator is bright it means there is content in that key Fixture Edit CLEAR Used to clear the selection and value of all manual run fixtures LOCATE Used to locate and light up the selected fixtures set value for all channels FIND Used to find the selected fixtures will not set value nor keep v...

Page 13: ...DmxAddr to A1 Copy the settings of No 1 fixture to No 2 10 fixtures Operation as follows Press and hold COPY Press Fixture Numeric Key 1 Press Fixture Numeric Key 2 10 3 Manual Run Fixture Select No 1 10 fixtures Press LOCATE key to light up all the selected fixtures Press PLAY key to enter SHAPE menu Press Edit Soft key Press key to select on Rotate Wheel A B to set the models of shape circle the...

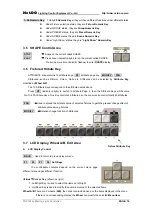
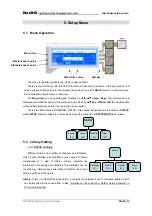
Page 14: ...hapter will introduce the functions of SETUP press SETUP indicator bright to enter settings menu the menu tree of SETUP MENU is as follows 5 2 Library Setting Path SETUP Library Different fixtures have different channels and attributes which require libraries to be identified by the console 1 library corresponds to 1 kind of fixture Library contains the information of channels and attributes The a...

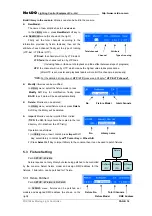
Page 15: ...t the fixture model press Modify Soft Key for modification finally press BACK to exit data will be saved automatically Delete libraries can be deleted In Library menu select fixture model press Delete Soft Key the library will be deleted Import libraries can be imported from U disk TIPS the R20 library should be copied to the root directory of U disk from the PC firstly Operation is as follows 1 I...

Page 16: ... settings of a fixture can be copied to other fixtures by COPY Key the DMX addr will be automatically assigned sequentially For example to copy the settings of fixture No 1 to No 2 10 the operation is as follows Press and hold COPY Press Fixture Numeric Key 1 source Sequentially press Fixture Numeric Key 2 10 target Delete In FixPatch menu the settings of a fixture can be deleted by DEL Fix Soft K...

Page 17: ...s consoles Path SETUP DataFile 5 4 1 Save File In DataFile menu data can be saved in U disk Insert U disk press SaveFile F1 soft key to enter SaveFile menu then select file name FOX01 99 by Cursor Key or Wheel A B and press ENTER soft key to save all the data into U disk Remark The new file will cover the old one in the U disk if their file names are the same 5 4 2 Read File In DataFile menu data ...

Page 18: ...efore data initialization 5 5 2 Channel Fader Settings Path SETUP Other CH Fader There are 20 channel faders in the console which can be set to 2 modes as follows attribute mode up to 40 attributes can be manually controlled select fixture and modify value There are totally 2 pages 20 attributes each page pages turned by P2 Key dimmer mode Change Fixture No 1 20 to dimming control output as a sepa...

Page 19: ...l cover the value of the running playback and output to the fixtures The output of playback will not restore until the manual run fixtures are cleared Operation of Manual Run Fixture 1 Select fixtures Press Fixture Page Key to enter selecting fixture status press Numeric Key to select single or multiple fixtures Press two Numeric Keys at the same time and the fixtures between them will be also sel...

Page 20: ...ction requires the support of related data in library Press FIND key the indicator will flash slowly which means it s in FIND status press it again to exit In FIND status selected fixtures will be centered and lighted up without value Dimmer channel will be full and unaffected by Master Faders Only the manually modified data will be saved after exiting TIPS FIND function is recommended in editing ...

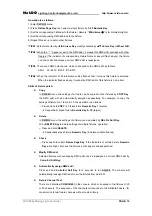
Page 21: ...xture and the last one change the most and gradually descend to the middle to achieve gradient effect If use FAN to expand the Pan Tilt attributes the fixtures will show fan beam FAN is usually used in editing Pan Tilt it can also be used in other attributes such as Dimmer Operation of FAN 1 Select fixtures 2 Press Attribute Key to select attributes 3 Press FAN key its indicator will flash and the...

Page 22: ...n all attribute of selected fixtures to Reference Fixture Align certain attribute Press and hold ALIGN key Press Attribute Key Successively Multiple attribute can be selected For example Dimmer Gobo 6 11 Lamp On Lamp Off Reset function Certain fixtures require operation such as Lamp On to their bulbs before use Operation Press LOCATE for 2 seconds to enter Fixture Menu In Fixture Menu Lamp On Lamp...

Page 23: ...ESET key to enter preset status indicator above will be bright Press Numeric Key to select presets 7 3 Customize PRESET Preset can be customized 7 3 1 Record PRESET Remark Press CLEAR key before editing presets to avoid any unexpected affect 1 Manual Run fixtures to edit and modified their attribute to the required effect 2 Press and hold RECORD select single or multiple attribute by Attribute Key...

Page 24: ...els D Dimmer Change E Iris Color wheels Gobo wheels change F Other 8 1 Edit and call SHAPE SHAPE can be called in Manual Run Single Step Program Multi Step Program and Scene Call SHAPE in Scene Just need to record data of manual run which uses SHAPE into Single Step Program or Scene When program or Scene runs the corresponding SHAPE will run automatically Call SHAPE in Chase Just add SHAPE into th...

Page 25: ...ified And some are only for fixtures with special attribute For example rainbow is just for fixtures with RGB CMY channels 8 2 Stop SHAPE There are 3 ways of operation to stop shapes as follows Stop all shapes Press STOP key all shapes will stop Then Press PLAY key the corresponding indicator will be bright and all shapes will restore running Stop shapes of certain fixtures Steps Select fixtures P...

Page 26: ...pages 10 programs each page and controlled by 10 playback faders Program Number xx xx the first number before dot is the page number the second one after dot is the playback number in that page Correspond to playback faders PROGRAM menu tree 9 1 HTP and LTP channel HTP channel HIGHEST TAKES PRECEDENCE output the highest value first This type of channel obeys the rule of highest value first which m...

Page 27: ...used as Chase The number of Steps is not limited but it s decided by the memory of console 9 4 2 Fast record Program The way of fast recording Single Multi Step Program under running status is as follow TIPS It s suggested to clear LTP remaining value firstly in order to edit a clean scene LOCATE is suggested in Manual Run it will give initial value to all fixture channels to avoid the affect of o...

Page 28: ... to the new one in order for a coherent chase data of current step can be cleared by pressing CLEAR if it s unwanted TIPS3 use SETP key to check data of every step modified data will be saved automatically TIPS4 new step can be added after current step by pressing NewStep soft key at the current step TIPS5 current step can be deleted by pressing DEL Step soft key 9 5 1 Copy Step Operation of copyi...

Page 29: ...e output at the same time Flash Press and hold Playback Key the program will be output Release to stop it LTP output Output LTP channels in advanced without Dimmer output Then push up Playback Fader to output Dimmer 9 8 3 Use Playback Menu Playback menu is used to set the run parameters of Multi Step Program Press TIME PB key to enter Playback menu select program by Playback Key then set the speed...

Page 30: ...p Program control area as shown on the right can control the program its number will be displayed in LCD screen which is connected to the area 2 ways to connect First Push Playback Fader or press Attribute Key to connect the corresponding program Indicator of corresponding Attribute Key will flash fast Second Press TIME PB key to enter Playback menu then press Attribute Key to connect the correspo...

Page 31: ...ime menu as shown on the right Select program by Playback Key set time by Cursor Key or Wheel A B Range 0 1s 59m 59s Clear the selected item by pressing CLR Time soft key Remark The modification of time doesn t affect the running program modified time will be used until the Playback Fader is pulled down to 0 and pushed up again 9 10 Fader Synchronization of Playback Path PROGRAM FadeSync Enter Fad...

Page 32: ...ric Key 10 1 Edit SCENE Record Scene 1 Manual Run to edit lighting effects Superimpose and run multiple saved scenes or playbacks also can do 2 Press and hold RECORD Select fixtures Press Scene Numeric Key to finish recording TIPS Step in parentheses can be skipped if it s skipped data of all fixtures will be recorded Attribute can also be chosen to record Press and hold RECORD Select single or mu...

Page 33: ...chronous Parallel Operation Through MIDI interfaces Master Slave consoles can be connected to achieve synchronous parallel operation it means the Slave console will follow the operation of the Master console Operation that can be Synchronous Playback including faders Playback Keys Page Keys Go Stop Keys STEP Key and Scene Operation Steps are as follows 1 Enter Midi Sync menu to set the Master Slav...

Page 34: ...Show Numeric Key to prepare for recording 2 The recording will start when there is recordable operation like push faders turn pages etc TIPS it s recommended to press key CLEAR after the recording starts in order to clear the outputting data and record the initial parameters 3 Press the Light Show Numeric Key again to end recording Play Press corresponding Numeric Key to start playing TIPS Press i...

Page 35: ... upgrade is finished the console will automatically restart Upgrade will not affect user s data in the console 15 Data Protection Users can protect their own data in the console by the function DataLock and Login Password Steps to enter Data Protection menu 1 Press and hold SETUP Key turn on the console hold the keys until the LCD screen displays INPUT PASSWORD 2 Press Numeric Key 11 13 18 20 toge...

Reviews: