background image


 8 

F RO N T   C O N T RO L   PA N E L


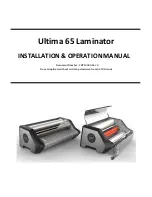
Figure 7: Front Control Panel 


LOW 

When lit, this Light Emitting Diode (LED) indicates 
that the amount of distilled water in the humidifier 
bottle is running low and needs to be replenished. 


HUMIDITY VOLUME 

The position of this setting knob controls the amount 
of time the humidifier is ON during a 60-second 
period.   

During the STOP and IDLE Modes, the humidifier 
runs for the number of seconds that the knob is set to.  
For example, if the humidity volume setting is set on 
10, the humidifier will run for 10 seconds and cycle off 
for 50 seconds to complete the 60-second cycle. 

During the RUN Mode, humidifier runs for 2 times 
the number the knob is on.  For example, if the 
humidity volume setting is set on 10, the humidifier 
will run for 20 seconds and cycle off for 40 seconds to 
complete the 60-second cycle. 

NOTE:  When the humidifier is in operation, the 

humidity volume LED will be lit. 

RUN/IDLE/STOP 

When pressed, the selected mode is enabled, and the 
previously set mode is disabled. These touch switches 
are used to select the mode of transport powered by 
the feed motor. The three selectable modes are the 
RUN, IDLE, and STOP Modes.  A lit LED in the two 
o’clock position from the mode selection switch 
indicates the selected mode. 


RUN Mode 

In RUN Mode, the motor, fans and heaters are ON.  

IDLE Mode 

In IDLE Mode the motor is ON, while the heaters 
and fan are both OFF. 

STOP Mode 

In STOP Mode, the motor, heaters and fans are OFF. 

NOTE:  The humidifier operates in all three 

modes. 

ROTATE SHUTTER 

The shutter is located at the exit point of the lacquer 
container. The purpose of the shutter is to maintain 
the humidity level within the lacquer container. When 
blinking, the rotate shutter LED indicates that the 
shutter is not in the correct position and needs to be 
manually rotated (see the “Shutter Control Lever” 
section).  

Normally, whenever the laminator is in either STOP 
or IDLE modes, the shutter should be closed. 
Whenever the laminator is set to RUN mode, the 
shutter must be open. 

If the shutter is open when in STOP or IDLE Mode, 
the LED will blink to indicate the shutter needs to be 
closed. 

If the shutter is closed and then the RUN mode is 
selected, the machine will not be allowed to enter 
RUN mode.   


Summary of Contents for ACCU-18XE

Page 1: ...ACCU 18XE Liquid Laminator ACCU 18XE Liquid Laminator Owner s Operation Manual...

Page 2: ...NER 10 HUMIDIFIER SYSTEM 11 PRINT CATCH TRAY 11 SHUTTER CONTROL LEVER 12 BELT AND DRYER ASSEMBLIES 12 DRAIN VALVE AND PLUG 12 MATERIALS AND SUBSTRATES 13 OPERATIONS 14 MEASURING VISCOSITY 14 START UP...

Page 3: ...d for use with Neschen Accutech lacquer only Use of other manufacturers lacquer may damage the machine and will void any warranty WARNING This laminator is designed for laminating Any use for purposes...

Page 4: ...Material Safety Data Sheets MSDS for important health safety and environmental information Always observe manufacturers recommendations when handling chemicals To obtain MSDS Sheets for any Neschen A...

Page 5: ...of the roller containing the plastic gear pointing to the right NOTE Make sure that the bushings are tight against roller cores and that the bushing shoulder is sitting inside of the roller brackets F...

Page 6: ...e warranty ELECTRICAL REQUIREMENTS Connect the laminator in accordance with details as listed on the identification label located below the rear control panel Refer also to the Technical Specification...

Page 7: ...are contained Belt and Dryer Assembly An array of 9 fans and 3 heaters used to dry lacquer on coated images refer to figure 15 Shutter Control Lever Lever used to open and close the shutter Humidifier...

Page 8: ...e touch switches are used to select the mode of transport powered by the feed motor The three selectable modes are the RUN IDLE and STOP Modes A lit LED in the two o clock position from the mode selec...

Page 9: ...nob counterclockwise will cause the speed of the motor to decrease F R Forward Reverse The selected Motor Direction Touch Switch controls the direction of the feed motor forward F and reverse R The LE...

Page 10: ...dity volume adjustment knob which is used to maintain the correct viscosity of the lacquer See the Processing Images section Because of the controlled environment the laminator can be operated for one...

Page 11: ...e nebulizer not in the upright position and without water may damage the unit and will void the warranty The humidifier system has a water supply bottle which MUST be checked daily and filled as requi...

Page 12: ...d images over the air dryer system The speed at which the images move is controlled using the speed switch on the front control panel AIR DRYER SYSTEM The air dryer system is an array of nine fans 120...

Page 13: ...his from happening feed small size images into the center of the in feed slot If images do fall they can be retrieved through the rear opening of the dryer after the main power is turned OFF CAUTION S...

Page 14: ...cosity Cup 3 A stopwatch Figure 17 2 Zahn Viscosity Cup MEASUREMENT PROCEDURE 1 Immerse the 2 Zahn Cup fully in the lacquer 2 Raise the cup out of the lacquer Immediately as the top edge of the 2 Zahn...

Page 15: ...om transfer roller when full 6 Turn on the laminator and set it to the IDLE mode 7 Adjust the roller height by following the instructions in the Roller Height Adjustment section 8 Adjust the scraper a...

Page 16: ...top metal roller and middle silicone rubber roller for excess lacquer Allow a couple of minutes of run time for excess lacquer to disappear Excess lacquer between the rollers will be picked up by the...

Page 17: ...st the roller height and scraper tension before processing images 7 When finished set the transport mode switch to IDLE and then close the shutter 8 At the end of the day measure the lacquer viscosity...

Page 18: ...one part household detergent i e Simple Green 409 etc 10 Rinse the scraper in the cleaning solution and then reinstall the scraper 11 Run the machine in IDLE for an additional 15 20 minutes while you...

Page 19: ...Inspect fan operation and if faulty call Technical Service Prints not exiting machine Shutter is not open Open shutter and if necessary remove jammed images by running unit in reverse Run speed is too...

Page 20: ...below the rear control panel WARNING If your laminator does not operate correctly contact technical service immediately SERVICE AND REPLACEMENT PARTS Service and maintenance must be performed fully i...

Page 21: ...Phase 115 VAC 50 60 Hz 12A 230 VAC 50 60 Hz 6A Environment Temperature 50 F to 86 F 10 C to 30 C Relative Humidity 30 to 79 Relative Humidity Moisture Dry Moisture Free Environment Cleanliness Dirt f...

Page 22: ...22 STIFFENER SCRAPER BLADE STAINLESS STEEL 88300520 SCRAPER BLADE PLASTIC 88160519 SCRAPER ASSEMBLY blade stiffener bracket and shield 88300525 BUSHING ROLLERS TRANSPORT SHAFT 88300526 GEAR 52 TOOTH 8...

Page 23: ...G Any unauthorized changes or modifications to this unit without Neschen Accutech s prior written approval will void the user s warranty and will transfer health and safety obligations to the user WAR...

Page 24: ...Tel 888 490 4232 Fax 410 579 8959 Note Neschen Accutech recommends that your main power be installed by a licensed electrician in accordance with electrical codes in your area Specifications are subj...

Reviews: