background image


Version: 161017

/PAL/H:…/kunder/BulgarianPost


Page | 4 


OPERATION MANUAL Postmaster - 6000


The 6000 System 

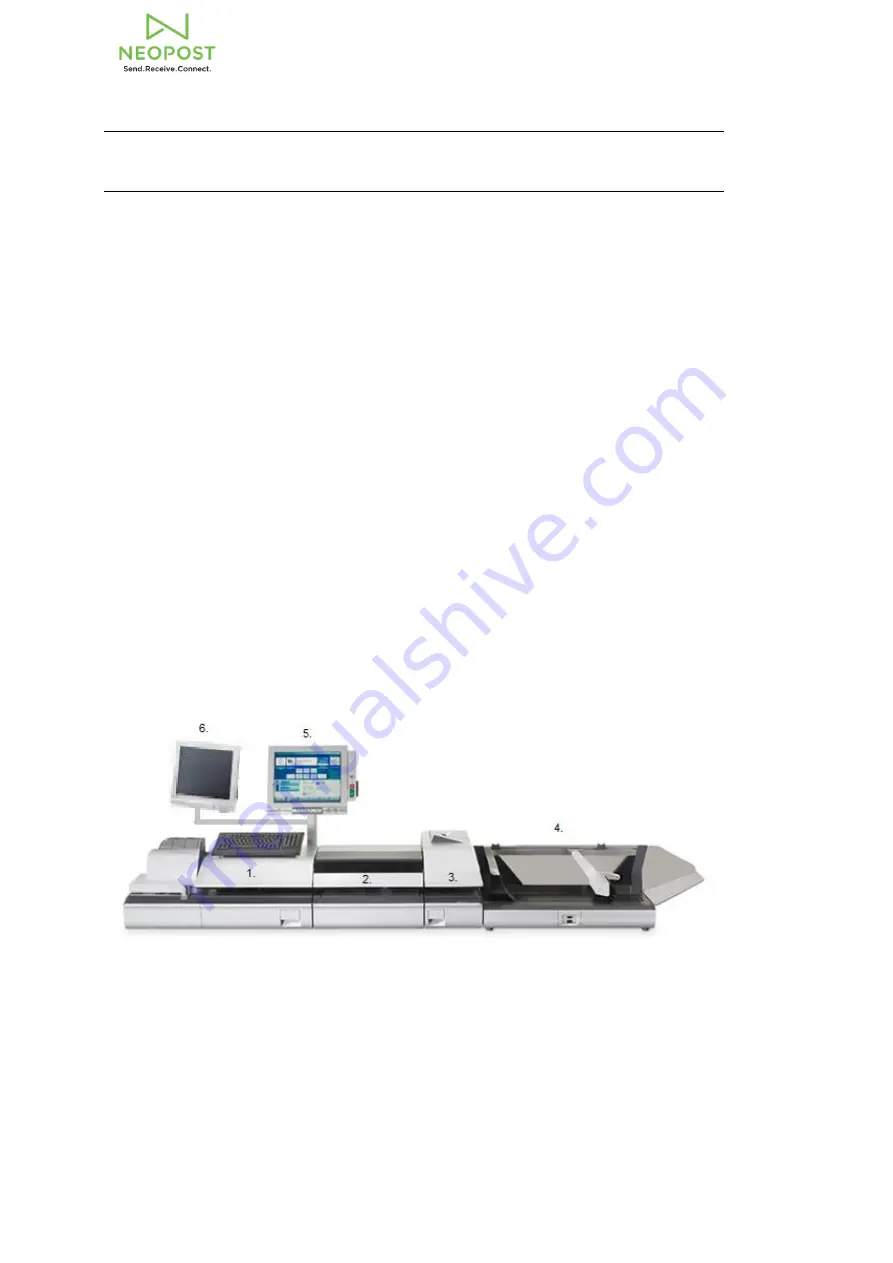
The Postmaster -6000 consist of the following components: 
 
1)


Mix Mail Feeder Unit 


Automatic feeder of all mail 
 

2)


Scale Unit 


The scale is used to measure the weight of the mail items 
 

3)


Printing Unit 


Print PPI on mail pieces 
 

4)


Conveyer stacker Unit 


To collect registered  mail for easy pick up by operator 
 

5)


Touch screen control Unit for machine 


To control the complete Unit 


Start/stop 


Change PPI marking 
 

6)


Touch screen unit for Postmaster program 


To control the accounting program 


Summary of Contents for POSTMASTER 6000

Page 1: ...POSTMASTER 6000 2016 OPERATION MANUAL POSTMASTER 6000 NEOPOST Box 1126 171 22 Solna Sweden ...

Page 2: ... We therefore recommend to get acquainted with all information provided prior to using the system and its components The right use of the system and its components will increase the benefits you derive from using it but also minimize the risks by avoiding hazardous situations This document is made as a supporting tool for operators using the Postmaster 6000 There might be incomplete or incorrect i...

Page 3: ...ical use 3 The 6000 System 4 Start up machine Instructions 5 Operation Procedures 6 Maintenance Menu 9 Customer tree 10 Registration of Company 11 Registration of rate groups 14 Registration of rate types 15 Registration of rate button 16 Registration of rate 17 Printing reports 18 Cleaning Procedures 20 Practical recommendations 22 ...

Page 4: ... manuals and instructions If not so supplied to you during the delivery and or installation of the MSA 6000 please contact your Neopost supplier immediately Typical use Only use the machine in a legal and safe manner Respect the warning signs and symbols found on the machine Keep in mind that long hair jewellery and clothing can get caught in machinery The machine shall be used only when it is int...

Page 5: ... feeder of all mail 2 Scale Unit The scale is used to measure the weight of the mail items 3 Printing Unit Print PPI on mail pieces 4 Conveyer stacker Unit To collect registered mail for easy pick up by operator 5 Touch screen control Unit for machine To control the complete Unit Start stop Change PPI marking 6 Touch screen unit for Postmaster program To control the accounting program ...

Page 6: ...ces on the conveyor belts or in the machines prior to switching on the machine 2 Put on the power switches on off on the right side of the base Machine is starting up If power switch already switch on press the Sleep wake key on the machine control touch screen to wake or sleep mode 3 Enter pin code if used 4 Press button Imprint Memories on the machine screen 5 Press button Bulgarian Post 6 The m...

Page 7: ...nual User guide 6000 machine Note that the explanation which is given is based on test runs done by Neopost and can vary from actual customer information If something is unclear please do not hesitate to contact the Neopost service desk Accounting process 1 Make sure that the machine control screen is awake 2 Start up the computer if not started 3 Go to desktop and start Postmaster see pic 4 You a...

Page 8: ...eding 8 Start running the machine with the green button next to the machine screen To stop the feeding press the red button next to the green 9 For manual input of mail use the Manual input function a Press the Manual input button b Fill in weight of item c Fill in numbers of item to be registered d Press OK e A transaction is made for these items on chosen customer and rate 10 Before changing to ...

Page 9: ...nce menu see chapter maintenance menu b Open folder Transaction yyyy mm dd date c Check date of folder d If wrong date right click on folder and change e Press F5 to update the view f Find transaction with error g Open transaction to see content i Only possible to edit change customer number ii Press OK to close and save h Delete transaction i Right click on the transaction ii Select delete transa...

Page 10: ...se to the folder you want to review Click the left button If selecting for example companies all companies registered are shown to the right in the menu Company Here is the company s data set Customer groups Connecting customer to groups Customer Registration of customer accounts Rates Registration of the various rates and prices Rate group Grouping the rates into groups on the registration menu R...

Page 11: ... the customers It is the customer that the cost is recorded on When printing for internal charge you get a total for the different customers Customer belongs to customer groups and there are all customer postage costs within customer group together to form a total All groups of clients postage will be added together for a grand total for the entire company If you have several companies you get a g...

Page 12: ...reate a new company Right click on folder Company A window will appear Insert the customer number Press Tab button to change line Insert the customer name Depending on functions in the program some off the fields is mandatory Press the Save button to register the company The new company will now appear on the right side of the window To check or change settings on a company double click with the l...

Page 13: ...at customer group for printing To create a new customer group Right Click on Customer Group folder A new window will appear Enter the number of the customer group Enter the customer group name Link to Article should be Ingen Koppling Press save The new customer group is now displayed in the right menu If you want to check or change settings on a customer groups double click with the left button on...

Page 14: ...r Enter the number of the customer Enter the the customer name Choose with the drop down list which customer group customer should belong to Then select which company customer should belong to Press save Depending on functions in the program some off the fields is mandatory The new customer will now appear on the right hand menu If you check or change settings on a customer double click with the t...

Page 15: ...a new rate group Right click on the folder Rate group A new window will appear Insert the rate group number Insert the rate group name Press Save This name will be on top of the columns for the rates in the registrations rate menu See example above If you want to check or change settings on rate group double click with the left button on the icon for the rate group the settings will be displayed ...

Page 16: ...eated To create a new rate type Right click on the folder Rate type A new window will appear Insert the rate group number Insert the rate group name Move the cursor to the change color button and press the left button Choose a color with the cursor and press the left button Press OK If using color coding in the registration menu the option Use color coding must be marked Press Save If you want to ...

Page 17: ... possibility to put more rates in the column To create a new Rate button Right click on the folder Rate button A new window will appear Insert the rate button number Insert the rate button name o This name will be on the grey button Press Save If you want to check or change settings on the Rate button double click with the left button on the icon on the item the settings will be displayed ...

Page 18: ...hen running this rate Set Rate button with dropdown list o If many rates in the same rate group rate button could be used to be able to group more rates At max weight ranges the maximum weights for the various postal boundaries are set Enter the first weight limit in grams for example 20 for 20gram or 100 to 100gram Insert price for this weight group If the price is 4 60 this shall be entered as 4...

Page 19: ...NUAL Postmaster 6000 Printing reports Choose print and reports in tool menu Reporting menu is shown Depending on report needed a description on the function will be set Click on dropdown list and choose stored daily report Press print to show the report on screen ...

Page 20: ...he folder Transactions and current transactions are displayed If you want to review transactions made at another date right click on the folder and choose Select the date of transactions with the left mouse button Enter the dates of transactions If there is an error in a transaction delete the entire transaction To delete a transaction Press the F5 key to refresh the transactions in folder Right c...

Page 21: ...Clear mail jammed 2 2 Clean the accessory belts and rollers 2 3 Clean the mail path sensors 2 4 Replacethefeeder fingers 3 Maintaining the weighing system 31 3 1 Clear mail stalled in the dynamic weighing system 4 Maintaining the base 33 4 1 Clear mail jammed in the base 4 2 Clear a label jammed in the base 5 Maintaining the ink system 37 5 1 Display the ink tank data 5 2 Change the ink data 5 3 D...

Page 22: ...Version 161017 PAL H kunder BulgarianPost Page 21 OPERATION MANUAL Postmaster 6000 1 Presentation of the Franking machine 1 1 Practical recommendations 1 2 Equipment overview 1 3 Equipment connection ...

Page 23: ...ment unit If moving call for help Labels Use approved labels only PSD Do not remove a PSD when power is on The device is not hot plug type Cables and connectors Mind the keyboard and carriage flex connection are designed basically for one remove reinsert Veillez à ne pas les couder Do not bend them Do not insert a USB device in the RJ45 ethernet port Before diassembling MAINE POWER CABLE MUST REMA...

Page 24: ...rocessed through the mailing system Print base Prints PPI print on items and labels Stacker optional Collects and stacks processed mail There are three optinal stackers available Control panel Allows the user to operate the mailing system Weighing platform Optional static platform for mail not going through the mailing system Cleaning access Cleaning access for the feeder weighing platform and the...

Page 25: ...supplied with the mailing system Do not use this product on a wet floor or near water In case of liquid spillage disconnect the power cord from the outlet before cleaning Base right side connectors USB devices Keyboard External label dispenser Printer Lan adaptor Bar code reader Cables Communication cable Connects the mixed mail feeder and the dynamic scale Connects the base and the dynamic scale ...

Page 26: ... PAL H kunder BulgarianPost Page 25 OPERATION MANUAL Postmaster 6000 2 Maintenance feeder 2 1 Clear mail jammed 2 2 Clean the accessory belts and rollers 2 3 Clean the mail path sensors 2 4 Replace the feeder fingers ...

Page 27: ...rianPost Page 26 OPERATION MANUAL Postmaster 6000 Clear mail jammed To clear mail jammed in the feeder 1 Open the cover 2 Gently remove jammed envelopes Respect the direction from start to print to remove the envelope 3 Close the cover ...

Page 28: ...ccessory belt and rollers For an optimal efficiency of the machine cleaning should be proceed at least once a week or each time when necessary 1 Use a damp cloth and compressed air 2 Open the cover 3 Clean the belts and rollers with a damp cloth and compressed air Respect the direction when cleaning 4 Close the cover Maintenance feeder ...

Page 29: ...ANUAL Postmaster 6000 Clean the mail path sensors Clean the mail path sensors 1 Use a damp cloth and compressed air 2 Open the cover 3 Verify the sensors Markt in yellow below Wipe them with respect to the direction of the paper 4 Close all covers and assemblies ...

Page 30: ...e part A0002367 Important Before changing fingers verify that they are worn out on both side You can simply switch the upper cover of the finger only one time If both side have been used order new one To remove a feeder finger rubber pad 1 Open the feeder top cover to reach the 3 first fingers 2 Keep firmly the finger pad from both ends 3 Pull the finger pad down till it unclips Maintenance feeder...

Page 31: ...e 30 OPERATION MANUAL Postmaster 6000 To replace a feeder finger rubber pad 1 Insert the location pin 1 of the pad in the locating hole position 2 at both ends of the feeder finger 2 Press the rubber pad against the feeder finger until it clips on ...

Page 32: ...Version 161017 PAL H kunder BulgarianPost Page 31 OPERATION MANUAL Postmaster 6000 3 Maintaining the weighing system 3 1 Clear mail stalled in the dynamic weighing module ...

Page 33: ... Gently remove jammed envelopes respecting the direction of the paper circuit 3 Close the cover To clean the mail path sensors 1 Use a damp cloth 2 Open the cover 3 Check sensors clean the sensors with the cloth in accordance with the direction of the paper path 4 Close the cover Do not lean on or leave any object on the dynamic weighing platform as it may alter its weighing accuracy ...

Page 34: ...Version 161017 PAL H kunder BulgarianPost Page 33 OPERATION MANUAL Postmaster 6000 4 Maintaining the base 1 1 Clear jammed mail in the base 1 2 Clear a label jammed in the base ...

Page 35: ...ase 1 Pull the release handle on the lower assembly of the base 2 Remove gently the jammed envelopes respecting the direction of the paper circuit If the jammed envelopes can t be removed perform the following 3 Hold the handle opened and push on the inside lever to unlock the base drawer 4 Pull the base drawer towards you Maintaining the base ...

Page 36: ...MANUAL Postmaster 6000 5 Gently tilt the base drawer on the left side and remove it 6 Remove gently the jammed envelopes respecting the direction of the paper circuit 7 Pull the base drawer back into place 8 Shut the base drawer by pushing the jam release handle ...

Page 37: ... 1 Try to disengage the blocked label from the top of the dispenser If not possible do the following 2 Remove all labels from the dispenser Check that no label are stuck in the bottom of the dispenser 3 Follow the steps of How to clear a jammed mail in the base When the base drawer is removed press on the blue lever to remove the jammed labels ...

Page 38: ...anPost Page 37 OPERATION MANUAL Postmaster 6000 5 Maintaining the ink system 5 1 Display ink tank data 5 2 Change the ink data 5 3 Display print head information 5 4 Testingthe printing quality 5 5 Clean the printing heads automatically ...

Page 39: ...tem When the tank is empty it must be replaced The inkjet nozzle technology requires clean print heads for excellent print quality The system cleaning process is automatic Display data of the ink tank You can view the level of ink and other data on the ink tank including Percent ink consumption Color of the ink the tank status present or absent Date of first use Change the ink tank 1 Open the ink ...

Page 40: ...N MANUAL Postmaster 6000 2 Press on the blue release lever to disengage the ink tank 3 Pull out the old ink tank 4 Insert the new ink tank then push it ubtil you hear the click 5 Close the drawer The alignment process of the printing heads starts automatically ...

Page 41: ...e 40 OPERATION MANUAL Postmaster 6000 Display print head information To display the print head information 1 As supervisor 2 The print head information screen is displayed Press and select the path Maintenance Ink management Print head information ...

Page 42: ...6000 Test the printing quality To test the printing quality 1 As supervisor 2 The following screen is displayed 3 Press Printing quality test The test starts automatically pres s and select the path Maintenance Ink management Printing quality management Maintaining the ink system ...

Page 43: ...EAD CLEANING The cleaning starts automatically 4 The complete cycle of cleanning containing 3 cycles realize this operation 3 times Total duration approximately 3 minutes 5 To go back to the main menu put the machine on a sleep mode If the printing quality degrades do a cleaning of the ink system Press on And select the path Maintenance Ink level alert Managing the print quality Entretien du systè...

Page 44: ...rsion 161017 PAL H kunder BulgarianPost Page 43 OPERATION MANUAL Postmaster 6000 5 Maintaining the sealer water network 6 1 Fill the sealer bottle 6 2 Clean the water filter 6 3 Clean the moistening ramp ...

Page 45: ...the system runs out of water mail processing continues but the envelopes will be poorly sealed Fill the sealer bottle To add water 1 Remove the bottle from its base and turn it over 2 Unscrew the cap and fill the bottle with water up to the limit marks 3 Screw on the cap and put the bottle back into place Maintaining the sealer water network ...

Page 46: ...ng it towards you 2 Pull the water filter vertically to disengage it 3 Clean the watre filter vertically to disengage it 4 Put the water filter back in place 5 Close the drawer For maximum efficiency of the machine clean it once a month or whenever necessary If the filter is too dirty you can order another contact the Neopost support Maintaining the sealer water network ...

Page 47: ...Postmaster 6000 Maintaining the sealer water network To clean the moistening ramp 1 Open the feeder by pulling the handle towards you 2 Pull up the right of the blue release lever Make sure the system is switched off before cleaning Maintaining the sealer water network ...

Page 48: ...on 161017 PAL H kunder BulgarianPost Page 47 OPERATION MANUAL Postmaster 6000 1 Pull the ramp backwards to disengage it 2 Remove the ramp 3 Clean the ramp with hot water Maintaining the sealer water network ...

Page 49: ...Version 161017 PAL H kunder BulgarianPost Page 48 OPERATION MANUAL Postmaster 6000 6 Re install the ramp by hiring the pipes 7 Push down on the blue lever ...

Reviews: