


NV-HMI-7XX User Manual
39
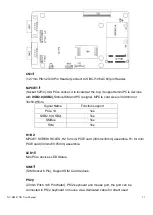
H1/H2:
MPCIE1 SCREW HOLES, H2 for mini PCIE card (30mmx30mm) assemble. H1 for mini
PCIE card (30mmx50.95mm) assemble.
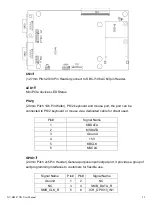
LED1
:
Mini PCIe devices LED Status.
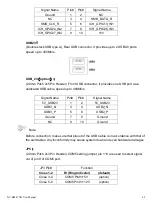
SIM1
(
option
):
(SIM Socket 6 Pin), Support SIM Card devices.
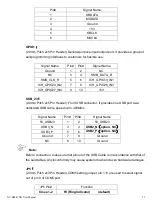
PS_ON1
:
(2.0mm Pitch 1X2 Pin Wafer), ATX Power and Auto Power on jumper setting
.
PS_ON
Mode
Close 1-2
Auto Power on (Default)
Open 1-2
ATX Power
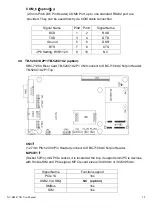
PS_ON2
(
option
):
(2.0mm Pitch 1X2 Pin Wafer),They can be used directly via cable connection to
SBC-7106A JP5.
PS_ON2
SBC-7106A /JP5
Pin1
Pin1
Pin2
Pin2
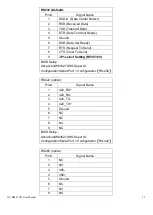
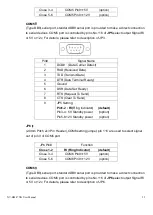
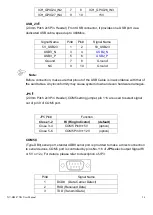
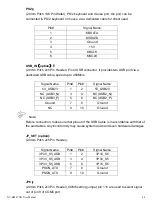
PS2
:
(2.0mm Pitch 1X6 Pin Wafer), PS/2 keyboard and mouse port, the port can be
connected to PS/2 keyboard or mouse via a dedicated cable for direct used.
Pin#
Signal Name
1
KBDATA
2
MSDATA
3
Ground
4
+5V
5
KBCLK
6
MSCLK
GPIO1
:
(2.0mm Pitch 2x5 Pin Header),General-purpose input/output port, it provides a group of
self-programming interfaces to customers for flexible use.
Summary of Contents for NV-HMI-717P
Page 9: ...NV HMI 7XX User Manual 9 1 2 Dimensions Figure 1 1 Dimensions of NV HMI 717...
Page 10: ...NV HMI 7XX User Manual 10 Figure 1 2 Dimensions of NV HMI 721...
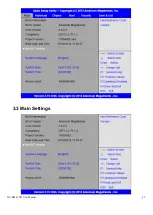
Page 49: ...NV HMI 7XX User Manual 49 3 3 Main Settings...
Page 69: ...NV HMI 7XX User Manual 69 Step 3 Read license agreement Click Yes Step 4 Click Next...
Page 77: ...NV HMI 7XX User Manual 77 Step 2 Select Resistive Touch Step 3 Click Next to continue...
Page 81: ...NV HMI 7XX User Manual 81 Step 2 Select Projected Capacitive Step 3 Click Next to continue...
Page 102: ...NV HMI 7XX User Manual 102 Hardware Saturn Hardware Configuration...
Page 103: ...NV HMI 7XX User Manual 103 About To display information about eGalaxTouch and its version...


