background image


17 


16 


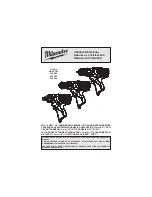
The above pictures have numbers in circled 

in them. See list below. 
 

1 Tool 
2 Retainer 
3 Front 

cover 

4 Stopper 
5 Plug 

Snap off this portion after 
driving in the self-drilling 
anchor. 

7 Turning 

Handle 

8 Anchor 

adapter 

Striking by hammer drill 

10  Move right and left 
11 Hole 

depth 

12 Drift 

Key 

13 Wrench 

out 

14  Taper shank adapter 


15

Drill bit (with tapered shank 

16

Hole depth indicating groove: 
A standard depth conforming 
to the anchor outside diameter 
is indicated. 

17

Core bit 

18

Core bit shank 

19

Center pin 

20

Guide plate 

21

Core bit tip 

22

Oil gauge 
Check the oil quantity by 
holding the body upright. 

23

Re-supply oil when the oil 
level is low 

24

Wear limit 

25

No of carbon brush. 


Precautions on using SDS hammer drill. 
 

1/ Before using the SDS hammer drill always 

make sure the oil supply is full and the screw 

is tight. 


2/ The handle must always be attached to the 

drill before operation takes place. Always 

Place the handle on the side that suits the job 

in hand, do not use the drill without the 

handle as this could invite injuries.  


3/ Safe operation, always make sure you 

have a stable posture and safe footing before 

operating the SDS drill. 


4/ When working at a high level, always 

make sure that no person or persons are 

under you, as this could invite injuries to 

those persons under you. 


5/ Before starting any job like breaking, 

chipping a wall, floor or ceiling, thoroughly 

confirm that no items such as an electric 

cable, water  pipe or conduit are buried inside 

as this could cause injury or flooding.    


ASSEMBLY & OPERATION 

13 

Summary of Contents for CT0721

Page 1: ...INSTRUCTION MANUAL CAUTION Before using this hammer drill or any of its accessories read this manual and follow all its Safety Rules and Operating Instructions SAVE THESE INSTRUCTIONS FOR REFERENCE Sa...

Page 2: ...N TOOLS LTD 20 Station road Rowley Regis West Midlands B65 0JU U K Declare that the design and construction of the following machine in the form supplied by us comply with the requirements of the appr...

Page 3: ...L CT0721 110v 60Hz SDS Chuck Accessory chuck SDS SDS fitting 38mm No Load Speed Voltage 400 min approx 110v 60Hz Reversible No Input power 800 w approx Impact hammer action 4200min approx Sound power...

Page 4: ...ords increase the risk of electric shock When operating a power tool outdoors use an extension cord suitable for outdoor use Use of a cord suitable for outdoor use reduces the risk of electric shock P...

Page 5: ...e working conditions and the work to be performed Use of the power tool for operations different from intended could result in a hazardous situation SERVICE Tool service must be performed only by qual...

Page 6: ...ing symbols may be used on your tool Please study them and learn their meaning Proper interpretation of these symbols will allow you to operate the tool better and safer V volts A amperes Hz hertz W w...

Page 7: ...SDS Chuck Trigger Handle Model CT0721 230v 50Hz cable Model CT0722 110v 60Hz cable Motor Housing KNOW YOUR ROTARY HAMMER DRILL 7...

Page 8: ...amaged do not plug the drill into the power source until the missing or damaged part is replaced Carefully unpack the tools see Components chart at right hand side of this page NOTE See illustration o...

Page 9: ...CARTON CONTENTS 9...

Page 10: ...elt it may be necessary to spin the bit until the shaft drops completely in to place Once you are satisfied the bit has seated release the black shroud this should lock the bit into place Note The bit...

Page 11: ...1 1 2 4 6 1 2 3 5 7 ASSEMBLY OPERATION 11...

Page 12: ...8 10 12 14 9 11 13 15 ASSEMBLY OPERATION 12...

Page 13: ...imit 25 No of carbon brush Precautions on using SDS hammer drill 1 Before using the SDS hammer drill always make sure the oil supply is full and the screw is tight 2 The handle must always be attached...

Page 14: ...hexagonal hole on the front cover until it reaches the extremity 2 By slightly tapping the top of the bit holder with a wooden mallet replace the bit holder to grip the bit firmly Fig 1 2 38mm 1 Push...

Page 15: ...drill bit with tapered shank to the taper shank adaptor 2 Turn on the switch and drill a hole until it reaches the hole depth indicating groove see Fig 9 3 After clearing out the dust and particles wi...

Page 16: ...se Shell oil ROTELLA 40 engine oil or equivalent this is sold at most shop or filling stations anywhere Maintenance and inspection 1 Inspecting the tool When using dull tool bits this can cause motor...

Page 17: ...rating oils etc to come in contact with plastic parts They contain chemicals that can damage weaken or destroy plastic DO NOT abuse power tools Abusive practices can damage the tool as well as the wor...

Page 18: ...PARTS DIAGRAM 18...

Page 19: ...arts Use of any other parts may create a HAZARD or cause damage to your power tool Any attempt to repair or replace electrical parts on this power tool may create a hazard unless repair is performed b...

Page 20: ...APPLICATION TOOL BITS The tool bits shown can be purchased from Tool shops Hire shops etc 20...

Page 21: ...te chipping digging Drilling and squaring by applying optional accessories Application Examples Installation of piping and wiring sanitary facility instillation machinery instillation water supply and...

Reviews: