


22
Turning the TV On and Off
Standby Setup: The AC-DC adapter and the AC power cord
must be set up and connected to have the TV in standby mode
ready to be turned on. Press the
ON/OFF
button on the side
panel of the TV to go into standby mode.
1. If the TV is in standby mode, press the
POWER
button
on the remote controller or the TV itself to turn the TV on.
2. Press the Power button again on the remote controller or
the
ON/OFF
button the TV itself to turn the TV off.
Note
: If the TV is on and the
POWER
button is pressed to turn
the TV off, the TV goes into standby mode.
Programme selection
You can select a Programme number with the
PR
xy
button
or NUMBER buttons.
Volume adjustment
Press the
VOL
Ïq
button to adjust the sound level.
Quick view
Press the
Q.VIEW
button to view the last channel you were
watching.
Sound mute function
Press the
MUTE
(
) button. The sound is switched off and the
mute display
appears.
To cancel mute mode, press the
MUTE
(
) button again,
VOL
Ïq
or
SSM
button.
On screen menu language selection
The menu can be displayed on the screen in desired
language. First, select your language.
1. Press the
MENU
button.
2. Select the
Setup
menu, then press
VOL
Ïq
button.
3. Select the
Language
menu, then press
VOL
Ïq
button.
4. Press the
PR
xy
button to select your desired
language.
5. Press the
TV/AV
button.
All the on screen displays will appear in the selected
language.
Basic Operation
TV/AV
I/II LIST
SLEEP Q.VIEW
MENU
PC/ *
PSM
SSM
ARC/ *
REVEAL
TEXT
MIX
SIZE
HOLD
INDEX
UPDATE
TIME
10
Position :
ƇƉ
Back : MENU
Exit :TV/AV
Language
English
Deutsch
Français
Español
Italiano
22
11
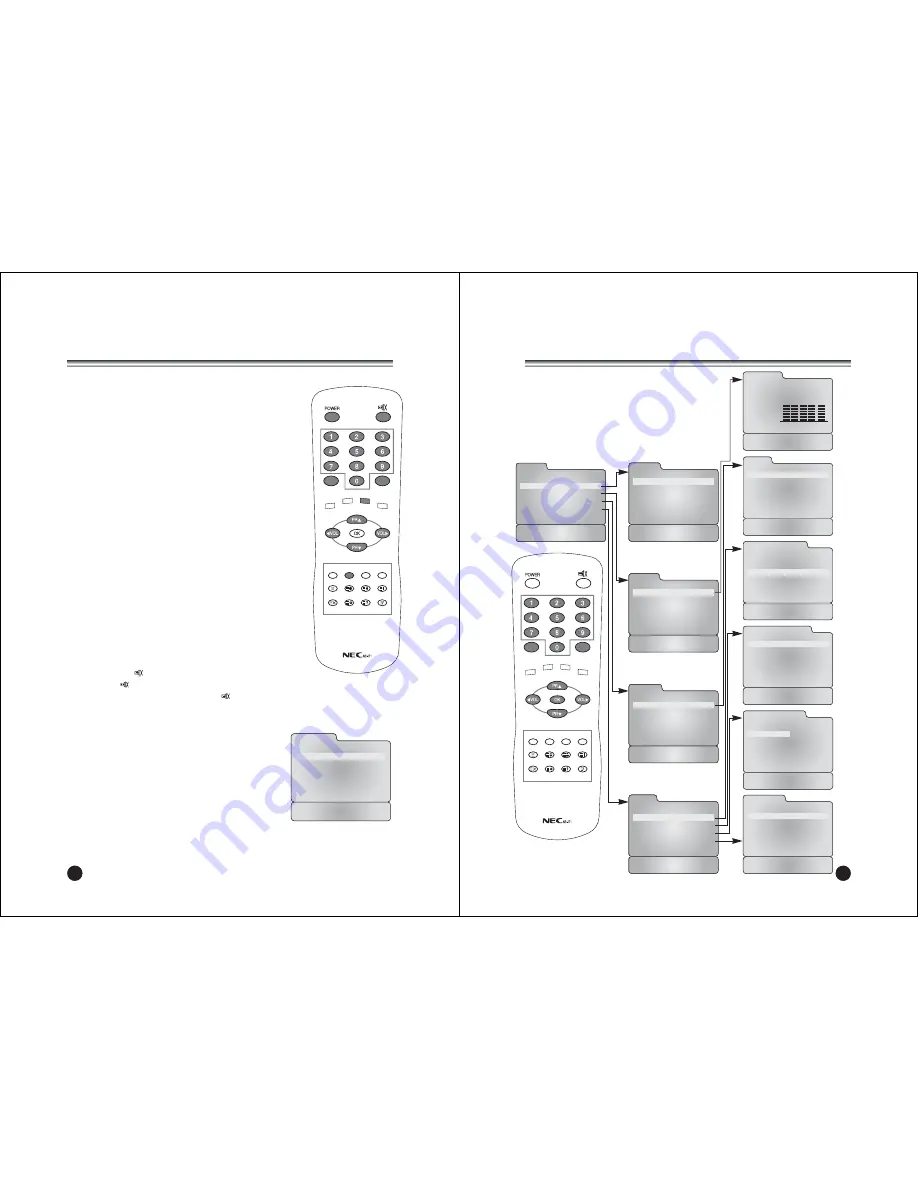
On Screen Menus and Displays
TV/AV
I/II LIST
SLEEP Q.VIEW
MENU
PC/ *
PSM
SSM
ARC/ *
REVEAL
TEXT
MIX
SIZE
HOLD
INDEX
UPDATE
TIME
Auto Programme
System
BG
Start
Position :
ƇƉ
Back : MENU
Adjust :
ȖȘ
Exit : TV/AV
Position :
ƇƉ
Back : MENU
Exit : TV/AV
Language
English
Deutsch
Français
Español
Italiano
Clock
Clock --:--
Off Time
--:-- Off
On Time
--:-- Off
On Programme
1
Position :
ƇƉ
Back : MENU
Adjust :
ȖȘ
Exit : TV/AV
Manual Programme
Programme
1
Channel
69
Table
V/UHF
System
BG
Search
ȘȘȘ
Memorize
Name
-----
Position :
ƇƉ
Back : MENU
Adjust :
ȖȘ
Exit : TV/AV
MENU
Picture
Ș
Sound
Ș
Special
Ș
Setup
Ș
Position :
ƇƉ
Next :
ȖȘ
Exit : TV/AV
Setup
Auto Programme
Ș
Manual Programme
Ș
Programme Edit
Ș
Language
Ș
Position :
ƇƉ
Back : MENU
Next :
ȖȘ
Exit : TV/AV
Picture
Contrast
90
Brightness
75
Colour
75
Sharpness
60
Position :
ƇƉ
Back : MENU
Adjust :
ȖȘ
Exit : TV/AV
Sound
Equalizer
Ș
Balance
0
AVL
Off
Surround
Off
Sound Mode
MONO
Position :
ƇƉ
Back : MENU
Next :
ȖȘ
Exit : TV/AV
Special
Clock
Ș
Blue Back
Off
Auto Sleep
Off
Childlock
Off
Radio
Off
ARC
16:9
Position :
ƇƉ
Back : MENU
Next :
ȖȘ
Exit : TV/AV
Programme Edit
P00 ----- P05 -----
P01 ----- P06 -----
P02 ----- P07 -----
P03 ----- P08 -----
P04 ----- P09 -----
ƅ
Delete
ƅ
Name
ƅ
Move
ƅ
Skip
Position :
ƇƉȖȘ
Back : MENU
Exit : TV/AV
Equalizer
Flat
Music
Movie
Speech
User
Position :
ƇƉ
Back : MENU
Exit : TV/AV
0.1 0.5 1.5 5.0 10KHz
1. Press the
MENU
button to display main menu.
2. Press the
PR
xy
button to select menus-Picture,
Sound, Special, Setup.
3. Adjust each menu with the
VOL
Ïq
button.
4. Press the
MENU
button to return to preceding
menu.
5. Press the
TV/AV
button to finish adjusting menu.
Summary of Contents for NLT-17WF
Page 16: ...500 028Z041028 ...


