background image

28

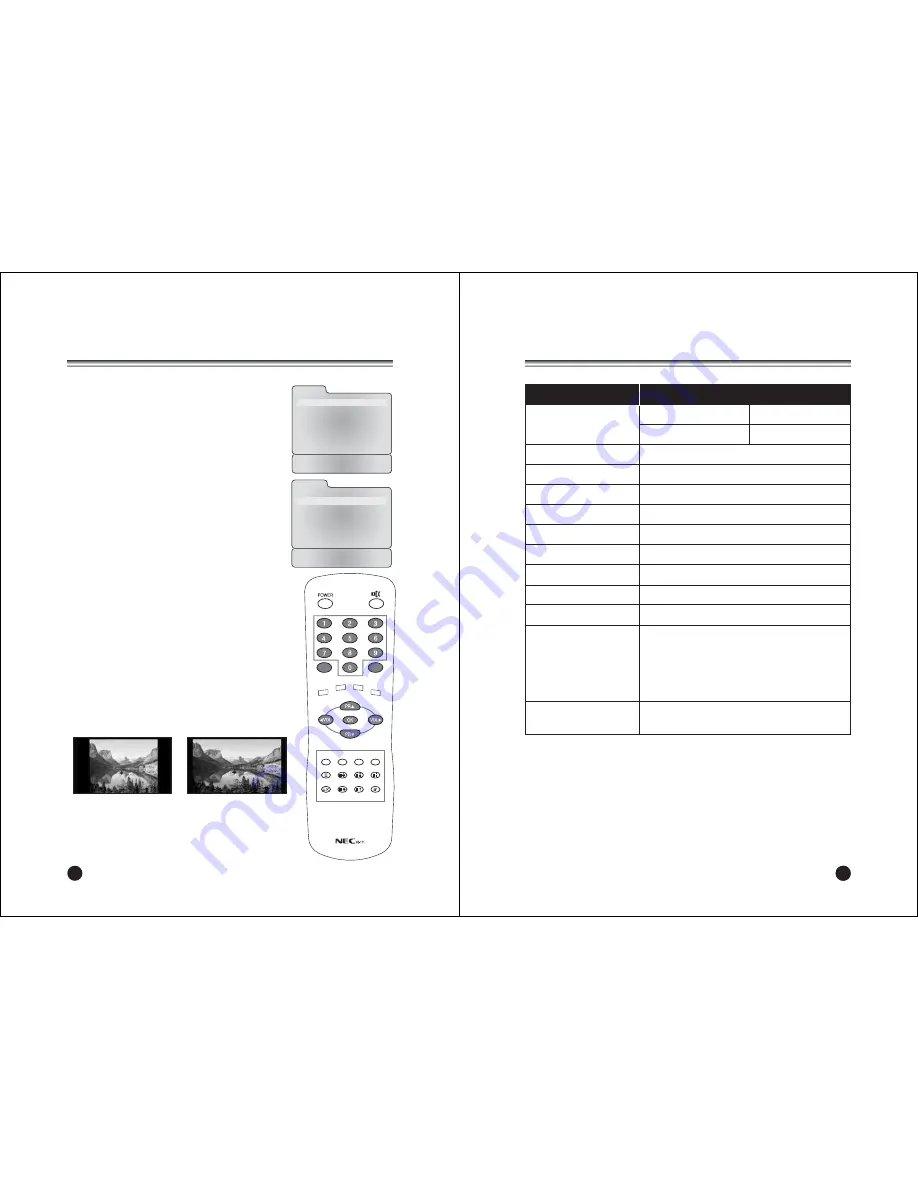
Connecting PC as monitor

TV/AV

I/II LIST

SLEEP Q.VIEW

MENU

PC/ *

PSM

SSM

ARC/ *

REVEAL

TEXT

MIX

SIZE

HOLD

INDEX

UPDATE

TIME

MENU

Picture

Ș

Sound

Ș

H/V Position

Ș

Auto
Reset

1280  x 768   60Hz

Position : 

ƇƉ

Next : 

ȖȘ

Exit : TV/AV

Picture

Contrast

60

Brightness

80

Temperature

6500K

Clock

50

Phase

34

ARC

16:9

Position : 

ƇƉ

Back : MENU

Adjust : 

ȖȘ

Exit : TV/AV

This function is possible only when the set is in PC mode.
Use the 

TV/AV

button on remote controller.

Picture adjustment

You can adjust picture 

Contrast

,

Brightness

,

Temperature

,

Clock

,

Phase

and

ARC

as you prefer.

1. Press the 

TV/AV

button to select the PC mode.

2. Press the 

MENU

button.

3. Select the  

Picture

.

4. Press the 

PR

xy

button to select the desired

picture item.

5. Press the 

VOL

Ïq

button to make appropriate

adjustments.

6. Press the 

TV/AV

button to exit menu.

Contrast

This function is to adjust 

picture

to light/dark.

Brightness

This function is to adjust 

brightness

of picture.

Temperature

Temperature is a measure of the warmth of the image
color.

Clock

This function is to minimize any vertical bars or stripes
visible on the screen background. And the horizontal
screen size will also change.

Note

: This mediation range is different according to 

the supported resolution. 

Phase

This function allows you to remove any horizontal
noise and clear or sharpen the image of characters.

ARC (Aspect Ratio Control)

Selects a screen mode.-4:3 or 16:9 

* 4:3 mode : Sets the picture to 4:3 normal mode.
* 16:9 mode : Sets the picture to 16:9 wide mode.

4 : 3

16 : 9

22

29

Product Specifications

Model

NLT-17WF

Main body

Horizontal size    520(520) mm    Thickness      60(180) mm

(With stand)

Height

320(365) mm    Weight 

4.85(6.2) kg

Power requirements

DC 12V/5.0A

Television system

PAL-BG, I, DK / SECAM-BG, DK / NTSC-M

Television programme

VHF: 0~12 UHF :21~69 Cable : S1~S41

LCD Panel

17.1" WIDE TFT LCD panel

Resolution

WXGA(1280 X 768)

Power consumption

50W

Stand by Power consumption      Below 3W

External antenna impedance 75

Audio output

2W + 2W

External input ports

• ANTENNA IN (TV/RADIO)    • DC 12V IN

• PC/DTV IN

• COMPONENT IN

• HEADPHONE OUT

• COMPONENT audio IN

• S-VIDEO IN

• AV IN

• PC AUDIO IN

AC/DC Power Adaptor

100-240Va.c. 50/60Hz

Output : 12Vd.c., 5.0A

Note

. a. Although LCD panel uses highly precise technology, it may display blank 

pixels, dark spots, or lightning pixels on the screen. This is normal and not 
an indication of a defect

b. Technical specifications are subject to change without    notice

Summary of Contents for NLT-17WF

Page 1: ...indicated on the label of the AC DC adaptor a Connect the DC plug of the AC DC adaptor to the 12V socket of the set b Connect the AC DC adaptor and its power cord c Connect the power cord to an AC mains In the event of thunderstorms or power cuts please pull out the mains plug of the AC DC adaptor and the aerial plug Do not allow anything to rest upon or roll over the power cord and do not place t...

Page 2: ...th a soft clean cloth If the screen requires additional cleaning use a clean damp cloth Do not use liquid or aerosol cleaners 22 5 Contents Warnings 3 4 Contents 5 Supplied Accessories 6 Controls 7 9 Controller of panel 7 Remote controller 8 9 Basic Operation 10 Turning the TV On and Off 10 Programme selection 10 Volume adjustment 10 Q View 10 Sound mute function 10 On screen Language selection 10...

Page 3: ... VCR to the S VIDEO input Connect the audio outputs of an S VIDEO VCR to the AV IN audio inputs 7 A V IN Connect the Audio Video outputs of external equipment to these inputs 8 ANT Antenna input 1 2 3 4 5 6 7 8 1 ON OFF Switches TV set on or off 2 MENU Displays a menu 3 PR Programme Up Down Selects a programme or a menu item 4 VOL Volume Up Down Adjusts the volume Adjusts menu settings 5 TV AV Sel...

Page 4: ...e batteries with correct polarity to and to 3 Replace the battery compartment cover Install two high quality 1 5V AAA alkaline batteries Don t mix old batteries with new batteries Remove batteries when you won t use the remote controller for a long time Liquid leakage from old batteries may cause operation failure uNotes for using remote controller Make sure there are no objects between the remote...

Page 5: ...RC REVEAL TEXT MIX SIZE HOLD INDEX UPDATE TIME 10 Position ƇƉ Back MENU Exit TV AV Language English Deutsch Français Español Italiano 22 11 On Screen Menus and Displays TV AV I II LIST SLEEP Q VIEW MENU PC PSM SSM ARC REVEAL TEXT MIX SIZE HOLD INDEX UPDATE TIME Auto Programme System BG Start Position ƇƉ Back MENU Adjust ȖȘ Exit TV AV Position ƇƉ Back MENU Exit TV AV Language English Deutsch França...

Page 6: ...atever order you desire Also you can assign a programme name with 5 characters to each programme number 1 Press the MENU button 2 Select the Setup menu then press VOLÏqbutton 3 Select Manual Programme menu then press VOLÏqbutton 4 Select a programme with the VOLÏq button or number buttons 5 Press the PRxy button to select Channel menu 6 Press the VOLÏq button or directly number buttons to select a...

Page 7: ...Rxy button during normal TV viewing If you want to select the skipped programme directly enter the programme number with the NUMBER buttons or select it in the Programme Edit TV AV I II LIST SLEEP Q VIEW MENU PC PSM SSM ARC REVEAL TEXT MIX SIZE HOLD INDEX UPDATE TIME 14 Programme Edit P00 P05 P01 P06 P02 P07 P03 P08 P04 P09 ƅDelete ƅName ƅMove ƅSkip Position ƇƉ ȖȘ Back MENU Exit TV AV Edit Name Ƈ ...

Page 8: ...und Mode menu If the sound quality is poor while you are watching a programme broadcast in Stereo select MONO with the VOLÏq button Press the VOLÏq button to switch between MONO and STEREO Please note that it works only when the broadcast is done in stereo If a programme is received in two language dual language you can switch to DUALм or DUALн by pressing the VOLÏq button repeatedly DUALм sends t...

Page 9: ...Ïqbutton 3 Press the PRxy button to select Auto Sleep 4 Press the VOLÏq button to select On 5 Press the TV AV button to return to normal TV viewing Note If the set connects with the external input source in the middle of a lapse of 10 minutes after a TV channel stops broadcasting Auto Sleep function is automatically canceled Childlock Childlock menu is necessary in order to disable the buttons on ...

Page 10: ...z Programme 1 5MUWZQbM Delete Auto Programme Ș 7NN QUM 7NN Edit Name Ș 6IUM Position ƇƉ Adjust ȖȘ Exit TV AV Radio Auto Programme Start Back MENU Start ȖȘ Exit TV AV Radio Name Edit Ƈ Station P01 Ɖ Adjust ƇƉ ȖȘ Back MENU Confirm OK Exit TV AV Note If you want to listen to the radio in the PC mode the ANT Jack must be connected to the antenna input of the set OFF time in the radio means the LCD bac...

Page 11: ...git sub page number This is displayed along the bottom of the screen Press this button again to exit this function TIME Press this button to display the concealed information such as solutions of riddles or puzzles Press this button again to remove the information from the display REVEAL 22 Antenna connection 1 Connect RF out on the VCR to the Antenna input on the rear of the TV 2 Connect the ante...

Page 12: ...ay be a small flicker when the set is switched on This is normal there is nothing wrong with the set b Some dot defects may appear on the screen like Red Green or Blue spots However this will have no impact or effect on the monitor performance c The resolution which is not supported will appear at the resolution which gets near to the resolution which is supported d When resolutions are displayed ...

Page 13: ...put with PRxy button 14 Press the VOLÏq button to select Input PC Radio Note a When selecting radio mode sound mode alternates between MONO and STEREO according to the received signal b In PC mode radio mode supports only Auto c In PC mode radio control function is on an equality with Radio function in the front See page 20 Sound Equalizer Ș Balance 0 AVL Off Surround Off Sound Mode L R Input PC P...

Page 14: ... And the horizontal screen size will also change Note This mediation range is different according to the supported resolution Phase This function allows you to remove any horizontal noise and clear or sharpen the image of characters ARC Aspect Ratio Control Selects a screen mode 4 3 or 16 9 4 3 mode Sets the picture to 4 3 normal mode 16 9 mode Sets the picture to 16 9 wide mode 4 3 16 9 22 29 Pro...

Page 15: ...tion Change the batteries Make sure the infrared transmitter window is not receiving strong light such as light from fluorescent lamps The reception may be weak The state of the broadcast may also be bad Make sure the antenna is facing the right direction Make sure the outside antenna is not disconnected Make sure the antenna is facing the right direction There may be reflected electric waves from...

Page 16: ...500 028Z041028 ...

Reviews: