background image

E – 10

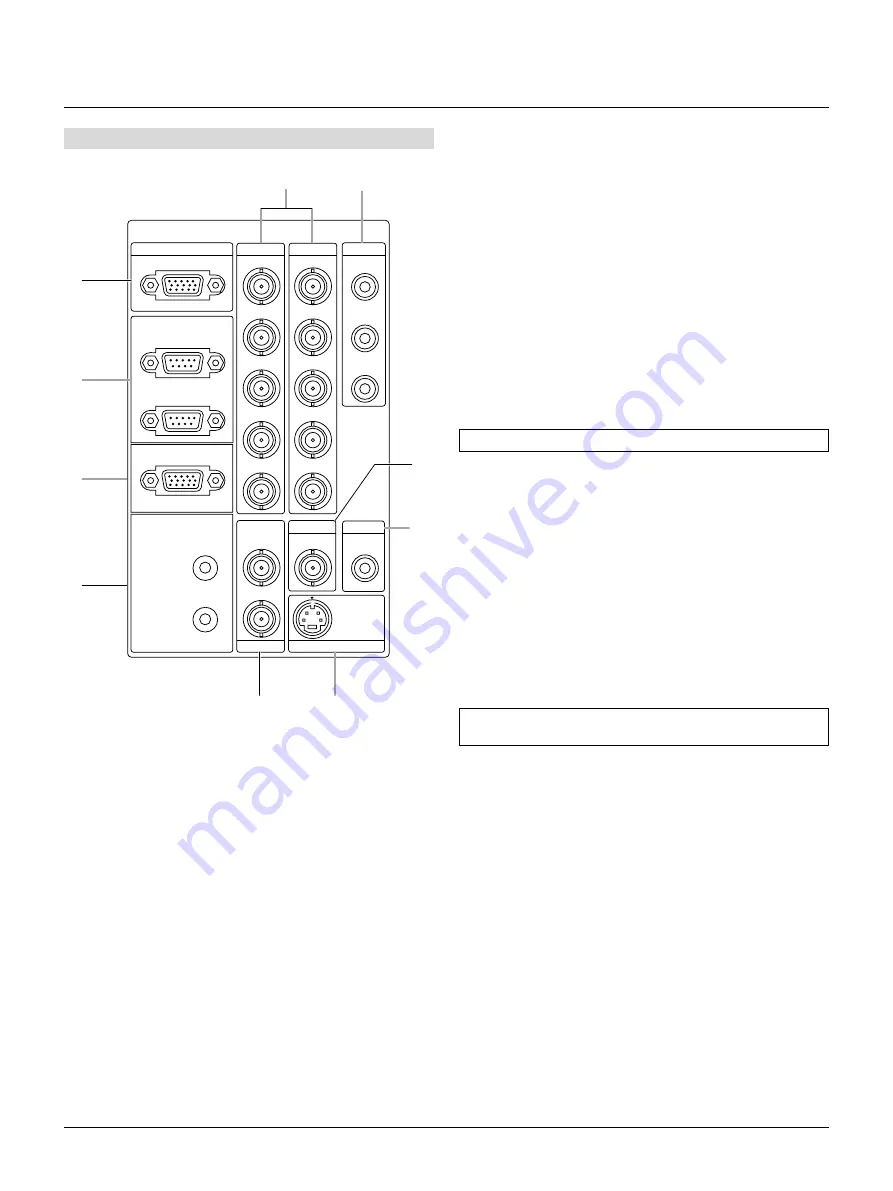
Terminal Panel

1

INPUT3

RGB

R/Cr

G/Y

B/Cb

H/HV

V

R/Cr

Cr

Y

G/Y

B/Cb

Cb

H/HV

V

OPTION

IN

OUT

REMOTE1

REMOTE2

INPUT7

INPUT8

INPUT5

S-VIDEO1

Y

C

S-VIDEO2

VIDEO1

VIDEO2

INPUT6

IN

OUT

INPUT2

INPUT1

INPUT4

2

3

4

9

10

5

6

7

8

1 INPUT 3 RGB Connector (Mini D-Sub 15 pin)

Connect your PC or other analog RGB equipment such as a high-
definition document camera.

2 Option Connector (Mini D-Sub 9 pin)

For system expansion such as PC-control.
IN:

connect to the external equipment such as PC.

OUT: for daisy-chaining multiple projectors and operating them

with the same external equipment. To do so, connect to a
second projector' s IN terminal to relay the input at the IN
terminal of the first projector until all the projectors are con-
nected.

3 REMOTE 1 Connector (Mini D-Sub 15 pin)

This terminal allows external control of the projector from either
the Switcher or from an external control. When the
Switcher is used, connect to the REMOTE 1 terminal on the back
of the Switcher.

NOTE: This projector is compatible with the ISS-6020 Switcher.

4 REMOTE 2 Jacks

IN:

wired remote control input.

OUT: for daisy-chaining multiple projectors and operating them

with the same remote control. To do so, connect to a second
projector' s IN terminal to relay the input at the IN terminal
of the first projector until all the projectors are connected.

5 INPUT 1 and INPUT 2 Terminals (BNC)

Connect R,G,B,H (Horizontal sync) and V (Vertical sync) outputs
of the external equipment such as the Switcher. If using a compo-
nent with a combined sync (SYNC) output, connect it to the H/V
terminal.
Also connect component video outputs (Y/Cb/Cr) of the external
equipment such as DVD player.

NOTE: The INPUT 2 terminal does not support SW1 Level and
SW2 Level modes for the ISS-6020 switcher.

6 INPUT 4 Cr/Y/Cb Terminal (RCA)

Connect component video outputs (Y/Cb/Cr) of the external equip-
ment such as DVD player.

NOTE: This terminal accepts component signal only.

7 INPUT 5 VIDEO 1 Terminal (BNC)

Connect to the BNC video output of the external equipment such
as a VCR or laser disk player.

8 INPUT 6 VIDEO 2 Terminal (RCA)

Connect to the RCA video output of the external equipment such
as a VCR or laser disk player.

9 INPUT 7 S-VIDEO 1 Terminal (BNC)

Connect to the Y/C separate BNC video outputs of the external
equipment such as a VCR or laser disk player.

Summary of Contents for MultiSync XT5000

Page 1: ...MultiSync XT5000 High Light Output Projection System User s Manual ...

Page 2: ...ential area is likely to cause harmful interference in which case the user will be required to correct the interference at his own expense CAUTION RISK OF ELECTRIC SHOCK DO NOT OPEN RISQUE D ELECTROCUTION NE PAS OUVRIR ATTENTION CAUTION TO REDUCE THE RISK OF ELECTRIC SHOCK DO NOT OPEN COVER NO USER SERVICEABLE PARTS IN SIDE REFER SERVICING TO QUALIFIED SERVICE PERSONNEL This symbol warns the user ...

Page 3: ...tor on a flat level surface and in a dry area free from dust and moisture 2 Do not place the projector in direct sunlight near heaters or heat radiating appliances 3 Exposure to direct sunlight smoke or steam could harm internal components 4 Handle your projector carefully Dropping or jarring your projector could damage internal components 5 Do not place heavy objects on top of the projector 6 If ...

Page 4: ...is utiliser de détergent forts ou de solvants tels que de l alcool ou du diluant 3 Utiliser un souffleur ou du papier pour objectif pour nettoyer l objectif et faire attention de ne pas griffer ou endommager l objectif Précautions contre l incendie ou la décharge 1 S assurer qu il y ait une ventilation suffisante et que les ouvertures ne soient pas obstruées afin d éviter des concentrations potent...

Page 5: ...set up including ad justment of user controls These costs are the responsibility of the NECTECH dealer from whom the product was purchased 3 Payment of shipping charges HOW YOU CAN GET WARRANTY SERVICE 1 To obtain service on your product consult the dealer from whom you purchased the product or ship it prepaid to any authorized NECTECH service center 2 Whenever warranty service is required the ori...

Page 6: ...nce White Balance E 35 Brightness R G B E 35 Contrast R G B E 35 Lamp E 35 Lamp Mode E 35 Lamp Output E 35 Factory Default E 36 All Data Current Signal E 36 Image Options E 36 Image Mode E 36 Aspect Ratio E 36 VD Delay E 36 Clamp Timing E 36 Video Mode E 36 Gamma E 36 Noise Reduction E 37 Color Matrix E 37 Y C Delay E 37 Motion Select E 37 Motion Level E 37 YTR Adjustment E 37 CTR Adjustment E 37 ...

Page 7: ...offers built in redun dancy An image can be projected from in front or behind a screen and the projector can even be installed on the ceiling Supports RGB digital HDTV and DVD signals as well as most IBMVGA S VGA XGA SXGA scaling Macintosh or any other RGB signals within a horizontal frequency range or 15 to 83 5 kHz and a vertical frequency range of 50 to 85 Hz This includes NTSC3 58 PAL PAL60 SE...

Page 8: ... switch to the ON position I and the POWER indicator on the rear panel will turn amber in color Press to the OFF position 0 to turn the main power off NOTE When turning off the main power first return the projector to the standby condition by pressing the POWER OFF button on the remote control or the POWER button on the rear panel and then turn off the main POWER switch These procedures are nec es...

Page 9: ... when the projector is not connected with the switcher correctly or when the switcher is turned off 4 Two Digit Display INDICATOR Displays projector error codes The current projec tor ID address is displayed in normal operation ON OFF Switch Turns the INDICATOR on or off 5 Enter Button Executes your menu selection and activates items selected from the menu When the slidebar or dialog box is diplay...

Page 10: ... wired remote control input OUT for daisy chaining multiple projectors and operating them with the same remote control To do so connect to a second projector s IN terminal to relay the input at the IN terminal of the first projector until all the projectors are connected 5 INPUT 1 and INPUT 2 Terminals BNC Connect R G B H Horizontal sync and V Vertical sync outputs of the external equipment such a...

Page 11: ... triple stacking Use the supplied DFP cable to connect the OUTPUT terminal of the first projector to the second projector s INPUT until all the pro jectors are connected These connectors can also be used to accept TMDS standard Pannel Link digital signal output from a digital ready computer In this case some graphics cards may cause flick ering noise on the screen List of Recommended Graphics Card...

Page 12: ...y the Color adjustment screen Pressing this button sequentially selects Color Temperature White Balance Switcher RGB Gain Ref White Bal 7 ADJUST PICTURE Press to display the Picture adjustment screen Pressing this button sequentially selects Brightness Contrast Color Hue Sharpness V Aperture 8 IMAGE PROJECTOR Press to display the Image Option screen Pressing this button se quentially selects Image...

Page 13: ...sing and holding CTL pressing this button allows you to adjust the lens focus 25 MAGNIFY ZOOM Magnify the size of a target portion While pressing and holding CTL pressing this button allows you to zoom the lens in and out 26 CTL Used in conjunction with other buttons similar to a shift key on a computer 27 Infrared Transmitter Direct the remote control toward the remote sensor on the projec tor ca...

Page 14: ...duce shock to the projector or the lens Do not touch the lens surface Doing so can degrade the optical performance Installation Procedures 1 Remove the upper and the lower lens hood 1 Remove the protective sponge 2 Remove the two screws Push down on the lower lens hood then lift up and pull off the upper lens hood 3 Lift up the lower lens hood by 1 cm to release the hook Re move the lower lens hoo...

Page 15: ...ctor of the lens unit into the socket of the ex tension cable attached to the projector 4 Reattach the lens hood 1 Insert the lower lens hood into the hook 2 Insert the upper lens hood while pushing the left and right bottom Secure the two screws Hook 5 Attach the dust cap NOTE This completes installation for the optional lens TL 08SF and TL 1Z For TL 2Z and TL 4Z attach the supplied dust cap as s...

Page 16: ...F 5 degree C and 95 degrees F 35 degree C Do not expose the projector to moisture dust or smoke This will degrade the screen image Ensure that you have adequate ventilation around your projector for proper heat dissipation Do not cover the vents on the projector cabinet 80 100 200 300 400 500 Setting Up The projector To set up and use the projector you must first do 1 Determine the screen size and...

Page 17: ... Power cable stopper is provided with the projector so that the cable cannot be accidentally unplugged from the AC IN 1 Remove two screws These screws are used later again 2 Plug the power cable into the AC IN and then attach the stopper 3 Fix the stopper using the two screws ...

Page 18: ...r to shut off the light completely on the screen To use the shutter function hold down the CTL button and press the MUTE PICTURE button on the remote control Lens Shift Adjustable Range Lens can be shifted within the shaded area as shown below using the normal projection position as a starting point H width of projected image V height of projected image 0 23H 0 3H 0 5V 0 32V Screen Width H Screen ...

Page 19: ...is the same for both rear and front projection Contact your dealer if you need a transparent screen If you re projecting the image from the rear and your image is in verted use the Main Menu Projector Options Setup Orientation to access to correct the orientation See page E 39 Stack Projection up to three units The MultiSync XT5000 can be stacked without any additional fram ing gravity stacking On...

Page 20: ... same display orientation 2 Hookup 2 1 Use the supplied DFP cable to connect the RGB DIGITAL output INPUT 9 of the master projector to the RGB DIGITAL input of the slave projector the second and third stack until all the projectors are connected 2 2 Next using a commercially available bi directional RS 232C cable connect the OPTION OUT terminal of the master pro jector to the OPTION IN terminal of...

Page 21: ... page E 40 for setting the communi cation speed 4 2 2 Select the appropriate speed between 4800 and 38400 4 3 Set the Link Mode on each projector 4 3 1 Select Main Menu Projector Options Link Mode 4 3 2 Select Slave on the slave projector s 4 3 3 Select Master on the master projectors See page E 40 for setting Link Mode 4 4 Project a source image from all projectors 4 4 1 Display any signal onto t...

Page 22: ...jector Or connect to the INPUT3 RGB on your projector 3 Turn on the projector and the document camera NOTE Refer to your document camera s owner s manual for more information about your camera s video output requirements Connecting Your VCR Or Laser Disc Player Use common RCA cables not provided to connect your VCR or la ser disc player to your MultiSync XT5000 Projector To make these connections ...

Page 23: ...and signal selection Select Main Menu Projector Options Switcher Control SW1 Level See page E 40 for the information in detail For more information on the Switcher refer to the user s manual accompanying the ISS 6020 ISS 6020G Switcher All cables mentioned above are optional The Switcher ISS 6020 ISS 6020G Personal computer VCR From R G B H V on separate H and V on the RGB OUTPUT module To REMOTE1...

Page 24: ...ontrol cables Select Main Menu Projector Options Switcher Control SW2 Level See page E 40 for the information in detail Refer to the user s manual accompanying the Switcher Cables mentioned are not included with the projector NOTE Be sure to set all the slide switches S8603 of the Switcher to RS 422 positions Set the one on the last slave Switcher to the appropriate position to match the connected...

Page 25: ...ot 10 of the Master Master Slave 1 Slave 2 Slave 3 Slave 4 Slave 5 Slave 6 Slave 7 Slave 8 Slave 9 Slave 10 1 2 3 4 5 6 7 8 OPEN 1 2 3 4 5 6 7 8 OPEN 1 2 3 4 5 6 7 8 OPEN 1 2 3 4 5 6 7 8 OPEN 1 2 3 4 5 6 7 8 OPEN 1 2 3 4 5 6 7 8 OPEN 1 2 3 4 5 6 7 8 OPEN 1 2 3 4 5 6 7 8 OPEN 1 2 3 4 5 6 7 8 OPEN 1 2 3 4 5 6 7 8 OPEN 1 2 3 4 5 6 7 8 OPEN ISS 6020 ISS 6020G Output to Setting of S8601 NOTE Slave numb...

Page 26: ...hen the Switcher is used 9 Identifying the Projector 15 Ground Others Used inside the Projector Normally set to OPEN When using with the Switcher ISS 6020 ISS 6020G connect no 1 2 6 7 9 and15 pins of the projector to the same no pins of the switcher as shown below 5 4 3 2 1 10 9 8 7 6 15 14 13 12 11 Pin Configuration of Optional CTL 6010 Cable REMOTE 1 connector of the Switcher mini D sub 15 pin f...

Page 27: ...erminal The projector can be controlled by the same format signal as the supplied remote control from the external controller regardless of setting on Pin 14 NOTE When turning off the power to the projector using the external control do not disconnect the plug from the power outlet These procedures are to protect your projector and the connected equipment 11pin OPEN OPEN OPEN OPEN OPEN OPEN OPEN O...

Page 28: ...ber You can operate the projector assigned the same ID number as the remote control Projector ID 01 Projector ID 02 Projector ID 03 Remote Address 03 You can daisy chain multiple projectors and operate them separately with the same remote control in wired operation To do so Use the remote control cable to connect the Remote Control Output of one projector to the Remote Control Input of the next un...

Page 29: ...e power cable IMPORTANT The projector should be unplugged if it will not be used for an ex tended period If you want to turn off the image briefly five minutes or less press the MUTE PICTURE button instead of turning the projector off and on The projector will display a black blue image or logo if no input signal is present Do not turn the projector off and then immediately back on The Projector n...

Page 30: ...s one letter or numeral in the entry screen CTL TEST Displays the Passcode Entry window INPUT 1 10 in SW Level mode Displays the Select switcher Input Slot window NOTE This feature is available for SW 2 Level mode only When the SW 1 Level mode is selected pressing INPUT key switches to the corresponding slot without displaying the Select Slot window CTL MENU ADDRESS Displays the remote ID entry wi...

Page 31: ...D Default Source Select Communication Port Communication Speed Front Floor Rear Ceiling Rear Floor Front Ceiling Blue Black Logo RGB1 RGB2 Auto RGB Component VIDEO1 2 S VIDEO1 2 Switcher Auto NTSC3 58 NTSC4 43 PAL PAL60 SECAM On Off On Off On Off Off Caption1 4 Text1 4 Off S1 S2 RGB1 RGB2 75Ω Hi Z Enable Disable 1 64 Last Select D SUB IR 4800 9600 19200 38400 Source Name Input Terminal Entry No Ho...

Page 32: ...ilable A highlighted triangle indicates the item is active Tab Indicates a group of features in a dialog box Selecting any tab brings its page to the front Radio button Use this round button to select an option in a dialog box Check box Place a checkmark in the square box to turn the option On Slide bar Indicates settings or the direction of adjustment OK button Press to confirm your setting You w...

Page 33: ...the list and place it on the clipboard in the projector Paste Enables you to paste the signal placed on the clip board to any other line of the list To do this select Paste and then select the line number you want to paste to Last press ENTER When complete select OK and press ENTER To exit without storing setting select Cancel Select Source Name and press ENTER to display the Source Name Edit wind...

Page 34: ...ff User can adjust the image display functions Horizon tal Position Vertical Position and Pixel Adjust manually Horizontal Vertical Position when Auto Adjust is off Adjusts the image location from left to right This adjustment is made automatically when the Auto Adjust is turned on Pixel Adjust when Auto Adjust is off Displays the Clock and Phase adjustments Clock Use this item with the Auto Adjus...

Page 35: ...n bottom Aiming a projector upward on a wall rather than straight at a wall creates this distortion Use the or buttons on the slide bar to correct this keystone trapezoidal distortion NOTE With the projector aimed directly at the screen the maxi mum keystone angle that can be corrected is 15 degrees Reference White Balance Expert mode only This feature adjusts the white balance that is used as a r...

Page 36: ...squeezed video picture with a 16 to 9 aspect ratio expanded in the horizontal direc tion converted to 4 to 3 aspect ratio Cinema Displays DVD s squeeze video picture with a 16 to 9 aspect ratio compressed in the vertical direction main taining the 16 to 9 aspect ratio Anamorphic Select this mode for use of anamorphic lens This mode will change the aspect ratio according to the lens This feature is...

Page 37: ...djusts level of motion detection when Adaptive is selected YTR Adjustmen Expert mode only Adjusts Luminance Transient Time CTR Adjustment Expert mode only Adjusts Chroma Transient Time Telecine Expert mode only Use 3 2 pull down correction to eliminate jitter and artifacts in video Auto For film source such as a DVD player Off For signals other than film sources Signal Level This function is only ...

Page 38: ...eature is set Even after setting On Off Timer turning the projector on or off with the remote control is possible There are two time display formats 24 hour or AM PM for mat 1 Open the On OFF Timer window 2 Select EDIT and press ENTER on the remote control to open the EDIT window 3 Set the Week Day On Time and Off Time using the CURSOR buttons and INPUT buttons 1 thru 10 To cancel the on time or o...

Page 39: ...r Wide Zoom signal OFF Does not identify any S video signal Page 2 Signal Select RGB 1 2 Allows you to choose RGB for an RGB source such as a computer or Component for a component video source such as a DVD player Normally select Auto and the projector automatically detects a component signal However there may be some component sig nals that the projector is unable to detect If this is the case se...

Page 40: ...l to display Passcode window Entry Registers new passcode To register a new passcode 1 Select Entry to open the Entry window 2 Enter a four digit passcode using the 1 through 10 but tons Each time you press the INPUT button an asterisk will appear next to the Enter the Passcode message NOTE 0000 and 9999 cannot be used as a passcode 3 Once you have finished entering your FOUR DIGIT passcode press ...

Page 41: ... be selected You can turn on or off red green or blue respectively Displaying Current Status of Link Mode When selecting the tab Page 4 you will get the following dialog box Master ID Indicates the Master projector Status Indicates the status of the master projector Connected PJ Indicates number of connected slave pro jectors Slave No Indicates serial number of the slave projec tor ID Indicates ID...

Page 42: ... 84 Short focal lens TL 1Z 1 5 2 5 1 Zoom lens TL 2Z 2 5 4 0 1 Zoom lens TL 4Z 4 0 7 0 1 Zoom lens Image Size 80 500 diagonal at 4 3 Electrical Scan Rate Horizontal 15 83 5 kHz Vertical 50 85 Hz Pixel Clock 100MHz Inputs RGB YCr Pr Cb Pb 2 BNC RGB H HV V 1 D dub 15 pin YPbPr YCrCb 1 RCA Video 1 BNC 1 RCA S Video 1 S Video Terminal Y C 1 BNC Digital I O RGB DIGITAL 1 MDR 20pin DFP Specification Max...

Page 43: ...avity stacked Dimensions 22 0 W x 26 9 D x 12 2 H with foot not including lens 560 mm W x 682 mm D x 308 mm H with foot not including lens Net Weight 94 8 lbs 43Kg Environment Operational Temperature 40 to 95 F 5 to 35 C Humidity 20 80 non condensing Storage 14 to 122 F 10 to 50 C Regulations USA UL 1950 FCC Class A Canada CSA950 C UL Europe EN60950 EN55022 Class A EN55024 EN61000 3 2 EN61000 3 3 ...

Page 44: ... 43 3kHz 35 1kHz 37 9kHz 53 7kHz 48 4kHz 56 5kHz 60 0kHz 35 0kHz 49 7kHz 31 5kHz 58 1kHz 31 5kHz 37 9kHz 48 4kHz 70Hz 75Hz 72Hz 75Hz 85Hz 56Hz 60Hz 85Hz 60Hz 70Hz 75Hz 67Hz 75Hz 70Hz 72Hz 60Hz 60Hz 60Hz 75 0MHz 78 8MHz 31 5MHz 31 5MHz 36 0MHz 36 0MHz 40 0MHz 56 3MHz 65 0MHz 75 0MHz 78 8MHz 30 2MHz 57 3MHz 28 3MHz 79 0MHz 31 5MHz 40 0MHz 65 0MHz 1 1 1 2 1 2 1 2 1 2 1 2 1 1 1 1 1 2 1 1 2 1 Analog RG...

Page 45: ...justment L N CTR Adjustment L N Telecine L N Signal Level White L L RGB Gain L L Y Cb Cr Gain L L Y Pb Pr Gain L L Projector Timer L L Options Menu M M Setup N N Link Mode M M Switcher Control N N Passcode M M PC Card Files N N Help M M Test Pattern N N Direct Key LENS SHIFT I I FOCUS I I ZOOM I I MENU L L POWER I I INPUT M L MUTE PICTURE SHUTTER OSD L L Each letter used in the above note means th...

Page 46: ...E 46 Appendix 506 19 92 326 12 83 174 6 85 682 26 85 35 5 1 40 308 12 13 30 1 18 54 2 13 Dimensions The drawings do not include the lens part Unit mm inch ...

Reviews: