background image

 8

OSM

®

 (On-Screen Manager) control buttons on the front of the

monitor function as follows:

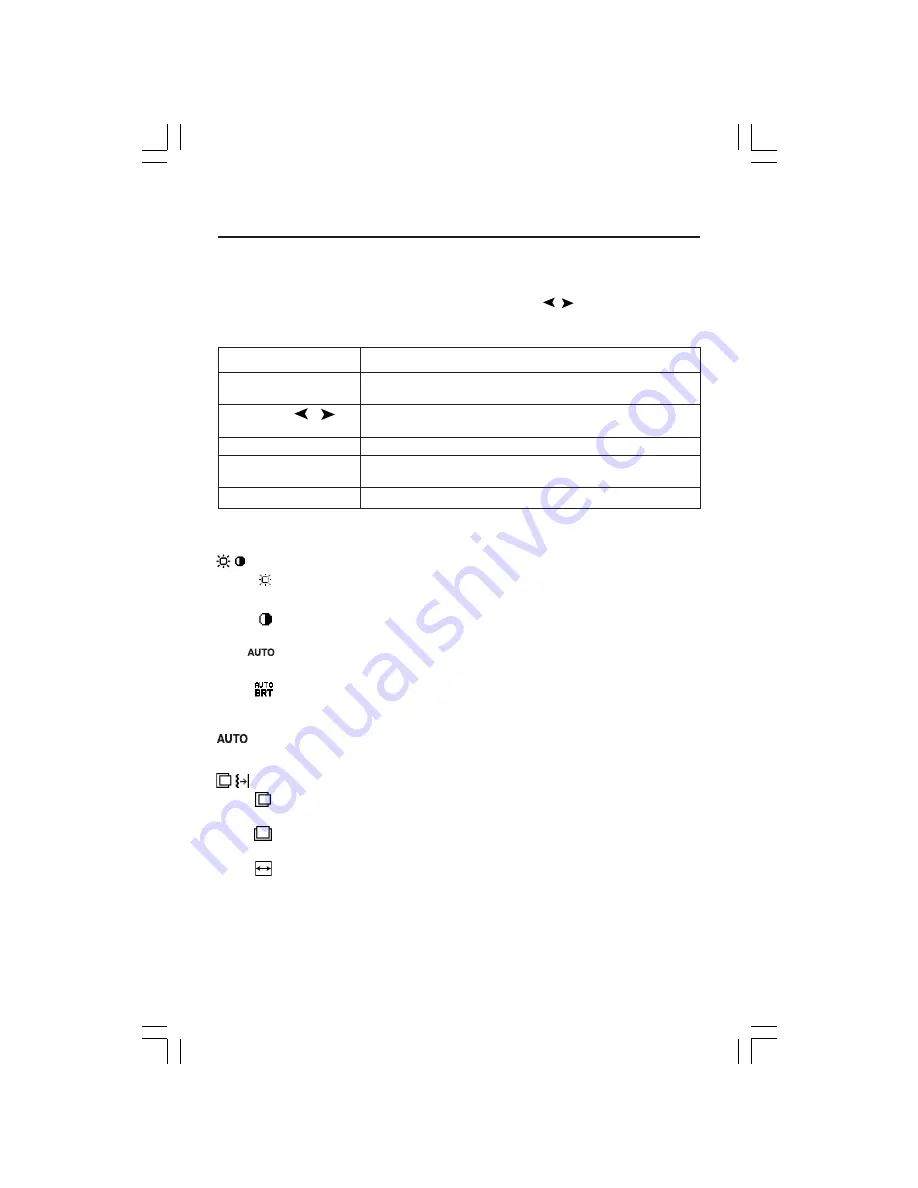
To access OSM menu, press any of the control buttons (    ,    , 

+

).

To change signal input, press the SELECT button.
NOTE: OSM must be closed in order to change signal input.

Menu

EXIT

Exits the OSM controls.
Exits to the OSM main menu.

CONTROL 


/

Moves the highlighted area left/right to select control menus.
Moves the highlighted area up/down to select one of the controls.

ADJUST 


/

+

Moves the bar left/right to increase or decrease the adjustment.

SELECT

Activates the Auto Adjust function.  Enter the OSM controls.
Enter the OSM sub menu.

RESET

Resets the highlighted control menu to the factory setting.

NOTE: When 

RESET

 is pressed in the main and sub-menu, a warning window will appear

allowing you to cancel the 

RESET

 function by pressing the EXIT button.

Brightness/Contrast Controls

BRIGHTNESS

Adjusts the overall image and background screen brightness.

CONTRAST

Adjusts the image brightness in relation to the background.

AUTO CONTRAST (Analog input only)

Adjusts the image displayed for non-standard video inputs.

AUTO BRIGHTNESS

This function adjusts the brightness automatically for the best CONTRAST and
BRIGHTNESS setting based on the white display area.

Auto Adjust 

(Analog input only)

Automatically adjusts the Image Position and H. Size settings and Fine settings.

Image Controls

LEFT / RIGHT

Controls Horizontal Image Position within the display area of the LCD.

DOWN / UP

Controls Vertical Image Position within the display area of the LCD.

H.SIZE (Analog input only)

Adjusts the horizontal size by increasing or decreasing this setting.
Should the “AUTO Adjust function” do not give you a satisfactory picture
setting, a further tuning can be performed using the “H.Size” function (dot
clock). For this a Moiré test pattern could be used. This function may alter the

Controls

LCD2080UXimanual_053105.pmd

6/2/05, 2:51 PM

8

Summary of Contents for MultiSync LCD2080UXi

Page 1: ...MultiSync LCD2080UXi TM ...

Page 2: ...y 19 TCO 99 20 TCO 03 22 Manufacturer s Recycling and Energy Information 23 Avertissement 25 Contenu 26 Mise en marche rapide 27 Commandes 32 Usage recommandé 36 Fiche technique 38 Fonctions 39 Dépannage 41 Références 42 Garantie limitée 43 TCO 99 44 TCO 03 46 Informations du fabricant relatives au recylage et aux économies d énergie 47 Appendix 49 ...

Page 3: ... Class B digital device pursuant to part 15 of the FCC Rules These limits are designed to provide reasonable protection against harmful interference in a residential installation This equipment generates uses and can radiate radio frequency energy and if not installed and used in accordance with the instructions may cause harmful interference to radio communications However there is no guarantee t...

Page 4: ...deo Signal Cable 15 pin mini D SUB male to DVI A Video Signal Cable DVI D to DVI D cable User s Manual Cable cover Remember to save your original box and packing material to transport or ship the monitor MultiSync LCD2080UXi TM Power Cord 15 pin mini D SUB male to DVI A User s Manual Cable Cover DVI D to DVI D cable LCD2080UXimanual_053105 pmd 6 2 05 2 51 PM 2 ...

Page 5: ...onitor and the other end to the power outlet Figure C 1 NOTE If you use this monitor at AC125 240V please refer to Recommended Use section of this manual for proper selection of AC power cord 5 The Vacation Switch on the left side of the monitor must be turned on Turn on the monitor with the front power button Figure D 1 and the computer NOTE The Vacation Switch is a true on off switch If this swi...

Page 6: ...pe mode To raise or lower screen place hands on each side of the monitor and lift or lower to the desired height Figure RL 1 NOTE Handle with care when raising or lowering the monitor screen Figure RL 1 NEC optional product attachment Do not use this connector unless specified LCD2080UXimanual_053105 pmd 6 2 05 2 51 PM 4 ...

Page 7: ...ockwise from Landscape to Portrait or counter clockwise from Portrait to Landscape Figure R 1 To toggle the orientation of the OSM menu between Landscape and Portrait modes refer to the Controls section OSM Rotation function Figure R 1 Swivel Grasp both sides of the monitor screen with your hands and adjust the swivel as desired Figure TS 2 Tilt Grasp top and bottom sides of the monitor screen wit...

Page 8: ...onitor is now ready for mounting in an alternate manner 5 Reverse this process to reattach stand tighten the two bottom screws turn stand 180 counterclockwise you will hear two clicks and tighten two top screws NOTE Use only VESA compatible alternative mounting method 100mm pitch NOTE Handle with care when removing monitor stand Quick Start continued Figure S 2 and Figure S 3 Caution Use the origi...

Page 9: ...rt your monitor Perform AUTO ADJUST by using OSM AUTO Press select to adjust For additional information on user controls and software utilities visit our website at www necdisplay com SIMPLE X FULL X DETAIL Size Fine Position O O O X O O O 1 5 seconds 2 seconds 10 to 20 seconds Time Contrast Long cable capability 1 Black Level O Automatic adjustment is performed X Automatic adjustment is not perfo...

Page 10: ...t Controls BRIGHTNESS Adjusts the overall image and background screen brightness CONTRAST Adjusts the image brightness in relation to the background AUTO CONTRAST Analog input only Adjusts the image displayed for non standard video inputs AUTO BRIGHTNESS This function adjusts the brightness automatically for the best CONTRAST and BRIGHTNESS setting based on the white display area Auto Adjust Analo...

Page 11: ...sRGB and NATIVE color presets are standard and cannot be changed Color temperature increases or decreases in each preset R Y G C B M S Increases or decreases Red Yellow Green Cyan Blue Magenta and Saturation depending upon which is selected The change in color will appear on screen and the direction increase or decrease will be shown by the color bars NATIVE Original color presented by the LCD pan...

Page 12: ...rce input port to the new found video source automatically NONE The Monitor will not search the other video input port unless the monitor is turned on DVI SELECTION This function selects the DVI input mode Input 1 When the DVI selection has been changed you must restart your computer AUTO By using the DVI D to DVI D cable the DVI SELECTION is DIGITAL By using the D SUB to DVI A cable the DVI SELEC...

Page 13: ...ttings can be reset by highlighting the control to be reset and pressing the RESET button Information DISPLAY MODE Provides information about the current resolution display and technical data including the preset timing being used and the horizontal and vertical frequencies Increases or decreases the current resolution MONITOR INFO Indicates the model and serial numbers of your monitor OSM Warning...

Page 14: ...outlet and refer servicing to qualified service personnel under the following conditions When the power supply cord or plug is damaged If liquid has been spilled or objects have fallen into the monitor If the monitor has been exposed to rain or water If the monitor has been dropped or the cabinet damaged If the monitor does not operate normally by following operating instructions Do not bend power...

Page 15: ...and contrast controls to enhance readability Use a document holder placed close to the screen Position whatever you are looking at most of the time the screen or reference material directly in front of you to minimize turning your head while you are typing Avoid displaying fixed patterns on the monitor for long periods of time to avoid image persistence after image effects Get regular eye checkups...

Page 16: ... 600 x 800 1 at 56 Hz to 85 Hz all modes listed 624 x 832 1 at 75 Hz 768 x 1024 1 at 60 Hz to 85 Hz 870 x 1152 1 at 75 Hz NEC DISPLAY SOLUTIONS cites 1024 x 1280 1 at 60 Hz to 85 Hz recommended resolution for optimal 1200 x 1600 at 60 Hz display performance Active Display Area Landscape Horiz 408 mm 16 1 inches Vert 306 mm 12 0 inches Portrait Horiz 306 mm 12 0 inches Vert 408 mm 16 1 inches Power...

Page 17: ... necessary for compatibility between P D and other DVI based digital connec tor such as DVI and DFP Pivoting Stand Allows users to adjust the monitor to the orientation that best fits their application either Landscape orientation for wide documents or portrait orientation for the ability to preview a full page on one screen at one time The Portrait orientation is also perfect for full screen vide...

Page 18: ...ng arm or bracket Allows for the monitor to be mounted on a wall or an arm using any third party compliant device Ultra thin frame design allows you to view more of your ideas and less of the monitor bezel while freeing up more horizontal and vertical desktop space for multiple monitor applications NaViSet software offers an expanded and intuitive graphical interface allowing you to more easily ad...

Page 19: ... at regular intervals whenever the screen is idle or turning off the monitor when not in use Message OUT OF RANGE is displayed screen is either blank or shows rough images only Image is displayed only roughly pixels are missing and OSM warning OUT OF RANGE is displayed Either signal clock or resolution is too high Choose one of the supported modes OSM warning OUT OF RANGE is displayed on a blank s...

Page 20: ... Support www necdisplay com Sales and Product Information Sales Information Line 888 632 6487 Canadian Customers 866 771 0266 Ext 4037 Government Sales 800 284 6320 Government Sales email gov necdisplay com Electronic Channels World Wide Web www necdisplay com Product Registration www necdisplay com European Operations www nec display solutions com Drivers and Downloads www necdisplay com LCD2080U...

Page 21: ...IONS for service MUST have prior approval which may be obtained by calling 1 800 632 4662 The Product shall not have been previously altered repaired or serviced by anyone other than a service facility authorized by NEC DISPLAY SOLUTIONS to render such service the serial number of the product shall not have been altered or removed In order to be covered by this warranty the Product shall not have ...

Page 22: ...ter a certain time beneficial both for the user and the environment Electrical safety Emissions Electromagnetic fields Noise emissions Ecology The product must be prepared for recycling and the manufacturer must have a certified environmental management system such as EMAS or ISO 14 001 Restrictions on chlorinated and brominated flame retardants and polymers heavy metals such as cadmium mercury an...

Page 23: ...ease visit our website at USA http www necdisplay com Europe http www nec display solutions com Japan http www nec display com Country specific recycling programs can also be found at Sweden http www el retur se Germany http www recyclingpartner de Holland http www mirec nl Japan http www diarcs com Energy saving This monitor features an advanced energy saving capability When a VESA Display Power ...

Page 24: ...eveloped as a joint effort by the TCO The Swedish Confederation of Professional Employees Svenska Naturskyddsforeningen TheSwedishSocietyforNatureConservation andStatensEnergimyndighet The Swedish National Energy Administration The requirements cover a wide range of issues environment ergonomics usability emission of electrical and magnetic fields energy consumption and electrical and fire safety ...

Page 25: ...in batteries relays and switches Mercury damages the nervous system and is toxic in high doses TCO 99 requirement states that batteries may not contain any Mercury It also demands that no mercury is present in any of the electrical or electronics components associated with the display unit CFCs freons CFCs freons are sometimes used for washing printed circuit boards CFCs break down ozone and there...

Page 26: ...must be disposed of separately from normal household waste This includes monitors and electrical accessories such as signal cables or power cords When you need to dispose of your NEC display products please follow the guidance of your local authority or ask the shop where you purchased the product or if applicable follow any agreements made between yourself and NEC The mark on electrical and elect...

Page 27: ...lent pour assurer la conformité FCC 2 Veuillez utiliser le câble de signal vidéo blindé fourni un mini D SUB à 15 broches vers le câble un DVI A câble ou DVI D à DVI D câble L utilisation d autres câbles et adaptateurs peut provoquer des interférences avec la réception radio et télévision 2 Cet appareil a été testé et s avère conforme avec les spécifications d équipements de Classe B section 15 de...

Page 28: ...DVI A Câble pour le signal vidéo Câble DVI D vers DVI D Manuel de l utilisateur Gaine de câble Ne pas oublier de conserver la boîte et le matériel d emballage d origine pour transporter ou expédier le moniteur Contenu MultiSync LCD2080UXi TM Cordon d alimentation Mini D SUB mâle 15 broches vers DVI A Manuel de l utilisateur Gaine de câble Câble DVI D vers DVI D LCD2080UXimanual_053105 pmd 6 2 05 2...

Page 29: ...trique sur l arrivée CA située à l arrière du moniteur et l autre extrémité sur la prise de courant Figure C 1 NOTA Si vous utilisez ce moniteur à AC125 240V s il vous plaît faites référence à section de l Usage Recommandée de ce manuel pour sélection adéquate d AC pouvoir cordon 5 L Interrupteur de Vacances sur le côté gauche de l écran doit être allumai Allume l écran Figure D 1 de Silhouette de...

Page 30: ...ortrait ou Paysage Pour lever ou baisser l écran placez les mains de chaque côté du moniteur et positionnez le à la hauteur de votre choix Figure RL 1 NOTA Manipule sur soin quand augmentant ou l écran diminuant écran Fixation de produit NEC en option N utilisez pas ce connecteur sauf indication contraire Figure RL 1 LCD2080UXimanual_053105 pmd 6 2 05 2 51 PM 28 ...

Page 31: ...ez le dans le sens horaire de Paysage à Portrait ou dans le sens inverse de Portrait à Paysage Figure R 1 Pour alterner l orientation de menu d OSM entre Landscape et Portrait référer au section de Commandes function de Rotation de l OSM Pivoter Placez les mains de chaque côté de l écran et réglez l orientation comme désirée Figure TS 2 Incliner Mettez vos mains sur les côtés inférieur et supérieu...

Page 32: ...Le moniteur est maintenant prêt à être monté de façon différente 5 Renversez ce processus pour rattacher le support serrez les deux vis inférieures tournez le support 180 dans le sens inverses des aiguilles d une montre vous entendrez deux clicks et serrez les deux vis supérieures NOTA Utilisez uniquement une méthode de montage compatible VESA Pas de 100mm NOTA Prenez des précautions pour ôter le ...

Page 33: ...en marche Effectuez un RÉGLAGE AUTOMATIQUE en utilisant la fonction OSM AUTO Appuyez sur Sélectionner pour effectuer le réglage Pour l information additionnelle sur des commandes d utilisateur et des utilités de logiciel visitez notre site web à www necdisplay com SIMPLE X FULL X DÉTAIL Dimension précision position O O O X O O O 1 5 seconde 2 secondes 10 à 20 secondes Durée Contraste Le niveau du ...

Page 34: ...inosité et de contraste LUMINOSITÉ Règle la luminosité globale de l image et du fond de l écran CONTRASTE Règle la luminosité de l image en fonction du fond CONTRASTE AUTO Entrée analogique seulement Règle l image affichée pour des entrées vidéo non standard LUMINOSITÉ AUTO Cette fonction permet de régler automatiquement la luminosité afin d obtenir les meilleurs contrastes en fonction d une zone ...

Page 35: ... changement dans couleur apparaîtra sur écran et la direction augmentation ou diminue être transparu par la couleur des bars NATIVE Originale couleur nrésenta par le LCD panel qu est unadjustable Outils 1 NETTETE Cette fonction permet de conserver la netteté de l image numériquement pour toutes les résolutions Elle est réglable de façon continue afin d obtenir comme vous préférez une image distinc...

Page 36: ... le bouton CONTRÔLE lorsque le câble de signal DVI est branché au connecteur DVI I entrée 1 du moniteur Sinon il est possible que le MAC ne puisse être mis sous tension NOTA Selon le carte de PC Video ou le câble utilisé cette fonction peut pas fonctionner PROGRAMMATEUR ARRÊT Le moniteur sera mis automatiquement hors tension lorsque l utilisateur final sélectionne un laps de temps préréglé Outils ...

Page 37: ...SM disparaissent avec le bouton Exit PAS DE SIGNAL Cette fonction génère un avertissement lorsqu il n y a aucun signal horizontal ou vertical de synchronisation présent Une fois l alimentation positionnée sur MARCHE ou lorsqu il y a un changement du signal d entrée la fenêtre PAS de Signal apparaît ERREUR RESOLUTION Cette fonction vous avertit de l utilisation en résolution optimisée Après la mise...

Page 38: ...ifié dans les cas suivants Lorsque le cordon d alimentation ou la fiche est endommagé e Si du liquide a été renversé ou des objets sont tombés à l intérieur du moniteur Si le moniteur a été exposé à la pluie ou à de l eau Si le moniteur est tombé ou le boîtier est endommagé Si le moniteur ne fonctionne pas normalement en suivant les directives d utilisation Ne courbe pas le pouvoir du cordon N uti...

Page 39: ...u maximum la poussière Régler les commandes de luminosité et de contraste du moniteur pour améliorer la lisibilité Utiliser un support de document placé près de l écran Positionner ce que l on regarde le plus souvent l écran ou les documents de référence directement devant soi pour réduire au maximum les mouvements de la tête lorsque l on dactylographie Pour éviter la persistance d images images r...

Page 40: ...24 1 60 Hz à 85 Hz 870 x 1152 1 75 Hz NEC DISPLAY SOLUTIONS 1024 x 1280 1 60 Hz à 85 Hz recommande une résolution pour des 1200 x 1600 60 Hz performances d affichage optimales et couleurs Zone d affichage active Paysage Horiz 408 mm 16 1 inches Vert 306 mm 12 0 inches Portrait Horiz 306 mm 12 0 inches Vert 408 mm 16 1 inches Alimentation 100 240V 50 60 Hz Tension d alimentation 0 7 0 35A Dimension...

Page 41: ...sous composant de P D En tant que connecteur basé DVI pour broches d entrées numériques un simple adaptateur suffit pour assurer la compatibilité entre P D et autres connecteurs numériques basés DVI comme DVI et P D Support pivotant Permet à l utilisateur de régler l orientation du moniteur selon l application utilisée soit Landscape pour les documents larges ou Portrait afin d avoir la possibilit...

Page 42: ... n importe quel autre bras au baie de montage conforme VESA Permet de monter le moniteur sur un mur ou un bras à l aide de n importe quel autre dispositif compatible Le design à encadrement ultra mince vous permet de visionner davantage de vos idées et une partie moins importante du cadre tout en libérant de l espace sur votre bureau à l horizontale comme à la verticale pour des applications à mul...

Page 43: ...ide ou n affiche que des images indistinctes l image est indistincte des pixels manquent et le message d avertissement OSM HORS LIMITE est affiché La fréquence du signal ou la résolution sont trop élevées Choisissez un mode pris en charge L avertissement OSM HORS LIMITE est affiché sur un écran vide La fréquence du signal est hors limites Choisissez un mode pris en charge L image défile ou est ins...

Page 44: ... ligne www necdisplay com Ventes et information produit Ligne d information sur les ventes 888 632 6487 Clientèle canadienne 866 771 0266 Ext 4037 Ventes au gouvernement 800 284 6320 Adresse électronique du service des ventes au gouvernement gov necdisplay com Courrier électronique World Wide Web www necdisplay com Produit enregistré www necdisplay com Opérations Européennes www nec display soluti...

Page 45: ...e autorisation de retour de marchandise en composant le 1 800 632 4662 Le produit ne pourra avoir été enlevé ou modifié réparé ou entretenu au préalable par personne d autre que du personnel technique autorisé par NEC DISPLAY SOLUTIONS et le numéro de série du produit ne pourra pas avoir été enlevé Pour être couvert par cette garantie le produit ne pourra pas avoir été soumis à l affichage d une i...

Page 46: ...Énergie Mode économiseur d énergie après une durée déterminée intéressant pour l utilisateur comme pour l environnement Sécurité de l installation électrique Émissions Champs électromagnétiques Émissions de bruit Écologie Le produit doit être préparé pour le recyclage et le fabricant doit posséder un système de gestion environnemental certifié comme EMAS ou ISO 14 001 Restrictions sur les produits...

Page 47: ...teur NEC veuillez visiter notre site Web au É U http www necdisplay com Europe http www nec display solutions com Japon http www nec display com Vous pouvez trouver également des programmes de recyclage sur les sites suivants Suède http www el retur se Allemagne http www recyclingpartner de Hollande http www mirec nl Japon http www diarcs com Économie d énergie Ce moniteur est équipé d une capacit...

Page 48: ... nationale de l énergie de la Suéde La directive couvre plusieurs volets environnement ergonomie facilité d utilisation émissions de champs électriques et magnétiques consommation énergétique sécurité électrique et sécurité incendie Les exigences environnementales concernent la restriction de la présence et de l utilisation entre autres de métaux lourds de retardateurs de flamme contenant du brome...

Page 49: ...vées La directive TCO 99 stipule que les batteries ne peuvent de mercure Elle exige aussi que le mercure soit absent de tous les composants électriques ou électroniques associés à l écran Hydrocarbures chlorofluorés fréon Les hydrocarbures chlorofluorés fréon sont parfois utilisés dans le lavage des cartes à circuits imprimés Les hydrocarbures chlorofluorés décomposent la couche d ozone et endomma...

Page 50: ...r élimination Ceci inclut notamment les moniteurs et accessoires électriques tels que les câbles signaux et les cordons d alimentation Lorsque vous devez vous débarrasser de vos produits d affichage NEC des autorités veuillez suivre les recommandations locales ou demander conseil auprès du revendeur qui vous a vendu le produit en question Vous pouvez aussi respecter tout accord passé entre NEC et ...

Page 51: ... the green component of the image Press or to Analog input only adjust B H position Adjusts the position of the blue component of the image Press or to Analog input only adjust R SHARPNESS Adjusts the sharpness of the red component of the image Press or to Analog input only adjust G SHARPNESS Adjusts the sharpness of the green component of the image Press or to Analog input only adjust B SHARPNESS...

Page 52: ... satisfactory picture setting a fine tuning can be performed using the Fine function It improves focus clearity and image stability by increasing or decreasing this setting For this a Moiré test pattern could be used If the Fine value is wrongly calibrated the result would look like on the left drawing The image should be homogeneous When FINE value is wrong When FINE value is correct Tag5 Black L...

Page 53: ...ource and a new secondary source is supplied to the monitor then the monitor will automatically switch to the new video source When current video input signal is not present then the monitor searches for a video signal from the other video input port If the video signal is present in the other port then the monitor switches the video source input port to the new found video source automatically NO...

Page 54: ...c Threshold Adjusts the slice level of a synchronization signal Press SELECT to move the Analog input only adjustment menu SEP COMP Adjusts the sensitivity of the separate or composite input signals Try this option if the FINE adjustment does not successfully eliminate the noise Sync On Green Adjusts the sensitivity of the Sync On Green input signals Adjusts the slice level when separating a synch...

Page 55: ...fications sans préavis La reproduction totale ou partielle de ce document sans l accord préalable de NEC Display Solutions of America Inc est interdite DÉCLARATION DE CONFORMITÉ Cet appareil est conforme à l article 15 du règlement de la FCC L utilisation est soumise à deux conditions 1 Cet appareil ne peut pas occasionner d interférences nuisibles et 2 cet appareil doit accepter toutes interféren...

Page 56: ...production of this document or portions thereof without prior approval of NEC Display Solutions of America Inc is prohibited DECLARATION OF CONFORMITY This device complies with Part 15 of FCC Rules Operation is subject to the following two conditions 1 This device may not cause harmful interference and 2 this device must accept any interference received including interference that may cause undesi...

Reviews: