background image

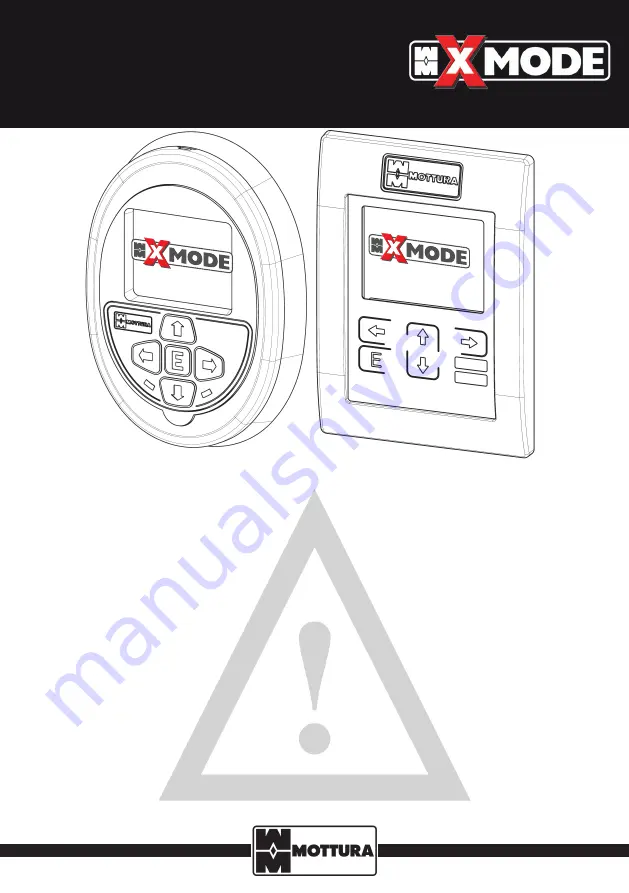
POWERED ELECTRONIC LOCK  

ESCUTCHEON DISPLAY 

99.688 - 99742

GENERAL WARNINGS

Mottura Serrature di Sicurezza S.p.A. thanks you for choosing this product and reminds you: 
-  to read these instructions very carefully before installing and using this product and before doing any maintenance. 
-  the escutcheon display is sensitive to electrostatic discharges that may come from your body; before handling the escutche-

on, make sure you have taken all precautions to prevent it from being permanently damaged by an electrostatic discharge. 

-  to keep these instructions for future use and attach the sales receipt to validate the warranty.  
-  In case of problems, contact your authorized dealer only. 

“DO NOT use a liquid, spray, or wet cloth to clean the escutcheon! If liquids enter the scanner, they will oxidize and permanently 
damage its components. Use a dry cloth only. DO NOT paint the escutcheon with any method or substance. Failure to follow 
these instructions will immediately void the warranty.” 

Mottura Serrature di Sicurezza S.p.A. may change the characteristics of the products described in these instructions at any time 
and without notice. 

ESCUTCHEON FUNCTIONS

Unless otherwise specified, all of the functions described in this manual refer to both PROTECTED-duplication and FREE-duplication 
TAGS (transponder keys). 

The escutcheon with color display can be connected to Mottura’s powered “XMODE” lock on the inside of the door to replace 
the 3-key escutcheon. It can be used to open and close the lock from inside the door, and can fully manage all of the available 
lock functions plus the ones used by means of the internal 3-key escutcheon. Specifically, this visual interface displays lock 
movement phases (opening and closing), any errors that may be generated during these phases, lock and door status, power 
supply status, and programming access.

Summary of Contents for Xmode 99688

Page 1: ...ts components Use a dry cloth only DO NOT paint the escutcheon with any method or substance Failure to follow these instructions will immediately void the warranty Mottura Serrature di Sicurezza S p A may change the characteristics of the products described in these instructions at any time and without notice ESCUTCHEON FUNCTIONS Unless otherwise specified all of the functions described in this ma...

Page 2: ... 11 EXTERNAL KEYPAD CODES 18 11 1 ENTERING PROGRAMMING MODE 11 2 INSERTING CODES 11 3 DELETING A SINGLE CODE 11 4 DELETING ALL CODES 11 5 PREVIOUS MENU 12 CHANGING LOCK CLOSING MODE 21 13 PARENTAL SECURITY CODES 22 13 1 OPENING CLOSING LOCK ON INSIDE 13 2 DELETING CODE FROM INSIDE 14 COURTESY TIMES 24 15 DATE AND TIME 25 16 TIME SLOT BACK STOP 26 16 1 DELETE A SINGLE TIME SLOT 16 2 DELETE TIME ONE...

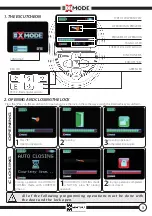
Page 3: ...N press E Closing operation Closing operation in AUTOMATIC CLOSING mode with COURTESY time on 2Opening 2Closing operation completed Door closed 3Opening operation completed Door open All of the following programming operations must be done with the door and the lock open 1 THE ESCUTCHEON OPERATION IN PROGRESS PROGRESS OF OPERATION TAG NO USED FOR PROTECTED SYSTEM ONLY FUNCTION KEYS EXECUTE KEY GRE...

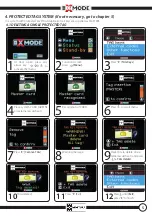
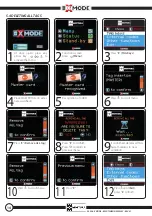
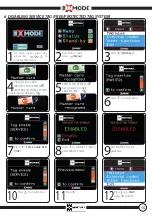
Page 4: ...nd press E 6 Select INFORMATION menu with and press E 7 Press Other several times until reaching LANGUAGE menu 8 Press Change to set the language you want English Spanish French Italian and press E 9 Select MENU with and press E 10 Press until Exit press E to finish 4 PROTECTED SYSTEM Place system CARD GREEN or MASTER TAG ORANGE TAG card on external escutcheon FREE SYSTEM 5 PROTECTED SYSTEM Recogn...

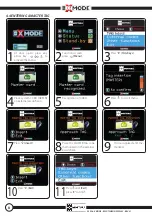
Page 5: ...system CARD GREEN on external escutcheon 5 Recognition of CARD 6 Press to scroll menu 9 Place TAG to delete on ex ternal escutcheon and press TAG delete 7 Press E Remove TAG 8 Warning message 11Press E Exit 12Press until Exit press E to finish 10TAG deleted In a system with protected key TAG duplication all keys are supplied as MASTERS 4 1 DELETING A SINGLE PROTECTED TAG ...

Page 6: ...LL TAGS PROTECTED SYSTEM Press E 1 At door open press any arrow key to activate the menu 2 Functions screen press Menu 3 Press E TAG Keys 4 Place system CARD GREEN on external escutcheon 5 Recognition of CARD 6 Press to scroll menu 9 Place SYSTEM TAG on exter nal escutcheon and press TAG delete 7 Press E Remove TAG 8 Warning message ...

Page 7: ...nized and me morized 8 Press Insert 4 3 ENTERING A SERVICE TAG 11 Press E Exit 12 Press until Exit press E to finish 1 At door open press any arrow key to activate the menu 2 Functions screen press Menu 3 Press E TAG Keys 4 Place system CARD GREEN on external escutcheon 5 Recognition of CARD 6 Press to scroll menu ...

Page 8: ...nsert 9 TAG recognized and me morized 4 4 ENTERING A MASTER TAG 10 Press E Exit 11 Press until Exit press E to finish 1 At door open press any arrow key to activate the menu 2 Functions screen press Menu 3 Press E TAG Keys 4 Place system CARD GREEN on external escutcheon 5 Recognition of CARD 6 Press to scroll menu ...

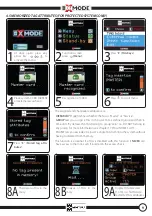
Page 9: ...having to delete it from memory This function is essential if a TAG is disabled with this function it NEVER can have access to the lock even if inserted in the access check 4 5 MEMORIZED TAG ATTRIBUTES FOR PROTECTED SYSTEMS ONLY 7 Press E Stored tag attri butes 8A There are no TAG in me mory 8B Analysis of TAG in me mory 9A Display TAG detected 1 of 5 no first TAG de tected 2 TAG attributes 1 At d...

Page 10: ...lect attribute Press to change value of selected attribute 12 Press to change Type from MASTER to SERVICE Press to scroll menu Press to change Group from 0 to C Press to scroll menu Press to change Active from YES to NO Press E to confirm Note with these settings TAG no 127 is NOT enabled to access the lock even though it is in memory Press E to return to previous menu 13 Press to scroll menu 14 P...

Page 11: ...ace MASTER TAG to be memorized on external escutcheon 9 TAG recognized and memo rized 10 Press E Exit If the system is new the first TAG placed becomes MASTER TAG 1 At door open press any arrow key to activate the menu 2 Functions screen press Menu 3 Press E TAG Keys 4 Place any TAG only if a new system or a MASTER TAG on external escutcheon 5 Recognition of CARD 6 Press to scroll menu ...

Page 12: ...TAG to be memorized on external escutcheon 7 Press E TAG insertion SER VICE 8 Press Insert If the system is new the first TAG placed becomes MASTER TAG 1 At door open press any arrow key to activate the menu 2 Functions screen press Menu 3 Press E TAG Keys 4 Place any TAG only if a new system or a MASTER TAG on external escutcheon 5 Recognition of CARD 6 Press to scroll menu ...

Page 13: ... 11 Press until Exit press E to finish 9 TAG deleted N B The MASTER TAG you have used to enter programming CAN NOT BE DELETED individually 7 Press E Remove TAG 8 Place TAG to delete on exter nal escutcheon and press TAG delete 1 At door open press any arrow key to activate the menu 2 Functions screen press Menu 3 Press E TAG Keys ...

Page 14: ...stem returns to new condition 7 Press E Remove ALL tag 8 Press E to confirm Press to return to previous menu 11 Press E 10 Press to scroll menu 4 Place MASTER TAG on exter nal escutcheon 5 Recognition of CARD 6 Press to scroll menu 1 At door open press any arrow key to activate the menu 2 Functions screen press Menu 3 Press E TAG Keys ...

Page 15: ... scroll menu 10 Press to scroll menu 11 Press E 9 All SERVICE TAGS are disabled 7 Press E TAG enable SER VICE 8 Press to disable all memo rized SERVICE TAGS 6 DISABLING SERVICE TAG FREE PROTECTED TAG SYSTEM 12 Press until Exit press E to finish 1 At door open press any arrow key to activate the menu 2 Functions screen press Menu 3 Press E TAG Keys ...

Page 16: ... press Menu 3 Press E TAG Keys 4 Place System CARD PROTECTED SYSTEM MASTER TAG FREE SYSTEM on external escutcheon 5 PROTECTED SYSTEM Recognition of CARD FREE SYSTEM 6 Press to scroll menu 9 All SERVICE TAG are enabled 7 Press E TAG enable SER VICE 8 Press to enable all memo rized SERVICE TAG 10 Press to scroll menu 11 Press E 12 Press until Exit press E to finish ...

Page 17: ...ty Replace immediately RETE BATTERIE MAINS 2 Functions screen press Status 3 DOOR STATUS LOCK STATUS WORK MODE POWER STATUS 8 QUICK LOCK STATUS INFORMATION DOOR OPEN 1 At door open press any arrow key to activate the menu 2 DOOR STATUS LOCK STATUS WORK MODE POWER STATUS 9 QUICK LOCK STATUS INFORMATION DOOR CLOSED Examples 1 At door open press any arrow key to activate the menu ...

Page 18: ...herwise press to exit 8 Press to scroll menu Insert codes see par 11 2 Delete single code see par 11 3 Delete ALL codes see par 11 4 Previous menu see par 11 5 11 EXTERNAL KEYPAD CODES IMPORTANT this choice is always available but is valid only if the external keypad is present Selecting this item in the absence of the keypad has no effect on keypad management of codes Remember that code insertion...

Page 19: ...press E End on the escutcheon display to return to the main menu 8A Press E Insertion codes 11 2 INSERTING CODES 8C Insert code to be removed from external keypad then press E You can delete multiple codes from the external keypad without additional confirmations on the display At the end press E End on the escutcheon display to return to the main menu 11 3 DELETING A SINGLE CODE 8B Press to remov...

Page 20: ...SPLAY REV 01 20 8A Press E Remove ALL codes 8B Warning 8C Press to delete all codes in memory 11 4 DELETING ALL CODES 8D Wait time 8E Message all codes have been deleted 8A Press E to return to the main menu 11 5 PREVIOUS MENU ...

Page 21: ...TOMATIC CLOSING lock closes automatically when door is closed LATCHES ONLY at command opens closes latchbolts only not spring latch See XMODE lock USER manual Chapter 6 Lock operation modes 1 At door open press any arrow key to activate the menu 2 Functions screen press Menu 3 Press until Other fun ctions and press E 6 Select LOCK OPERATION menu with and press E 4 PROTECTED SYSTEM Place system CAR...

Page 22: ...g menu again on the display will shown the code E to confirm to delete 10 System returns to menu FUNCTIONS 1 At door open press any arrow key to activate the menu 2 Functions screen press Menu 3 Press until Other fun ctions and press E 6 Select SECURITY INTER NAL CODES menu with and press E 4 PROTECTED SYSTEM Place system CARD GREEN or MASTER TAG ORANGE TAG card on external escutcheon FREE SYSTEM ...

Page 23: ...incorrect error message is displayed Code is displayed Current code none Press E to exit 2 Use the keys to enter the set code Enter in case of error 2 Code is displayed Press to delete 3 If entered code is correct lock starts opening ope ration 3 Press E to confirm 13 1 OPENING CLOSING LOCK ON INSIDE 13 2 DELETING CODE FROM INSIDE ...

Page 24: ...LOSING mode and the waiting time for release of the SPRING LATCH if the door stays ajar 1 At door open press any arrow key to activate the menu 2 Functions screen press Menu 3 Press until Other fun ctions and press E 6 Select COURTESY TIMES menu with and press E 4 PROTECTED SYSTEM Place system CARD GREEN or MASTER TAG ORANGE TAG card on external escutcheon FREE SYSTEM 5 PROTECTED SYSTEM Recognitio...

Page 25: ... is essential to insert the correct data in order to use the access control and time slot functions 1 At door open press any arrow key to activate the menu 2 Functions screen press Menu 3 Press until Other fun ctions and press E 6 Select DATE AND TIME menu with and press E 4 PROTECTED SYSTEM Place system CARD GREEN or MASTER TAG ORANGE TAG card on external escutcheon FREE SYSTEM 5 PROTECTED SYSTEM...

Page 26: ...y in certain periods of the year START END START END Monday 15 00 19 00 Tuesday 08 30 12 30 15 00 19 00 Wednesday 08 30 12 30 15 00 19 00 Thursday 08 30 12 30 15 00 19 00 Friday 08 30 12 30 15 00 19 00 Saturday 08 30 18 30 SLOT 1 SLOT 2 SLOT 3 SLOT 4 START END START END START END START END MON 15 00 19 00 TUES 08 30 12 30 15 00 19 00 WED 08 30 12 30 15 00 19 00 THURS 08 30 12 30 15 00 19 00 FRI 08...

Page 27: ...lues shown ONLY on this screen 10 Press to set values 15 00 START 19 00 END YES ON Press E to confirm and go to SLOT 2 11 Do not set data and press E to confirm 12 Summary screen of settings for MONDAY Press E to set time slots for other days of the week 13 Press Input to set time slots for TUESDAY 14 Press E to set single time slots 15 Press to set values 08 30 START 12 30 END YES ON Press E to c...

Page 28: ...ribed below automatically deletes the subsequent slots on the same day For example if three time slots are set and you delete the data for the second one the third time slot will be reset as well 19 Press E to confirm all changes 20 The system saves all data and returns to the menu FUNCTIONS 16 1 DELETE A SINGLE TIME SLOT 1 Go to the screen with the time slot values to be reseted 4 Press E to conf...

Page 29: ...t Press Reset 2 Summary screen with reset time slots Press E to return to Day selection screen 3 Press E to confirm changes 16 3 DELETE ALL TIME SLOTS 1 Press Data reset to dele te all time slot data 2 Press E to confirm 3 The system memorizes the deletion and returns to the menu FUNCTIONS ...

Page 30: ...professional offices etc Assign a TAG to a specific group or return to default group 0 see paragraph 4 5 Memorized TAG Attributes EXAMPLE You have a business that requi res the following openings USE DAY ENTRANCE EXIT GROUP Cleaning staff Mon Fri 06 30 08 00 A 18 00 20 00 Cafeteria staff Mon Fri 11 00 14 30 B Maintenance staff Thurs Sat 8 00 17 00 C USE GROUP TAG KEY Cleaning staff A 1 with all it...

Page 31: ...ogram 7 Press E to enter program ming to reset data and to exit 11 Press to set va lues of START 06 30 END 08 00 Press E to con firm and go to next SLOT 10 Press E to set time slot values Reset to reset data 9 Press Change to select Day Status to enable YES NO time slots Input to program 1 At door open press any arrow key to activate the menu 2 Functions screen press Menu 3 Press until Other fun c...

Page 32: ...are done press E to confirm All data will be memori zed Press E again to exit ATTENTION if more than one time slot is set in a day deleting a single time slot as described below automatically deletes the subsequent slots on the same day For example if three time slots are set and you delete the data for the first one the second and third time slot will be reset as well 17 1 DELETING A SINGLE TIME ...

Page 33: ...ion screen 3 Press E to confirm changes 17 3 DELETING ENTIRE USER GROUP 1 Press Reset to delete all time slot A data 2 Press E to confirm 3 The system memorizes the deletion and returns to the FUNCTIONS menu 17 4 DELETING ALL TIME SLOTS USERS 1 Press Data reset to dele te all time slot data 2 Press E to confirm 3 The system memorizes the deletion and returns to the FUNCTIONS menu ...

Page 34: ...t forward reverse fast if kept pressed for more than 2 seconds Data is hidden during fast scrolling and reappears when the key is released Press E to end the display 1 At door open press any arrow key to activate the menu 2 Functions screen press Menu 3 Press until Other fun ctions and press E 6 Select ACCESS CONTROL menu with and press E 4 PROTECTED SYSTEM Place system CARD GREEN or MASTER TAG OR...

Page 35: ... to the FUN CTIONS menu 3 The system memorizes the deletion and returns to the FUNCTIONS menu 19 INFORMATION 1 At door open press any arrow key to activate the menu 2 Functions screen press Menu 3 Press until Other fun ctions and press E 6 Select INFORMATION menu with and press E 4 PROTECTED SYSTEM Place system CARD GREEN or MASTER TAG ORANGE TAG card on external escutcheon FREE SYSTEM 5 PROTECTED...

Page 36: ...re Press to go to the next screen 8 Information on system num ber Press to go to the next screen 11 Information on lock fir mware Press to go to the next screen 9 Information on number of operations performed by lock Press to go to the next screen 12 Language used by display see chapter 3 Press E to exit 1 Select EXIT with and press E 2 Press until Exit press E to finish 20 EXITING THE MENU ...

Page 37: ...ct position or because motor drive mechanism is not perfectly engaged after manual operation with cylinder Open Close the lock completely manually with cylinder Message POS at top means that lock at start of operation is not in correct position for recognition by system following for example an incomplete manual operation with the cylinder Open Close the lock completely manually with cylinder Spri...

Page 38: ...cheon du ring insertion is SYSTEM CARD Change CARD and present the right one IN A PROTECTED SYSTEM CARD placed on external escutcheon du ring insertion is TAG already in memory as MASTER Change CARD and present the right one IN A PROTECTED SYSTEM CARD placed on external escutcheon du ring insertion is TAG already in memory as SERVICE Change CARD and present the right one IN A PROTECTED SYSTEM CARD...

Page 39: ...AG already memorized the TAG placed on external escutcheon during PROGRAMMING it is not yet inserted in sy stem memory Place MASTER TAG first TAG inserted in system on external escutcheon when re quested IN A FREE SYSTEM TAG placed on external escutcheon during insertion is already in memory as MASTER Insert correct TAG IN A FREE SYSTEM TAG placed on external escutcheon during insertion is already...

Page 40: ...LEM CAUSE REMEDY TIME SLOT BACK STOP You have set an END time that is earlier than START time Reset time slot TIME SLOT KEY You have set a START time for the second time slot earlier than the END time of the preceding time slot Reset time slot ...

Reviews: