80
Chapter 6: Microsoft SQL Server 2000 Customization
Prerequisites
Please verify that the following services start and stop normally using
Start ->
Settings -> Control Panel -> Administrative tools -> Services:
1.
MSSQLSERVER
2.
SQLSERVERAGENT
If these services are running, please stop these services using
Control Panel ->
Services
Customization Steps
Step 1:
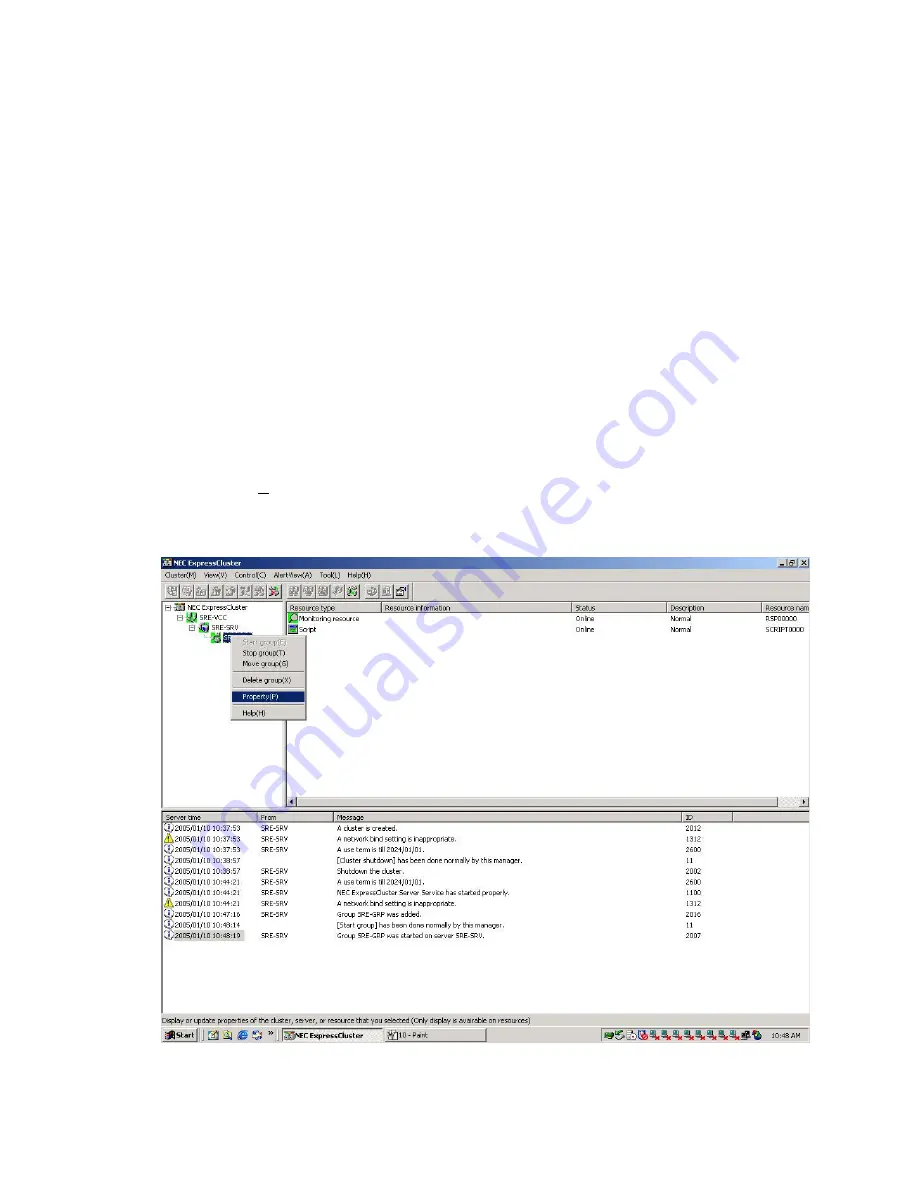
Right Click on the Fail over Group in the ExpressCluster Manager UI and select
the
Property(P)
menu item.
The Screen shot is as shown:
Summary of Contents for ExpressCluster SRE
Page 1: ...NEC ExpressCluster SRE Version 7 0 Installation and Configuration Guide Windows edition ...
Page 10: ...10 Step 2 Click the Registration button ...
Page 11: ...11 Step 3 Click the License item is inputted button ...
Page 16: ...16 Step 8 Confirm the license information and click Next on the following screen ...
Page 19: ...19 Step 2 Click the Create cluster C button on the following screen ...
Page 20: ...20 Step 3 Select NEC ExpressCluster Standard SE SX S and click Next on the following screen ...
Page 23: ...23 Click Next Step 5 On the following screen click the Add A button ...
Page 26: ...26 Step 8 Click Next on the screen below ...
Page 27: ...27 Step 9 Select No NP resolution mode O and click Next on the screen below ...
Page 28: ...28 Step 10 Click Next on the screen below ...
Page 29: ...29 Step 11 Click Next on the screen below ...
Page 30: ...30 Step 12 Click Next on the screen below ...
Page 31: ...31 Step 13 Click Finish on the screen below ...
Page 34: ...34 Step 2 Click Yes below Step 3 Select Detailed set up D and click OK ...
Page 35: ...35 Step 4 Select the Return mode tab and select Auto return N as below ...
Page 40: ...40 Step 5 Select the server from the Server list S and click the Add A button ...
Page 41: ...41 Step 6 Click OK on the following screen ...
Page 44: ...44 ...
Page 47: ...47 Step 2 Click the Registration button ...
Page 52: ...52 Step 8 Confirm the license information and click Next on the following screen ...
Page 58: ...58 Click Next Step 5 On the following screen click the Add A button ...
Page 61: ...61 Step 8 Click Next on the screen below ...
Page 62: ...62 Step 9 Select No NP resolution mode O and click Next on the screen below ...
Page 63: ...63 Step 10 Click Next on the screen below ...
Page 64: ...64 Step 11 Click Next on the screen below ...
Page 65: ...65 Step 12 Click Next on the screen below ...
Page 66: ...66 Step 13 Click Finish on the screen below ...
Page 69: ...69 Step 2 Click Yes below Step 3 Select Detailed set up D and click OK ...
Page 70: ...70 Step 4 Select the Return mode tab and select Auto return N as below ...
Page 75: ...75 Step 5 Select the server from the Server list S and click the Add A button ...
Page 76: ...76 Step 6 Click OK on the following screen ...
Page 79: ...79 ...
Page 82: ...82 Step 4 Click on the Replace button This takes you to the following screen ...
Page 86: ...86 Step 11 Click on the Replace button This takes you to the following screen ...
Page 89: ...89 Step 16 Close the file and click OK on the following screen ...
Page 90: ...90 Step 17 Click OK again on the following screen ...
Page 97: ...97 Step 4 Click on the Replace button This takes you to the following screen ...
Page 101: ...101 Step 11 Click on the Replace button This takes you to the following screen ...
Page 104: ...104 Step 16 Close the file and click OK ...
Page 105: ...105 Step 17 Click OK again on the following screen ...
Page 117: ...117 Step 8 Save the file and click OK Click OK again on the following screen ...
Page 123: ...123 Step 2 Windows 2003 Select Internet Protocol TCP IP and click the Properties button ...
Page 124: ...124 Windows 2000 Select Internet Protocol TCP IP and click the Properties button ...
Page 125: ...125 Step 3 Change the IP Address to it IP 20 20 20 1 The image is as below ...
Page 128: ...128 Step 7 Click OK on the following screen ...
Page 129: ...129 This completes the steps to change the default IP addresses ...


