NEC DT410 Series User Manual Download Page 190

 182 

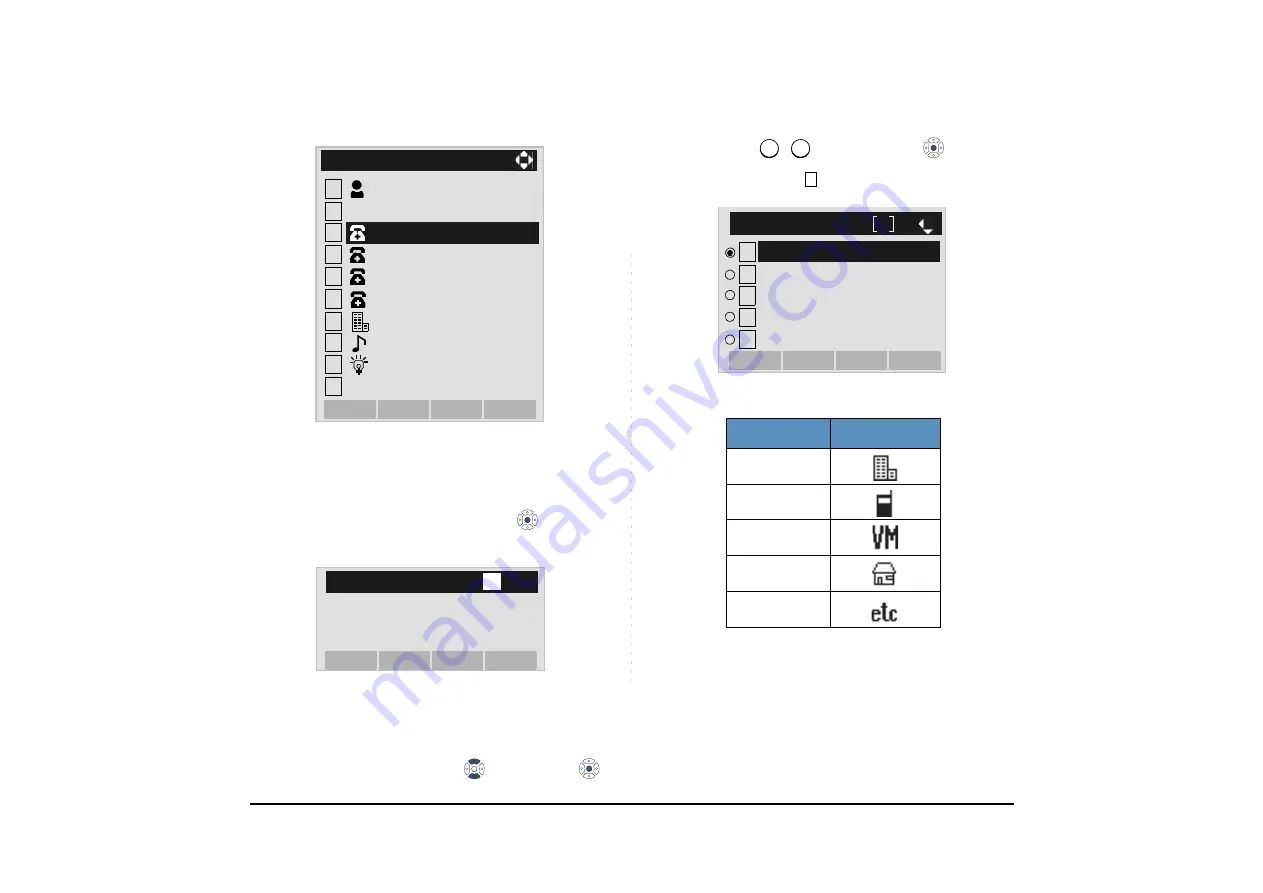
STEP 9: Enter a telephone number to be registered in

directory.

Enter a telephone number by using digits keys. After 
entering the telephone number, press 

 or 

Next 

soft 

key.

STEP 10:Select a Category to which the entered tele-

phone number belongs. 

Select an item by either of the following operations.
• Highlight an item by using 

, and then press 


or 

Next

 soft key.

• Press 

 - 

 key, and then press 

 or 

Next

 soft 

key.

In this example, 

Company


is selected.

Selectable categories are as follows:

1
2

[Edit]

3

4
5

OK

Back

6
7

8

9
0

Save

Gr

No

Company Name

Ring Tone

Ken Kobus

Tel #4

Tel #2
Tel #3

Illumination

0

Colleagues

Tel #1

Input a Telephone number.

[Tel #1]

Next

Back

BK

1

Category

ICON

Company

Mobile

Voice Mail

Home

Others

0

5

1

1

2

[Category]

3
4
5

Company

Next

Prev

Home

Others

Mobile

Voice Mail

Summary of Contents for DT410 Series

Page 1: ...DT830 DT430 DT410 USER S GUIDE NEC Corporation 2014 SEPTEMBER NWD 172904 001 ISSUE 1 0 ...

Page 2: ...pared this document for use by its employees and customers The information contained herein is the property of NEC Cor poration and shall not be reproduced without prior written approval from NEC Corporation All brand names and product names on this document are trademarks or registered trademarks of their respective companies Copyright 2014 NEC Corporation ...

Page 3: ...or Customers in Australia Telephone receivers produce magnetic fields that can attract small metallic objects such as pins or staples To avoid injury do not place the handset where such objects can be picked up ...

Page 4: ...ALLATION PROCEDURE ADJUSTING ANGLE OF TILT LEG 25 TO REMOVE TILT LEG 26 TO ATTACH TILT LEG 26 CONNECTING LAN CABLE 27 CONNECTING LINE CORD 28 CONNECTING AC ADAPTER 29 INSTALLING DIRECTORY CARD 29 ATTACHING THE HANDSET 30 ATTACHING THE HEADSET 30 INSTALLING REMOVING KEY SET UNIT 31 WALL MOUNTING 32 3 TERMINAL SETUP SETUP WITH UP DOWN KEY 35 SETUP WITH FEATURE KEY 36 SETUP WITH MENU KEY FOR DT830 SE...

Page 5: ...ON USING THE HEADSET 104 ADUSTING HEADSET RINGER TONE VOLUME 105 HOW TO USE THE WIRELESS HEADSET 105 HOW TO INPUT CHARACTERS 106 SECURITY MODE 120 EMERGENCY CALL 122 XML APPLICATION 123 SCREEN POP UP 125 5 FEATURE OPERATION TO ORIGINATE A CALL USING SELECTIVE DIALING DYNAMIC DIAL PAD PRESET DIAL 128 TO ORIGINATE A CALL USING SPEED CALLING ONE TOUCH SPEED CALLING KEYS 129 TO REGISTER NAME ON ONE TO...

Page 6: ...D ON CALL 139 CALL WAITING ORIGINATING 140 CALL PARK 142 CALL PICK UP GROUP 143 CALL PICK UP DIRECT 143 OUTGOING TRUNK QUEUING 144 OFF HOOK TRUNK QUEUING 144 EXECUTIVE OVERRIDE 144 LAST NUMBER REDIAL 145 REDIAL 145 CALL FORWARDING ALL CALLS 147 CALL FORWARDING BUSY LINE 149 CALL FORWARDING DON T ANSWER 150 LOGGED OUT IP STATION CALL DESTINATION 151 CALL BACK 153 TO SAVE AND REPEAT A NUMBER 153 TO ...

Page 7: ...ERATION TO ADD NEW DATA 179 TO CHANGE GROUP NAME 187 TO FIND REGISTERED DATA 189 TO MAKE A CALL FROM DIRECTORY 203 TO ADD PREFIX TO NUMBER 204 TO EDIT DIRECTORY DATA 207 TO DELETE ALL DATA 208 TO DELETE SPECIFIC DATA 209 7 CALL HISTORY OPERATION FOR DT830 SERIES 211 TO VIEW CALL HISTORY 211 TO MAKE A CALL FROM CALL HISTORY 212 TO ADD CALL HISTORY DATA TO DIRECTORY 213 TO EDIT DIRECTORY DATA FROM C...

Page 8: ... DATA 224 TO DELETE SPECIFIC DATA 225 8 SPECIFICATIONS TECHNICAL SPECIFICATIONS 226 9 MENU LIST MENU LIST FOR DT830 SERIES 228 MENU LIST FOR DT430 Series 237 10 WEB PROGRAMMING OUTLINE 238 TO LOGIN 239 TO LOGOUT 241 HOW TO OPERATE 243 11 OPTION DEVICES SMART DEVICE INTEGRATION 244 TERMINAL MODE 247 OTHER FEATURES 250 ...

Page 9: ...0 Series 1 2 ABC 3 DEF 4 GHI 5 JKL 6 MNO 7 PQRS 8 TUV 9 WXYZ 0 Menu HOLD Transfer Speaker Recall Feature Answer Mic Scroll Exit Help Redial 1 2 ABC 3 DEF 4 GHI 5 JKL 6 MNO 7 PQRS 8 TUV 9 WXYZ 0 Menu HOLD Transfer Speaker Recall Feature Answer Mic Scroll Exit Help Redial ...

Page 10: ... 2 ABC 3 DEF 4 GHI 5 JKL 6 MNO 7 PQRS 8 TUV 9 WXYZ 0 Menu HOLD Transfer Speaker Recall Feature Answer Mic Scroll Exit Help Redial 1 2 ABC 3 DEF 4 GHI 5 JKL 6 MNO 7 PQRS 8 TUV 9 WXYZ 0 Menu HOLD Transfer Speaker Recall Feature Answer Mic Exit Help Redial ...

Page 11: ...s 1 2 ABC 3 DEF 4 GHI 5 JKL 6 MNO 7 PQRS 8 TUV 9 WXYZ 0 Menu HOLD Transfer Speaker Recall Feature Answer Mic Exit Help Redial 1 2 ABC 3 DEF 4 GHI 5 JKL 6 MNO 7 PQRS 8 TUV 9 WXYZ 0 Menu HOLD Transfer Speaker Recall Feature Answer Mic Exit Help Redial ...

Page 12: ... 3 DEF 4 GHI 5 JKL 6 MNO 7 PQRS 8 TUV 9 WXYZ 0 Menu HOLD Transfer Speaker Recall Feature Answer Mic Exit Help Redial 1 2 ABC 3 DEF 4 GHI 5 JKL 6 MNO 7 PQRS 8 TUV 9 WXYZ 0 HOLD Transfer Speaker Exit Help Recall Feature Redial Conf Directory Mic Message Answer ...

Page 13: ...5 1 DTZ 2E 3 DT410 Series 1 2 ABC 3 DEF 4 GHI 5 JKL 6 MNO 7 PQRS 8 TUV 9 WXYZ 0 HOLD Transfer Speaker Recall Feature Redial Conf Directory Mic Message Answer ...

Page 14: ...the bottom of the LCD is available The appropriate feature key is displayed on the screen according to the call handling pro cess 5 Help Explanations of the Soft Keys can be called up on the LCD by pressing this key 6 Programmable Keys These keys can be programmed as Flexible Line key Programmable Feature Key by Telephony Server Administrator When Telephony Server Administrator sets One Touch Spee...

Page 15: ...ursor key a Up Down DOWN UP Used to adjust LCD contrast speaker receiver vol ume and ringer volume LCD Contrast Press or key while idle Speaker Receiver Volume Press or key during conversation Ringer Volume Press or key during ringing b Redial Last Number Call Speed Calling Station Group Press key to activate redial feature Press redial and scroll back through numbers that have been dialed When th...

Page 16: ...l Speed Calling Station Group Press key to activate redial feature Press redial and scroll back through numbers that have been dialed When the desired number is displayed press the or key to activate dialing Conf only for DTZ 2E 3 and DTZ 6DE 3 Press key to establish a conversation LED on key lights when key is active Up Move the highlighted area one line up the screen Down Move the highlighted ar...

Page 17: ... key while idle Speaker Receiver Volume Press or key during conversation Ringer Volume Press or key during ringing MENU KEY From the key you can use various application features such as Directory and Call History To Display Menu List STEP 1 Press key while indicating the current time on LCD The Menu List is displayed in LCD Use Cursor Key to select desired Menu Item You can also select the Menu It...

Page 18: ...dministrator History Directory Setting Portal Service 1 2 Service To access external XML server For details please contact the system administrator Note This icon appears only when XML service is used Setting To control settings for ringing volume LCD display and Music on Hold For details see SETUP WITH MENU KEY FOR DT830 SERIES Phone To switch from Main Menu to the Portal screen or Phone screen t...

Page 19: ... entrance screen of the phone When you use multiple XML applica tions the URL that is registered as the home URL is the Portal screen this is where other XML applications can be accessed Menu Item Digit key to select Description 8 Menu Item Description Call History To view Call History For details see 7 2FOR DT430 SERIES in chapter 7Call History Operation Directory To use Phonebook function For de...

Page 20: ...n Back OK Up Down Back OK Up Down Back OK Feature Icon Description Missed Call This icon appears when there is a missed call Once you have checked the missed call this icon will disappear Voice Mail This icon provides notification of received Voice Mail Once you have checked the Voice Mail this icon will disappear Bluetooth This icon appears when a cordless handset or Bluetooth adapter BCA Z is co...

Page 21: ...d mark and logos are regis tered trademarks owned by Bluetooth SIG Inc and any use of such marks by NEC Corpora tion is under license Note Power save mode can be set at installation For details please contact the system administrator Feature Icon Description Note DT410 Series do not support the Shortcut Menu Note Unavailable Menu items are grayed out Feature Description Missed Calls Access history...

Page 22: ...ed Calls Access to history of Missed Call Voice Mail Access to history of incoming Voice Mail 1 2 1 1 2 Receive IM Shortcut Menu 3 4 0 Presence Bluetooth Voice Mail OK Back Missed Calls Note If two or more records exist use or soft key to display the next former records Note For unanswered incoming calls will be dis played on the left of the name Note If you make answer a call to from the telephon...

Page 23: ...Forwarding Don t Answer feature MICM Press key to activate Manual Intercom MSG Message Press key to leave message indication at station in no answer or busy condition MULTILINE APPEARANCE A programmable extra extension key Press this key to see status of extra extension MSG Wait Press key to leave message waiting indication on boss station from secretary s station no MSGwt Press key to cancel mess...

Page 24: ...andset receiver volume Feature 3 Selects ringer tone Feature 4 Adjusts transmission receiving volume Feature 5 Activates hands free operation Feature 6 Deactivates hands free operation Feature 7 Turns call indicator lamp on or off for incoming call notification If turned off this lamp will still light to indicate message waiting Feature 8 Selects between Normal Dynamic Dial Pad and Preset Dial Not...

Page 25: ...t that key Mic Microphone Press the Soft Key below Mic to activate or deactivate the Microphone LED on Mic key will illuminate when Mic is on NoDist Do Not Disturb Press the Soft Key to reject call termination to the preassigned station Default Displays for Each Status Default Soft Key settings are provided corresponding to particular functions Different Soft Key settings are displayed at the bott...

Page 26: ... registered is in logout status Exe Over Executive Override Enables selected station users upon encountering a busy condition at an internal station to bridge into the busy connection CallWait Call Waiting Enables a busy station to receive a second incoming call A camp on indication tone is sent to the busy station and you can use a switchhook flash to answer the second call CallBack Call Back Pro...

Page 27: ...s you to send a switchhook flash while on an outside trunk Busy Out UCD Busy Out Allows a station user to block UCD calls and to cancel Busy Out Flash Flash Provides the station with a switchhook flash CF NoAns Call Forward No Answer Permits a call to an unanswered station to be forwarded to a predesignated station if the called station does not answer within a predetermined period of time MC Trac...

Page 28: ...d group IDChange Call ID Change Display Allows you to toggle between standard display and an alternate display G PickUp Call Pickup Group Enhancement Allows you to answer any ringing station within your expanded call pickup group CHCNF Call Hold Conference Allows a station user to establish a conference connection by adding a third party who is held on another line to the existing two party connec...

Page 29: ...ou can assign any numbers ex Telephone num ber etc to the key see TO ORIGINATE A CALL USING SPEED CALLING ONE TOUCH SPEED CALLING KEYS and TO REGISTER NAME ON ONE TOUCH SPEED CALLING KEY For the assignment of the keys confirm with the Telephony Server Administrator 1 2 ABC 3 DEF 4 GHI 5 JKL 6 MNO 7 PQRS 8 TUV 9 WXYZ 0 Menu HOLD Transfer Speaker Recall Feature Answer Mic Scroll Exit Help Redial Scr...

Page 30: ...Call Park Group Recall Individual Hold Exclusive Call Hold Call Transfer Individual Hold on Call Park Group Receiving an Incoming Call During Conversation Individual Use Call Transfer Conference Steady Lit During Conversation Other Party Use Active Feature Under a setting of feature key like a Call Forwarding Key Description Maximum digits to be displayed Line Key Name and Number informa tion 8 di...

Page 31: ... Note For example when an incoming call is terminated to a line key on Page 3 while Page 1 is being dis played on the screen the screen is not automati cally switched from Page 1 to page 3 You must display Page 3 manually and then answer the incoming call Scroll Scroll BEN RACHEL LINDA PAUL 012345 HANNAH FDA FDN Key No 1 Key No 2 Key No 3 Key No 4 Key No 5 Key No 6 Key No 6 Key No 8 MICHAEL PETER ...

Page 32: ...sual Set tings Side Tone Volume of Online Monitoring Feature 2 Adjusts handset receiver volume For the settings contact the Administrator You can confirm the settings in Audio Visual Set tings Audio Settings Receive Bias Re ceive Gain of Online Monitoring Feature 3 Selects ringer tone For the settings contact the Administrator You can confirm the settings in Audio Visual Set tings Audio Settings R...

Page 33: ...pside down STEP 2 Adjust the tilt leg in the direction of the arrow until you hear it click TO LOWER TILT LEG STEP 1 Turn the telephone set upside down STEP 2 While lifting the center of the stopper adjust the tilt leg in the direction of the arrow until you hear it click DT830 DT430 410 First Level Second Level Third Level Fourth Level Tilt Leg Stopper Tilt Leg ...

Page 34: ...ilt leg downward Remove the tilt leg from the termi nal TO ATTACH TILT LEG STEP 1 Turn the telephone set upside down STEP 2 Align the hooks c h of the tilt leg over the ap propriate slots C H of the telephone set STEP 3 Slide the tilt leg upward until the hooks c and b click into place STEP 4 Fit the indicated portions a and b of the stop per into the grooves A and B on the tilt leg DT830 DT430 41...

Page 35: ...Switch STEP 2 Connect the telephone to the network device using the LAN cable STEP 3 Thread the LAN cable through the groove on the back of the telephone STEP 4 When AC adapter is used to supply power to the telephone connect the AC DC adapter to the telephone as shown below DT830 Telephone To LAN Groove LAN Straight Cable To PC Telephone LAN Straight Cable Groove ...

Page 36: ... until you hear it click STEP 2 Thread the line cord through the groove on the back of the telephone STEP 3 Lead the line cord out through the groove on the tilt leg as shown in the figure below DT430 410 Line Cord Line Cord Plug Line Connector Telephone Line Cord Groove Telephone Tilt Leg Groove Line Cord ...

Page 37: ...bers or other important information Directory cards are available as options STEP 1 Remove the protective sheet from the cover STEP 2 Attach the cover to the directory card and then attach it to the directory card holder DT830 DT430 410 Telephone AC Adapter Plug AC Adapter Cord Connector for AC Adapter Telephone AC Adapter Plug AC Adapter Cord Connector for AC Adapter Groove Note To remove the dir...

Page 38: ...CONNECT THE HEADSET STEP 1 Insert the modular plug into HEADSET con nector on the back of the telephone until it clicks STEP 2 Place the headset cord into the groove as shown in the figure below and fix it DT830 DT430 410 Groove HANDSET Connector Telephone Modular Plug Coiled Cord Note The headset which can be connected to the tele phone is HW251N A10 manufactured by Plan tronics Note To make a ca...

Page 39: ... the telephone STEP 3 Remove the line key card TO INSTALL KEY SET UNIT LINE KEY PANEL BUTTON PANEL AND LINE KEY CARD STEP 1 Align the holes in the line key card with the buttons on the telephone STEP 2 Align the holes in the line key panel button panel with the buttons on the telephone and then push the four corners of the panel until the panel clicks into place DT830 DT430 410 Line Key Panel Butt...

Page 40: ...P 3 Attach WM L UNIT to the wall directly or the wall plate When attaching WM L UNIT to the wall directly Secure WM L UNIT with the six screws in cluded with the telephone set or hang WM L UNIT on the wall with the two screws pur chased separately inserted into the wall WARNING Be careful not to drop the telephone set while mounting it on the wall It can cause injury Make sure the telephone set is...

Page 41: ...the modular terminal to the wall as shown in the following figure If the modular connector is attached directly on the wall or the wall plate is used instead of modular ter minal skip this step STEP 5 Insert the line cord plug included with the telephone set into the modular connector STEP 6 Insert the line cord plug into the LINE connec tor on the back of the telephone Wrap the ex cess cord and s...

Page 42: ...back of the telephone as shown in the figure below STEP 8 Insert the four tabs on WM L UNIT in the tab slots on the back of the telephone Tuck the excess cord into WM L UNIT Wall Line Cord WM L Line Connector Telephone Groove Modular Plug Wall Tabs Tab Slots ...

Page 43: ... TO ADJUST HANDSET RECEIVER VOLUME Press Up Down key in the off hook status or during the call LCD indication for North America Latin America Asia Middle East and Russia LCD indication for Australia TO ADJUST SPEAKER VOLUME Press Up Down key during speakerphone operation or during the call TO ADJUST RINGER TONE Press Up Down key during ringing Feature Menu Menu DT830 DT430 410 HANDSET HANDSET DT83...

Page 44: ... in microphone STEP 1 Press soft key associated with the Mic Dis play or press and key TO CHANGE HANDSET RECEIVER VOLUME Handset receiver volume can be changed STEP 1 Press and key The LCD displays the current volume status STEP 2 Press and key to alternate be tween Large and Small volume Note For details of configuration setting please con tact the system administrator DT830 DT430 410 LCD LCD LCD...

Page 45: ... displays the selected tone number n 1 10 No Frequency Hz Modulation Hz 1 520 660 16 2 520 660 8 3 1100 1400 16 4 660 760 16 5 Melody 1 6 Melody 2 7 Melody 3 8 Melody 4 9 Melody 5 10 Melody 6 Note Tone number 5 6 8 10 Melody 1 2 4 6 will sound continuously DT430 410 Feature 3 4 26 PM MON 22 SEP 2014 RINGER TONE n ...

Page 46: ...MP ON OFF You can choose to turn the call indicator lamp either on or off during ringing STEP 1 Press and key The LCD displays DT430 410 Feature 4 4 26 PM MON 22 SEP 2014 T R VOL SMALL Feature 4 4 26 PM MON 22 SEP 2014 T R VOL LARGE DT430 410 Feature 5 4 26 PM MON 22 SEP 2014 HANDS FREE ON Feature 6 Note The call indicator lamp lights when used as a Message Waiting Lamp even when it is turned off ...

Page 47: ...mber and the sta tion will go hands free off hook automatically For details see TO ORIGINATE A CALL USING SELECTIVE DIALING DYNAMIC DIAL PAD PRESET DIAL DT830 DT430 410 Feature 8 4 26 PM MON 22 SEP 2014 Direct Dial Pad ON 4 26 PM MON 22 SEP 2014 Direct Dial Pad OFF Feature 8 Note When this feature is ON you may initiate a call by pressing Speaker Key or going off hook after dialing the number For ...

Page 48: ...Select an item by either of the following operations Highlight an item by using and then press or OK soft key Press key STEP 4 Select Offhook Ring Select an item by either of the following operations Highlight an item by using and then press or OK soft key Press key 1 1 1 2 Data Backup Restore Setting 3 Download OK Menu User Setting 1 1 1 2 Display User Setting 3 4 5 6 7 Change Password Peripheral...

Page 49: ...he procedure below shows how to enable disable the ringing of headset STEP 1 Display the Menu screen and select Setting STEP 2 Select User Setting Select an item by either of the following operations Highlight an item by using and then press or OK soft key Press key Note Default setting is 2 Enable Note The enabled item is highlighted 1 2 1 2 Offhook Ring OK Back 1 2 Disable Enable 1 1 1 2 Data Ba...

Page 50: ...of headset se lect Disable or Enable Select an item by one of the following operations Highlight an item by using and then press or OK soft key Press or key and then press or OK soft key 1 1 1 2 Display User Setting 3 4 5 6 7 Change Password Peripherals Talk OK Back Security Incoming Call Usability 3 3 1 2 Incoming Call 3 4 5 6 Ring Tone Headset Ring Volume OK Back Illumination Ring Volume Offhook...

Page 51: ...tem by either of the following operations Highlight an item by using and then press or OK soft key Press key STEP 4 Select Ring Tone Select an item by either of the following operations Highlight an item by using and then press or OK soft key Press key 1 1 1 2 Data Backup Restore Setting 3 Download OK Menu User Setting 1 1 1 2 Display User Setting 3 4 5 6 7 Change Password Peripherals Talk OK Back...

Page 52: ...ft key For example press to select Down load1 Note The enabled item is highlighted 1 2 1 2 1 2 IM Ring Tone 3 Internal Call OK Back External Call 0 9 1 5 15 No Menu Item Frequency Hz Remarks 1st 2nd 0 Automatic 520 660 16Hz modulation 1 Tone Type 1 520 660 16Hz modulation 2 Tone Type 2 520 660 8Hz modulation 3 Tone Type 3 1400 1100 Door Phone 4 Tone Type 4 1100 No modulation 5 Tone Type 5 540 No m...

Page 53: ...ll not operate Also when selecting Download 1 2 3 the ringer tone file must be downloaded in advance If there is no downloaded file you hear no tone Note Tone Type 1 to Tone Type 8 In the preview function each ringer tone sounds continuously Actual ringer pattern of each tone is determined by the initial system settings Note Terminal settings may not become effective according as the system settin...

Page 54: ...all Select an item by either of the following operations Highlight an item by using and then press or OK soft key Press key STEP 4 Select Illumination Select an item by either of the following operations Highlight an item by using and then press or OK soft key Press key 1 1 1 2 Data Backup Restore Setting 3 Download OK Menu User Setting 1 1 1 2 Display User Setting 3 4 5 6 7 Change Password Periph...

Page 55: ... using and then press or OK soft key Press key For DT830 Series 1 2 1 2 1 2 Illumination 3 IM OK Back External Call Internal Call 0 9 Note When selecting Automatic the preview function will not operate Note When selecting Automatic or not performing this illumination setting Red is automatically applied Note You can set illumination pattern for the telephone set here Illumination pattern can be se...

Page 56: ... item by either of the following operations Highlight an item by using and then press or OK soft key Press key STEP 4 Select RTP Alarm Select an item by either of the following operations Highlight an item by using and then press or OK soft key Press key 1 1 1 2 Data Backup Restore Setting 3 Download OK Menu User Setting 2 2 1 2 Display User Setting 3 4 5 6 7 Change Password Peripherals OK Back Se...

Page 57: ...oft key Menu Items Descriptions 0 Automatic Follow the setting on the System If no setting is made in the Sys tem the default setting Alarm ON is applied 1 Disable Follow the setting on the terminal OFF 2 Enable Follow the setting on the terminal ON Note For the setting on the System contact the Sys tem Administrator Note The enabled item is highlighted 0 1 2 0 2 0 1 RTP Alarm 2 Automatic OK Back ...

Page 58: ... item by either of the following operations Highlight an item by using and then press or OK soft key Press key STEP 4 Select DTMF Tone Select an item by either of the following operations Highlight an item by using and then press or OK soft key Press key 1 1 1 2 Data Backup Restore Setting 3 Download OK Menu User Setting 2 2 1 2 Display User Setting 3 4 5 6 7 Change Password Peripherals OK Back Se...

Page 59: ...llowing operations Highlight an item by using and then press or OK soft key Press key STEP 3 Select Talk Select an item by either of the following operations Highlight an item by using and then press or OK soft key Press key Menu Items Descriptions 0 Automatic Follow the setting on the System If no setting is made in the Sys tem the default setting DTMF ON is applied 1 Disable Follow the setting o...

Page 60: ...hlight an item by using and then press or OK soft key Press key and then press or OK soft key 1 2 Display User Setting 3 4 5 6 7 Change Password Peripherals OK Back Security Incoming Call Talk Usability 3 3 1 2 Talk 3 4 5 OK Back Hold Music Prefix RTP Alarm DTMF Tone Key Touch Tone Note When 0 Automatic is set the default setting Tone is applied Note The enabled item is highlighted 0 1 2 3 0 3 0 1...

Page 61: ...elect an item by either of the following operations Highlight an item by using and then press or OK soft key Press key STEP 4 Select Hold Music Select an item by either of the following operations Highlight an item by using and then press or OK soft key Press key 1 1 1 2 Data Backup Restore Setting 3 Download OK Menu User Setting 2 2 1 2 Display User Setting 3 4 5 6 7 Change Password Peripherals O...

Page 62: ...Menu screen and select Setting STEP 2 Select User Setting Select an item by either of the following operations Highlight an item by using and then press or OK soft key Press key Note You can preview the designated music on hold When selecting Download the music on hold file must be downloaded in advance If there is no downloaded file you hear no tone in the preview function in actual operating con...

Page 63: ... using and then press or OK soft key Press key and then press or OK soft key 3 3 1 2 User Setting 3 4 5 6 Change Password Peripherals OK Back Security Incoming Call Talk Display 7 Usability 1 1 1 2 Display 3 4 5 6 Back Light Language OK Back Font Size Local Volume Screen Saver Time Format Menu Item Meaning 0 Automatic Follow the setting on the system default 1 12 hour Indication 12 hour clock 2 24...

Page 64: ...P 3 Select Display Select an item by either of the following operations Highlight an item by using and then press or OK soft key Press key STEP 4 Select Local Volume Select an item by either of the following operations Highlight an item by using and then press or OK soft key Press key 1 1 1 2 Data Backup Restore Setting 3 Download OK Menu User Setting 3 3 1 2 User Setting 3 4 5 6 7 Change Password...

Page 65: ...d then press or OK soft key Press key and then press or OK soft key Menu Item Meaning 0 Automatic Each volume level is displayed on LCD default 1 Disable Each volume level is not displayed on LCD 2 Enable Each volume level is displayed on LCD Note The enabled item is highlighted 0 2 0 1 Local Volume 2 OK Back Disable Enable Automatic ...

Page 66: ...ng STEP 2 Select User Setting Select an item by either of the following operations Highlight an item by using and then press or OK soft key Press key STEP 3 Select Display Select an item by either of the following operations Highlight an item by using and then press or OK soft key Press key Note For details on the XML service contact the Sys tem Administrator 1 1 1 2 Data Backup Restore Setting 3 ...

Page 67: ...nd then press or OK soft key Press or key and then press or OK soft key STEP 7 The display goes back to the Screen Saver screen When Enable is selected Step 7 Select Wait Time Input Wait Time to launch the screen saver 1 999min and then press or OK soft key 3 3 1 2 Display 3 4 5 6 Back Light Language OK Back Font Size Local Volume Screen Saver Time Format 1 1 1 2 Screen Saver OK Back Screen Saver ...

Page 68: ...ay Select an item by either of the following operations Highlight an item by using and then press or OK soft key Press key STEP 4 Select Back Light Select an item by either of the following operations Highlight an item by using and then press or OK soft key Press key Note Backlight feature is optional For DT410 Series this feature is not supported 1 1 1 2 Data Backup Restore Setting 3 Download OK ...

Page 69: ...Highlight an item by using and then press or OK soft key Press or key and then press or OK soft key Menu Item Meaning 1 Disable Backlights of LCD and digit keys are disabled 2 Enable Backlights of LCD and digit keys are enabled Note The enabled item is highlighted 1 2 1 2 Back Light OK Back Disable Enable ...

Page 70: ... item by either of the following operations Highlight an item by using and then press or OK soft key Press key STEP 4 Select Font Size Select an item by either of the following operations Highlight an item by using and then press or OK soft key Press key 1 1 1 2 Data Backup Restore Setting 3 Download OK Menu User Setting 3 3 1 2 User Setting 3 4 5 6 7 Change Password Peripherals OK Back Security I...

Page 71: ...E The following explains how to set a language to be displayed on LCD STEP 1 Display the Menu screen and select Setting STEP 2 Select User Setting Select an item by either of the following operations Highlight an item by using and then press or OK soft key Press key Note The enabled item is highlighted 1 2 1 2 Font Size OK Back Small 12dot Standard 16dot 1 1 1 2 Data Backup Restore Setting 3 Downl...

Page 72: ...t an item by either of the following operations Highlight an item by using and then press or OK soft key Press key and then press or OK soft key For example press to select Spanish 3 3 1 2 User Setting 3 4 5 6 7 Change Password Peripherals OK Back Security Incoming Call Talk Display Usability 6 6 1 2 Display 3 4 5 6 OK Back Screen Saver Time Format Local Volume Back Light Font Size Language 0 9 1 ...

Page 73: ...ect User Setting Select an item by either of the following operations Highlight an item by using and then press or OK soft key Press key Note The enabled item is highlighted OK Back 16 15 14 13 12 11 10 17 18 19 20 21 Danish Swedish Greek Portuguese French Spanish English Polish Turkish Russian Romania Catalan 21 Catalan Note Depending on the System Configuration the expiration date of password ca...

Page 74: ...the new password again and then press or OK soft key Note The initial password is 0000 When changing the password for the first time enter 0000 as the old password 4 4 1 2 User Setting 3 4 5 6 7 Peripherals OK Back Security Incoming Call Talk Display Change Password Usability New Pass Change Password OK Cancel Set BK 1 Old Pass Retry Pass Note A maximum of 32 digits 0 9 and can be set as a passwor...

Page 75: ...lay the Menu screen and select Setting STEP 2 Select User Setting Select an item by one of the following operations Touch panel operation Highlight an item by using and press or OK Press Note When the password entry ends in failure the fol lowing error message is issued In that case press OK soft key and try again Password OK 1 Complete Password OK 1 Password Error 1 1 1 2 Data Backup Restore Sett...

Page 76: ... an item by using and press or OK Press STEP 4 Select Help Key Mode Select an item by one of the following operations Touch panel operation Press or OK Press 7 7 1 2 User Setting 3 4 5 6 7 Peripherals OK Back Security Incoming Call Talk Display Change Password Usability 1 1 1 Usability OK Cancel Help Key Mode ...

Page 77: ...al data off the telephone STEP 1 Display the Menu screen and select Setting STEP 2 Select User Setting Select an item by either of the following operations Highlight an item by using and then press or OK soft key Press key No ITEM DESCRIPTION 1 Sub Menu Set the Help key which displays sub menu 2 Popup Window Set the Help key which displays pop up window 1 2 1 Help Key Mode OK Cancel SubMenu 2 Popu...

Page 78: ...t key Press key STEP 4 Enter the password and then press or OK soft key STEP 5 Press or OK soft key to clear the person al data of the telephone 0 0 2 User Setting 3 4 5 6 0 Peripherals OK Back Security Talk Display Change Password Setting Reset 7 Usability Setting Reset OK Back BK 1 Input a password Setting Reset OK Back Are you sure ...

Page 79: ... Put the downloading file into a desired direc tory of TFTP server and then specify it as the directory for downloading STEP 2 Display the Menu screen and select Setting STEP 3 Select Download Select an item by either of the following operations Highlight an item by using and then press or OK soft key Press key STEP 4 Select Protocol Select an item by either of the following operations Highlight a...

Page 80: ... by either of the following operations Highlight an item by using and then press or OK soft key Press key STEP 8 Select User ID Select an item by either of the following operations Highlight an item by using and then press or OK soft key Press key STEP 9 Enter a User ID by using digit keys then press or OK soft key 1 2 1 2 Protocol OK Back TFTP FTP 1 2 4 4 Note For details on character entry metho...

Page 81: ...s key STEP 13 Enter the directory where the download file is stored and then press or OK soft key STEP 14 The display goes back to the FTP Settings screen Press or Back soft key to display the Download Menu screen Note For details on character entry method see HOW TO INPUT CHARACTERS in chapter 4 Basic Operation 2 2 1 2 FTP Settings 3 OK Back Folder User ID Password OK Back BK A Password Input a p...

Page 82: ...es Select an item by either of the following operations Highlight an item by using and then press or OK soft key Press key STEP 18 Select a file to be downloaded 2 2 1 2 Download Menu 3 4 FTP Settings OK Back Download Files Protocol Download Address Download Address OK Back BK 1 For 1 When downloading a file for Music on Hold Select Hold Music and go to STEP 20 When downloading a file for ringer t...

Page 83: ...me will be displayed When downloading a file for Music on Hold the default file name is MOH wav When downloading a file for ringer tone the default file name is Melody1 2 3 wav File Format Maximum Size PCM µ law 8kHz s wav under 32 seconds 2 1 2 3 1 3 1 2 Ring Tone 3 OK Back Download3 Download1 Download2 Hold Music Exec Cancel BK A Input a file name MOH wav File Format Maximum Size PCM µ law 8kHz ...

Page 84: ...hen changing the file name go to the next step STEP 21 When not changing the file name go to STEP 22 File Name Directory csv Fixed Code Unicode UTF 8 Note Enc key is available for SV9500 V1 or later Note If you change the encrypted file into the unen crypted file press NoEnc soft key Directory Exec Cancel BK A Input a file name Directory csv Enc Directory Exec Cancel BK A Input a file name Directo...

Page 85: ...ete an entered character press BK soft key Note Be sure not to turn OFF the DT830 Series while Saving is displayed on the LCD Note When the downloading process ends in failure Downloading Failed is displayed on the LCD Check to see the following and then retry Check Points Actions Download file is not placed in the specified directory Place the download file in the specified directory A different ...

Page 86: ...nd select Setting STEP 3 Select Data Backup Restore Select an item by either of the following operations Highlight an item by using and then press or OK soft key Press key STEP 4 Select Protocol Select an item by either of the following operations Highlight an item by using and then press or OK soft key Press key STEP 5 Select a protocol used by the destination server Select an item by either of t...

Page 87: ...ct User ID Select an item by either of the following operations Highlight an item by using and then press or OK soft key Press key STEP 9 Enter a User ID by using digit keys then press or OK soft key 1 2 Protocol OK Back TFTP FTP 1 2 5 5 1 2 Backup Restore 3 4 OK Back Data Backup Data Restore Server Address 5 Protocol FTP Settings Note For details on character entry method see HOW TO INPUT CHARACT...

Page 88: ... key STEP 13 Enter the destination directory of the FTP TFTP server and then press or OK soft key STEP 14 The display goes back to the FTP Settings screen Press or Back soft key to display the Backup Restore screen Note For details on character entry method see HOW TO INPUT CHARACTERS in chapter 4 Basic Operation 2 2 1 2 FTP Settings 3 OK Back Folder User ID Password OK Back BK A Password Input a ...

Page 89: ...ighlight an item by using and then press or OK soft key Press key STEP 18 The default file name will be displayed as fol lows 3 3 1 2 Backup Restore 3 4 OK Back Data Backup Data Restore 5 FTP Settings Protocol Server Address Server Address OK Back BK 1 For Note Do not change the extension of the backup file The setting data of the telephone can only be backed up as a tgz file Note When changing th...

Page 90: ...key is available for SV9500 V1 or later Note If you change the encrypted file into the unen crypted file press NoEnc soft key Note Be sure not to turn OFF the DT830 Series while Saving is displayed on the LCD Exec Cancel BK A Data Backup Input a folder name PersonalData tgz ef NoEnc Note When the data backup ends in failure Upload Failed is displayed on the LCD Check to see the following and then ...

Page 91: ... downloading STEP 2 Display the Menu screen and select Setting STEP 3 Select Data Backup Restore Select an item by either of the following operations Highlight an item by using and then press or OK soft key Press key STEP 4 Select Protocol Select an item by either of the following operations Highlight an item by using and then press or OK soft key Press key STEP 5 Select a protocol used by the ser...

Page 92: ...ct User ID Select an item by either of the following operations Highlight an item by using and then press or OK soft key Press key STEP 9 Enter a User ID by using digit keys then press or OK soft key 1 2 Protocol OK Back TFTP FTP 1 2 5 5 1 2 Backup Restore 3 4 OK Back Data Backup Data Restore Server Address 5 Protocol FTP Settings Note For details on character entry method see HOW TO INPUT CHARACT...

Page 93: ...ss key STEP 13 Enter the directory where the backup file is stored and then press or OK soft key STEP 14 The display goes back to the FTP Settings screen Press or Back soft key to display the Backup Restore screen Note For details on character entry method see HOW TO INPUT CHARACTERS in chapter 4 Basic Operation 2 2 1 2 FTP Settings 3 OK Back Folder User ID Password OK Back BK A Password Input a p...

Page 94: ...r OK soft key Press key STEP 18 The default file name will be displayed as fol lows 3 3 1 2 Backup Restore 3 4 OK Back Data Backup Data Restore 5 FTP Settings Protocol Server Address Server Address OK Back BK 1 For 2 Note Do not change the extension tgz of the backup file If the extension is changed the file cannot be restored properly Note When changing the default file name press BK soft key onc...

Page 95: ...Restore screen by Exit soft key Note A maximum of 20 characters 0 9 A Z a z or _ can be entered as a file name Note To delete an entered character press BK soft key Note Enc key is available for SV9500 V1 or later Note If you change the encrypted file into the unen crypted file press NoEnc soft key Note Be sure not to turn OFF the DT830 Series while Saving is displayed on the LCD Exec Cancel BK A ...

Page 96: ...fied between DT830 Series and FTP TFTP server Set the same file name from both DT830 Series and FTP TFTP server Incorrect IP address of FTP TFTP server has been entered from the telephone Set the proper IP address of FTP TFTP server The power to FTP TFTP server or network equipment is OFF Turn on the power LAN cable is disconnected Reconnect the cable securely ...

Page 97: ...ng and then press or OK soft key Press key STEP 2 Select Ring Volume Select an item by either of the following operations Highlight an item by using and then press or OK soft key Press key STEP 3 Ring Volume can be set in 13 levels 0 12 Adjust the ringer tone volume by using key and then press or OK soft key Menu 3 3 1 2 Menu 3 OK Back Directory Call History Settings 1 1 Turn the volume up Turn th...

Page 98: ...of the following operations Highlight an item by using and then press or OK soft key Press key STEP 3 To disable enable the off hook ringing select Disable or Enable Select an item by either of the following operations Highlight an item by using and then press or OK soft key Press or key and then press or OK soft key Menu 3 3 1 2 Menu 3 OK Back Directory Call History Settings 2 2 1 2 Settings 3 OK...

Page 99: ...ns Highlight an item by using and then press or OK soft key Press key STEP 3 Make a selection from the following list Select an item by either of the following operations Highlight an item by using and then press or OK soft key Press or key and then press or OK soft key STEP 4 After Making a selection press or OK soft key Menu 3 3 1 2 Menu 3 OK Back Directory Call History Settings 3 3 Menu Item Me...

Page 100: ... following operations Highlight an item by using and then press or OK soft key Press key STEP 3 To disable enable the ringing of headset se lect Disable or Enable Select an item by either of the following operations Highlight an item by using and then press or OK soft key Press or key and then press or OK soft key Menu 3 3 1 2 Menu 3 OK Back Directory Call History Settings 4 4 1 2 Settings 3 OK Ba...

Page 101: ...E AN EXTERNAL CALL TO MAKE AN INTERNAL CALL TO ANSWER AN EXTERNAL CALL TO ANSWER AN INTERNAL CALL MULTILINE APPEARANCE TO HOLD A CALL TO PLACE A CALL ON EXCLUSIVE HOLD TO TRANSFER A CALL TERMINAL OPERATION USING THE HEADSET ADUSTING HEADSET RINGER TONE VOLUME HOW TO INPUT CHARACTERS SECURITY MODE EMERGENCY CALL XML APPLICATION SCREEN POP UP ...

Page 102: ...e login code is accepted display changes to normal idle status Note This feature is only available for DT830 Series DT830 Cancel Back Set OK Password Login ID Cancel Back Set OK Password Login ID 31313 Cancel Back Set OK Password Login ID 31313 Note The LCD can display the my line information name and station number when the station is idle For details please contact the system administrator Mic N...

Page 103: ...ne Indicating Double Height Characters By pressing the Soft Key or the Line Feature Key you can switch the characters displayed to double height size in the order of Enlarged Characters 2nd line Enlarged Characters 3rd line No Enlarged Characters The following shows an example when using this fea ture No Enlarged Characters Note This feature is only available for DT830 Series Note The soft key loc...

Page 104: ... the system administrator STEP 1 Lift handset or press key receive dial tone STEP 2 Dial the Central Office access code e g 9 Mic NoDist 7 25 AM MON 22 SEP 2014 31313 Mic NoDist 31313 7 25AMMON22SEP2014 Note Personal Directory Name Display function is available only for DT830 Series Note This section describes the Normal Dial Mode Regarding the other mode see TO ORIGINATE A CALL USING SELECTIVE DI...

Page 105: ...irst seven digits of the number or the last seven digits of the number are displayed For more information please contact the system adminis trator 1 25 PM MON 22 SEP 2014 9XXXXXXXXX Mic Dialed Code Number 9XXXXXX 00 05 Elapsed Time TOM JONES Mic NoDist Dialed Code Name Information registered in Personal Directory Number Note My Line is an actual line that is directly associ ated with station numbe...

Page 106: ...on number is not registered in Personal Directory STEP 3 Use the handset or Mic to start a conversa tion while in a conversation When dialed station number is registered in Personal Di rectory Note Personal Directory Name Display function is available only for DT830 Series Note This section describes the Normal Dial Mode About the other mode see TO ORIGINATE A CALL USING SELECTIVE DIALING DYNAMIC ...

Page 107: ...flash es red while hearing ring tone When calling party telephone number is registered in Per sonal Directory When calling party telephone number is not registered in Personal Directory Note My Line is an actual line that is directly associ ated with station number of the telephone You can make answer a call via this line Usually My line is seized automatically only by lifting the handset or press...

Page 108: ...When caller ID is not received 1 25 PM MON 22 SEP 2014 DDD 3 Trunk Trunk Number Type Mic NoDist Answer TOM JONES Name Information Personal Directory Mic NoDist registered in 00 05 Elapsed Time Calling Party Mic NoDist Telephone Number 00 05 Elapsed Time 01234567 Note When an incoming call is terminated to My Line of the telephone you can usually answer the call only by lifting the handset or press...

Page 109: ... number is not registered in Personal Directory STEP 2 Press key or touch the appropriate Line Key STEP 3 Lift the handset to answer the call while in a conversation When calling station number is registered in Personal Di rectory When calling station number is not registered in Personal Directory Note Personal Directory Name Display function is available only for DT830 Series Name Information reg...

Page 110: ...ss held line Use handset to converse If unanswered STEP 1 After preprogrammed time Automatic Recall is initiated STEP 2 Visual and audible signal rapid flash and ring burst is sent to station that placed call on hold DT830 DT430 410 Speaker Speaker Note If held line appears on other DT Series stations the associated LED flashes red slowly Note Any station with this line appearance can retrieve the...

Page 111: ...rsing ask party to hold STEP 2 Press key Receive interrupted dial tone STEP 3 Dial destination station s extension hang up or wait for answer Note If held line appears on other DT Series stations LED remains steadily lit red Note Only the DT Series that set Exclusive Hold option can retrieve the call DT830 DT430 410 HOLD Mic Held Station Number 2001 E_HOLD 1 25 PM MON 22 SEP 2014 Speaker Note Excl...

Page 112: ... STEP 4 Press Headset key to end the call and the Headset key turns off To Answer a Call STEP 1 Press the Headset key while the ringing tone is on and the Headset key lights red STEP 2 Press the flashing line key to start a conver sation with another line Depending on the in stallation phase you can answer the call by pressing key instead of line key STEP 3 Press Headset key to end the call and th...

Page 113: ...y lights red Depending on the installation phase you can answer the call by pressing key instead of Hook key STEP 2 Press Hook key to end the call and the Hook key turns off Note To provide a ringer tone from the headset the system configuration is required For details con tact the system administrator Note Ringer tone volume can be adjusted only for the wired headset which is connected to the ter...

Page 114: ...Menu screen uppercase lowercase The enabled entry mode is indicated in the top portion of the LCD screen DT830 Uppercase Alphabetic Lowercase Alphabetic Numeric Character Mode By pressing key Indicates the enabled character mode DT830 only Input a name Name OK Back Option BK A A Input a name Name OK Back Option BK A a Input a name Name OK Back Option BK A 1 1 2 Word width SubMenu 3 4 5 6 7 8 Paste...

Page 115: ...betic lower case alphabetic and numeric character Word case Switch between uppercase and lowercase Word width Not used Delete Delete a single character Copy Copy the specified characters Cut Cut the specified characters Paste Paste the specified characters Space Enter a space Return Start a new line Overwrite Insert Write over existing characters 1 2 Word width SubMenu 3 4 5 6 7 8 Paste Space Chan...

Page 116: ...ASE SHIFT 1st 2nd 3rd 4th 5th 6th 7th 8th 9th 10th 11th 12th 13th 1 A B C 2 a b c 2 D E F 3 d e f 3 G H I 4 g h i 4 J K L 5 j k l 5 M N O 6 m n o 6 P Q R S 7 p q r s 7 T U V 8 t u v 8 W X Y Z 9 w x y z 9 SP 0 1 A a 2 A a 3 A a 4 A a 5 A a 6 A a 7 A a 8 A a 9 A a 0 A a ...

Page 117: ...0th Note1 11th 12th 13th 14th 15th 16th 17th 18th 19th 20th _ 21th 22th 23th 24th 25th 26th 27th 28th 29th 30th Note1 Used as a case shift key Shifts the characters between alphabetic and numeric Note1 and key is the same for Russian Turkish and other Languages A a A a A a ...

Page 118: ...h 12th 13th 14th 15th A Б В Г а б в г Д Е Ё Ж З д е ё ж з И Й К Л и й к л М Н О П м н о п Р С Т У р с т у Ф Х Ц Ч ф х ц ч Ш Щ Ъ Ы Ь ш щ ъ ы ь Э Ю Я э ю я SP Note and key is the same for English Refer to the Character Code For English 2 2 1 A a 2 A a 3 A a 4 A a 5 A a 6 A a 7 A a 8 A a 9 A a 0 A a ...

Page 119: ...10th 11th 12th 13th 14th 15th A B C Ç a b c ç D E F d e f G Ğ H I İ g ğ h I i J K L j k l M N O Ö m n o ö P R S Ş p r s ş T U Ü V t u ü v Y Z y z SP Note and key is the same for English Refer to the Character Code For English 2 2 1 A a 2 A a 3 A a 4 A a 5 A a 6 A a 7 A a 8 A a 9 A a 0 A a ...

Page 120: ...Æ Ç a b c à á â ã ä å æ ç D E F È É Ê Ë d e f è é ê ë G H I Ì Í Î Ï g h i ì í î ï J K L j k l M N O Ñ Ò Ó Ô Õ Ö Œ Ø m n o ñ ò ó ô õ ö œ ø P Q R S ß p q r s ß T U V Ù Ú Û Ü t u v ù ú û ü W X Y Z w x y z SP Note and key is the same for English Refer to the Character Code For English 2 2 1 A a 2 A a 3 A a 4 A a 5 A a 6 A a 7 A a 8 A a 9 A a 0 A a ...

Page 121: ...0th 11th 12th 13th 14th 15th 1 2 3 4 5 6 7 8 9 0 _ Used as a case shift key Shifts the characters between alphabetic and numeric Note When entering password 0 9 and are available is entered by pressing key is entered by pressing key 1 1 2 1 3 1 4 1 5 1 6 1 7 1 8 1 9 1 0 1 1 1 ...

Page 122: ...TEP 3 Press or OK soft key on the Sub Menu to go back to text input screen STEP 4 Enter en by using digit keys Press key twice to enter e Press key twice to enter n STEP 5 Press key once to enter a space 5 Input a name Name OK Back Option BK A K 2 1 2 Word width SubMenu 3 4 5 6 7 8 Paste Space Change word OK Cancel Cut Delete Copy Return Overwrite Insert 9 10 Word case Input a name Name OK Back Op...

Page 123: ... HELP key or Option soft key to display SubMenu screen and then select Word case to switch the text input mode from low ercase to uppercase 2 1 2 Word width SubMenu 3 4 5 6 7 8 Paste Space Change word OK Cancel Cut Delete Copy Return Overwrite Insert 9 10 Word case Input a name Name OK Back Option BK A Ken 5 Input a name Name OK Back Option BK A Ken K 2 1 2 Word width SubMenu 3 4 5 6 7 8 Paste Spa...

Page 124: ...EP 11 Enter obus by using digit keys Press key three times to enter o Press key twice to enter b Press key twice to enter u Press key four times to enter s STEP 12 Press or OK soft key Input a name Name OK Back Option BK a Ken K 6 2 8 7 Input a name Name OK Back Option BK a Ken Kobus ...

Page 125: ...ng Sub Menu screen select Overwrite Insert and then press or OK soft key STEP 4 Enter new words over existing characters In this example F is entered Input a name Name OK Back Option BK A ABCDE 10 1 2 Word width SubMenu 3 4 5 6 7 8 Paste Space Change word OK Cancel Cut Delete Copy Return 9 10 Word case Overwrite Insert Input a name Name OK Back Option BK A ABFDE ...

Page 126: ...oft key STEP 4 Place the cursor at the end point of the target characters and then press End soft key STEP 5 Place the cursor at position where you want to paste the copied characters and then press HELP key or Option soft key Input a name Name Back BK A ABCDE Option OK 5 5 1 2 Word width SubMenu 3 4 5 6 7 8 Paste Space Change word OK Cancel Cut Delete Return 9 10 Word case Overwrite Insert Copy I...

Page 127: ...ss or OK soft key or press key STEP 7 The copied characters CD are inserted as follows 7 7 1 2 Word width SubMenu 3 4 5 6 7 8 Space Change word OK Cancel Cut Delete Return 9 10 Word case Overwrite Insert Copy Paste Input a name Name Back BK A CDABCDE Option OK ...

Page 128: ...r invalidates the security mode this function cannot be used For details of the security mode con tact the system administrator DT830 Security lock will be released Please input a password BK OK Cancel Note While the telephone is locked key becomes disabled Also any features provided by the telephony server such as call origination or call answering cannot be performed The Incoming call cannot be ...

Page 129: ...ord and then press or OK soft key Security Lamp is extinguished and Security Mode is canceled Security Lock Security lock will be released OK Cancel Please input a password BK Note When the password entry ends in failure the fol lowing error message is issued In that case press or OK soft key and then retry Note After a third attempt if incorrect password entered three times the following error me...

Page 130: ...the feature of the terminal in collaboration with a mobile phone until the terminal is placed in Secu rity mode Note Emergency Call cannot be made with Speaker key Note When pressing Unlock soft key the telephone prompts for the Security mode cancellation pass word DT830 Dial Emergency Number Only Unlock Note Emergency telephone number needs to be set in advance For the setting of the emergency te...

Page 131: ...the suspended application by pressing an icon of itself The following explains how to start the XML application from DT830 For more information refer to manuals relating to XML applications To start up XML application When you start up the phone the application screen which is registered as home URL is displayed automatically To switch XML applications From the menu screen displays XML application...

Page 132: ... cannot execute any operations on XML applications When you press Next key the application exit screen appears On the exit screen the currently running XML application icons excluding Portal are displayed Select an application icon you want to exit and then press icon The selected application exits Now you can launch a new application History Directly Setting Portal Service XML 1 XML 3 4 windows a...

Page 133: ...by one of the following operations Highlight an item by using and press or OK Press STEP 3 Select Usability Select an item by one of the following operations Highlight an item by using and press or OK Press STEP 4 Select Help Key Mode Select an item by one of the following operations Press or OK Press DT830 Menu 1 1 1 2 Data Backup Restore Setting 3 Download OK Back User Setting 7 7 1 2 User Setti...

Page 134: ... while ed iting a name list on Directory Menu call indi cator lamp and line key flash red STEP 2 To open the pop up screen and confirm in coming call number when you set Help Key Mode as Sub Menu press key to dis play the menu screen and press soft key 1 When you set Help Key Mode as Pop up Win dow press Help key The screen is displayed and you can check the incoming call information Menu Item Mea...

Page 135: ...list of Directory press key to display the menu screen And highlight Directory icon using and then press key When you finish a conversation hang up the handset And you can go back to the screen of Directory Note Pop up screen cannot be closed by pressing Exit Key Menu Input a name Name Back BK A ABCDE Option OK ...

Page 136: ...d telephone number Digit Keys 0 9 and STEP 2 The dialed number appears on the top of LCD STEP 3 Lift handset or press key or STEP 4 Press the originating Line Key and lift hand set Note Pressing the Speaker Key or going off hook is not necessary DT830 DT430 410 Speaker 2000 Mic 1 25 PM MON 22 SEP 2014 Note Originating call operation is cancelled by the fol lowing soft key operation Press Exit key ...

Page 137: ...s played When registering Name Information of One touch Speed Calling you can use uppercase alphabetic uppercase European or lowercase European characters DT830 DT430 410 Speaker Feature Feature SPEED SET 1 25 PM MON 22 SEP 2014 Mic NoDist Feature Note To program a hook switch for transfer or feature activation press key as first digit dis plays on LCD Note To program a pause press the key as any ...

Page 138: ...nate a Call Using Speed Calling One Touch Speed Calling Keys Available characters for One Touch Speed Calling keys ALPHABETIC CHARACTER UPPERCASE Note To delete the entry press DEL or BK key and delete each one character Note To delete the whole setting press CLEAR key and back to idle status DT830 DT430 Push Speed Calling Key NAME 1 25 PM MON 22 SEP 2014 NEC BNET SET CANCEL CLEAR NAME 1 25 PM MON...

Page 139: ...Á É Í Ò Ú 9 Â Ê Î Ó 7 Û Ã Ë Ï Ô Ü Ä 3 4 Õ 8 Å Ö Æ Œ Ç Ø 2 6 1 Note The shaded area indicates the characters which cannot be entered DIGIT KEY 1 2 3 4 5 6 7 8 9 0 CHARACTER a d g j m p t w 0 b e h k n q u x c f i l o r v y à è ì 5 ñ s ù z á é í ò ú 9 â ê î ó 7 û ã ë ï ô ü ä 3 4 õ 8 å ö æ œ ç ø 2 6 1 Note The shaded area indicates the characters which cannot be entered ...

Page 140: ...e Touch Speed Calling key The LCD displays previously stored dig its STEP 3 Dial the Speed Calling System access code and the abbreviated call code STEP 4 Press key again Note When Redial feature is enabled at installation Last Number Redial feature and Speed Calling features using Redial key are not avail able For details contact the system administra tor DT830 DT430 410 XXXXXX LNR SPD _ _ X Mic ...

Page 141: ...ode receive service set tone STEP 3 Enter Account Code up to 10 digits STEP 4 Receive dial tone and dial desired number To Enter Account Code After Authorization Code STEP 1 Lift handset or press key receive dial tone STEP 2 Enter feature access code for Authorization Code receive service set tone STEP 3 Enter Authorization Code receive second service set tone STEP 4 Enter Account Code receive dia...

Page 142: ...caller hears special dial tone STEP 7 Enter Authorization Code or call will be de nied To Enter With Account Code see above Service set tone is optional depending upon system programming VOICE CALL STEP 1 Lift handset STEP 2 Dial desired station number STEP 3 Press Voice STEP 4 Speak to called party Note For North America Account Codes can be up to 24 digits Note For North America the total number...

Page 143: ...ne Touch Speed Calling key dialing the extension and pressing the key VOICE displays if programming on an DT Series with LCD Save by pressing One Touch Speed Calling key Note If called party is on their line when a Voice Call is attempted calling station s display indicates Note A voice call is restricted if called party s station is not a DT Series Display indicates 2000 Mic Voice 1 25 PM MON 22 ...

Page 144: ...aged in a non intercom call the station may press AICM after placing original caller on hold with key To Bridge Into An Automatic Intercom Call STEP 1 Press the AICM key lift handset or press key STEP 2 A three party conference is established DT830 DT430 410 Speaker Called party ICM 2 1 25 PM MON 22 SEP 2014 Overriding party ICM 1 1 25 PM MON 22 SEP 2014 Speaker HOLD Note Bridging is an optional f...

Page 145: ...key To Bridge Into A Manual Intercom Call STEP 1 Press MICM lift handset or press key STEP 2 A three party conference is established DT830 DT430 410 Speaker Called party ICM 2 1 25 PM MON 22 SEP 2014 Calling party ICM 1 1 25 PM MON 22 SEP 2014 Speaker HOLD Note Bridging is an optional feature Note The SIG key signals the corresponding station when speaking over the intercom path is unnec essary No...

Page 146: ...fter placing the original call on hold with key To Bridge Into A Dial Intercom Call STEP 1 Press the DICM key lift handset or press key STEP 2 A three party conference is established DT830 DT430 410 Speaker Called party ICM 2 1 25 PM MON 22 SEP 2014 Speaker HOLD Calling party ICM 2 1 25 PM MON 22 SEP 2014 Note Bridging is an optional feature Note Dial intercom provides a Dial Intercom group where ...

Page 147: ...l receive the camp on indication one short tone burst LED of key flashes STEP 2 Press key Call in progress is placed on hold STEP 3 Connection to camped on call is established STEP 4 Press key to return to original call Camped on call is placed on hold STEP 5 By repeating these steps it is possible to al ternate between calls Display indicates con nected station or trunk at any given time Note The...

Page 148: ...ve busy tone STEP 2 Press CALL WAITING STEP 3 Receive special ringback tone STEP 4 Call waiting tone is sent to busy station Or STEP 4 Lift handset or press key STEP 5 Dial Call Waiting access code receive dial tone STEP 6 Dial busy station Note To program a hook switch for transfer or feature activation press as first digit dis plays on LCD DT830 DT430 410 Feature Recall Feature Recall Called sta...

Page 149: ...s sible to alternate between calls Display indi cates connected station or trunk at any given time Using Soft Key STEP 1 Hear burst of tone Display indicates C WAIT and key flashes STEP 2 Press key receive call waiting tone To Disconnect STEP 1 Press key Station user is automati cally connected to original party Called station number C WAIT SET 2000 Mic 1 25 PM MON 22 SEP 2014 Answer Answer Callin...

Page 150: ... Retrieve A Parked Call From Originating Station STEP 1 Dial Call Park local retrieval code STEP 2 Station user is connected to parked call To Retrieve A Parked Call From A Remote Station STEP 1 Dial Call Park local retrieval code STEP 2 Station user is connected to parked call DT830 DT430 410 Feature Recall Feature Parked station or trunk CALLPARK SET DDD 3 1 25 PM MON 22 SEP 2014 Elapsed time 10...

Page 151: ... key STEP 2 Press One Touch Speed Calling key STEP 3 Dial Direct Call Pick up access code STEP 4 Press key again When A Station Within System Rings STEP 1 Lift handset receive dial tone STEP 2 Press PICK DIRECT and dial the station number to be picked up Or STEP 2 Dial Direct Call Pick up access code and the station number to be picked up STEP 3 Connection to calling party is established STEP 4 If...

Page 152: ...receives service set tone and leaves speaker on STEP 4 The desired number is automatically dialed when a trunk becomes available EXECUTIVE OVERRIDE If Called Station Is Busy STEP 1 Press OVERRIDE STEP 2 Interrupted parties receive warning tone STEP 3 Three way conference is initiated Using Soft Key STEP 1 Press Exe Over soft key STEP 2 Interrupted parties receive warning tone and three way confere...

Page 153: ...ogrammable fea ture keys or may be programmed on a One Touch Speed Calling key by storing the Recall and Override access code Note When Redial feature is enabled at installation Last Number Redial feature and Speed Calling features using Redial key are not available For details contact the system administrator DT830 DT430 410 LNR SPD _ _ X XXXXXX Mic PickUp CF All Note1 A law Countries Europe Aust...

Page 154: ... STEP 2 Press or soft key until desired num ber is displayed STEP 3 Press Delete soft key STEP 4 Press One soft key To Delete the All Call History Data of Outgoing Call STEP 1 Press Redial key Last number dialed is displayed STEP 2 Press Delete soft key STEP 3 Press All soft key Redial 02 XXXXX2 Delete End Speaker Redial 01 XXXXX1 Delete End Redial 02 XXXXX2 Delete End Redial 02 XXXXX2 Cancel One ...

Page 155: ...ting STEP 6 Press key Call Forwarding All Calls is set Using Soft Key STEP 1 Press CF All soft key Receive special tone STEP 2 Dial destination wait for service set tone STEP 3 FORWARD SET is displayed call forward ing for all calls is set To Verify Only For Terminal With LCD STEP 1 Press FWD STEP 2 Display indicates the station number calls are forwarded to DT830 DT430 410 Speaker Speaker Forward...

Page 156: ...el code Receive service set tone LED goes out at your station or the DT Se ries of the multiline station STEP 3 Press key Call Forwarding All Calls is cancelled Using Soft Key STEP 1 Press CF All soft key STEP 2 Receive service set tone and FORWARD CANCEL is displayed Speaker Speaker FORWARD CANCEL 1 25 PM MON 22 SEP 2014 FORWARD CANCEL Mic 1 25 PM MON 22 SEP 2014 ...

Page 157: ... STEP 2 Dial destination wait for service set tone STEP 3 FORWARD SET is displayed Call Forward ing Busy Line is set To Verify Only For Terminal With LCD STEP 1 Press FWD BY STEP 2 Display indicates the station number calls are forwarded to To Cancel STEP 1 Press key Receive dial tone If can celing for another station press MULTILINE APPEARANCE STEP 2 Press FWD BY or dial Call Forwarding Busy Line...

Page 158: ...3 Press FWD NA or dial Call Forwarding Don t Answer access code Receive special dial tone STEP 4 Dial destination station or external telephone number Receive service set tone STEP 5 FWD NA LED lights at your station or at the DT Series of the multiline station you are set ting STEP 6 Press key Call Forwarding Don t Answer is set Speaker FORWARD CANCEL 1 25 PM MON 22 SEP 2014 FORWARD CANCEL Mic 1 ...

Page 159: ... set tone LED goes out at your station or the DT Series of the multiline station STEP 3 Press key Call Forwarding Don t Answer is cancelled LOGGED OUT IP STATION CALL DESTINATION To Set STEP 1 Lift handset or press key STEP 2 Press the CFLogout Key or dial Logged Out IP Station Call Destination access code STEP 3 Dial destination station number receive ser vice set tone STEP 4 Replace handset or p...

Page 160: ...ncel code re ceive service set tone STEP 3 Replace handset or press key Logged Out IP Station Call Destination is canceled Using Soft Key STEP 1 Lift handset or press key receive Dial Tone STEP 2 Press CFLogout soft key receive service set tone STEP 3 Dial destination station number receive ser vice set tone STEP 4 Logged Out IP Station Call Destination lamp goes off and CFLogout indication disap ...

Page 161: ...splayed and the Call Back soft key flashes on the display TO SAVE AND REPEAT A NUMBER To Save STEP 1 Press key STEP 2 Dial desired telephone number STEP 3 Press Save Rep Dialed number is now stored Save Rep LED lights Or STEP 3 Receive internal call STEP 4 Press Save Rep Number is stored in mem ory DT830 DT430 410 Called party CALLBACK SET 2000 1 25 PM MON 22 SEP 2014 Called party CALLBACK 2000 1 ...

Page 162: ...AGE STEP 1 Press key Receive dial tone STEP 2 Dial desired station number Encounter no answer or busy condition STEP 3 Press MSG Message is sent to called DT Se ries STEP 4 Called station MSG LED lights Note If saved number is busy or no answer is received to save it again press Save Rep again before hanging up Speaker Note Up to four messages can be stored in DT Series memory Note If a fifth mess...

Page 163: ...STEP 3 Message is erased To Erase STEP 1 To erase a message without returning the call press MSG to display desired message STEP 2 Dial or while message displays Mes sage is erased DT830 DT430 410 station Calling MSG 2001 12 28PM 1 25 PM MON 22 SEP 2014 Speaker Note If station that left message is busy callback or MSG may be set If station that left message does not answer MSG may be set notifying...

Page 164: ...le Station A can page Station B When Station B dials answer code they are connected To Page Station A STEP 1 Dial Paging access code receive continu ous ringback for one second STEP 2 Page station B STEP 3 Remain off hook or hang up To Answer Station B If Station A remains off hook STEP 1 Station B dials Paging answer code and they are immediately connected If Station A hung up STEP 1 Station B di...

Page 165: ...n A remained off hook STEP 1 Station B dials Paging answer code and is connected with Station A Station A announc es call STEP 2 Station A hangs up Station B and the calling party are connected If Station A hung up STEP 1 Station B dials Paging answer code Station A DT Series rings STEP 2 Station A picks up and announces call STEP 3 Station A hangs up Station B and the calling Note Paging function...

Page 166: ...to matically established STEP 3 Announce the call to the boss If Boss Accepts Call STEP 1 Secretary replaces handset STEP 2 Secretary presses boss line to return to call ing party If Boss Refuses Call STEP 1 Secretary presses boss line to return to call ing party Calling trunk number DDD 3 1 25 PM MON 22 SEP 2014 PAGING DDD 3 1 25 PM MON 22 SEP 2014 DT830 DT430 410 Calling party DDD 3 1 25 PM MON ...

Page 167: ...ne To Cancel At Boss Station Pattern1 STEP 1 Lift handset or press key Receive dial tone STEP 2 Press Boss line appearance STEP 3 Press MW CANCEL line feature key Re ceive service set tone Pattern2 STEP 1 While engaged in conversation on boss mul tiline press MW CANCEL key No service set tone is heard DT830 DT430 410 Speaker MSG Wait 1 25 PM MON 22 SEP 2014 Recall MSG Wait 1 25 PM MON 22 SEP 2014 ...

Page 168: ... call hold access code Receive Dial Tone STEP 3 Press BOSS SEC OVERRIDE Receive ring back Tone Boss STEP 1 Hear 3 bursts of tone LCD indicates Option 1 STEP 1 Boss presses key and converses with secretary Trunk A is placed on hold STEP 2 Secretary hangs up Boss is connected to Trunk B STEP 3 Boss can alternate between the two parties by pressing key Option 2 STEP 1 Boss presses key and converses w...

Page 169: ...ss denies call presses key to re turn to Trunk A STEP 3 Secretary is returned to Trunk B DO NOT DISTURB While Idle On Hook STEP 1 Press NoDist LED lights To Cancel STEP 1 Press NoDist LED goes out Using Soft Key STEP 1 Press flashing NoDist soft key Answer Recall Answer Transfer Note With soft key operation NoDist flashes when set Note NoDist must be programmed by the Telephony Server Admin on a P...

Page 170: ...y STEP 4 REDIRECT is displayed on the LCD and the call immediately forwards to Station B Using Soft Key STEP 1 Station A sets Call Forward Don t Answer to Station B STEP 2 Station C dials Station A it rings and displays Station C s number on the display STEP 3 Station A presses the REDIR soft key STEP 4 REDIRECT is displayed on the LCD and the call immediately forwards to Station B Or Call Redirec...

Page 171: ...layed on Station A and the call immediately recalls to Station C PRIVACY While Off Hook STEP 1 Press NoDist LED lights STEP 2 Privacy feature prevents interruptions for the duration of the call Using Soft Key STEP 1 Press flashing NoDist soft key NoDist flashes when set STEP 2 Privacy feature prevents interruptions for the duration of the call DT830 DT430 410 PRIVACY SET 1 25 PM MON 22 SEP 2014 PR...

Page 172: ...one is sent to the interrupted par ties optional A three way conference is established OR Example DT Series Station A requests entrance into Station B s call in progress STEP 1 Station A lifts handset or presses key STEP 2 Station A presses the line appearance of Sta tion B Note NoDist must be programmed by the Telephony Server Admin on a Programmable feature key PRIVACY CANCEL 1 25 PM MON 22 SEP ...

Page 173: ...on basis Up to 100 entries are available per station You can make entries with key operation from the telephone Up to 32 digits can be registered for each dial number Up to 24 characters can be registered for each name Note Station A can be a single line station if it appears on the Station B DT Series Note Up to six parties can break into a two party con versation additional devise is required WA...

Page 174: ...TEP 2 If Local Phone is disabled the display changes as follows In that case select System and go to STEP 3 STEP 2 Press Sys soft key STEP 3 Enter a name and then press or OK soft key to perform a search Ex To enter NEC Press key twice to enter N Press key four times to enter E Press key twice to enter C Note Select an item on the menu screen in either of the following two ways Press an appropriat...

Page 175: ...BIKO UP DOWN More Number XXXXXXX1 Speaker Note More soft key appears in Phonebook data screen when the number of characters name or digits telephone number are exceeding displayable limit Up to 17 characters or digits can be displayed at a time If the name or telephone number exceeds the displayable limit press or More soft key to dis play the last 17 characters digits of the name tele phone numbe...

Page 176: ...nter NEC Press key twice to enter N Press key twice to enter E Press key three times to enter C Note Select an item on the menu screen in either of the following two ways Press an appropriate digit key Highlight a desired item and then press or OK soft key P Book Mic NoDist 1 25 PM MON 22 SEP 2014 Menu 2 History Back OK 1 2 Tool 3 Directory Note If soft key is pressed on the above screen the follo...

Page 177: ...t key If no data is registered in Local Phonebook the message Local phone book empty appears STEP 2 Name Entry screen appears STEP 3 Enter a name in this example NEC is en tered and then press or OK soft key If no appropriate data exists the message En try not found appears Note To delete an entered character press or Clr soft key Note To move the cursor one space to the right press key or soft ke...

Page 178: ...lr soft key Note To move the cursor one space to the right press key or soft key once Eu s Cnl Lower case character Eu l Cnl Upper case character Search NEC More DOWN UP Name NEC ABIKO Number XXXXXXXX1 Speaker Search NEC More DOWN UP Name NEC BNET Number XXXXXXXX Note More soft key appears in Phonebook data screen when the number of characters name or digits telephone number are exceeding displaya...

Page 179: ... enter s Press key twice to enter e STEP 6 The following number edit screen appears DOWN More Number 0123456789 Name Home UP Search Home EDIT DEL Number 0123456789 Name Home Search Home Edit Name OK Clr Home Edit Name OK Clr Ho Note If soft key is pressed on the above screen the following soft keys appear Pressing or Eu s Eu l soft key shifts characters between uppercase and lowercase Note To dele...

Page 180: ...ok data is displayed STEP 2 Press DEL soft key STEP 3 Press or OK soft key to delete the cur rently displaying data STEP 4 The data deletion has completed Two sec onds later the display returns to Name Entry screen Number 01234567 Cnl Name House Clr OK Number 0123456712 Name House Clr OK Cnl Entry edited DOWN More Number 0123456789 Name NEC ABIKO UP Search NEC ABIKO EDIT DEL Number 0123456789 Name...

Page 181: ...t key will disappear DOWN More Number 0123456789 Name Takahashi UP Search Takahashi Pref Cnl Number 0123456789 Name Takahashi Search Takahashi Clr Number 0184 Prefix Number Input Cnl OK Note To delete an entered digit press or Clr soft key Note More soft key appears in Phonebook data screen when the number of characters name or digits telephone number are exceeding displayable limit Up to 17 chara...

Page 182: ...CTER SP Blank Space Digit Code 1 2 3 4 5 6 7 8 9 0 Character A D G J M P T W SP B E H K N Q U X 0 C F I L O R V Y À È Ì 5 Ñ S Ù Z Á É Í Ò b Ú 9 Â Ê Î Ó 7 Û Ã Ë Ï Ô Ü Ä 3 4 Õ 8 Å Ö Æ Œ Ç Ø 2 6 1 Digit Code 1 2 3 4 5 6 7 8 9 0 Character a d g j m p t w SP b e h k n q u x 0 c f i l o r v y à è ì 5 ñ s ù z á é í ò b ú 9 â ê î ó 7 û ä ë ï ô ü å 3 4 õ 8 æ ö 1 ç 6 2 ...

Page 183: ...rent time is displayed on LCD OR STEP 1 Press key to display the Menu screen On the Menu screen select History for DT830 Series Call History for DT430 Series and then press or OK soft key or press key STEP 2 The history data of the last received call is displayed STEP 3 Press or soft key to display a desired history data Note When the system administrator invalidates the Phonebook this feature can...

Page 184: ...his example 012345 is entered After entering the prefix press or OK soft key Note While the history data is displayed you cannot make a call by dialing a telephone number P Book 51500 1 03 PM MON 22 SEP 2014 BBBBB Speaker Note A maximum of 10 digits 0 9 and can be set as a prefix Note When prefix is added up to 32 digits including the prefix can be sent as dial number Note To delete an entered cha...

Page 185: ...pears in Phonebook data screen when the number of characters name or digits telephone number are exceeding displayable limit Up to 17 characters or digits can be displayed at a time If the name or telephone number exceeds the displayable limit press or More soft key to dis play the last 17 characters digits of the name tele phone number Name Cnl Number AAAAA 01234531300 Speaker Note If you want to...

Page 186: ...Y OPERATION controlled by the telephone Note Local Phonebook feature allows you to register up to 100 records If exceeding 100 records at this point the error message shown below appears Press OK soft key to go back to the above display P Book 31300 1 03 PM MON 22 SEP 2014 _ _ _ Entry NG over OK Clr Add name OK NEC ABIKO Note If name information is stored on the call history the name is displayed ...

Page 187: ...le indicating the current time on LCD press key to open the Menu screen OR Press Directory key The Directory screen shown at STEP 3 can be directly displayed STEP 2 Select Personal Select an item by either of the following operations Highlight an item by using and then press or OK soft key Press key STEP 3 Select Edit Select an item by either of the following operations Highlight an item by using ...

Page 188: ...00 entries the following screen appears To go back to the Directory screen press or OK and delete some entries from Search Search 1 2 Group Setting Directory 3 4 0 Own Number Delete All Edit OK Back Directory is full Edit OK 1 1 1 Note Up to 32 characters can be entered as a name For details on character entry method see HOW TO INPUT CHARACTERS in chapter 4 Edit Name 1 2 Edit 3 4 5 Name OK Back 6 ...

Page 189: ...nd then press or OK soft key In this example Colleagues is selected STEP 8 Select Tel 1 Select an item by either of the following operations Highlight an item by using and then press or OK soft key Press key 2 2 1 2 Edit 3 4 5 OK Back 6 7 8 9 0 Save Gr No Tel 1 Company Name Ring Tone Ken Kobus Tel 4 Tel 2 Tel 3 Illumination 0 Group 0 9 2 Note Each group name can be changed from the Group Setting s...

Page 190: ...ng operations Highlight an item by using and then press or Next soft key Press key and then press or Next soft key In this example Company is selected Selectable categories are as follows 1 2 Edit 3 4 5 OK Back 6 7 8 9 0 Save Gr No Company Name Ring Tone Ken Kobus Tel 4 Tel 2 Tel 3 Illumination 0 Colleagues Tel 1 Input a Telephone number Tel 1 Next Back BK 1 Category ICON Company Mobile Voice Mail...

Page 191: ...ss key STEP 13 Enter a company name Enter a company name by using digits keys After enter ing the company name press or OK soft key Note A maximum of four telephone numbers can be set to an entry If two or more telephone numbers are required to be set set the remaining tele phone numbers to Tel 2 Tel 4 Note If multiple telephone numbers are registered to an entry and Priority Flag is disabled to a...

Page 192: ...mination 0 Colleagues 31300 Ring Tone NEC 0 9 Note You can set ringer tone for calls routed to the specified name calling party here Ringer Tone type can be set for Name Group and Tele phone set The ringer Tone type set for Name has higher priority than the types set for Group and Terminal set Note Set 2 Default when you don t want to change the ringer tone here The setting for Group or Tele phone...

Page 193: ...Kobus Tel 4 Tel 2 Tel 3 0 Colleagues 31300 NEC Illumination Automatic 0 9 Note You can set illumination type for calls routed to the specified name calling party here Illumina tion type can be set for Name Group and Telephone set The illumination type set for Name has higher priority than the types set for Group and Terminal set Note Set 2 Default when you don t want to change the illumination typ...

Page 194: ...STEP 21 The data is registered at memory number XX is displayed Press key or OK soft key The display returns to the Directory screen Note A memory number is automatically set in ascend ing numeric order 1 2 Edit 3 4 5 OK Back 6 7 8 9 0 Save Gr No Ken Kobus Tel 4 Tel 2 Tel 3 0 Colleagues 31300 NEC Automatic Automatic 0 Note If Name is not entered No Input Name will appear Name information is requir...

Page 195: ...ed Select an item by either of the following operations Highlight an item by using and then press or OK soft key Press key and then press or OK soft key STEP 4 Select Name Select an item by either of the following operations Highlight an item by using and then press or OK soft key Press key DT830 3 3 Search 1 2 Directory 3 4 0 Own Number Delete All Edit OK Menu Group Setting 1 1 1 2 Group 3 4 5 6 ...

Page 196: ...RACTERS in chapter 4 Note You can set ringer tone select 2 Ring Tone and illumination types select 3 Illumination for calls routed to the specified group here Ringer tone and illumination types can be set for Name Group and Telephone set The ringer tone and illumination types set for Name have higher priority than the types set for Group and Telephone set Also the ringer tone and illumina tion typ...

Page 197: ...ing operations Highlight an item by using and then press or OK soft key Press key STEP 4 Select a target group In this example Colleagues is selected Select an item by either of the following operations Highlight an item by using and then press or OK soft key Press key and then press or OK soft key DT830 1 1 1 2 Directory 3 4 0 Own Number Delete All Edit OK Menu Group Setting Search 1 1 1 2 Search...

Page 198: ...oft key while the name is highlighted In the following Detail screen you can make a call to the selected number by pressing or Call soft key Note If no entry is set to the selected group No data is issued Note If two or more telephone numbers are assigned to an entry a top priority telephone number is automatically selected when the Detail screen appears John Smith Directory Call Back Option Detai...

Page 199: ...ting Search 2 2 1 2 Search 3 4 Others OK Back Tel Number Group Name Note A distinction is made between upper case and lower case characters according as the system settings For example Ken Kobus and ken kobus are distinguished as different character strings For details contact the System Adminis trator Note A blank space is also distinguished while search ing database for a name Note Even if the n...

Page 200: ...a for a specific name press Detail soft key while the name is highlighted In the following Detail screen you can make a call to the selected number by pressing or Call soft key Note If two or more telephone numbers are assigned to an entry a top priority telephone number is automatically selected when the Detail screen appears Directory Call Back Option Detail Abe Ichiro Abe Sabro Abe Kentaro 1 2 ...

Page 201: ... name by pressing In the following Directory Name List screen you can make a call to the selected party by pressing or Call soft key If two or more tele phone numbers are assigned to an entry a top priority telephone number will be dialed 1 1 1 2 Directory 3 4 0 Own Number Delete All Edit OK Menu Group Setting Search 3 3 1 2 Search 3 4 Others OK Back Tel Number Group Name Note Even if the telephon...

Page 202: ...you can make a call to the selected number by pressing or Call soft key Note If two or more telephone numbers are assigned to an entry a top priority telephone number is automatically selected when the Detail screen appears 1 2 Detail 3 4 5 6 7 8 9 0 Gr No Call Back Tel 4 Tel 3 0 Colleagues NEC Automatic Automatic 0800XXXXXX 31300 Abe Kentaro ...

Page 203: ...ID Select an item by either of the following operations Highlight an item by using and then press or OK soft key Press key STEP 5 Enter a memory number 0 499 After entering the memory number press or OK soft key The list of memory numbers will be displayed with the entered memory number or the number clos est to the entered number in front 1 1 1 2 Directory 3 4 0 Own Number Delete All Edit OK Menu...

Page 204: ...etail soft key while the name is highlighted In the following Detail screen you can make a call to the selected number by pressing or Call soft key Note If no data exists in Directory No data is issued on the screen Note If two or more telephone numbers are assigned to an entry a top priority telephone number is automatically selected when the Detail screen appears Directory Call Back Option Detai...

Page 205: ... an item by one of the following operations Highlight an item by using and then press or OK soft key Press key STEP 5 Select a desired category In this example Company is selected Select an item by one of the following operations Highlight an item by using and then press or OK soft key Press key and then press or OK soft key 1 1 1 2 Directory 3 4 0 Own Number Delete All Edit OK Menu Group Setting ...

Page 206: ...ame is highlighted In the following Detail screen you can make a call to the selected number by pressing or Call soft key Note If there is no entry corresponding to the selected category No data is issued on the screen Note If two or more telephone numbers are assigned to an entry a top priority telephone number is automatically selected when the Detail screen appears Directory Call Back Option De...

Page 207: ...name After entering the name Press or OK soft key 1 1 1 2 Directory 3 4 0 Own Number Delete All Edit OK Menu Group Setting Search 4 4 1 2 Search 3 4 OK Back Tel Number Group Name Others Note A distinction is made between upper case and lower case characters For example Ken Kobus and ken kobus are distinguished as dif ferent character strings Note A blank space is also distinguished while search in...

Page 208: ...ame is highlighted In the following Detail screen you can make a call to the selected number by pressing or Call soft key Note If there is no entry corresponding to the selected Company No data is issued on the screen Note If two or more telephone numbers are assigned to an entry a top priority telephone number is automatically selected when the Detail screen appears Directory Call Back Option Det...

Page 209: ...EP 4 Select Alphabet Select an item by either of the following operations Highlight an item by using and then press or OK soft key Press key STEP 5 Select a desired group of alphabets In this example ABC is selected Select an item by one of the following operations Highlight an item by using and then press or OK soft key Press key and then press or OK soft key 1 1 1 2 Directory 3 4 0 Own Number De...

Page 210: ... pressing or Call soft key Note Select Others to find names which begin with a character other than alphabet such as numerics or symbols 1 2 Alphabet 3 4 5 6 7 8 OK Back PQRS JKL MND All DEF GHI TUV WXYZ Others ABC Directory Call Back Option Detail Abe Sabro Abe Kentaro Abe Taro Note If there is no entry corresponding to the group of alphabets No data is issued on the screen Note If two or more te...

Page 211: ...te While Directory screen is being displayed you cannot make a call by dialing a telephone num ber DT830 Abe Jiro Directory Call Back Option Detail Abe Ichiro Abe Kentaro Abe Jiro Directory Call Back Option Detail Abe Ichiro Abe Kentaro Note If multiple telephone numbers are registered to a target party a call is made to the first priority tele phone number Note If two or more telephone numbers ar...

Page 212: ...P 1 Display the Menu screen and select Setting STEP 2 Select User Setting Select an item by either of the following operations Highlight an item by using and then press or OK soft key Press key STEP 3 Select Talk Select an item by either of the following operations Highlight an item by using and then press or OK soft key Press key 1 2 Detail 3 4 5 6 7 8 9 0 Gr No Call Back Tel 4 Tel 3 Colleagues N...

Page 213: ...splay goes back the Prefix screen at STEP 5 If multiple prefixes need to be set re peat STEP 6 and STEP 7 In that case select Prefix 2 and Prefix 3 Incoming Call 1 2 Display Incoming Call 3 4 5 6 7 0 Change Password Peripherals Config OK Back Security Talk Usability 5 5 RTP Alarm 1 2 Key Touch Tone Talk 3 4 5 Hold Music OK Back DTMF Tone Prefix 1 1 Note A maximum of 10 digits 0 9 and can be set as...

Page 214: ...y using and then press or OK soft key Press key and then press or OK soft key STEP 4 Predetermined prefixes are displayed Select a prefix and then press or OK soft key to make a call Note If multiple telephone numbers are registered to a target party a call is made to the first priority tele phone number Directory Call Back Option Detail Abe Kentaro Abe Jiro Abe Ichiro Directory Call Back Option D...

Page 215: ... and then press or OK soft key STEP 4 On the Edit screen the detailed data for the selected name is displayed Modify the nec essary data by referring to TO ADD NEW DA TA After the data modification is complete press Save soft key on the Edit screen DT830 Directory Call Back Option Detail Abe Kentaro Abe Jiro Abe Ichiro Directory Call Back Option Detail Abe Kentaro Abe Jiro Abe Ichiro 4 4 1 2 SubMe...

Page 216: ...press or OK soft key Press key STEP 3 Press or OK soft key to delete all the da ta STEP 4 After all the directory data is deleted the dis play changes as follows STEP 5 Press or OK soft key Note To cancel the data deletion press or Back soft key DT830 0 0 1 2 Directory 3 4 0 Own Number Edit OK Menu Group Setting Search Delete All Delete All Directory Directory OK Back Deleted Directory OK ...

Page 217: ...ss key and then press or OK soft key STEP 4 The following confirmation message appears Press or OK soft key to delete the appro priate directory data STEP 5 After the appropriate directory data is delet ed the display changes as follows STEP 6 Press or OK soft key DT830 Directory Call Back Option Detail Abe Shintaro Abe Jiro Abe Ichiro Directory Call Back Option Detail Abe Shintaro Abe Jiro Abe Ic...

Page 218: ...IRECTORY TO EDIT DIRECTORY DATA FROM CALL HISTORY TO DELETE ALL DATA TO DELETE SPECIFIC DATA FOR DT430 SERIES TO VIEW CALL HISTORY TO MAKE A CALL FROM CALL HISTORY TO DELETE ALL DATA TO DELETE SPECIFIC DATA Note Register call history data to Personal Directory as necessary Call History data will be cleared when powering off the telephone However call history data can be backed up to your PC About ...

Page 219: ... the history of unanswered incoming calls Outgoing Display the history of outgoing calls Incoming Display the history of answered and unanswered incoming calls DT830 3 3 1 2 History 3 4 Delete All Outgoing OK Menu Missed Incoming Note For unanswered incoming calls will be dis played on the left of the name Note If you make answer a call to from the telephone number which is registered to Personal ...

Page 220: ...select Call by using or pressing key and then press or OK soft key Note While the history data is displayed you cannot make a call by dialing a telephone number DT830 2 Incoming Option Back 22 SEP 2014 MON 11 00 Abe Kentaro 7207 2 Incoming Option Back 22 SEP 2014 MON 9 58 Abe Kentaro Tel 7207 Note When making a call from Call History a prefix can be added to the dial number In that case select 3 P...

Page 221: ...hlight an item by using and then press or OK soft key Press key and then press or OK soft key STEP 3 Select New Select an item by either of the following operations Highlight an item by using and then press or OK soft key Press key STEP 4 Select a category In this example Company is selected Select an item by either of the following operations Highlight an item by using and then press or Next soft...

Page 222: ...STEP 6 The following Edit screen is displayed 31312 has been registered to Tel 1 See TO ADD NEW DATA in Chapter 6 Di rectory Operation and register detailed data such as name group etc to directory Category ICON Company Mobile Voice Mail Home Others 1 2 Category 3 4 5 Company Next Back Others Home Mobile Voice Mail 1 2 2 1 2 Note If the corresponding data is not stored in the directory only the te...

Page 223: ...ing and then press or OK soft key Press key and then press or OK soft key STEP 3 Select Addition Select an item by either of the following operations Highlight an item by using and then press or OK soft key Press key STEP 4 Select a search method See TO FIND REGISTERED DATA for the procedure of the searching method In this example Group is selected Select an item by either of the following operati...

Page 224: ...em by either of the following operations Highlight an item by using and then press or OK soft key Press key and then press or OK soft key 1 2 Directory Search 3 4 Group OK Back Others Name Tel Number 2 2 1 2 Group 3 4 5 6 20 Colleagues OK Back Group 6 Family Friends Default VIPs Group 20 Note If there is no corresponding data No data will be displayed on LCD Note In this example a mobile telephone...

Page 225: ...phone number is automatically selected when you make a call with out specifying a specific telephone number Select an item by either of the following operations Highlight an item by using and then press or OK soft key Press or key and then press or OK soft key STEP 10 The display moves to the Edit screen of Di rectory 7205 has been registered to Tel 2 See TO EDIT DIRECTORY DATA in Directory Opera ...

Page 226: ...ss key STEP 3 The following confirmation message appears Press or OK soft key to delete all the da ta STEP 4 After all history data is deleted the display changes as follows Press or OK soft key Note To cancel the data deletion press or Back soft key DT830 4 4 1 2 History 3 4 Outgoing OK Menu Incoming Missed Delete All Delete All Delete All Histories OK Back Delete History All History data has bee...

Page 227: ... item by using and then press or OK soft key Press key and then press or OK soft key STEP 3 The following confirmation message appears Press or OK soft key to delete the appro priate history data STEP 4 After the appropriate call history data is delet ed the display changes as follows Press or OK soft key Note By selecting 5 Delete All all records of Incoming Call can be deleted DT830 1 Incoming O...

Page 228: ...f name information of the caller exists the name is displayed as follows Note This feature is for DT830 Series and DT430 Series The following are examples of LCD dis plays of DT830 Series and DT430 Series DT430 Menu DT430 Series 2 Directory Menu Back OK 1 Call History 3 Settings 1 1 1 2 Menu 3 OK Back Settings Directory Call History Item Description Incoming Calls To view the history of incoming c...

Page 229: ... is saved No data will be dis played on LCD Note To go back to name display press key For the telephone without the cursor key switching between name and telephone number cannot be performed Note To go back to former menu STEP 3 press Back soft key Note If the telephone number of the caller is not received due to Caller ID blocking public phone or out of area etc Private is displayed on LCD Incomi...

Page 230: ... a missed call indicates that the telephone has received a voice mail Note When voice mail service is not used is displayed instead of Voice Mail 19 20 PM MON 22 SEP 2014 1 1 1 2 Shortcut 3 OK Back Voice Mail Missed Calls 2 2 2 Note If two or more records exist use key to dis play the next former records or pressing an appropriate digit key For example press 0 key to display the tenth record Note ...

Page 231: ...LL HISTO RY The following is an example when the history data of an incoming call is displayed STEP 2 Press key while the history data for the target telephone number is displayed on LCD Note While the history data is displayed you cannot make a call by dialing a telephone number DT430 Incoming Calls OK Back Del Ken Kobus 10 22 SEP 13 17 ...

Page 232: ... or OK soft key Press key STEP 3 Press Del soft key The display changes as follows STEP 4 Press or OK soft key to delete all the his tory data of selected call type Item Description Incoming Calls To delete all the history data of incoming calls Outgoing Calls To delete all the history data of outgoing calls DT430 1 1 1 2 Menu 3 OK Back Settings Directory Call History 1 1 1 2 Call History OK Back ...

Page 233: ...n example when the history data of an incoming call is displayed STEP 2 Press Del soft key The display changes as follows STEP 3 Press or OK soft key to delete the select ed history data Note To cancel the data deletion press or Back soft key DT430 Incoming Calls OK Back Del Ken Kobus 10 22 SEP 13 17 Delete One Back Incoming Calls OK ...

Page 234: ... green LED Fixed Feature Key 10 keys with Menu Cursor button Backlight Display and Digit Key lit for 10 seconds when you press any key For 24D 12D Display Backlight is optional Soft Key 4 Keys Call History Outgoing Call 10 records Incoming Call 10 records Hands free Standard equipment Full duplex Headset HW251N A10 NE Power Consumption 2 2 W 2 0 W Adapter optional Recording Unit ADA Analog Port Un...

Page 235: ...LAN Interface 2 port 10BASE T 100BASE TX 1000BASE T 8LDG only Full duplex Half duplex Auto Negotiation Fixed Voice CODEC G 711 µ law A law G 729a G 722 IP Address Setting Sets via DHCP server Sets Statically QoS ToS IP Precedence Diffserv VLAN Tag VLAN IEEE802 1Q p LLDP MED Security IEEE802 1x authentication EAP MD5 EAPOL Forwarding SIP RTP Encryption Power Supply Center Power Supply IEEE802 3af L...

Page 236: ...pplication screen registered in the service URL Setting Select this option to access user settings Portal Select this option to display XML application screen registered in the home URL Without a Home URL registered Menu Press to display the Menu screen History Select this option to view Call History data Also you can add the history data to the directory Directory Select this option to access dir...

Page 237: ...ed calls You can also make a call from this menu 2 Outgoing Select this option to view the history of outgoing calls You can also make a call from this menu 3 Incoming Select this option to view the history of incoming calls You can also make a call from this menu 4 Delete All Select this option to delete all the history data ...

Page 238: ...l Home or Others Company Priority Flag Select this option to specify whether to use the priority order of dialing number for call origination Disable Edit Select this option to edit the directory data 2 Addition Select this option to edit the personal directory data from call his tory Directory Search Select this option to search the personal directory Directory Register the telephone number to th...

Page 239: ...ect this option to search by alphabet 2 Edit Select this option to add new data to the personal directory 1 Name Select this option to enter a name of the target party to be added to the directory 2 Group Select this option to select a group to which the target party belongs Default 3 6 Tel 1 Tel 4 Select this option to enter the telephone number Category Set Select this option to specify phone nu...

Page 240: ...er tone type per group Default follows terminal set tings 3 Illumination Select this option to select an illumination pattern color of the call indication lamp Default follows terminal set tings 4 Own Number Select this option to view the number of the telephone itself 0 Delete All Select this option to delete all the registered directory data 2 System Select this option to view the Directory cont...

Page 241: ...e Light Blue White Rotation Automatic Red 6 Headset Ring Vol ume Not used 2 Talk Select this option to set up for telephone conversation 1 RTP Alarm Select this option to specify whether to use RTP alarm Automatic 2 DTMF Tone Select this option to specify whether to use DTMF tone Automatic 3 Key Touch Tone Select this option to set key touch tone generated when the digit keys are pressed while the...

Page 242: ... Fade Control is in service when turning on off the backlight of the display Enable 4 Change Password Select this option to change the password to lock unlock the telephone 0000 5 Security Not used 6 Peripherals Select this option to use peripheral equipment of terminal 1 USB Memory Not used 2 BCA Option Select this option to configure the BCA 1 BCA Connec tion Settings Select this option to make ...

Page 243: ...tone Download 1 Melody1 wav 2 Download 2 Select this option to download files for ringer tone Download 2 Melody2 wav 3 Download 3 Select this option to download files for ringer tone Download 3 Melody3 wav 3 Directory Select this option to download the directory files Directory csv 2 Download Address Select this option to enter an IP address of the FTP TFTP server 0 0 0 0 3 Protocol Select this op...

Page 244: ...ver Address Select this option to enter an IP address of the FTP TFTP server 0 0 0 0 4 Protocol Select this option to select a protocol of the server either FTP or TFTP FTP 5 FTP Settings Set necessary data when using FTP service 1 User ID Select this option to enter a user ID for the data backup via FTP server 2 Password Select this option to enter a password for data backup via FTP server 3 Fold...

Page 245: ...ption to access Phonebook feature For details see PHONE BOOK in chapter 5 Settings Select this option to make the user setting of DT Series Menu Item Description Default Value 1 Call History 1 Incoming Select this option to view the history of incoming calls You can also make a call from this menu 3 Outgoing Select this option to view the history of outgoing calls You can also make a call from thi...

Page 246: ... network When downloading the files for Music on Hold Ringer Tone and Directory to the DT Series FTP TFTP server is required on the net work For details on the FTP service contact the System Administrator Note Terminal settings through the Web Programming is available while the DT830 Series logs into the system Items Operating Conditions Operating System Microsoft Windows Vista Windows 7 CPU Compl...

Page 247: ...mming Login screen appears Enter a user name type USER and a password then click Note Enter the same password used when logging into the DT830 Series 0000 is used as password by the default setting Note For IP address of DT Series contact the System Administrator Note When the login screen does not appear check the LAN connection status and entered IP address If the problem persists please contact...

Page 248: ...240 STEP 4 The following Web Programming Home screen appears ...

Page 249: ...241 TO LOGOUT Follow the steps below to exit the Web Programming STEP 1 Click at the lower left of the screen STEP 2 The confirmation message appears Click to log out of Web Programming Logout OK ...

Page 250: ...screen is displayed close the Internet browser Note Make sure to perform the logout operation after the data setting of the telephone Note When 15 minutes have passed leaving the PC without operation after log in to Web Programming you are forcibly logged out from the Web Programming Back ...

Page 251: ...SERIES in 3 TERMINAL SETUP STEP 1 From the Home screen click User Setting Incoming Call Ring Tone External Call STEP 2 Select a desired tone type by clicking the corresponding radio button STEP 3 Click to save the change to the database STEP 4 A confirmation dialog appears Click on the dialog OK STEP 1 Click items to navigate through the menu STEP 3 Click OK button STEP 2 Click the radio button to...

Page 252: ...e Connect key lamp indicates the connection status between DT830 Series DT430 Series and the Bluetooth device For details of the Connect key lamp status see the table below Note For the combination with a mobile phone both Path key and Connect key must be assigned as the Programmable Feature Keys on the terminal If these keys are not assigned the Bluetooth adapter can not be operated For details p...

Page 253: ...the terminal For details of this procedure refer to the manual of your mobile phone To enable Bluetooth feature STEP 1 Press the Connect key several seconds from three or more seconds to less than eight seconds when the Bluetooth feature is OFF the Connect key is turn off STEP 2 The Connect key lights red and the Bluetooth feature turns ON Note If the terminal is not operated for three and a half ...

Page 254: ...th connection is ON the Connect key lamp lights red STEP 2 The most recently connected mobile phone must be within the range of a Bluetooth connection approximately 10 meters STEP 3 The Bluetooth connection between the terminal and the mobile phone is established automatically Note If the connection process between DT830 Series DT430 Series and the mobile phone is performed during pairing mode the...

Page 255: ...ERMINAL MODE For DT830 Series DT430 Series there are two types of terminal mode called Wired Telephone mode and Mobile Phone mode The terminal starts up on Wired Telephone mode by default Wired Telephone Mode Enables the terminal to make a voice call as a station in the system Mobile Phone Mode Enables the terminal to make a voice call for mobile phone To switch the terminal mode When the Bluetoot...

Page 256: ...ting Orange Wired Telepho ne Mode Indicates that the mobile phone is idle or not connected Flashing Orange Slow Light Wired Telepho ne Mode Indicates that the mobile phone is originating a call or the terminal is talking through the DT830 Series DT430 Series Flash Indicates that the mobile phone is playing music Quick Flash Indicates that you are talking on your mobile phone Burst Flash Indicates ...

Page 257: ...o the mobile phone automatically Smart Device Type Type 2 It is used for the type of mobile phones that de lays the start of a conversation when it an swers the call on Type 1 STEP 1 Press and hold the Path key when the terminal is in idle status STEP 2 You will hear a beep tone when the terminal mode is switched Smart Device Type Type 1 The beep tone sounds once Smart Device Type Type 2 The beep ...

Page 258: ...r key lamp lights red and the music will be played through the speaker automatically If you lift the handset while the music is playing the music will come from the handset through the receiver However when you replace the handset on DT830 Series DT430 Series the music will stop STEP 3 Press the volume key to adjust the sound volume To stop music STEP 1 Press the Speaker key while the music sounds...

Page 259: ...Published in Japan 1409 010 ...

Reviews: