background image

 
Weighing the pellets 
 

Once the system is assembled, filled with water, connected with power, and 
supplied with wood pellets a basic calibration of the auger is required. 


1.

Detach  the  drop  hose  from  the  drop  tube  on  the  burner  and  attach  a 
plastic bag or similar underneath  the drop hose. 
 

2.

Go to the 

System>Manual>External Auger> ON

. This will force start the 

external  auger.  Allow  for  approximately  15  minutes  of  auger  running 
time  after  pellets  begin  dispensing.    This  will  ensure  that  the  auger  is 
completely  filled  and  will  allow  for  a  more  accurate  weighing  later. 
Once complete, discard the pellets from the plastic bag and refasten the 
empty plastic bag to the drop hose.  
 

3.

Go  to  the 

Hopper  menu>  Force  external  auger>Force  auger  6  min

    to 

activate the 360 second test.  Wood pellets will begin dispensing. 
 

4.

When the test is complete, remove the plastic bag, and weigh only the 
pellets on a kitchen scale. Enter the weight in the controller by  going to 
the 

Hopper

 menu >

Auger capacity/6min>

 enter “pellet weight”. 


5.

Once completed your system is calibrated and you may now start up the 
boiler.  


15 

Installation and operation of the hopper level sensor 

 
Your  RTB  Phoenix  boiler  includes  a  lazer  distance  sensor  that  allows  you  to 
monitor the pellet level in your hopper.   
 

Installation: 

 
1.

Find the laser distance sensor at the back of the boiler. 
 

2.

If you are  using a RTB Phoenix  hopper, string the lazer distance sensor 
through the precut hole found in the back of the hopper.   
 

3.

Mount the lazer distance sensor on the underside of the hopper lid but 
directly  above  the  opening  to  the  hopper  auger.   

Note: 

The  sensor  is 

fitted  in  a    magnetic  housing  that  allows  it  to  be  easily  mounted  onto 
the underside of the hopper lid. 


Operation 
 

The laser distance sensor will measure the distance between the sensor and 
the pellet level in the hopper.  When the  pellet level gets  below a  minimum 
amount for operation i.e. at a greater distance (cm) than the 

STOP BOILER AT 

DISTANCE

  cm  level  (see  right),    the  system  will  automatically  go  to  a 

STOP 

state 

in  order to retain a minimum amount  of  pellets  for an  easy startup. If 

your boiler goes to a 

STOP state 

due to low pellets in the hopper, simply add 

pellets to the hopper and the boiler will start up automatically once the laser 
distance  sensor  recognizes  that  the  pellet  level  is  above  the  minimum 
required amount.   
 
If your system is online, you can choose to receive email notifications prior to 
this  forced  boiler  stop  level  and  prevent  any  down  times  by  specifying  the 
distance  when  a  notification  should  occur  i.e.  at   

INFO  MESSAGE  AT 

DISTANCE  cm

  and  by  enabling  e-mail  notifications  in  your  Stokercloud 

notification settings.  

FIRST TIME START-UP: 

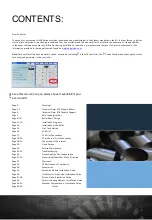
Summary of Contents for RTB PHOENIX v16.0

Page 1: ...NBE TR PILLESYSTE M RTB ready to burn UK V16 UK UK...

Page 2: ...it available if you ever need it Page 3 Warnings Page 4 5 Technical Data RTB Phoenix Boilers Page 6 Technical Data RTB Phoenix Hoppers Page 7 Bulk Feeding Options Page 8 10 Boiler Room Design Page 11...

Page 3: ...r system must cease immediately and must remain so until a solution to the draft problem has been resolved Continuing operation may result in death or injury Always read the manual before installing a...

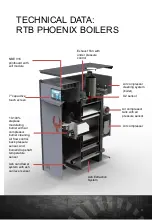
Page 4: ...ssor tank with air pressure sensor Air compressor Ash Extraction System 10 100 stepless modulating burner with air compressor burner cleaning air flow control back pressure sensor and burner drop shaf...

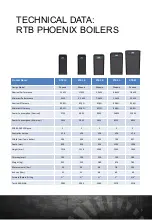
Page 5: ...ency 90 5 92 4 92 7 94 6 93 9 Power Consumption Nominal 37W 40W 90W 168W 125W Power Consumption Minimum 24W 20W 34W 82W 69W EN303 5 2012 Klasse 5 5 5 5 5 Controller Version V16 V16 V16 V16 V16 Width m...

Page 6: ...0 mm Height 1448 mm 1448 mm 1448 mm Height w lid open 1915 mm 1915 mm 1915 mm Weight 76 kgs 89 kgs 102 kgs Compatible w RTB 10 30 Phoenix RTB 10 30 Phoenix RTB 10 30 Phoenix kilo capacity will vary de...

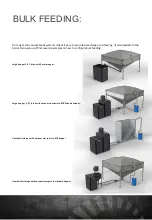
Page 7: ...r Below you will find several examples on how to configurebulk feeding Large hopper 3 3 7 6 ton with 3 meter auger Large hopper 3 3 7 6 ton with vacuum transport to RTB Phoenix hopper Homebuilt storag...

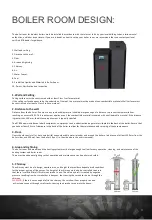
Page 8: ...atisfied The RTB Phoenix includes an inbuilt compressor compressor tank and extraction auger motor situated in the back of the boil er Ensure that you have at least 20 cm of clearance in the back of t...

Page 9: ...ws out of the fan or boiler during start up Power is reduced due to lack of underpressure If you have any problems with your chimney it is a good idea to keep a diary of any draft problem as draft pro...

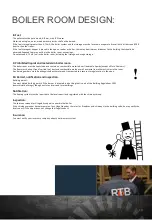
Page 10: ...l for oil burners The floor must be kept free of spilled fuel dust and combustible waste as well as waste from other activities in the room Any burning embers must be extinguished with water and trans...

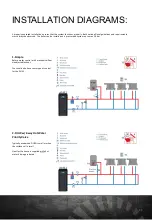
Page 11: ...r Priority Valve Typically used when DHW is small or when the surface coil is small Heat for the house is supplied while hot water is being produced A properly executed installation ensures that the s...

Page 12: ...pensation vlave the controller is able to control the minimum boiler return temperature on the system and adjust the forwarding temperature to the house based on an outdoor or indoor temperature refer...

Page 13: ...ww stokercloud dk And afterwards setup in a cascade system on www cascade stokercloud dk Cascade Stokercloud will start and stop the boilers in the cascade to ensure the desired combined heat and will...

Page 14: ...n a minimum of 10 PA and be stable at both nominal and minimum power 5 SHUNT or FLOWBOX W WEATHER COMPENSATION KIT The boiler must be installed with either an approved shunt or a flowbox with weather...

Page 15: ...llet level in your hopper Installation 1 Find the laser distance sensor at the back of the boiler 2 If you are using a RTB Phoenix hopper string the lazer distance sensor through the precut hole found...

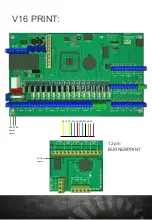
Page 16: ...V16 PRINT 12 pin BURNERPRINT 10 11 12 13 14 18 50 69 37 38 39 100 230 V power supply Air flow sensor 16...

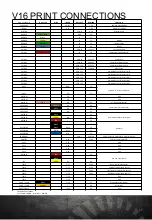
Page 17: ...Output for Accessories BUS 1 GRD 70 Available for Extension Module BUS 1 RX 71 BUS 1 TX 72 AIRFLOW 3V Free AIRFLOW TX Free AIRFLOW PINK RX 50 Air Flow Sensor Burner PRESSURE BROWN 3V 52 Compressor Pr...

Page 18: ...pacitor MOTOR CAP BLACK BLOWER Green Yelllow PE grounded on motor Combustion Blower Fan FL 85mm SKU 400003 BLOWER BLACK N BLOWER BLACK L1 EXTRA EXTRA EXTRA EXTRA CAP EXTRA CAP IGNTION BLUE N Igniter C...

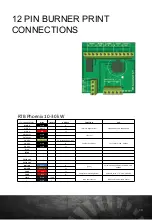
Page 19: ...Solenoid valve 1 2 SKU 400201 COMP Red N TEMP BLACK TEMP Drop Shaft Sensor Drop Shaft Temperature Sensor SKU 400048 0 1 BLACK 12 pin BURNER PRINT WIRE INPUTS OUTPUTS FUNCTION SKU MOTOR BLACK N Intern...

Page 20: ...4 Enter your controller password under PASSWORD 5 Follow the registration procedures on the site to setup your stokercloud account Your pellet boiler will now be online on www v16 stokercloud dk Tip M...

Page 21: ...nd save location Once your configuration are saved you will now have your own webpage and system dashboard on Stokercloud After a short period of time you will see data streaming from the burner 21 CO...

Page 22: ...er adjusting it should look like this NBE s Cloud Service ensures Fewest possible number of electric ignitions Best possible PI regulation An optimized system for your house Lower wood pellet consumpt...

Page 23: ...om exhaust mount found on top of the boiler adjacent to the exhaust fan Make sure that the O2 sensor is warm and has had power for at least 15 minutes Go to BOILER OXYGEN START OXYGEN CALIBRATION STAR...

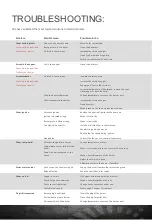
Page 24: ...ith a new one Ignition is located wrong Mount it correctly Burner grate is fitted wrong Mount it correctly Too high chimney draft Install a draft stabilizer in the chimney Set electric ignition power...

Page 25: ...ith pipe insulation Too many electric ignitions Flow in the system is fluctuating Set the pressure controlled circulation pump to fixed pressure External thermostat unstable Set External wait up in th...

Page 26: ...rfaces are below 47 degrees 6 Heated boiler room Lowers cooling of the boiler and smoke pipe and provides draft stabilizer more hot air to work with 7 More oxygen in combustion Increases air flow in t...

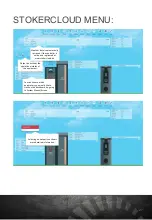
Page 27: ...on the dashboard by going to System Menus Screen Output icons show the operational status of the equipment Weather data is automatically retrieved if the controller is online and registered at www st...

Page 28: ...Submenus can be found when accessing a main menu Select to retrieve parameter help text 28...

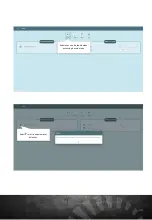
Page 29: ...Under boiler timer you can choose between ON OFF or nightime reduction temperature Under the DHW time you can choose between On Off during a timer period 29...

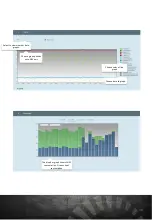
Page 30: ...Choose graph periods upto 48 hours Select to view weather data graphs Choose data to graph Choose color of line graph The blue bar graph shows DHW consumption Green heat consumption 30...

Page 31: ...Displays setting changes Displays changes in operations status Provides info messages LOG 31 Weather Compensation Data...

Page 32: ...ed by NBE The warranty does not cover parts such as the electrical igniter The buyer is obligated to check the goods immediately upon receipt If the buyer declares that the delivery was inadequate or...

Page 33: ...33...

Page 34: ...00 Allows you to pneumatically deliver pellets from your bulk storage to your day hopper Includes pelvac extraction auger transport piping fittings and vacuum head unit with rotary valve Available in...

Page 35: ...WIRING DIAGRAM 35...

Page 36: ...tor floorheating 4 A to DHW 5 The temperature sensor is to be mounted in the DHW tank If it is mounted high 1 it will give less hot water but fewer start ups If it is mounted low 2 it will give more h...

Page 37: ...ntroller with the provided 8 amp fuse Distance Sensor Red Distance Distance Sensor Yellow Distance Sig Distance Sensor Black Distance External Extraction Auger Green Yellow PE External Extraction Auge...

Page 38: ...to Vacuum Output Select the output the vacuum is connected to Duty Cycle Running time in percent for external feed auger 100 Always on Minutes per cm min Maximum minutes allowed for at least one cent...

Page 39: ...with any metal surface INSTALLING CERAMIC HEATING ELEMENT300 W Recommended adjustments Preheating 30 sek Power 65 Max time 6 min Blower low 40 Blower middle 50 Blower high 60 39 12 pin BURNER PRINT WI...

Page 40: ...0026 NBE weather compensation KIT w flowbox 510027 NBE 1 weather compensation KIT w flowbox 510028 NBE 3 way valve Part nr Size 1 Settings The picture on right shows the starting point of the dial If...

Page 41: ...rwarding temperature side after the weather comp valve and pump On the main printboard choose an availableinput between T2 T10 Or on the extension print choose an availableinput port fra T11 T18 Insta...

Page 42: ...ower high Comments Date Weighing g kW low kW kW high kW Blower low Blower middle Blower high Comments Date Weighing g kW low kW kW high kW Blower low Blower middle Blower high Comments Date Weighing g...

Page 43: ...ower high Comments Date Weighing g kW low kW kW high kW Blower low Blower middle Blower high Comments Date Weighing g kW low kW kW high kW Blower low Blower middle Blower high Comments Date Weighing g...

Page 44: ......
Reviews: