background image

www.naxa.com 

Page 19

the product on a bed, sofa, rug, or other similar surface. This product 
should not be placed in a built-in installation such as a bookcase or 
rack unless proper ventilation is provided or the manufacturer in-
structions have been adhered to.

10.  Power Sources: This product should be operated only from the type of 

power source indicated on the rating label. If you are not sure of the 
type of power supply to your home, consult your product dealer or 
local power company. For products intended to operate from battery 
power or other sources, refer to the operating instructions.

11.  Grounding or Polarization: This product may be equipped with a po-

larized alternating-current line plug that has one blade wider than 
the other. This plug will only fit into the power outlet in one direction. 
This is a safety feature. If you are unable to insert the plug fully into 
the outlet, try reversing the direction of the plug. If the plug should 
still fail to fit, contact an electrician to replace the obsolete outlet. Do 
not defeat the safety purpose of the polarized plug.

12.  Power-Cord Protection: Power supply cords should be routed so that 

they are not likely to be walked on or pinched by items placed upon 
or against them, paying particular attention to cords at plugs, conve-
nience receptacles, and at the point which they exit from the product.

13.  Protective Attachment Plug: The product may be equipped with an 

attachment plug with overload protection. This is a safety feature. 
See the operating instructions for replacement or directions to reset 
the protective device. If replacement of the plug is required, be sure 
the service technician has used a replacement plug that has the same 
overload protection as the original plug as specified by the manufac-
turer.

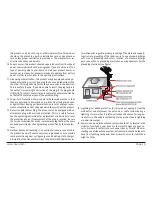
14. Outdoor Antenna Grounding: If an outside antenna is connected to 

the product, be sure the antenna system is grounded so as to provide 
some protection against voltage surges and built-up static charges. 
Article 810 of the National Electrical Code, ANS/NFPA 70 provides in-

formation with regard to proper grounding of the mast and support-
ing structure,grounding of the lead-in wire to an antenna-discharge 
unit, size of grounding conductors, location of antenna-discharge 
unit, connection to grounding electrodes, and requirements for the 
grounding electrode (see figure).

15.  Lightning: For added protection for this product, unplug it from the 

wall outlet and disconnect the antenna or cable system during a 
lightning storm or when it is left unattended and unused for long pe-
riods of time. This will prevent damage to the product due to lightning 
or power-line surges.

16.  Power Lines: An outside antenna system should not be located in the 

vicinity of overhead power lines or other electric light or power cir-
cuits, or where it can fall into such power lines or circuits. When in-
stalling an outside antenna system, extreme care should be taken to 
keep from touching such power lines or circuits, as contact with them 
might be fatal.

Summary of Contents for NS-439

Page 1: ...Digital CD Microsystem with Bluetooth NS 439 Instruction Manual Please read carefully before use and keep for future reference...

Page 2: ...0 CD Mode 11 Basic Operation 11 CD Functions 11 Program Operation 12 Radio Mode 12 Basic Operation 12 Preset Stations 13 Bluetooth Mode 13 Basic Operation 13 AUX Mode 14 Basic Operation 14 Setup Mode...

Page 3: ...material at our website Come visit us on the web at www naxa com and see all that we have to offer In the Box Please take a moment to make sure that you have ev erything in the list below Although we...

Page 4: ...TION button CD Radio BT AUX 3 STANDBY button 4 Standby Bluetooth LED 5 REPEAT M UP button 6 RANDOM M DN button 7 FM ST button 8 BAND 9 LCD display lens 10 SKIP SEARCH 11 SKIP SEARCH 12 VOL 13 VOL 14 O...

Page 5: ...www naxa com Page 5 Bottom View 18 AC IN jack 19 Speaker jacks 20 FM antenna 21 Wall mounting slots Digital Display...

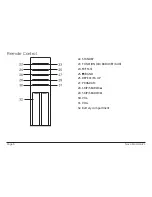
Page 6: ...Page 6 Naxa Electronics Remote Control 22 STANDBY 23 FUNCTION CD RADIO BT AUX 24 FM ST 25 BAND 26 REPEAT M UP 27 PROGRAM 28 SKIP SEARCH 29 SKIP SEARCH 30 VOL 31 VOL 32 Battery compartment...

Page 7: ...perate the remote within 15 feet of the sensor and at an angle of 60 degrees Batteries in the remote will last for approximately 6 months under normal use Replace the batteries if the remote control d...

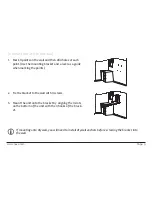
Page 8: ...ing bracket on the stand while making sure that the screw hole positions are aligned with each other refer to the drawing below 2 Use two of the included screws to fix the bracket to the stand Mount t...

Page 9: ...bracket and a level as a guide when marking the points 2 Fix the bracket to the wall with 4 screws 3 Mount the unit onto the bracket by aligning the 4 slots on the bottom of the unit with the 4 hooks...

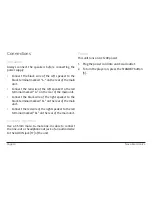
Page 10: ...ain unit Connect the black wire of the right speaker to the black terminal marked R on the rear ofthe main unit Connect the red wire of the right speaker to the red terminal marked R on the rear of th...

Page 11: ...ST again to resume playback Press BAND during playback to stop the disc Scan through the current track Press and hold SKIP SEARCH to scan through the current track in reverse Press and hold SKIP SEAR...

Page 12: ...Program play will display the programmed track number Press BAND twice to clear the program list The pro gram list will also be cleared if you open the CD door or if the unit is unplugged Radio Mode L...

Page 13: ...adio stations press REPEAT M UP or RANDOM M DN Bluetooth Mode Basic Operation This unit can stream audio wirelessly from devices that can transmit stereo audio with Bluetooth technology 1 Press FUNCTI...

Page 14: ...ring again The unit can display and adjust the clock while in Bluetooth mode Refer to the section SETUP MODE for instructions AUX Mode Auxiliary Aux mode allows you to play and audio de vice e g MP3 c...

Page 15: ...art to flash 12 H or 24 H 3 Press SKIP SEARCH or SKIP SEARCH to change between the two display modes then press PROGRAM to confirm The hour digit will flash 4 Press SKIP SEARCH or SKIP SEARCH to adjus...

Page 16: ...tatic sprays benzene or thinners to clean your CDs To reduce the risk of scratches always put CDs back in their case after use Do not subject CDs to prolonged exposure to direct sunlight high humidity...

Page 17: ...ade of the plug to the wide slot of the outlet and insert fully On Protection Against Laser Energy Exposure As the laser beam used in this product is harmful to the eyes do not attempt to disassemble...

Page 18: ...tructions should be read before the product is operated 2 Retain Instructions The safety and operating instruction should be retained for future reference 3 Heed Warnings All warnings on the product a...

Page 19: ...be equipped with an attachment plug with overload protection This is a safety feature See the operating instructions for replacement or directions to reset the protective device If replacement of the...

Page 20: ...may result in fire electric shock or other hazards 22 Safety Check Upon completion of any service or repairs to this product ask the service technician to perform safety checks to ensure that the prod...

Page 21: ...lutions Please refer to this guide before requesting service If you need further assistance please contact Naxa Technical Support www naxa com naxa_support Symptom Possible Solution The sound is disto...

Page 22: ...REPEAT mode is off press RE PEAT to cancel The Function mode is not working Ensure that the CD Compartment lid is closed Try resetting the unit Switch the unit off and unplug it from power Wait three...

Page 23: ...uctions in this manual Please also visit us on the web at www naxa com to get up to the minute news alerts and documentation for your device For additional assistance please contact Naxa Technical Sup...

Page 24: ......

Reviews: