background image

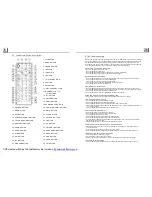
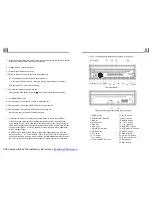
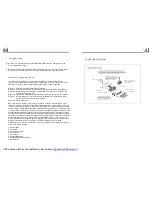
1.6 The Locations and Names of Controls on or in the unit

1. OPEN button
2. POWER/MUTE button
3. Monitor
4. AV IN socket
5. Disc Slot
6. USB Jack
7. SD/MMC Card Slot
8. MODE button
9. VOL knob
10. >>| button
11. |<< button
12. PLAY/PAUSE/1 button

13. INT/2 button
14. RPT/3 button
15. RDM/4 button
16. - 10 / 5 button
17. + 10 / 6 button
18. BAND/TEL button
19. APS/HANG UP button
20. EJECT button
21. RESET button
22. Small LCD Screen
23. IR Remote Sensor
24. Microphone
25. REL button

1

2

3

4

6

10

9

8

11

12

14

16

17

5

13

18

15

19

20

22

23

24

The Front Panel

The Front Facet after removing the front panel

7

21

25

SD/MMC

4. In the connection status: the audio of mobile phone transfers to the car audio system

whenever a dialling takes place or receiving a call.

5. Dialling when in connection status

5.1 Dial with the mobile phone directly.

5.2 Dial with remote control with the following procedures:

(1) Input telephone number with number buttons 0-9

* Short press CLEAR button to cancel the wrongly input number if necessary

(2) Short press TEL to execute the dialling.

5.3 To redial the last phone number dialled

Short press REDIAL button or tap the

icon, It will dial the last phone number.

6. Accept/Reject/End Call

.1 During ringing, short press TEL button to accept the call

6.2 During ringing, short press HANG UP button to reject the call

6.3 During talking, short press HANG UP button to end the call

Note: During ringing, the phone number appears.

6

7. To transfer the audio of a file played by Mobile Phone to the Car Audio Player

In the connection status between the Bluetooth devices of the Car Audio Player
and a Mobile Phone, if the mobile phone can play audio or video files and support

A2DP, when the Mobile Phone plays an audio or video file(For some Mobile Phones,

you must select Play by BT firstly), the audio of the playing file will be transferred
to the Car Audio Player.

In A2DP mode, if the Bluetooth device of the Mobile Phone support AVRCP, the
functions of the >>|, |<< , PLAY/PAUSE , EJECT, MUTE, EQ, LOUD, VOL and SEL
buttons are the same as one in media mode(no fast forward/backward functions for
the >>|/|<< buttons). The other buttons available in media mode are not available.

A PS

U SB

AV IN

OP EN

MI C

6

5

4

3

2

1

INT

RPT

RDM

-10

+10

MUTE

REL

MODE

PDF created with FinePrint pdfFactory trial version 

http://www.pdffactory.com

Summary of Contents for NCD-702

Page 1: ...adiate radio frequency energy and if not installed and used in accordance with the instructions may cause harmful interference to radio elevation reception which can be determined by turning the equipment off and on The user is encouraged to try to correct the interference by one or more of the following measures Reorient or relocate the receiving antenna Increase the separation between the equipm...

Page 2: ...wet hand 3 Switch off the main power when the unit is not in use Disconnect the power plug from the power outlet when you do not intend to use the unit for a prolonged period of time Before moving the unit remove the disc from the unit tray first 4 Do not open the cover or touch any of the components exposed out of the unit only for qualified technicians 5 Do not expose the unit under direct sunli...

Page 3: ...th Speed 14 4 8 Playback with Slow Speed 14 4 9 Display Still Frame Step by Step 15 4 10 Playback Repeatedly 15 4 10 1 One All Repeat 15 4 10 2 A B Repeat 15 4 11 Playback in Scan Mode 16 4 12 Playback from a specified Chapter Track or a Specified Time 16 4 13 Playback in Random 16 4 14 Playback in Different View Angle 16 4 15 Playback in Zoom Mode 16 4 16 Change the Caption Language 17 4 17 Chang...

Page 4: ...t of VCD Generally every song of karaoke disc is a track 1 2 Precautions Safety 1 Power Source The unit should be connected to power supply only of the type described in the operating instructions or as marked on the unit 2 The unit is designed for negative terminal of the battery which is connected to the vehicle metal Please confirm it before installation 3 Do not allow the speaker wires to be s...

Page 5: ... B arrow see fig 2 3 Replace the old battery by a new battery with polarity side upward See fig 3 4 Insert the battery holder to the original position in remote control See fig 3 1 Lithium battery CR 2025 3V 2 Battery Life 6 months with normal use in normal room temperature 3 Improper use of battery may cause overheating or explosion so that Result in injury or fire 4 Battery leakage may cause dam...

Page 6: ...her you have turned down the volume Ensure that you have set the right AUDIO setup of the player Ensure that the audio is not under mute NO PICTURE BUT HAVE SOUND Ensure that the player s video output has a good connection with monitor s video input Ensure that you have turned your monitor to the AV input channel connecting to your player Check whether the video connector is damaged Ensure that yo...

Page 7: ...redial the last phone number dialled Short press REDIAL button or tap the icon It will dial the last phone number 6 Accept Reject End Call 1 During ringing short press TEL button to accept the call 6 2 During ringing short press HANG UP button to reject the call 6 3 During talking short press HANG UP button to end the call Note During ringing the phone number appears 6 7 To transfer the audio of a...

Page 8: ...ANDFREE SYSTEM 1 Enter Bluetooth mode When you use MODE button or Mode Menu to enter Bluetooth mode it will display Bluetooth interface as right In Bluetooth interface the icons descriptions are as follows Tapping it can pop up AUDIO VIDEO SETUP interface as one in page 10 Tapping it can transfer audio between the Car Audio System and mobile phone Tapping it can exit to Mode Menu Same as CLEAR but...

Page 9: ...th Europe Egypt South Africa Middle East Region 3 Taiwan Hong Kong South Korea Thailand indonesia etc Region 4 Australia New Zealand Central South America South Pacific Inlands Region 5 Russia Mongolia Indian Peninsula Middle Asia East Europe North Korea North Africa North west Asia etc Region 6 China mainland Basically when a DVD movie disc for the version of region 6 was decided not to issue we ...

Page 10: ...reset music equalizer curves POP ROCK CLAS FLAT The sound effect will be changed 8 Shortly pressing the OPEN button on the front panel or long pressing the OPEN button on the remote control can slide the monitor of the Car Audio System out of the chassis or slide it into the chassis Mode Menu It is for adjusting the hue of the video output It is for adjusting the saturation of the video output It ...

Page 11: ... front panel to select your desired radio band of and AM2 and the word means which band is selected will be displayed on the small monitor of the front panel 3 TUNE SEEK UP DOWN BUTTONS In RADIO mode 1 Long press the button to automatically search up down for a available station from the current frequency 2 Briefly press the button to manually search up or down with step by step for your desired s...

Page 12: ...this button to turn on the LOC function to display the word LOC on LCD then tune again for the local radio station AM1 AM2 To play files in a disc insert the disc into the disc slot then it will automatically play To unload the disc in the disc slot press the EJECT button to eject disc in the disc slot and then you can remove the disc USB 1 Load unload disc or USB 4 Disc and Operation 4 For the DV...

Page 13: ...ure that is displaying as follows 90 deg cw 90deg ccw UP DOWN v LEFT RIGHT During JPEG playback press the PROG button to change the mode of refresh picture During JPEG playback press the STOP button to stop playing and return to the root menu During JPEG playback the following buttons are not available SLOW FWD SUBTITLE TITLE ANGLE AUDIO RDM INT and A B In JPEG mode the other operations are same a...

Page 14: ...P3 WMA CD 2 Use the direction buttons to move cursor onto the desired place for inputting the sequence number 3 Use the number button to input desired sequence number of title chapter track with desired sequence 4 Use the direction button to move cursor onto Play item then press the OK button to play the programmed titles chapters tracks in programmed order only pressing the PLAY button also can p...

Page 15: ...nguage of the caption or turn off the caption depend on the media used In the state of VCD MP3 WMA CD playing the button is not available 1 In the state of DVD playing press the AUDIO button repeatedly on the IR remote control to select the desired language type depend on the media used 2 In the state of VCD playing press the AUDIO button repeatedly to select the sound mode of the MONO L MONO R MI...

Page 16: ...evious seconds part of each track on the disc Press the INT button again to resume normal playback 2 In the state of DVD MP3 WMA playing the INT button is not available 1 In the state of DVD playing press the SEARCH button to display a interface and highlight the title item then use the number buttons to input the serial number of the title use the direction buttons to highlight the chapter item t...

Reviews: