background image

31

Smart

 2005 for Pocket PC 

|


User Manual

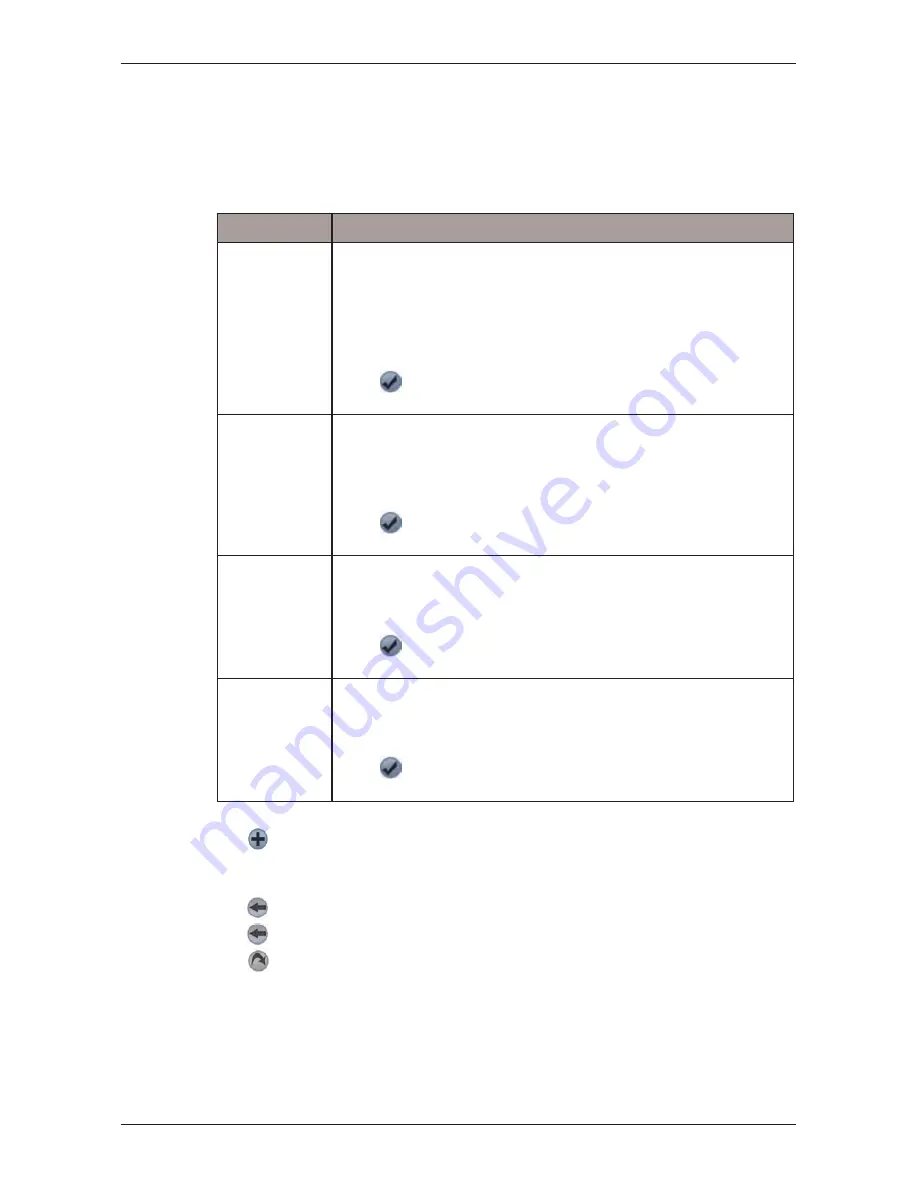
Adding a Destination Point via Address

1. Tap 

Address

.  

The 

Destination Address

 screen will open.

2. Select a country from the 

Country

 drop-down box.

3. Type and select the destination address:

4. Tap 

.  

The destination point is added to your trip.

• To add another destination point, go to step 2. 

5. Tap 

 to return to the 

Destination

 screen. 

6. Tap 

 to return to the 

Trip Planner

 screen.

7. Tap 

.  

The 

3D Map

 screen will open. Smart

 

will calculate and display the trip.

Box

Action

Postcode

• Tap the 

Postcode

 box.  

   The 

Destination Address - Postcode

 screen will display.  

• Type up to five characters of the postcode in the 

Postcode

 box. 


 Note: When navigating in United Kingdom or Netherlands, type the 

   postcode with spaces and without the last two letters.

• Select the postcode from the list that displays. 
• Tap 

.  

   The 

Destination Address

 screen will reopen. 

Area

• Tap the 

Area 

box.  

   The 

Destination Address - Area

 screen will display.  

• Type the name of a geographical location such as a town, city, state  
   or county in the 

Area

 box.  

• Select the area from the list that displays. 
• Tap 

.  

   The 

Destination Address

 screen will reopen. 

Road

• Tap the 

Road 

box.  

   The 

Destination Address - Road

 screen will display.  

• Type the name of a road in the 

Road

 box.  

• Select the road from the list that displays. 
• Tap 

.  

   The 

Destination Address

 screen will reopen. 

House number • Tap the 

House No. 

box.  

   The 

Destination Address - House No.


screen will display.  

• Type the house number in the 

House No.

 box.  

• Select the number from the list that displays. 
• Tap 

.  

   The 

Destination Address

 screen will reopen. 

Summary of Contents for Smart 2005

Page 1: ...Smart 2005 English Europe Australia New Zealand for Pocket PC User Manual ...

Page 2: ......

Page 3: ...S Setup 18 9 Setting your Destination 21 10 Using the 2D Map Screen to Plan a Route 29 11 Trip Planner 30 12 Viewing your Route 33 13 Map Screen Pop up Menu 39 14 Avoiding an Area 40 15 Route Demonstrator 41 16 Trip Meter 42 17 Favourites and Quick Navs 43 18 Settings 45 19 Smart Desktop Advanced Features 52 20 Continuous Continental Navigation 57 21 Improving Performance 59 22 Accessories 60 Appe...

Page 4: ...4 Smart 2005 for Pocket PC User Manual ...

Page 5: ...de you with voice and visual commands to your destination using the continuous stream of GPS data to track your position The iCN GPS antenna receives GPS signals To receive GPS signals ensure that the iCN is outdoors or in a vehicle outdoors and the GPS antenna has an unobstructed view of the sky The iCN can operate in all weather types except snowfall For details about reading the Smart GPS Statu...

Page 6: ...ion cradle or other device that came with your Pocket PC Microsoft ActiveSync will synchronise with your Pocket PC 4 If you are upgrading from Smart V1 90 and 1 91 continue to step 5 Otherwise go to step 7 5 Versions 1 90 and 1 91 Only The maps supplied with Smart V1 90 and 1 91 are not compatible with Smart 2005 Complete the following to uninstall maps from your Pocket PC and memory card a Open S...

Page 7: ...t Settings System tab Remove Programs 8 Uninstall Navman SmartST Desktop from your computer if it has previously been installed using the Add or Remove Programs feature in your Windows Control Panel Start Control Panel Add or Remove Programs Refer to subsequent chapters of this user manual to install and activate Smart 2005 install new maps and navigate to your destination ...

Page 8: ...D Map and 3D Map screens to activate the Pop up menu See page 39 for information on the Pop up menu Portrait vs Landscape Screens Microsoft Windows Mobile 2003 SE can display Smart in portrait or landscape mode This manual shows most Smart screens primarily in portrait mode however where landscape mode significantly differs from portrait mode both are shown Toggle Description Left Opens the Main Me...

Page 9: ...included with your Pocket PC See your Pocket PC user manual for more information Step 1 Install Smart Desktop on your Computer 1 Close all open programs on your computer 2 Insert the Smart CD into your computer CD ROM drive The Smart Desktop installer will start If your computer does not automatically launch the CD start the installation manually Start Run Type D Setup SmartST 2005 for Pocket PC e...

Page 10: ...he Save In box select ROM Storage then click OK Other Pocket PC models Smart must be installed in the default installation directory not a memory card 5 If you connect to the Internet via a dial up connection connect to the Internet now 6 Follow the prompts to register online and activate Smart on your Pocket PC Review and accept the Privacy Notice when prompted You will be prompted to enter your ...

Page 11: ... access it from the Start menu Start Programs Navman Smart Desktop 2005 for Pocket PC Uninstalling Smart Desktop from your Computer We recommend that you use the Add or Remove Programs feature in your Windows Control Panel Start Control Panel Add or Remove Programs Uninstall SmartST Desktop 2005 for Pocket PC Map information Selected maps Download selected maps to the Pocket PC memory card or memo...

Page 12: ...nternet via a dial up connection connect to the Internet now 2 Open Smart Desktop Start Programs Navman Smart Desktop 2005 for Pocket PC 3 On the Setup menu select Update software then Check for updates on the web Your computer will connect to the Internet and display the Navman website 4 Download the update for your region to your computer if available 5 On the Setup menu select Update software t...

Page 13: ...uter opens Windows Explorer close the Windows Explorer window e Australia New Zealand and North America users If you have already activated a Map Product Key for your country go to step i otherwise continue to step f European users If you have already activated a Gold Pan European Map Product Key activates all maps in Europe go to step i otherwise continue to step f f Click the map you want to ins...

Page 14: ...urope repeat step g until all required maps have been added to the Selected section of the Desktop Selected Maps tab European Silver Single Map Product Key users If you have another Silver Single Map Product Key to activate activates a single map go to step f k Click an Add to button to install all maps listed in the Selected section of the Desktop Selected Maps tab to your Pocket PC memory card o...

Page 15: ...onnect your Pocket PC to your computer if it is not already connected using a USB cable synchronisation cradle or other device that came with your Pocket PC Microsoft ActiveSync will syncronise with your Pocket PC b Open Smart Desktop if it is not already open Start Programs Navman Smart Desktop c Open the Maps on Pocket PC section Pocket PC tab Maps on Pocket PC d Click the map to be removed and ...

Page 16: ...running in the background To close all applications see your Pocket PC manual 3 Tap Start a to display the Start menu see Figure 1 4 Tap Programs b on the Start menu 5 Tap c on the Programs screen see Figure 2 Smart will open PiN 570 The Language Selection screen will display on PiN 570s not purchased in Australia Canada New Zealand United Kingdom or United States Tap the language name or associat...

Page 17: ...ing started Main Menu Screen The Main Menu screen provides access to all Smart functions including navigating to a destination 1 From the 2D Map screen open the Main Menu screen by pushing the 4 way toggle 2 Tap to display more Main Menu options ...

Page 18: ...eceiver from the list that appears See your Pocket PC manual for the correct COM port 3 Tap the second drop down box and select the baud rate speed for your GPS receiver from the list that appears See your GPS receiver manual for the correct baud rate 4 Tap the GPS checkbox to open the COM port Your Pocket PC will now obtain a GPS fix 5 Tap to return to the 2D Map screen Navman COM Ports and Baud R...

Page 19: ...eceiver or COM port Ground speed Indicates whether the COM port is open Baud rate drop down box which displays the selected baud rate for the GPS receiver COM port GPS Satellite Segment Key GPS Status Screen The GPS Status screen provides a visual representation of the information being received Latitude and longitude are displayed along with a north pointing compass ground speed and the heading i...

Page 20: ...e first drop down box NO GPS DATA A GPS COM Port has been opened but no GPS data are being received Ensure the GPS receiver is turned on and connected WAITING FOR GPS A GPS COM Port has been opened GPS data are being received but a GPS position fix has not yet been established Ensure the GPS receiver has an unobscured view of the sky If you are in a vehicle with athermic heat reflecting windows you w...

Page 21: ...he Destination screens Note If the text you enter does not match any address or Point of Interest or any name in Pocket PC Contacts the text will turn red In this case check your spelling and try again Destination Icons Each Destination screen displays a variable selection of icons Tap To Return to the previous screen Display the Route Options screen Add current location to Favourites Show the cur...

Page 22: ...Albert Example 2 If searching for Fred Archer Way search by Fred Example 3 If searching for Franz Grillparzer Strasse search by Franz Streets Named After People Italy In Italy if a street name is a person s name including at least a first and last name search by the last name Example 1 If searching for Via de Angelo de Thomasis search by Thomasis Example 2 If searching for Via Placido Giovanella se...

Page 23: ... the postcode with spaces and without the last two letters Select the postcode from the list that displays Tap The Destination Address screen will reopen Area Tap the Area box The Destination Address Area screen will display Type the name of a geographical location such as a town city state or county in the Area box Select the area from the list that displays Tap The Destination Address screen wil...

Page 24: ...ap screen will open To add the address as a Favourite tap The Favourite will be saved with the name of the road Navigating to the Intersection of Two Streets 1 From the Main Menu tap Destination then Intersection The Destination Intersection screen will open Note If you have previously selected a destination and not subsequently exited Smart the last address will display 2 Select a country from th...

Page 25: ... the name of a geographical location such as a town city state or county in the Area box Select the area from the list that displays Tap The Destination Address screen will reopen Road 1 Tap the Road 1 box The Destination Intersection Road 1 screen will display Type the name of a road in the Road 1 box Select the road from the list that displays Tap The Destination Address screen will reopen Road ...

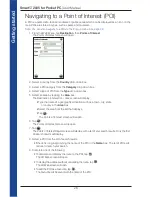
Page 26: ... Area screen will display Type the name of a geographical location such as a town city state or county in the Area box Select the area from the list that displays Tap The Points of Interest screen will reopen 6 Tap The Points of Interest screen will reopen 7 Tap The Points of Interest Results screen will display with a list of your search results Only the first 40 search results will display 8 Sele...

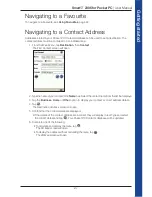
Page 27: ...your contact in the Name box Select the contact name from the list that displays 3 Tap the Business Home or Other option to display your contact s correct address details 4 Tap The Destination Address screen will open 5 Confirm that the correct details are displayed If the details of the contact address are incorrect they will display in red Type and select the correct details and tap Your Pocket P...

Page 28: ...cent destinations 1 From the Main Menu tap Destination then Recent The Recent Destinations screen will open 2 Select a destination from the list 3 Complete one of the following To calculate and display the route tap The 3D Map screen will open To display the address without calculating the route tap The 2D Map screen will open ...

Page 29: ...tap Map The 2D Map screen will display 2 Scroll the map by dragging the stylus then lifting it off the map Repeat until your destination is visible Zoom in or out of the map as required to locate your destination using to zoom in and to zoom out 3 Tap and hold the road or POI icon that represents your destination The Pop up Menu will display 4 Select Navigate to from the Pop up menu Smart will cal...

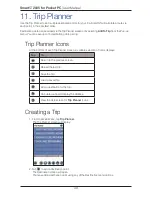
Page 30: ... per trip Trip Planner Icons At the bottom of each Trip Planner screen a variable selection of icons displays Creating a Trip 1 From the Main Menu tap Trip Planner The Trip Planner screen will display 2 Tap to add a destination point The Destination screen will open You may add a destination point using any of the Destination menu options Tap To Return to the previous screen Reload the last trip S...

Page 31: ...nited Kingdom or Netherlands type the postcode with spaces and without the last two letters Select the postcode from the list that displays Tap The Destination Address screen will reopen Area Tap the Area box The Destination Address Area screen will display Type the name of a geographical location such as a town city state or county in the Area box Select the area from the list that displays Tap T...

Page 32: ...ur Pocket PC or memory card Tap The Trip Save As screen will open Type a name for the trip in the Name box Select a folder in which to save the trip from the Folder drop down box Select a location from the Location box in which to save the folder and trip Tap OK The Trip Planner screen will reopen Loading a Trip 1 From the Main Menu tap Trip Planner The Trip Planner screen will open 2 Tap The Trip...

Page 33: ...screen either tap Map on the Main Menu screen or when a route has been calculated press the 4 way toggle to cycle through the screens Navigate around the map by dragging the stylus across the screen To display a smaller area in greater detail press To display a larger area in less detail press Tap and hold any point on the screen to access the Pop up menu Tap to recentre the map on your current po...

Page 34: ...se the angle and to increase the angle when the Information button is set to Angle Tap and hold any point on the map to access the Pop up menu Your current position is marked with Your next turn is highlighted in a different colour to future turns The colour will depend on the theme you are using Distance to next turn Tap to display the route summary Direction of next turn Tap to hear next instruc...

Page 35: ...to cycle through the screens until the Next Instruction screen is displayed or tap Map on the Main Menu Displays information from Information Buttons Direction of next turn Tap to hear next instruction Information Buttons Tap to cycle through the following display options Speed Time HDG current direction or heading DTG distance to go to destination ETA expected time of arrival at destination TTG t...

Page 36: ...to the turn Each distance shown in the righthand column represents the distance from your current location to that turn The next turn is highlighted To view the Instruction List screen press the 4 way toggle to cycle through the screens until the Instruction List screen is displayed Scroll up and down the list of instructions using the scroll bar Direction of turn Distance to turn Next instruction...

Page 37: ... View on the Main Menu Scroll up and down the list of instructions using the scroll bar Tap an instruction to view the map for the turn in the map view portion of the screen There are minor differences between the portrait and landscape versions of the Turn List View screen see Figures 1 and 2 e g landscape does not contain the Direction of Turn panel Figure 1 Portrait Figure 2 Landscape Direction...

Page 38: ...he route summary from the 3D Map and Next Instruction screens by tapping the lower right corner of the screen Viewing the Location Summary A summary of a location can be displayed on the 2D Map or 3D Map screen The location summary includes Name of street POI Favourite or Quick Nav Description of location Latitude and Longitude of location To display the location summary 1 Tap and hold the 2D Map ...

Page 39: ...tion Quick Nav Displays a list of your Quick Navs Route Detour Reroutes your route to avoid the next 1 2 5 or 10 kilometres or miles Add To Trip Adds the selected point to your trip as a destination point Add to Favourites Adds the selected point to your Favourites Add Avoid Area Adds an Avoid Area for you to size and locate Delete Avoid Area Deletes the selected Avoid Area Clear Avoid Areas Delet...

Page 40: ... displayed 4 Set the Avoid Area to the correct size and position To position the Avoid Area tap and drag it to the area you want to avoid To size the Avoid Area tap and drag the sizing boxes to the size required 5 Tap the Avoid Area to enable it Deleting an Avoid Area 1 From the Main Menu tap Map 2 Tap and hold the Avoid Area that you want to delete 3 Select Delete Avoid Area from the Pop up menu ...

Page 41: ...d the road or POI icon that represents your departure point 3 From the Pop up menu select Set as departure Step 2 Select Destination Point 1 Find your destination point by scrolling the map with the stylus 2 Tap and hold the road or POI icon that represents your destination 3 From the Pop up menu select Navigate to Step 3 Activate Route Demonstrator From the Pop up menu select Route Demonstrator I...

Page 42: ...onary time for your current trip From the Main Menu tap then Trip Meter The Trip Meter Totals screen is used to view the distance travelled average speed maximum speed time taken and stationary time for all of your trips to date or since the trip meter was last reset From the Trip Meter Current Route screen tap The Trip Meter Totals screen will open Tap again to redisplay the Trip Meter Current Ro...

Page 43: ...phical location such as a town city state or county in the Area box Select the area from the list that displays To select a road type the name of a road in the Road box Select the road from the list that displays To select a house number type the house number in the House No box Select the numebr from the list that displays 4 Tap The Favourite is saved with the name of the road Converting a Favour...

Page 44: ...ing Quick Navs 1 From the Main Menu tap Quick Nav 2 Tap your previously saved Quick Nav destination The 3D Map screen will open Smart will calculate and display the route to the Quick Nav Note You can also access Quick Navs via the Pop up menu Using Favourites 1 From the Main Menu tap Destination then Favourites 2 Select a Favourite from the list 3 Select one of the following options Displays the ...

Page 45: ...ferred colour scheme from the Map Colour Scheme drop down box in the Map Colours section display a topographical map on all map screens select the Display Topography check box in the Map Detail section display No Entry icons on blocked roads on all map screens select the Display Blocked Road Icons check box in the Map Detail section display grid lines on all map screens select the Display Map Grid...

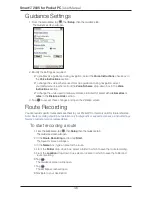
Page 46: ...se changes and open the 2D Map screen Route Recording You can record specific routes and save them to your Pocket PC or memory card for future reference Note Route recording should be undetaken only for diagnostic or support purposes as instructed by a Navman customer service representative To start recording a route 1 From the Main Menu tap then Setup then the Guidance tab The Guidance screen will...

Page 47: ...n will open 2 In the Route Recording section tap Play The Open screen will open 3 From the Folder drop down box select the folder containing the route to be played 4 From the list of recorded routes tap the route to be played The Guidance screen will reopen 5 Tap The 2D Map screen will open and the route recording will play To stop playing a route recording 1 From the Main Menu tap then Setup then...

Page 48: ...test distance when calculating a route change the Preference for Freeways move the Freeway Usage slider towards Min to use freeways less often when calculating a route move the Freeway Usage slider towards Max to use freeways more often when calculating a route avoid unsurfaced roads select the Avoid Unsurfaced Roads check box avoid ferries select the Avoid Ferries check box avoid toll roads selec...

Page 49: ...ction 3 Select or clear the appropriate check boxes in the POI Categories section until only those categories of POIs that you would like to display on the 2D or 3D Map screen are selected 4 Tap to accept these changes The 2D Map screen will open Active Map Selection Settings The Active Map Selection Settings screen allows you to specify which of the available maps are to be used Smart uses progra...

Page 50: ...t to export your Favourites to My Device My Documents Navman Favourites csv The message Export Complete will display 4 Tap The 2D Map screen will open The General screen also allows you to delete all Favourites Quick Navs or recent destinations To delete your Smart Favourites Quick Navs or recent destinations complete the following 1 From the Main Menu tap then Setup then the General tab The Gener...

Page 51: ...unced when in close proximity Custom POIs are added from the Smart Desktop POI Editor 1 From the Main Menu tap then Setup then the Active POI tab The Active POI Settings screen will open 2 Select the custom POI to be configured from the POI drop down box 3 Select the Active check box to activate the POI 4 Modify the settings for the selected POI as required To enable a visual warning when the POI i...

Page 52: ...o be installed 1 From the Map menu click Find City The Find City window will open 2 Type the name of the City or Town in the City Name box The list of available cities will reduce to match your search 3 Double click the name of the city or town The Map Display will rotate to centre on the selected city or town and will mark the city or town location ...

Page 53: ...e Points of Interest POIs Water parks Land contours To access the Map Layers section Desktop tab Settings Layers Select or clear each checkbox to indicate the layers to be installed with each map Colour Settings Description Controls map colours Displays the map border colour map colour map border width Adjusts the map border width Controls the map display solid colour no colour crosshatch texture ...

Page 54: ... name for the file in the File Name box then click OK The file name can be up to eight characters with no spaces 2 Add a POI to the POI File On the POI Editor window Edit menu click New The POI Details window will open Type a description for the POI in the Description box On the Degrees Minutes Seconds tab type or select the degree minute and second of the POI latitude in the Latitude boxes On the D...

Page 55: ...s enable a visual warning when the POI is in close proximity select the Visual Alert check box enable a warning chime when the POI is in close proximity select the Audio Alert check box change the units used to measure distance for this POI select the Metric or Imperial option select the distance from the POI at which the visual warning should display or the warning chime should sound select the d...

Page 56: ...om POI File from your Pocket PC 1 On the Map menu click Points of Interest The POI Editor window will open 2 On the File menu click Manage POI Files The Manage POI Files window will open displaying a list of custom POI files installed on your Pocket PC 3 Click the File Name or Size of the POI file to delete 4 Click Delete The file is removed from the list but is not yet deleted 5 To select another fil...

Page 57: ... exclude smaller roads and have a reduced level of geographical detail You can add and remove Basemaps using the Basemap Installer see below Install Basemap 1 Open Smart Desktop if it is not already open Start Programs Navman Smart Desktop 2005 for Pocket PC 2 On the Map menu click Basemaps The Navman Basemap Installer window will open 3 Click the appropriate Add button to install the Basemap to t...

Page 58: ... to your computer via Microsoft ActiveSync 3 5 or higher Close all open programs on your Pocket PC 2 Open Smart Desktop if it is not already open Start Programs Navman Smart Desktop 2005 forPocket PC 3 On the Map menu click Basemaps The Basemap Installer window will open 4 Select the Basemap to remove and click Remove ...

Page 59: ...quire The Active Map Selection Settings screen allows you to specify which of the available maps are to be used See page 49 for more information Increasing Allocation of Program Memory Smart requires an amount of allocated program memory equal to about 10 of the size of the installed and active maps 1 Tap Start to display the Start menu 2 Tap Settings on the Start menu 3 On the Settings screen tap...

Page 60: ...Accessories These Pocket PC accessories are available for separate purchase from your local Navman retailer In Vehicle Power Adaptor 12 V in vehicle power adaptor with 2 m power cable Universal PDA Mounting Kit Mounts any PDA device in your car ...

Page 61: ...ARE STEENWEG STRAAT BN BG DR LN MKT PK PL SQ STWG STR Belgium French AVENUE BOULEVARD CHAUSSÉE IMPASSE MONT MONTAGNE PLACE ROUTE ROUTE NATIONAL RUE SQUARE AVE BVD CH IMP MT MT PL RTE RN R SQ Belgium German CHAUSSEE PLATZ STRASSE CH PL STR Finland GATAN GATE GATA VÄGEN VÄG GT GT GT V V France ALLEE AVENUE BOULEVARD CHAUSSÉE DOMAINE FAUBOURG IMPASSE MONT MONTAGNE PASSAGE PLACE QUARTIER ROND POINT RO...

Page 62: ...TATALE SUPERSTRADA VIA VIALE C DA C SO FR LGO P ZA P LE SS SS V VL Luxembourg ALLÉE AVENUE BOULEVARD CHAUSSÉE DOMAINE FAUBOURG IMPASSE MONT MONTAGNE PASSAGE PLACE QUARTIER ROND POINT ROUTE ROUTE NATIONALE RUE SQUARE TRAVERSE ALL AVE BVD CH DOM FG IMP MT MT PAS PL QU RPT RTE RN R SQ TRA Netherlands BOULEVARD DIJK DWARSSTRAAT DWARSWEG GRACHT KADE KANAAL LAAN LEANE LOANE PARK PLANTSOEN PLEIN SINGEL S...

Page 63: ...in AVENIDA CALLE CALLEJÓN CAMINO CARRETERA GLORIETA PASEO PLAZA RAMBLA RONDA AVE C CJ CM CR G P O P RBLA RD Switzerland German BOULEVARD CHAUSSEE PLATZ STRASSE BVD CH PL STR Switzerland French AVENUE CHAUSSÉE IMPASSE MONT MONTAGNE PLACE QUARTIER ROUTE ROUTE NATIONAL RUE SQUARE AVE CH IMP MT MT PL QU RTE RN R SQ Switzerland Italian CONTRADA CORSO FRAZIONE LARGO PIAZZA PIAZZALE VIA VIALE C DA C SO F...

Page 64: ...111 Australia pcnsupport aus navman com www navman com Support for New Zealand Navman NZ Ltd PO Box 68 155 Newton Auckland New Zealand pcnsupport nz navman com www navman com Support for Europe Navman Europe Limited 4G Gatwick House Peeks Brook Lane Horley Surrey RH6 9ST United Kingdom support navman europe com www navman europe com Support for the US and Canada Navman USA Limited 27142 Burbank Fo...

Page 65: ...65 Smart 2005 for Pocket PC User Manual Notes ...

Page 66: ...66 Smart 2005 for Pocket PC User Manual Notes ...

Page 67: ......

Page 68: ...MN000416A ...

Reviews: