background image

NAVCAM-FHD               

USER MANUAL


NavCam-FHD Manual Ver 2.2   12/2013 
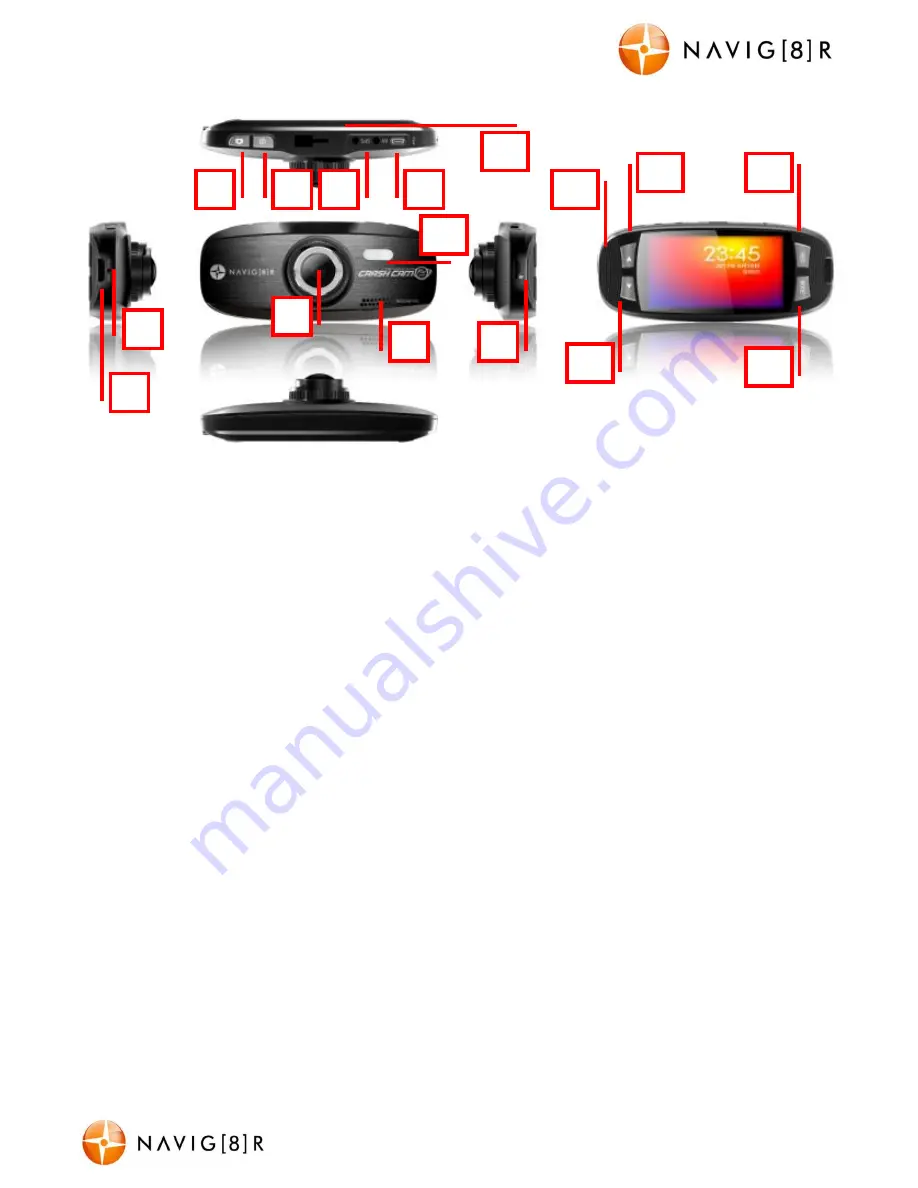
PRODUCT FEATURES 


On/Off Button.Hold for 3 seconds to turn ON 
or OFF 

Factory reset switch. Insert a small paper clip into this hole 
to reset settings back to default. 

Menu Button. Press to access menu features 
and preferences.  
Under Video Mode–adjust Resolution, Loop 
Recording, Motion Detection, Record Audio, 
Date Stamp and G-sensor.  
Under Camera Mode – adjust Resolution, 
Sequence, Quality, Sharpness, White Balance, 
Colour, ISO, Exposure, Anti-Shake, Quick 
Review and Date Stamp. 

10 

Navigate UP through Menu items or Increases Digital 
Magnification. 
Under Video Mode – Zoom IN before and during recording. 
Under Camera Mode – Zoom IN before taking a photo  
Under Playback Mode – Scroll UP to review saved files. 

Mini USB Interface. Usedfor charging / power 
port or PC interface and file transfer 

11 

Navigate DOWN through Menu items or increases Digital 
Magnification. 
Under Video Mode – Zoom OUT before & during recording.  
Under Camera Mode – Zoom OUT before taking a photo  
Under Playback Mode – Scroll DOWN to review files. 

AV-Output. TV connection via Composite 
3.5mm (cable not included). 

12 

Record. Start or stop recording or enter/confirm selections 
from the menu. 
Under Video Mode – Begin recording 
Under Camera Mode – Take a still picture  
Under Playback Mode – Select file for playback  

Micro SD Card Slot. Cards up to 32GB are 
supported. 

13 

Mode. Select between Video/ Camera /Playback modes or 
press and hold to mute or un-mute microphone. 
Note: When the device is muted, the microphone icon will be 
crossed out with a red line.
 

HDMI-Output. High definition TV connection 
via HDMI port. Mini HDMI required. (Cable not 
included). 

14 

Mounting point. For use with the Windscreen suction mount 
(included) 

7  Microphone. 

15 

Indicator lamp. Blue when Charging; Red when device is 
turned on. Blue and Red flashing during recording 
Note: Please note that charging the battery via computer 
USB is not possible.
 

8  Camera Lens.   

16     LED Light  

13 

11 

10 

12 

14 

15 

16 

Summary of Contents for Crashcam FHDWD

Page 1: ...NAVCAM FHD USER MANUAL 1 NavCam FHD Manual Ver 2 2 12 2013 note Product name is Crashcam FHD the Model Number for warranty service and ordering is Navcam FHD...

Page 2: ...in manuals for future reference Use this product only in the manner described Only use a water dampened soft cloth to clean the surface of this product The following will damage this product any liqui...

Page 3: ...tal Magnification Under Video Mode Zoom OUT before during recording Under Camera Mode Zoom OUT before taking a photo Under Playback Mode Scroll DOWN to review files 4 AV Output TV connection via Compo...

Page 4: ...Battery level Video record mode Loop record time Motion Detection Exposure compensation Date and time Photo mode Image stabilisation Exposure compensation Auto White Balance Auto ISO setting File Name...

Page 5: ...ng the file save process before turning off usually only a few seconds Note If the 12v socket is constant on in some European vehicles then the CRASHCAM FHD will need to be turned on off manually by t...

Page 6: ...the selected file visible on the screen press the MENU button Then use the up and down the arrows to choose DELETE and then the REC to confirm your choice Protect With the selected file visible on the...

Page 7: ...ecording Select Off 1 or 2 or 3 Minute Select the time for each recording segment For example if set to 1 then each video recorded is 1minute long If set to off then the camera will record until the S...

Page 8: ...ct that option Available Options Option Option Description Capture Mode Select single for no delay or a time 2S 5s 10s for a time delay to take the photo When press the rec key the time will count dow...

Page 9: ...nter system settings Press the buttons to select one of the setting options and press then REC to select that option Menu Option Selection Options Option Description Set Date Time Adjust fields Day Mo...

Page 10: ...ard will erase all of the content on the card Default Setting Select OK Cancel Select OK to return the device settings back to the original factory settings Firmware Version View the current car DVR s...

Page 11: ...o SDHC card must be inserted into the device before recording 2 The CRASHCAM FHD supports cycle recording in increments of 1 2 3 minutes It will overwrite the oldest video files with new ones Dependin...

Page 12: ...assenger carpet or under the dashboard 7 12v DC plug is connected to the car s 12v cigarette socket Once the wiring and installation of the CRASHCAM FHD has been completed please check the following W...

Page 13: ...mount may need to be reapplied Do not apply the suction mount on the portion of a windscreen which is not glass eg some vehicles may have a coating Can t see the device in my computer Check the USB c...

Page 14: ...ideo Resolution FHD 1920x1080 FHD 1440x1080 HD 1280 x 720 WVGA 848x480 VGA 640x480 QVGA 320x240 Auto Bump Record G sensor Supported Adjustable sensitivity low medium high Lens Viewing angle 120 degree...

Page 15: ...of the Laser Product and the type of defect Step 2a Contact your place of purchase They will assess the nature of the fault and refund or replace the product as per their store refund or warranty poli...

Reviews: