background image

KORE 2 – 51  

The Midi P

aniC

 button (the exclamation mark) sends an “all notes 

off” message to all plug-ins, which turns off any “stuck” notes and 
often solves other MIDI quirks. Furthermore, it resets KORE 2’s audio 
engine. Use this if you are experiencing quirky note behavior or if you 
“overloaded” a KoreSound with MIDI data. The keyboard shortcut for 
this command is the 0 on your numeric pad.

3.3.4 Global Controller

The g

loBal

 C

ontroller

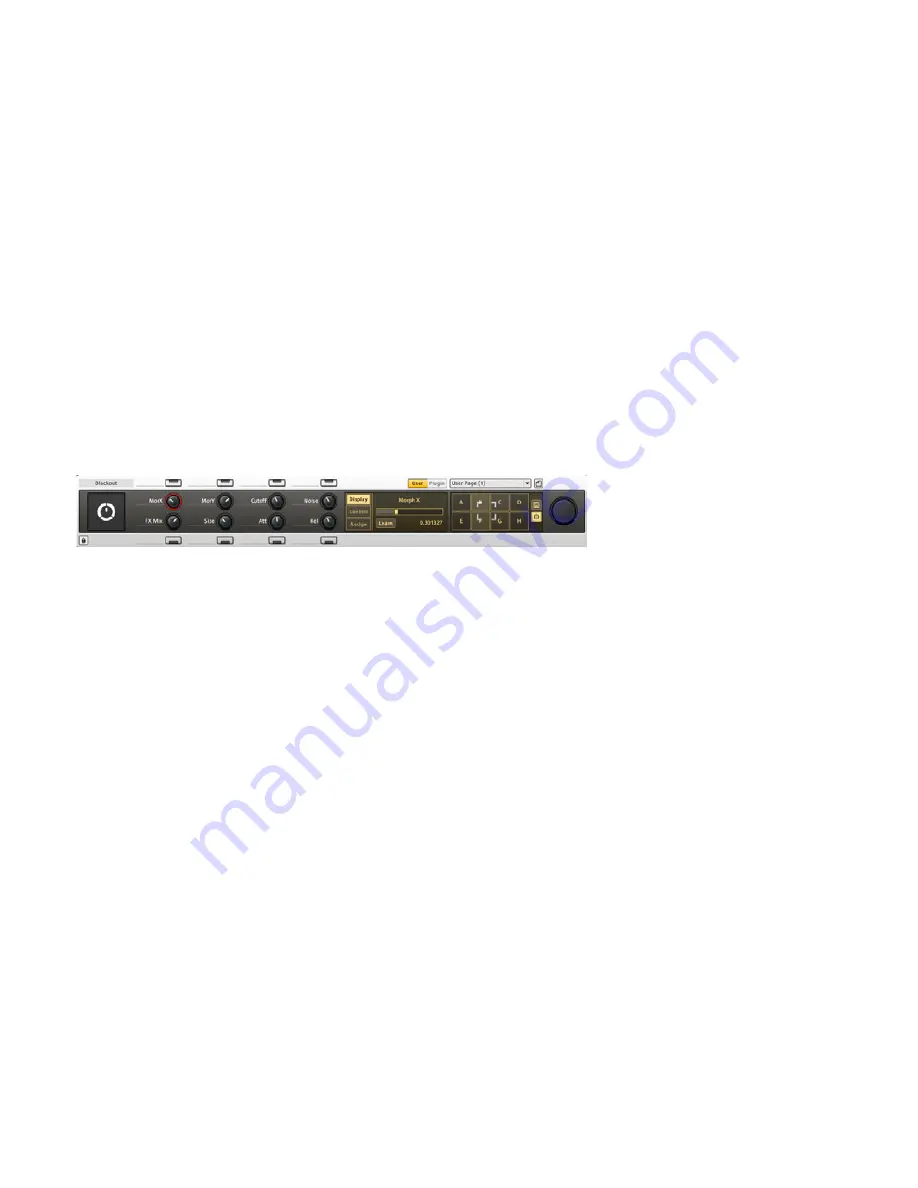
 is your one-stop interface to the C

ontrol

 P

age


system in KORE 2. There is a dedicated chapter about controlling 
KoreSounds in this manual (chapter 3.5). The g

loBal

 C

ontroller

 also 

mirrors the status of your KORE 2 Controller in terms of displayed 
Pages and parameter values.Toggle display of the g

loBal

 C

ontroller


on or off via the dedicated button on the g

loBal

 H

eader

 (see chapter 

3.2.1). It is always displayed in the upper-most region of the u

PPer

 P

ane

With an inactive 

l

oCK

 button the g

loBal

 C

ontroller

 is context sensitive. This 

means that it displays control elements related to the KORE 2 component 
in focus. You can set the focus with your mouse by clicking on a C

Hannel


i

nSert

 that holds a sound or a plug-in. 

Summary of Contents for O Kore 2

Page 1: ...OPERATION MANUAL ...

Page 2: ...bH hereinafter referred to as NATIVE INSTRUMENTS All product and company names are or trademarks of their respective owners Furthermore the fact that you are reading this text means you are the owner of legal version rather than an illegal pirated copy It is only through the loyalty and honesty of people like yourself that NATIVE INSTRUMENTS GmbH can continue to develop and create innovative audio...

Page 3: ...TIVE INSTRUMENTS North America Inc 5631 Hollywood Boulevard Los Angeles CA 90028 USA sales native instruments com www native instruments com MASSIVE was designed and developed entirely by Native Instruments GmbH Solely the name Massive is a registered trademark of Massive Audio Inc USA Native Instruments GmbH 2007 All rights reserved ...

Page 4: ... in order to let you find the sound you have in mind fast The Browser of KORE 2 is filled with musical attributes specify any combination and the sounds that match the description are immediately listed The repertoire of the KORE 2 Browser is filled with more than 500 sounds each providing several variations which can be morphed seamlessly They have been created for immediate use in your productio...

Page 5: ...u get the best out of KORE 2 1 2 How to Use This Manual This manual is split into three main parts The first part explains how to install the KORE 2 hardware The software installation and activation is described within the separate Setup Guide The second part covers KORE 2 systematically and provides information about all parts of KORE 2 structured according to the software s user interface As eac...

Page 6: ...o make sure that no glasses or bottles containing liquids which might spill are placed on the hardware Do not allow any objects or liquids of any kind to penetrate the unit The KORE 2 Controller is USB bus powered Operation can only be guaranteed as a single device with a USB2 controller or with a self powered USB2 hub Those who don t like read ing manuals will find that after mastering a few basi...

Page 7: ... connectors When cleaning the KORE 2 Controller use a soft dry cloth Do not use paint thinner solvents cleaning fluids or chemically impregnated wiping cloths 1 4 Notes Disclaimer Native Instruments GmbH cannot be held responsible for damage or data loss caused by improper use or modification to the KORE 2 Controller or the KORE 2 software Specifications subject to change The information contained...

Page 8: ...ht Native Instruments GmbH 2007 This publication may not be reproduced in whole or in part summarized transmitted transcribed stored in a retrieval system or translated into any language in any form or by any means without the prior written permission of Native Instruments GmbH All product and company names are trademarks or registered trademarks of their respective owners 1 5 Software Installatio...

Page 9: ... plug ins within KORE 2 The KORE 2 Controller can also access all types of Sound Variations and can act as a powerful hardware interface to KORE 2 s Sound Database If you own a KORE 1 Controller please note that it is fully compatible with KORE 2 Read more on this in chapter 3 9 When you install KORE 2 for the first time please make sure that you also choose to install the KORE 2 Controller driver...

Page 10: ...hes in chapter 2 3 3 3 4 Pedal inputs Various pedals expression sustain volume etc can be attached here The pedal input receives continuous signals It can be assigned to User Page Knobs Read more on using pedals in chapter 2 3 3 5 USB 2 port Be aware that at least the USB 2 connection has to be established to make the KORE 2 Controller work all other connections described here are optional It prov...

Page 11: ...rnal device such as a drum machine or sampler Please note that at the time of writing the KORE 2 Controller s knobs buttons and transport do not send MIDI information 8 Kensington Lock socket Use this to attach a Kensington style lock to prevent your KORE 2 Controller from being stolen This kind of lock can be found at dealers for notebook accessories ...

Page 12: ...less encoders with a far higher resolution than would be possible with the MIDI standard They control the target parameters incrementally leading to a very smooth control of values on the software side You can also use the Control Knobs to morph between Sound Variations ...

Page 13: ...hen the controller is becoming assigned and it is bright red when the knob is touched on the hardware or clicked in the software 9 16 Controller Buttons 1 8 The buttons contain a light indicating their on off state On the software level see the section about Control Pages the buttons can be used in gate or toggle mode They can also be used to recall a Sound Variation s settings 17 Stop Equivalent ...

Page 14: ... to morph Sound Variations 24 Enter This button confirms a selection and enters a selected Sound Matrix level 25 F1 This button is context sensitive and changes its function depending on the situation Please read chapter 3 9 for details 26 Escape Use this button to return to the next higher level of the menu structure 27 Scrollwheel The wheel has the same function as the Up Down buttons 28 31 Up D...

Page 15: ...e the Windows Explorer to view the contents of the folder Start the installation by double clicking Kore 2 Driver Setup exe The setup program will suggest C Program Files Native Instruments KORE 2 as the path for the destination folder You may also choose another folder if you wish During the installation you will be asked to attach the KORE 2 Controller Please connect the KORE 2 Controller to a U...

Page 16: ...e installed If this has not taken place please refer to the manual section above for instructions on manual driver installation After starting your computer connect the KORE 2 Controller to your computer with the enclosed USB cable and launch the KORE 2 application Whenever the KORE 2 Controller goes from a power off to power on state by connecting it to a powered up computer or starting the compu...

Page 17: ... the NI KORE 2 MIDI device by clicking on OFF When the device is enabled it will show ON 2 3 3 Connecting a pedal or footswitch Additional pedals expression volume etc can also be used with the KORE 2 Controller by connecting them to the Pedal Inputs to the right of the MIDI jacks The pedals are calibrated automatically when the KORE 2 Controller is starts up If the pedal and or footswitch are plu...

Page 18: ...back panel Either normally closed or normally open type footswitches can be used but make sure they re plugged in on power up so that KORE 2 can detect which type you re using Please read chapter 3 5 3 for information about assigning footswitches and pedals to KORE 2 s Control Pages ...

Page 19: ...with KORE 2 You will also be introduced to the way KORE 2 integrates hardware and software to produce one easily usable entity and the powerful concept of nested sounds is presented If these terms are familiar to you feel free to skip these passages However reading these chapters will help you to better your understanding of KORE 2 and its concepts 3 1 1 The instrument KORE 2 Stand alone plug in a...

Page 20: ...e used as a stand alone and as a plug in and some applications may be used as a plug in and as a host Often stand alone applications are hosts that use plug ins in both senses common examples are software sequencers Those sequencers mostly do not work as plug in versions Vice versa there are synthesizers and more commonly effects which are only available as plug ins and cannot be used as a stand a...

Page 21: ...RE 2 mixers by offering functions like creating copying and pasting channels It also comes with a handy Undo system On the View Menu you can control the contents of the application window The Help Menu is your launchpad to the Native Instruments Service Center for management of your licences and to support material on the Native Instruments website KORE 2 as a plug in The plug in version of KORE 2...

Page 22: ... host in itself This allows KORE 2 to organize mix and control multiple plug ins within the host When you have multiple KORE 2 plug in instances running in your host software you can easily navigate them via your KORE 2 Controller see chapter 3 9 There are three different versions of the KORE 2 plug in Kore 2 is the normal VSTi instrument Kore 2 FX is the effects version providing signal input Kor...

Page 23: ...on your system tagged with musical attributes for quick access Each entry in the database is a so called KoreSound It holds the mentioned Attributes as well as additional information for instance the sound s author If you are familiar with sampling techniques you can think of a KoreSound as being similar to a sample The only differ ence is that a sample is the record ing of a sound while the KoreS...

Page 24: ...ou can concentrate on making music A KORE 2 SingleSound on the Edit Area A KoreSound referencing only one plug in is called a SingleSound MultiSounds on the other hand differ from SingleSounds in one important aspect It can hold any number of plug ins to generate a sound connected to each other in arbitrary ways However as with a SingleSound you don t need to care about the way the plug ins are ha...

Page 25: ...he extreme by the fact that a MultiSound can hold any other KoreSound instead of a plug in Referring to the compari son between KoreSounds and samples again SingleSounds can be seen as recordings of single instruments while MultiSounds are recordings of whole bands or or chestras often including the ar rangement and a conductor tech nically a step sequencer or an ar peggiator Referring to the comp...

Page 26: ... KORE 2 the Performance filled with KoreSounds via the Browser is not very different from a MultiSound You can for example save the whole Performance as MultiSound using the File Menu and load it as part of another Performance The only difference between Performances and MultiSounds lies in non structural information A Performance saves the global clock s BPM value for instance while a MultiSound ...

Page 27: ...ns Similar to a hardware mixer in most cases host applications don t generate sound by themselves This task is left to the plug ins The host only provides the environment for the plug ins in terms of routing control and hardware access KORE 2 however is an instrument and therefore it features six sound generating Integrated Engines ABSYNTH FM8 GUITAR RIG KONTAKT MASSIVE REAKTOR These engines are d...

Page 28: ...on t work unless the same plug in is also installed on the second machine KORE 2 and plug in parameters It is important to note that the interaction between KORE 2 and the plug ins yields different results depending on the way the respective plug in handles automatable parameters KORE 2 can only use and control those parameters that are exposed by the plug in via the VST or AU interface Depending ...

Page 29: ...bles in KORE 2 It contains a dedicated section about Reaktor in KORE 2 KORE 2 and sample libraries KORE 2 acts as a host for VST AU plug ins This means it directly handles the parameters that are exposed by the various plug ins But plug ins do not only consist of parameter settings they also bring along other content like samples KORE 2 only loads the plug in and the sample content is handled on t...

Page 30: ...ystem and Sound Variations Any KoreSound provides Control Pages A Control Page is a set of controls eight buttons and eight knobs that remote control a user defined set of the KoreSound s parameters This unifies the handling of KoreSounds and of underlying plug ins to large extend All KoreSounds coming with KORE 2 provide dedicated Pages that use all capacities of the system One knob or button of ...

Page 31: ...ations another property of every KoreSound A Sound Variation is a snapshot of the KoreSound s Control Page settings This means that you can tweak a KoreSound via its Pages and the hardware until it fits your needs and save these settings as a Sound Variation You can alter it further and save the new result as another Sound Variation Each KoreSound can hold up to eight them You can recall any of th...

Page 32: ...ing the different elements in a broader functional way In this section you will also learn the names of the most important controls to help you while reading this manual The KORE 2 interface with the Global Header on top the Upper Pane below the Lower Pane displaying the Browser and the Info Pane on the bottom ...

Page 33: ...an either display the Global Controller and the Edit Area which shows the Sound Matrix or the Global Controller and the Sound Manager which deals with Keyboard Mapping and Automation The Lower Pane contains the Browser The Info Pane can be hidden via a switch on the Global Header It displays small helpful explanations if you mouse over the various elements of KORE 2 s interface The KORE stand alon...

Page 34: ...iguration You can toggle between the Edit Area with the Sound Matrix and the Sound Manager via the dedicated buttons If the Browser is active the Sound Matrix or Sound Manager respectively can be hidden to maximize the Browser Use this interface flexibil ity to your advantage by hiding the Edit Area when you want to load and play sounds only or by having only the Global Controller and the Sound Ma...

Page 35: ... time and measure related functions KORE 2 has an internal clock that can be used to synchronize all time When using KORE 2 as a plug in the global clock is provided by the host software and cannot be influenced from within KORE 2 It will run synchronized automatically When using KORE 2 as a plug in the global clock is provided by the host software and cannot be influenced from within KORE 2 It wi...

Page 36: ...Time Signature of KORE 2 s clock can also be edited here The Bar Display gives you a visual clue of your position in the current bar The last section of the Global Header displays the Activity Area which displays vital KORE 2 information such as the names and values of the parameters you are editing the MIDI Activity LED and the CPU Usage Display It also contains a handy MIDI Panic button and the ...

Page 37: ...an focus a channel by clicking on its Channel Header and a sound by clicking on the Channel Insert it resides in However you can also lock the Global Controller to keep the current component in focus regardless of KORE 2 Controller status Click on the Lock button to do this You can toggle the view of the Global Controller by clicking on the dedicated Global Controller but ton on the Global Header ...

Page 38: ...d for audio input from external hardware or parental Sound Matrix levels Group Channels sum and process the output of channels of the same Sound Matrix Level The channels change their form according the entry chosen on their Input Source menu Signals be they audio or MIDI are sent through the Matrix from top to bottom from the parental mixer level to the child and from the higher Channel Insert to...

Page 39: ...nd Manager In the Sound Manager you work on the keyboard ranges of the KoreSounds manage the Control Pages and the list of automatable parameters that are published to the host software when KORE 2 is running as a plug in The parameters can then be remote controlled by the facilities of the host software e g by drawing curves on the sequencer s automation tracks The Recall function of the Page Lis...

Page 40: ...e The ranges are displayed on a concise graphical window that can be directly manipulated via the mouse Please read more on the Sound Manager in chapter 3 6 This can be used to eas ily layer sounds for fast but unique and creative sound de sign This can be used to eas ily layer sounds for fast but unique and creative sound de sign ...

Page 41: ... the application s menu language Activate the Browser with a click on the dedicated Browser button on KORE 2 s Global Header It always appears at the bottom of the inter face and its size can be altered with a handle You can maximize the Browser by hiding the Sound Matrix or Sound Manager from the Upper Pane A detailed rundown on the Browser s functionality can be found in chapter 3 7 Activate the...

Page 42: ...ds The File Menu The File Menu provides functions to create load and save Performances and KoreSounds New Performance creates an empty Performance Open Performance opens a dialog letting you navigate your file system to choose and load a Performance File kpe Save Performance writes the current Performance to disk If it has been saved previously the new version overwrites the old one If it is a pre...

Page 43: ...ost recently opened files making it easy to return to files used in recent projects Options opens KORE 2 s maintenance pages The Options consist of for tabs dealing with the database plug ins and the configuration of your KORE 2 Controller and they are explained in chapter 3 3 5 Please have a look at the separate Native Instruments Setup Guide for details about the Audio and MIDI Settings for your...

Page 44: ...issuing an Undo command The keyboard shortcut is Ctrl y Find opens the Browser with the focus on the Quick Search field The keyboard shortcut is Ctrl f Pre Listen activates the Pre Listen mode see chapter 3 7 The keyboard shortcut is Ctrl p The View Menu The View Menu of the stand alone simply mirrors the View buttons of the Global Header See chapter 3 3 3 for details Try to memorize the keyboard ...

Page 45: ... keeps you up to speed with the latest developments in KORE 2 You can discuss all matters KORE 2 within an active community of fellow users The KORE 2 website also includes free tutorials special KORE 2 events that might be of interest and information about well known artists using KORE 2 About opens the About Screen which displays the Version number and installation type of your KORE 2 installati...

Page 46: ...isk with a new name and to a location of your choice Save Performance As Sound converts the current Performance to a KORE 2 MultiSound The Browser will come up in Save mode you can edit the Meta Information tag it with Attributes and save it into the database Please read chapter 3 7 for details about the Browser and about saving KoreSounds When Auto Compact Window is activated KORE 2 automatically...

Page 47: ...sion number and installation type of your KORE 2 installation Here you also find the names of all the people involved in the creation of KORE 2 The Global Controller switch toggles the display of KORE 2 s Global Controller on the Upper Pane on and off The keyboard shortcut for this command is F1 The Edit Area switch displays the Sound Matrix on the Upper Pane This can only be visible alternatively...

Page 48: ...tcut for the Info Pane is F8 You will quickly learn how valuable the View buttons are when managing screen real estate Working with KORE 2 in a host environment poses limitations in terms of space and with the different views you will always come up with the perfect configuration by activating needed components and hiding the stuff you don t need One thing to mention is the context sensitivity of ...

Page 49: ...e are controlled by the host clock of the sequencer That s why the plug in lacks the Transport Area The Transport Area sports the following elements Stop the square button stops the central clock and resets it to beat one of the bar The KORE 2 Controller Stop button duplicates this function Use Ctrl Space as keyboard shortcut Mac command space Play the arrow button starts KORE 2 s central timing c...

Page 50: ... flashing at every beat When using a MIDI Player see chapter 3 8 34 the central clock has to run for the player to play the MIDI file This is not the case for Step Sequencers or Arpeggiator as they can also be triggered by note events The Activity Area The Activity Area holds some informational displays and two buttons The Value Display always displays the name value and unit for the parameter you...

Page 51: ...l Page system in KORE 2 There is a dedicated chapter about controlling KoreSounds in this manual chapter 3 5 The Global Controller also mirrors the status of your KORE 2 Controller in terms of displayed Pages and parameter values Toggle display of the Global Controller on or off via the dedicated button on the Global Header see chapter 3 2 1 It is always displayed in the upper most region of the U...

Page 52: ...active the Global Controller always provides access to the Control Pages of the Performance or the currently selected Multi Sound or Single Sound which can be an Instrument an audio effect or even a MIDI effect At any time you can hit the Lock button to keep the currently focused slot on the Controller This is also depicted by a Lock Icon on the focused component on the Sound Matrix With an active...

Page 53: ...our operating system Please note that it is necessary to restart KORE 2 for the change to take effect When you are using KORE 2 as a plug in there is another option displayed The Maximum Plug in Height value specifies to which degree the Auto Compact Mode can resize the plug in window according to the elements displayed This value prevents that the KORE 2 window grows larger than your screen Refer...

Page 54: ...Sounds and MIDI files The User Sounds Folder field is just for your reference Click on the three tabs to see where the default locations for the KORE 2 content are However you can define additional folders on your file system to be monitored by KORE 2 Any content placed there will be automatically added to the database when a Rescan see below is initiated These folders are listed as Additional Fol...

Page 55: ...ug ins is explained By clicking OK you acknowledge any changes you made and close the options window Plug ins Options The Plug ins section offers several options regarding the handling of your VST and or AU plug ins This screen varies for PCs and Macs mainly because Macs support Audio Unit plug ins and allocate them differently in the file system On a PC it looks as follows If Enable plug in scan ...

Page 56: ... is active KORE 2 will scan the content of your PlugIn folder for additions every time it starts Validate Plug ins During Scan will run a technical check for every scanned plug in to ensure proper functioning If checked the command Ignore built in AudioUnits discards the plug ins that come with your Apple Mac OS X installation The Ignore System VSTs command should be used if you only want to work ...

Page 57: ...ss Refresh Rate determines how often the state of the LEDs and the display s contents are updated Invert Display changes the default red on black lettering to black lettering on a red background LED Brightness Low adjusts the brightness of the LED ring around the knobs for the off untouched state Note that for unassigned or deactivated controls the LED is switched off completely LED Brightness Hig...

Page 58: ...tomatically adapt itself to the pedal inputs and everything should be smooth again 3 4 Edit Area Routing signals This is a KoreSound with three mixer levels The Edit Area of KORE 2 is where sound is assembled mixed and routed You can think of it as a hierarchically nested mixer structure for audio and MIDI signals ...

Page 59: ...t they contain additional information e g that they connect to physical in and outputs and store the tempo of KORE 2 s global clock 3 4 1 Components and views of the Edit Area Channels and Channel Inserts Each level of the Edit Area is composed of a row of channels Per default the top level always has a Master Channel which is displayed on the far right of the Sound Matrix The Master Channel is no...

Page 60: ...le A channel displays its type on the Channel Header and the Channel Inserts display the names of the component residing inside them The type of the components is depicted by various symbols If you ever see the following symbol on your Sound Matrix it means KORE 2 is having problems in finding or loading a plug in Have a look if the plug in has been moved on your file system or if all fails re ins...

Page 61: ...more about the Browser in Chapter 3 7 or from your file system or by right clicking and working with the resulting context menu An empty Channel Insert s context menu displays three sections New Sound creates a new empty KoreSound with its own Sound Matrix The second section contains the Internal Modules of KORE 2 namely the internal MIDI modules and the audio FX In the third and lowest section yo...

Page 62: ... or plug in residing in the Channel Insert with a different one For SingleSounds Edit will open the Sound Header of the respective sound below the Sound Matrix For MultiSounds Edit opens its level of the Sound Matrix to display the channels of the MultiSound Save puts the browser into save mode allowing you to set Attributes and save the sound to the user sound path Delete removes the currently fo...

Page 63: ...h process all new KoreSounds are selected and Edit Mode is opened so you can assign any attribute to all the sounds Click on Done when you are finished By default KORE 2 offers you to create the folder in the User Sounds path Change this if you must Add Extra Output is only available for plug ins that provide several stereo outputs Please read your plug in s manual for more information on how to a...

Page 64: ...tween the Inserts The target spot is displayed with two yellow lines The same applies to changing channel positions except that you can t replace existing ones Take a channel by its Channel Header and move it to its new place in the Sound Matrix Again the target is depicted by yellow lines Rename channels by double clicking their Channel Header and type in a new name via the keyboard of your compu...

Page 65: ...the Mixer View button to the left of the Channel Inserts of the leftmost channel The Mixer View showing the Channel Inserts the Pan knob Channel Solo and Channel Mute buttons the Output Level Meter and an optional Input and Aux output section The Channel View showing the Channel Inserts and the Audio and MIDI tabs ...

Page 66: ... Insert content A click or double click on an occupied Channel Insert both have different outcomes depending on the KoreSound it holds In the case of a SingleSound a single click displays the interface of the sound Depending on the content of the SingleSound a double click opens the floating interface of the VST AU plug in or the interface of an internal KORE 2 Module which appears on the Edit Are...

Page 67: ...higher Sound Matrix level to the lower and from the higher to the lower channel Insert Via the Aux sends audio signals can also flow horizontally within one Sound Matrix level Channel Types KORE 2 Channels are flexible things Although there is such a thing as channel types any channel can at any time change its type by definition of a different Input Source for the channel This is done via the Inp...

Page 68: ...els of any type by using the Insert Channel commands on the context menu You can also Duplicate a channel with all its content and settings and of course Delete channels from the Sound Matrix The entry Deactivate does the same as a click on the Channel Number it bypasses the channel and takes it out of the processing loop saving CPU cycles Bypassing channels can be automated and mapped to the KORE...

Page 69: ...nnel Header to invoke it and choose Use as Master if you want to transform an existing Channel into the Master The Master Channel is the default routing destination for newly created Channels of the respective Sound Matrix level and it is always visible even if the Sound Matrix area is fully occupied and you have to scroll to see all non master Channels Using the two Tabs you can access the parame...

Page 70: ...so only the soloed channel is audible The Mute button silences the channel Please be aware that signal processing still affects a muted channel and will put the same load on your CPU as if not muted To the right you find the Input Gain knob for leveling out incoming signals It ranges from 40 dB to 40 dB and comes in very handy for avoiding clippings inside of your sound structures The current leve...

Page 71: ... as the top level However you don t gain access to your hardware inputs Instead you can choose Sound Input which is the signals coming from the parental Sound Matrix level Please note that if you do not choose Sound Input from the Input Menu the channel cannot receive audio from its parental Sound Matrix level Next on the Audio Tab you find the Output section The Output Destination menu defines wh...

Page 72: ...s to the number of channels on that Sound Matrix level The numbered outputs of your audio hardware For channels sitting on lower levels of the Sound Matrix the Output Menu doesn t provide the possibility to select an output destination to the audio hardware Instead use the menu entry Sound Output which allows you to route the output to the sum of the respective Sound Matrix level ...

Page 73: ... of lower hierarchy levels you have to use the top level to get the audio signal from your hardware and channel it to the lower mixer Level The basic audio signal flow is as follows Signals run through the Sound Matrix from top to bottom Each lower level can receive its input from the parent mixer in the hierarchy if it has channels with active inputs ...

Page 74: ...he external audio As with audio signals MIDI flows from higher Channel Inserts to lower ones The Aux System KORE 2 offers a flexible system of auxiliary sends for routing audio signals between channels of the same Sound Matrix level You find the auxiliary sends to the right of the channel s Output section By default you have six Aux sends per channel that route the signals to possible other channe...

Page 75: ...level of the Sound Matrix If there is any other channel on that level with the Group Bus defined as its Input you can choose it from the menu and the new routing is established Choosing Remove from the menu deletes the output assignment All other Sends sitting to the right are moved one step to the left The MIDI Tab The MIDI Tab of a Sound Matrix Level The MIDI Tab focuses on receiving and routing...

Page 76: ...of the Channel Mapping Tab of the Sound Manager see chapter 3 6 4 and are immediately reflected there You can use the Pitch Transpose Control to transpose incoming note messages semitone wise The range is four octaves up or down MIDI routing In addition to the fact that MIDI signals run vertically through KORE 2 s Sound Matrix you can also route the data horizontally between channels of the same S...

Page 77: ... 3 4 3 Nesting sounds The Nesting of Sounds lies in the nature of the Sound Matrix Any Channel Inserts can hold any kind of KoreSound no matter if it is a SingleSound or a MultiSound Any Channel Insert can again hold an arbitrarily deep Sound Matrix structure in itself leading to a nested structure of Sound Matrizes You can have a single channel with several Channel Inserts occupied by MultiSounds...

Page 78: ... One source multiple destinations A standard case you will encounter is the need to route audio signals to several channels at once There are two different approaches to do this You can use KORE 2 s system of auxiliary sends to distribute the signals within one and the same level of the Sound Matrix In the picture above you can see an Input Channel receiving audio from external hardware and two Gr...

Page 79: ...arate MultiSound In the picture above we have inserted the two effects into a separate MultiSound that is nested inside the top level channel Both channels of the new sound are Input Channels and receive their signals from the parental Sound Matrix level By doing this we can easily save the new sound as a separate entity that can be re used at a later stage in a different context This is ideal for...

Page 80: ...a song into one MultiSound and the elements for the next track into the next MultiSound This has the advantage that you can take all but the current song out of the processing loop with the Channel Bypass function Always remember that you can assign Bypass to buttons of your KORE 2 Controller By using this technique you can contain many different MultiSounds within one Performance without overload...

Page 81: ...ounds and route your Source Channels through them Then you take a Performance User Page and assign the Aux Level settings to the Controller knob If you invert one assignment more on this in chapter 3 5 4 you can seamlessly blend between the two effects signals with one Controller element This is not true parameter morphing but only a pseudo morph However it can lead to very organic transitions ...

Page 82: ... KORE 2 Controller hardware you have eight Control Page Buttons and eight Control Page Buttons at your disposal If a parameter is assigned to the element you can see the Short Parameter Name depicted to the left of the Knob or Button The Display Tab of the Global Controller always displays the Controller that has been touched last with its long name and the Parameter Value The value is also displa...

Page 83: ...stem plays an important role in making KORE 2 a musical Super Instrument A Control Page is nothing else but a set of KORE 2 and or plug in parameters assigned to the hardware elements of your KORE 2 Controller There can be many Pages per Sound and of course you can customize them to fit your personal style Whether it s a KORE 2 mixer setting the filter cutoff of a synth or the depth of a delay sim...

Page 84: ...cation or KORE 2 plug in will automatically display the same Page unless you lock it to a specific component you want to see all the time Set a value and it will immediately update on both systems The factory KoreSounds come with a ready to use set of Control Pages that have the most important parameters of the sound assembled on one or two Pages Last but not least the parameters of the Control Pa...

Page 85: ... field of sound and ensures that you will come up with fresh sounds all the time The concept is very easy Specify a sound via the User Pages be it on screen or with your KORE 2 Controller hit the Save button click a slot and you have your first Variation Go on to make some more up to eight can be saved Now you can move the Morph handle to seamlessly morph between the different states of the Contro...

Page 86: ...rameters published by a VST AU plug in Depending on the complexity of the plug in there can be quite a number of them The Plug in Pages are fixed you cannot change them manually Channel Pages display the mixer parameters of the currently focused channel Click on the Channel Header to see its Channel Page or navi gate to it using your KORE 2 Controller see chapter 3 9 for details 1 2 ...

Page 87: ...actly which Page is being displayed On the Header Row of the Global Controller there are two buttons The User Page button switches to the User Page of the component currently in focus and provides access to the Page Select menu Here you can choose which Page is displayed on the Controller Of course you can always use your KORE 2 Controller for navigation too If you have focused a channel by clicki...

Page 88: ...e Page Select menu Once you have created a User Page you are ready to populate it by assigning parameters to the Controls of the Page This is a straightforward process Click on the Controller you want to assign the parameter to or touch it on your KORE 2 Controller It starts to blink in red within the software and glows on the hardware Click on the Learn button on the Assign or Display Tab of the ...

Page 89: ... around If you assign a switched dual state parameter to a Control Page Knob the knob switches the button at its extreme values fully left and fully right If you assign a continuous parameter to a Control Page Button it will toggle the continuous parameter between the Destination Range Mininum and the Maximun see chapter 3 5 4 Advanced Assignments Managing User Pages If you want to rename delete o...

Page 90: ...ck on the Destination Remove buttons to the right of the Destination Labels The Relative Assignment mode is for keeping the relative position of multiple assigned parameters This applies only if one of the parameters is moved directly i e not via the Control Page but by using the parameter dial on the KORE 2 plug in interface For example You have two different parameters cutoff and resonance of th...

Page 91: ...Destination Range Min and Max values Also you can click inside of the range to move both limits at the same time There are more ways to do this Click with your mouse into the value fields and drag up or down Double click on the value and type it in via the keyboard of your computer An Example If you have set Destination Range Minimum to 0 and the Maximum to 100 although the Destination parameter h...

Page 92: ...n the Destination Range Display External control The Control Tab provides some utility parameters dealing with the KORE 2 Controller plus a facility for assigning external MIDI control Please read chapter 3 9 The KORE 2 Controller to learn more about the KORE 2 Controller The KORE Control Section of the Control Tab looks differently for knobs and switches In the above picture you see the Knob sett...

Page 93: ...rameters more than for the knobs The Behavior menu controls the mode of the button Toggle means the button switches state with every button hit Trigger only sends one message if you hit the button Depending on the Action On parameter this can be down or up Use this to get buttons that can only switch on off other buttons Gate leads to an on state while the button is being held down and switches to...

Page 94: ...morphing The last section on the Global Controller of KORE 2 is dedicated to the Sound Variations Every KoreSound can store up to eight different settings of its Control Pages These can be recalled directly or you can morph between the settings of the knobs not the buttons creating seamless sound transitions Define some Controllers on your User Channel or Plug in Pages and click the Sound Variatio...

Page 95: ... the Variations discretely leading to jumps in the parameter values This also works when you use your KORE 2 Controller for changing Variations Furthermore you can switch the Sound Variations directly via the eight buttons of your KORE 2 Controller Please read the chapter about your KORE 2 Controller to learn more about using the KORE 2 hardware Please note that you can assign the two axes of the ...

Page 96: ...thin the host for parameter automation 3 6 1 The Sound Tree The Sound Tree displaying a KORE 2 Performance On the left side of the Sound Manager you have the Sound Tree with all available Sounds and Channels in the Performance along with their names The underlying structure of the Sound Tree can be summarized as follows The highest node is always a MultiSound the Performance ...

Page 97: ...ound Tree and each of them has its own symbol Sounds are represented by a circle Channels are represented by a small Fader as their symbol The Master Channel has a shadowed Fader as its symbol Plug ins are represented by a plug symbol Any element on the Sound Tree can be compacted and expanded to hide or show its child elements To do this click on the small symbols plus minus in front of the Sound...

Page 98: ...ove you can see the two pre defined User Pages of a SingleSound named Synthia The list doubles as a general manager for your Pages and as a facility to assemble the list of parameters that are published within the host for automation Please read the next chapter for more information on this Click on the name of a User Page to change it via the keyboard of your computer You can also grab a User Pag...

Page 99: ... read the next chapter for details about host automation Delete is self explanatory too as it deletes the currently selected Page To create a new Page click on the New Page icon in the Global Controller or use the Learn button The two Page Up Down buttons step through the Pages on the list Use the button further down the Page List to add parameters representing the horizontal X and vertical Y morp...

Page 100: ...KORE 2 100 3 6 3 Pages and host automation KORE 2 s list of automatable parameters ...

Page 101: ...ormed into a linear list KORE 2 creates the list by simply adhering the KoreSounds Pages to each other When a new sound is created or loaded its Pages are inserted at the first available slot of the list if any Pages have been removed before there can be holes in the list This process only ceases when around 1000 parameters with 16 on each Page corresponding to more than 60 Pages are published Thi...

Page 102: ...long to the node currently selected on the Sound Tree see chapter 3 6 1 Use the Add to Automation List button below the Page List to add the currently selected Page to the Automation List This means that all the parameters residing on the respective Page will be accessible to the host Each of the added Pages shows up on the Automation List The first 32 rows of the Automation List are reserved for ...

Page 103: ...mation List the list is not re arranged This provides consistent Automation IDs for the remaining Pages and if the Performance has been automated in a host everything is still working as before If you want to re arrange the Automation List you can either grab an entry with the mouse and drop it at the new position in the list or you can use the small arrows to the right of the Remove button for mo...

Page 104: ...ne keyboard or for crossfading between different sounds via the velocity of the incoming MIDI notes Click on the Channel Mapping Tab of the Sound Manager to open the Mapping Area providing you with easy means to set up Key Ranges on one concise interface Ranges are set up for the channels not for Sounds or plug ins The editor always displays all the Key Ranges for all current channels of the Sound...

Page 105: ...s key range without changing their boundaries This is due to the fact that channel key ranges are features of the KoreSounds and are left untouched by settings on higher levels That means that MIDI notes lying outside of the parental channel s key range will not reach the respective child channel although its key range may be wider KoreSounds are entities independent of the parental Performance or...

Page 106: ...trigger the respective channel If for example the lower limit is set to 100 only notes with a velocity higher or equal to 100 will trigger sound on this channel Furthermore you can choose the MIDI Input port and MIDI Channel 1 16 or Omni for the currently selected KORE 2 channel In Omni mode the channel receives MIDI data on all MIDI channels The lower right corner of the Mapping Editor has contro...

Page 107: ... The Browser is at the heart of KORE 2 s approach to sound management It provides you with a consistent and easy to use interface for managing your Sounds Effects Performances plug ins and MIDI files Apart from looking at your User Sounds Folders that are defined via KORE 2 s Options see chapter 3 3 5 the important concept in the Browser are the Attributes The huge KoreSound library has been compl...

Page 108: ...ide you can generate search results by using keywords in the Quick Search field below The Search Results List displays the resulting Sounds based on your selections in the Attributes Area or on your keyword search respectively The layout of the Browser can be altered by dragging the small handle on the frame between the windows to either side It can be resized vertically via the handle on top of t...

Page 109: ...AU and KORE 2 internal which also can be of instru mental FX or MIDI variety The other three buttons are only accessible for the Sounds and Plug ins Views They switch the Browser function to search for three different varieties of Sounds or Plug ins Instruments meaning Sounds or Plug ins that actually produce sound FX which are concerned with processing sound MIDI components or Plug ins like seque...

Page 110: ...he menu Depending on what you are browsing the menu appears differently And if you have created your own User Categories it will look different too This system allows you to define the combination of shown Attributes for every view of the Browser The minimal context menus for browsing the different components of the database look as follows ...

Page 111: ...ns see chapter 3 3 5 for details This view is not available for plug ins The Factory Attributes Categories are listed next providing access to KORE 2 s pre defined Attributes Use the Create User Set command to set up your own system of Attributes see chapter 3 5 The Options sub menu provides some additional options for controlling Browser behavior The menu for Sounds MIDI files and plug ins have a...

Page 112: ...Ctrl click on the Search Results Header of the columns you get a context menu showing all available categories the Meta Information see one of the next sections for a detailed description plus some additional ones Name displays the name of the KoreSound Vendor displays the information written in the Vendor field of the Meta Information ...

Page 113: ... field of the Meta Information Flag is a convenient feature for filtering through large Results Lists For example You have searched for a combination of Attributes see below for more on searching and received a large number of results Now you can scroll through the list and tag KoreSounds by adding ticks in the Flag column If you have finished you simply order the list by the Flag column and you h...

Page 114: ...se sideways to resize the columns Clicking and dragging the column header of a column to move it to another place horizontally A red line appears to denote the position of the left side of the moved column Sorting the column with a click on the column headers A small arrow appears on the header of the sorting column Click again to reverse the sort order ...

Page 115: ...you want to select contiguous sounds use the shift key and click on the first and the last sound of the group of sounds you want to select 3 7 2 Factory Content and Integrated Engines Out of the box KORE 2 comes as a ready to play Super Instrument with about 500 KoreSounds stemming from the libraries of the major Native Instruments products plus 300 KoreSounds in the guise of presets for the inter...

Page 116: ...heir plug in interfaces to program sounds on the plug in level If you already have licenses for the respective Native Instruments products they replace the Integrated Engines and can be programmed You can however use the pre defined User Pages containing the most important parameters of the KoreSounds to produce and save new content As an added bonus every KoreSound based on the Integrated Engines...

Page 117: ...n of the Attributes List You can use the Attributes List on the left side of the browser to display and combine a variety of Attributes be they pre defined by Native Instruments or of your own design leading to a list of Search Results Furthermore you can use the Quick Search field to search for sounds by entering search terms The last two options can be combined for further refinement of Search R...

Page 118: ...dded or taken out of the game to refine your search options The Attributes are self explanatory just choose a set that fits your idea of the Sound you are looking for and try to be flexible by playing around with different combinations For each category you can decide whether multiple selections are allowed Options on the context menu or not After having produced a list of Search Results you can u...

Page 119: ...ds You will get hits from the names the authors the Meta Information etc This can be very powerful and fast if you already know what you are looking for e g if you are looking for KoreSounds produced by a specific author The Quick Search can also be combined with filtering via the Attributes List Any keywords provided in the Quick Search field will further constrain your search leading to fewer hi...

Page 120: ...ard shortcut Ctrl f Loading KoreSounds from your search results There are several ways to open KoreSounds from the Search Results List A doubleclick opens the KoreSound in the currently focused Channel Insert on the Sound Matrix You can drag and drop KoreSounds into existing Channel Inserts Any content residing in the Channel Insert is replaced by the new KoreSound It is also possible to drag and ...

Page 121: ...of the Sound Matrix Please note that it is possible to select multiple Sounds in the Search Results List If multiple KoreSounds are opened via the context menu or by drag and drop into the Sound Matrix they will open in multiple Channel Inserts of the same channel The Pre Listen function KORE 2 offers a Pre Listen function on the Search Results List This can be very convenient if you want to quick...

Page 122: ... into the same Channel Insert as the previous sound If you switch off the Pre Listen function the Channel Insert returns to the state it was before the activation of the Pre Listen function This means it either contains the KoreSound it had before or it is empty as before The button to the right of the Pre Listen button is the Pre Listen Apply command By clicking this button while in Pre Listen mo...

Page 123: ...t Area if you save a Performance as a KoreSound see File Menu Global Menu of the plug in or when using the command Import Plug in presets from the context menu of a KoreSound You are greeted with an Attributes Area divided into two parts On the left you have two columns to define the Attributes classes The first column offers a choice between two options Standard which contains the descriptive Att...

Page 124: ... to a KoreSound simply click on an Attribute and a tick will appear next to it Work your way through the different classes to add descriptive Attributes to your KoreSound If you set an Attribute in a specific Attribute class it is denoted with a tick to the right of the class name This way you always know which classes you already used ...

Page 125: ... above you can see the Attributes List in Edit mode for a set of KoreSounds Two different colors of the ticks behind the Attributes stand out A grey tick means that the Attribute is set for at least one single KoreSound of the edited set A black tick means that the Attribute is set for all KoreSounds of the set You can change the Attributes as you would for a single KoreSound Any changes you make ...

Page 126: ... Meta fields containing words are also included in your database and can be searched via the Browser Especially the Comments field can come in very handy where you can fill in additional descriptions and comments All of these fields can also be displayed in the Search Results The fields of the Meta Information window are The Name field simply shows the name of the KoreSound If you want to change i...

Page 127: ...ctory presets of the plug in you will set that bank name This field is also used to denote the MultiSounds of KORE 2 and provide a special function for Reaktor 5 KoreSounds Have a look on Appendix A for more on this The Path field shows the folder on your file system where the KoreSound is saved Please read the section about saving KoreSounds further down the text for more on this The Comments fie...

Page 128: ... in the normal Browser view via the context menu of the Attributes List After creation they populate the context menu where you can choose them for display They will stay empty though as long as they are not classed with Attributes This is only possible in Edit mode ...

Page 129: ...econd column displays its Attributes in the next Here you can create new Attributes by typing them in the first available field denoted by the entry Create new This system opens up a totally flexible world for organizing your KoreSound database in the way it works best for you So if you think Native Instruments just didn t cut it with the included Attributes Sets how dare you just create your own ...

Page 130: ... at This is accomplished via the Path field on the Meta Information section of the Edit page By clicking on the Path field you open a menu with your location options The User Sounds entry opens a sub menu with the available user Sounds folders as defined by the installed products The second section of the menu offers Additional User Sounds Folders you can define in the Database Options of KORE 2 s...

Page 131: ...ser and the KoreSound is saved in KORE 2 s database If you want to save a Performance as a KoreSound for nested use in future Performances choose Save performance as Sound from the File Menu of the stand alone or from the Global Menu of the plug in You will be greeted with the Browser in Edit mode and the rest of the procedure is the same as with saving KoreSounds It is recommended to s t o r e y ...

Page 132: ... can choose from the context menu of the Attributes List provide some additional functionality for your searches OR Mode means that choosing multiple Attributes leads to results that match at least one of the Attributes AND Mode with multiple Attributes means that only hits matching all of the tagged Attributes make it to the Search Results List ...

Page 133: ...ly get too many or not enough hits and it can be productive to tweak the Search Options for a better result Deleting KoreSounds If you want to completely delete a KoreSound from the database use the context menu of the KoreSounds on the Search Results List Select the sound you can also select multiple entries right click on it Mac Ctrl click and choose Remove from Database from the menu This will ...

Page 134: ...ks as a tremolo Via the Envelope Follower it can be dependent on the input signal s volume This adds a great deal of flexibility to the effect as you can control the speed of the modulation and the effect volume via the dynamics of the input signal Label Function Range Unit Static Sets the balance between direct signal and effect 0 100 Env Amt Sets the amount of control the Envelope Follower has o...

Page 135: ...s for the left and the right chan nel respectively 180 180 deg Threshold Sets the input audio threshold level above which the modulation envelope is triggered 0 100 Attack Sets the time to reach maximum level of the modulation signal once the envelope is triggered 0 200 ms Release Sets the time for the modulation signal to cease after the input signal falls below the threshold level 0 800 ms ...

Page 136: ...rding to the Type setting all frequencies below around or above this frequency are passed to the output while others are attenuated 25 10000 Hz Resonance Amount Sets the sharpness of the filter s response peak At higher values the filter slope becomes steeper and the cutoff frequency more accentuated 0 100 Saturation Level Sets the level where overdrive saturation will start to reduce the gain At ...

Page 137: ...ng only frequencies around the cutoff frequency while attenuating all others 0 100 Depth Amount of modulation of the Cutoff frequency by the envelope follower 100 100 Threshold Sets the input audio threshold level above which the modulation envelope is triggered 0 100 Attack Sets the time taken for the modulation signal to reach maximum level once the envelope is triggered 0 200 ms Release Sets th...

Page 138: ... slow tempos If this happens a lamp lights up to indicate a conflicting setting Label Function Range Unit Mix Controls the balance between the dry unprocessed signal at the left and the wet processed signal at the right 0 100 FX Input Switches the audio input on or off On Off Tempo Sync Switches between internal off and external on tempo synchronization If on KORE 2 s master tempo is used If off t...

Page 139: ...s the Delay times of the right delay to those of the left one On Off Feedback Sets the feedback signal amplitude as a percentage of the main signal 0 100 Cross Feedback Sets the amount of cross feedback as a percentage of themain feedback signal At high values the left channel feeds the right channel and vice versa At low values each channel remains separate 0 100 Low Cut High Cut Sets the cutoff ...

Page 140: ...for the input signal Turn up to get more overdrive 0 60 dB Hipass Lopass Cutoff The cutoff frequency of the high and low pass filters respectively Frequencies above below the cutoff will be attenuated 25 8000 80 25000 Hz Hipass Lopass Reso Sets the sharpness of the filter s response peak At higher values the filter slope becomes steeper and the cutoff frequency more accentuated 0 100 Tilt Controls...

Page 141: ... Range Unit Mix Controls the balance between the dry unprocessed signal at the left and the wet processed signal at the right 0 100 Drive This is the gain control for the input signal Turn up to increase the overdrive 0 60 dB EQ Center The center frequency of the peak EQ 25 12500 Hz EQ Boost Controls the gain of the peak EQ Use it to push the Center Frequency 0 40 dB Volume Output volume of the di...

Page 142: ...tion and flanger Sync Synchronizes the modulation to KORE 2 s Central Clock On Off Rate Controls the modulation signal frequency 0 10 Hz Depth Determines the range of the flanging effects i e the difference between the high est and lowest points with chorus the amount of animation and with pitch modulation the amount of pitch deviation 0 100 Intensity Controls the amount of effect In chorus and fl...

Page 143: ...trol filter resonance with synthesizers compensate for singers with a poor microphone technique and increase guitar sustain by reducing peaks and creating a more consistent level However restricting the peaks may make the average signal level seem softer Use the Out Gain control to compensate by increasing the output level The compressor analyses the incoming signal to decide when to apply compres...

Page 144: ...above which compression begins 48 0 dB Ratio Sets the amount by which the signal is compressed At 1 there is no compres sion and the output signal equals the input signal At the maximum setting signal levels are clamped to the threshold level i e the compressor acts as a limiter 1 inf Attack Sets the time to reach maximum compression once a signal exceeds the thresh old level 0 1 10 ms Release Set...

Page 145: ...ts the time by which the incoming signal is delayed before it feeds into the main reverb effect 0 200 ms Size Controls the size of the simulated reverb room i e the reverb decay time 1 100 High Decay Controls the reverb signal s frequency spectrum High values reduce the amount of high frequency attenuation resulting in a longer decay for high frequency bands 0 100 High Cut Sets the cutoff frequenc...

Page 146: ...the right 0 100 Rate Common Sets the frequency of delay time modulation 0 8 Hz Rate Offset Controls the offset between two internal rate values similarly to the Depth Offset 0 100 Depth Common Controls the depth of the Ensemble effect technically this is the amount of delay time modulation 0 100 Depth Offset Controls the offset between two internal depth values metaphorically this controls the dep...

Page 147: ...he dry unprocessed signal at the left and the wet processed signal at the right 0 100 Threshold Sets the level below which the expander takes effect 70 10 dB Ratio Controls the intensity of expansion Turn to the left for no effect a middle value leads to soft expansion and a high value means hard gating 0 4 Attack Sets the time to reach maximum expansion once a signal falls below the threshold lev...

Page 148: ...t individual levels before the bands are mixed back together The Shift control moves all center frequencies up and down by a specified number of semitones while the LR Split control creates a wider stereo image by sending alternate frequency bands slightly to the right or left of the stereo field At first look the Filterbank may seem like a graphic equalizer The ability to alter band levels center...

Page 149: ... the frequency spec trum 48 48 semi tones LR Split Controls the offset of each band to the left or right channel For the left channel the value is added to the Shift setting and for the right channel the value is subtracted Experimenting with this control produces very audible stereo effects 24 24 semi tones Band 1 8 Level Sets each band s output level inf 0 dB Gain Adjust Controls the amount of a...

Page 150: ...h acts on the signals of the complete effect as opposed on Feed back with negative values see below On Off Mix Controls the balance between the dry unprocessed signal at the left and the wet processed signal at the right 0 100 Center The higher the value the shorter the internal delay times leading to a shift of the resulting comb filter effect to higher frequencies This interacts with the modulat...

Page 151: ...hs respectively 180 180 deg Feedback Sets the amount of Feedback i e how much of the output signal is fed back into the input With a negative Feedback the output of the internal delay line is inverted before it is fed back into the input This leads to a different set of peaks and drops in the spectrum 100 100 Low Cut High Cut Sets the cutoff frequencies of the low pass high pass filters modifying ...

Page 152: ...cessed signal at the right 0 100 Pre Delay Sets the time by which the incoming signal is delayed before it is fed into the main reverb effect 0 200 ms Size Controls the size of the simulated reverb room i e the reverb decay time 1 100 Diffusion Sets the amount of diffusion applied to the reverb signal With lower values the reverb sound becomes more echo like 0 100 Early Late Controls the balance b...

Page 153: ...ed logarithmically throughout the spectrum If that s a hard concept to grasp don t worry There aren t a lot of controls and a little experimentation will tell you all you need to know The Shift Amount works in conjunction with the Range value to allow subtle harmonic enhancements as well as massive displacements Negative values shift the frequency downwards If the spectrum shifts below 0Hz it is m...

Page 154: ...ed by the Amount parameter value 1 10000 Hz Amount Alters the amount of shifting as percentage of the maximum value set by Range Negative values shift the frequency downwards Range Range Hz Stereo Split When enabled the right channel signal is frequency shifted in the opposite direc tion of the left channel creating a strong stereo effect on off Feedback Sets the amount of shifted output signal th...

Page 155: ...oid opening of the gate by low frequencies 10 5000 Hz Detector Filter Hi Cut Cutoff frequency of the 2 pole low pass filter of the level detector Can be used to avoid opening of the gate by high frequencies 100 20000 Hz Threshold Sets the level at which the Gate opens 80 10 dB Hysteresis Determines by how much the threshold for closing is lower than the threshold for opening 0 20 dB Attack Sets th...

Page 156: ...tion effects From swooshing pitch shift waves to metallic mayhem this unit is perfect for creative sound design sessions Label Function Range Unit Mix Controls the balance between the dry unprocessed signal at the left and the wet processed signal at the right 0 100 Shift Coarse Common coarse pitch shift for the left and the right channel 24 24 semi tones Shift Fine Common fine pitch shift for the...

Page 157: ...rains used to create the pitch shifted signals in the left and right channel 90 90 deg Grain Rate This knob sets the length of the produced grains Technically it is the rate of the granular delay buffer readout Grain Reverse When this button is active all grains are played back in reverse On off Feedback Sets the amount of feedback i e how much of the output signal is fed back into the input 100 1...

Page 158: ...into a mix or to change the sound s character Label Function Range Unit Low End Sets the low end of the modified frequency spectrum used as center frequency of the first band 20 8000 Hz Width Determines the width of the modified frequency spectrum This value divided by eight also defines the width of each band 1 12 Oc taves Gain 1 8 Sets the gain change of each band respectively 20 20 dB Gain Adju...

Page 159: ...ones A great deal of its flexibility lies in the fact that you can exclude low frequency content from being processed via the Split Frequency control Label Function Range Unit Mix Controls the balance between the dry unprocessed signal at the left and the wet processed signal at the right 0 100 Split Frequency The input signal is split into two frequency bands the lower of which is not processed b...

Page 160: ...aping curve The knob crossfades between symmetric distortion creating 3rd 5th 7th etc odd harmonics and assymmetric distor tion creating 2nd 4th 6th etc even harmonics 0 100 Distortion Meter This meter shows the amount of harmonic distortion Tone The effect signal has two components The signal at the lowpass output of the frequency splitter and the waveshaped signal This dial crossfades between th...

Page 161: ...ate a louder more squashed sound Increasing the Input Gain amplifies the signal reaching the limiter resulting in a stronger limiting effect Excessive amounts of gain can cause distortion as the limiter attempts to limit more and more of the signal Like a compressor the limiter analyses the incoming signal to calculate how much limiting to apply The Release knob controls how fast the algorithm rec...

Page 162: ...t of amplification or attenuation applied to the limited signal This also shifts the output reference level where limiting occurs For example if set to 10dB even though the limiter clamps the signal internally to 0dB the next stage will see all signals clamped 24 24 dB 3 8 20 Lo Fi This effect reduces a signal s fidelity by lowering its sample rate and virtual bit resolution it does this virtually...

Page 163: ...0 Hz Down Sampling Jitter Controls the depth of random modulation applied to the virtual sampling rate High jitter values make the Sample Rate frequency less audible the distortion artifacts remain 0 100 Quantizes Bit Depth Sets the virtual bit depth Low values reduce the resolution used to encode dif ferent levels of the signal with lower values giving a grittier dirtier sound 1 20 Bits Quantizes...

Page 164: ...ocess Label Function Range Unit Invert L R Inverts the phase of the left or right channel respectively On Off High pass L R Switches the high pass filter for the respective channel on or off On Off High pass Frequency Sets the threshold below which the incoming signal is attenuated 10 500 Hz High pass Poles Crossfades between a 2 pole and a 4 pole filter The number of poles defines the steepness o...

Page 165: ...e tech nique If on the channels will be transformed to a stereo signal On Off MS to LR S Amount Sets how much of the middle signal of the mid side recording is mixed into the sum This controls the apparent stereo width 24 6 dB 3 8 22 Mod Delay The Mod Delay unit modulates the delay time using an internal LFO Additionally the delayed signal can be filtered and fed back to the input at an adjustable...

Page 166: ... Hz Modulation Depth Sets the amount of modulation as a percentage of the delay time 0 100 Modulation LR Phase Sets the phase offset of the LFO modulating the right or left channel delay times respectively At the maximum setting the LFO signal is 180 out of phase 0 180 De grees Feedback Amount Sets the level of the delayed signal that feeds back to the effects input 0 100 Cross Feedback Sets the l...

Page 167: ...xample it is possible to compress a drum kit s kick drum but leave the cymbals untouched The controls are like those of the Easy Compressor see above except that each band has its own Gain and Ratio controls The minimum Ratio setting gives no compression At the maximum setting the compressor behaves like a limiter Gain can even out the levels for the different bands For example if one frequency ra...

Page 168: ...t Attack time the compressor needs some time to analyse the signal and react to it Activating the Look Ahead button delays the audio by a very short amount 32 samples so that the compression algorithm can foresee peaks before they happen and be ready to process them instantly Label Function Range Unit Threshold Sets the level above which compression begins 48 0 dB Gain L Gain LM Gain HM Gain H Set...

Page 169: ...isecond at 44 1kHz on off Out Gain Controls the overall amount of amplification applied to all bands It is both post compression and post gain control 24 24 dB 3 8 24 Multimode Filter This effect provides several filter characteristics that can be blended into each other for specific tasks While Cutoff and Resonance control the filter s center or cutoff frequency and its slope the main mode can be...

Page 170: ...es the filter slope gets steeper and the cutoff frequency becomes accentuated 0 100 Resonance Saturation Level Sets the level where overdrive saturation will start to reduce the gain At high resonances this particularly affects the range around the cutoff frequency At a low saturation level the signal is saturated early while at high values higher signal peaks are possible 20 20 dB Type LP BP HP C...

Page 171: ...2 pole filter into another 2 pole unit At high values the two units cutoff frequencies are spread around the main cutoff This results in a reduced resonant peak 0 6 semi tones 3 8 25 Parametric EQ The Parametric Equalizer divides the frequency spectrum into four bands Each band s gain can then be adjusted separately to boost or attenuate specific parts of the sound s frequency spectrum This can be...

Page 172: ...e two middle bands respectively 20 20 dB Mid 1 Frequency Mid 2 Frequency Sets the center frequencies of the two middle bands respectively All frequency gain around these center frequencies in a range depending on the Mid 1 2 Bandwidth controls is changed by an amount controlled by the Mid 1 2 Gain controls 40 8000 80 16000 Hz Mid 1 Width Mid 2 Width Sets the width of the two middle frequency bands...

Page 173: ...so provided This effect is well suited for altering drums and percussion but be creative and try it on anything else for interesting rhythmic echoes Label Function Range Unit Mix Sets the balance between the dry unprocessed signal and the wet fil tered one 0 100 FX In Switches the signal input on or off On Off Delay Unit Sets the time base of the pattern grid This is the time unit for one step At ...

Page 174: ...for each tap individually 60 0 dB Filter Low High Cut Sets the cutoff frequency of the low pass high pass filters that modify the delayed signal Frequencies below above are attenuated with a slope of 12 dB per octave 10 5000 100 25000 Hz 3 8 27 Phaser The Phaser adds a swirling and animated effect to the signal It is somewhat similar to the Flanger but generally warmer sounding and without the met...

Page 175: ...age of the delay time 0 100 Modulation LR Phase Sets the phase offset of the LFO modulating the right or left channel delay times respectively At the maximum setting the 0 180 De grees Color Feedback Feeds the output of the chain of allpass filters back into its input leading to a shift in phasing frequencies 100 100 Color Bandwidth This influences the way the phase rotation changes with higher fr...

Page 176: ...ft channel delay time as a percentage of the main delay time while increasing the right channel time Positive values create the opposite effect 100 100 Reverberation Size Controls the size of the simulated reverb room which equals the decay time of the reflections 1 100 Reverberation Diffusion Sets the amount of diffusion applied to the reverb signal With lower values you ll hear more discrete ref...

Page 177: ...eft and the wet processed signal at the right 0 100 Fast Chooses between the two speeds of the Rotor that are defined via the Slow and Fast knobs On Off Acceleration Sets the time it takes the Rotor to spin from slow to fast 0 2 s Slow The Slow speed sets the rotational speed of the rotor when the Fast switch is off 0 2 Hz Fast The Fast speed sets the rotational speed of the rotor when the Fast sw...

Page 178: ...ing determines the difference between the left and right virtual microphone signals by moving the microphones away from each other by a cer tain distance This provides a perceived width or stereo spread when the Rota tor is spinning With Spread set to minimum both mics are in the same place As Spread is increased they move around the speaker cabinet in a circle but in opposite directions With Spre...

Page 179: ... create the opposite effect 100 100 Reverberation Size Controls the size of the simulated reverb room i e the reverb decay time 1 100 Reverberation Diffusion Sets the amount of diffusion applied to the reverb signal With lower values the reverb sound becomes more echo like 0 100 Reverberation Early Late Controls the balance between the early reflections and the main reverb signal 0 100 Low Decay H...

Page 180: ...chnically this adjusts the effect s delay time 50 10000 Hz Delay LR Offset Controls the difference between delay times of the left and right channel At negative values the left channel delay is shorter at positive values the right channel delay time is shorter At mid position both use the same delay time 100 100 Modulation Syn Synchronizes the frequency of the LFO to KORE 2 s time base On Off Modu...

Page 181: ...ayed signal that is fed back to the effects input High settings result in flanging sounds 0 0 995 Inverse Feedback Turns phase inversion of the feedback signal on or off On Off 3 8 32 Stereo Mix The Stereo Mix is a very useful utility as well as an effect It enables you not only to control the left right balance of a stereo signal and to swap the channels but it also allows you to split the signal...

Page 182: ... position of the lower or upper bands respectively 1 1 Lower Upper Width Controls the stereo width of the lower upper bands respectively A value of 0 means centered a value of 2 means far to the side 0 2 3 8 33 MIDI Filter The MIDI Filter provides an easy way to filter out unwanted MIDI data at any point in the Sound Matrix You can define key and velocity ranges to allow only parts of the note mes...

Page 183: ... is processed None effectively switches the Filter off All processes all 16 channels and a number between 1 and 16 filters the respective MIDI channel All None 1 16 Low High Pitch Filter Use these to specify the lower and upper margins for the MIDI note values that the filter will let through Click with the mouse and drag up or down to change the values Example if you choose a low Pitch Filter val...

Page 184: ... all MIDI notes with a velocity below 32 and above 96 will be discarded and all notes with a velocity beteen the two values will pass through 0 127 Event Filter If these filter buttons are active white the respective MIDI events are blocked Notes stands for MIDI note events CC for continuous controller like mod wheel CA stands for channel aftertouch PA for polyphonic aftertouch PB is pitch bend an...

Page 185: ...means if you have a MIDI Player sitting on the top level of your Performance with some other MIDI Players or KoreSounds containing plug ins that run sequencers the top level MIDI Player has to run for the downstream sequencers to run The MIDI Player can also be controlled by an upstream Step Sequencer component and of course this works the other way around too Another intended use of this plug in ...

Page 186: ...omatically populated with the currently loaded tracks and displayed in the Track List Click on the small triangle to open the menu and choose the desired track When the MIDI Player is running it will switch to the new Track At which point this will happen depends on the setting of the Clocksync menu see below Apart from choosing a Track from the menu you can also use the Previous Track Next Track ...

Page 187: ...ssages for that note value will stop the playback of the respective Track In this case the track playback acts as if it was a sample in a sampler A note value between C 2 and G8 can be specified to stop playback of the MIDI Player with note on messages You will find the Load button on the File Area in the middle part of the MIDI Player It opens a standard file dialog window from your operating sys...

Page 188: ...efine a MIDI note for triggering the respective track Click with your mouse and move it up or down to make a selection from the complete range of MIDI note values C 2 to G8 or set it to None which means the respective track cannot be started via MIDI notes The trigger mode is described a few paragraphs above 3 8 35 MIDI Transformator The MIDI Transformator provides some convenient tools for changi...

Page 189: ...two parameters define x and y values for the second break point When the right Out value is smaller than the left Out value you get a negative slope which can be used for velocity crossfading applications Note that you can only crossfade between two velocity zones with this concept More complicated velocity switches are not supported The slope of the velocity response curve between the two break p...

Page 190: ...iator KORE 2 s Arpeggiator is a powerhouse of patterns It can produce all the standard arpeggiator patterns we know and love but also goes far beyond that Due to its very flexible note buffer concept it is able to generate a much greater variety of patterns than your standard arpeggiator And it can do chords too The Channel Select and Input Source settings of the Sound specify whether the the Arpe...

Page 191: ...e the keys The setting of the Clocksync menu is for telling the Arpeggiator when it has to start playing There are four entries on the menu None means it will start playing immediately Step leads to a start on the next step of the Arpeggiator This interacts with the Rate parameter see below For example If Rate is set to 8 and Clocksync is set to Step the Arpeggiator will start on the next eighth B...

Page 192: ... from whole notes 1 to 64th notes 64 and is relative to the global clock or host clock respectively The triplets and dotted buttons change the grid of the played notes to dotted or triplets These two parameters can only work alternatively not both at the same time They lead to the following changes in grid length A Dotted note adds the half of the note value as defined by Rate If you have a rate o...

Page 193: ...ing factor into the pattern This factor can be positive and negative ranging from 100 to 100 Swing is sometimes also called shuffle and skews the rhythmical relationship between repeated note pairs and their length With a positive Swing setting the initial note of a pair is played longer while the second gets shorter With negative Swing it is the other way around Pitch and Velocity The Pitch Range...

Page 194: ... highest lowest 2nd highest 2nd lowest Random Played in random order Chord The complete chord is played through the octaves specified by the Pitch Range parameter This only works if the AutoChord menu is not set to off The AutoChord function converts the arpeggiated single note sequence into a sequence of chords The type of chord is chosen from the AutoChord menu Combined with the scale correction...

Page 195: ...es You can also alter the MIDI velocity of the incoming notes By default the Arpeggio is played with the velocity of the original notes The incoming velocities can be modulated via the Velocity Mod control When the Fix button is inactive the Mod control sets the incoming velocity values in a relative way If the Fix button is active the velocity for all notes of the Arpeggio can be altered directly...

Page 196: ...anspose up to one octave up or down The basis of the Arpeggiator is its note buffer You can think of it as storage with a capacity of eight notes The notes you play on your keyboard or that are fed into the plug in from a sequencer are stored and reproduced according to the settings you specify A traditional Arpeggiator only repeats the sequence of notes you feed it and this is also the default be...

Page 197: ...to Pause the empty slots are replaced by silence First means the first note will fill in Last means the last note will fill in Cycle steps through the input notes as replacements for the empty buffer slots For example Say you play a chord with the notes CEG set the Force Steps parameter to 5 and you are in Cycle Mode In this case the resulting Arpeggio pattern would be CEGCE Combined with the Repe...

Page 198: ...round its loop The Piano Roll Edit Area The Piano Roll Edit Area allows you tocompose your sequences You have one octave of note pitches and a step timeline of 32 steps at your disposal Use your mousebutton Windows left mousebutton to input notes on the grid If you want to delete a step use the right mousebutton on windows and Ctrl click on Mac The yellow vertical lines on the grid are the Loop Ma...

Page 199: ...of the interface The values are defined by clicking on the vertical columns under the Step Grid and dragging them up or down By clicking on the three tabs you can switch between the three parameters Velocity controls the MIDI velocity of the sequencer steps It ranges from 0 to 127 You can randomize the velocity for all steps by clicking on the Velocity Randomizer the small dice symbol Octave trans...

Page 200: ...e sequencer is triggered via incoming note messages There are three different entries None means that the sequencer will commence immediately when the Run button is activated Gate starts the sequencer when a note on is received and stops it when the note off is received The Channel Select and Input Source settings of the Sound define whether the Step Sequencer receives any MIDI data and on which M...

Page 201: ...r will switch playback on the first beat of the next bar The Time section On the left side of the Time section sits the Rate menu It offers a choice of settings ranging from 1 for whole notes to 64 for 64th notes The values are equivalent to the grid spacing of the sequencer so with a Rate setting of eight the sequencer will advance one step every eighth of the global host clock The triplets and d...

Page 202: ... 100 Swing is sometimes also called shuffle and skews the rhythmical relationship between repeated note pairs and their length With a positive Swing setting the initial note of a pair is played longer while the second becomes shorter With a negative Swing setting it is the other way around The Pitch section Use the Pitch Octave knob to set the octave for the complete pattern on a range of eight oc...

Page 203: ...ameter and its value The four buttons below the Display and the six buttons around the Scrollwheel are your main controls for navigating through KORE 2 You can move through the channels of a Performance or KoreSound change the focus and set values The lights of these buttons always show options you have selected if a button is lit you can use it if not it has no function for the currently selected...

Page 204: ... 2 The only difference is that the KORE 1 Controller unlike the KORE 2 Controller has to be connected to the computer before you start the application The KORE 2 Controller can be connected at any time Please use the latest driver available for the KORE Controller Have a look at the Upload Manager of the Service Center When comparing the two Controllers you will immediately see that the button lay...

Page 205: ... button and is used for navigating and using the Control Page system Sound mode KORE 2 Controller is activated by the Sound button It is used for switching through the Channel Inserts and provides control over the Sound Variations The F2 button takes you to Browser mode allowing you to navigate your Search Results List and load KoreSounds Each of those modes contains two Pages where you can toggle...

Page 206: ...es Navigating your Sound Matrix takes place in Sound Navigation Mode which can be reached by hitting the Sound button Let us navigate from the top the Performance to the bottom a Plug in Page of a KoreSound on the KORE 2 Controller We have a Performance named My Shiny Thing with a SingleSound and a MultiSound in two channels and hit the Sound button The Display Header shows the full name of the cu...

Page 207: ... Enter to navigate into its Sound Matrix You can see the contents of the MultiSound s Sound Matrix neatly laid out with the Display Header telling you where you are by displaying the Performance name and the name of the MultiSound If you want to move up a level on the Sound Matrix simply hit the Escape button Just watch the KORE 2 window on your computer while you do all this and you will quickly ...

Page 208: ... on the channel roster Multiple KORE 2 plug in instances While you are in Sound mode the F1 button has a special function that only applies when you have multiple instances of the KORE 2 plug in running in a host environment It will take you to a screen showing all running instances While holding the F1 button you can use the Up Down Left Right buttons to switch through the respective instances cu...

Page 209: ...avigation of the Control Pages in your Performance takes place in Control Mode which is activated by the conveniently named Control button Let s look at the procedure in detail This time we start from a state where we entered a MultiSound in Sound Mode by selecting it and hitting Enter You see that this MultiSound has two channels The first channel holds two SingleSounds and the second holds one W...

Page 210: ...he Control Knobs and Buttons of your Hardware There is another way to navigate your User Pages that can be achieved by pressing and holding the F1 button You can see two sections on this screen the upper part is named User Pages and is where navigation through the available User Pages takes place Keep holding the F1 button and use the Up Down buttons to switch through the Pages The View menu provi...

Page 211: ...splays the last Knob parameter you used with Name Meter and Value Please note that pressing a Button on your hardware displays the Button parameters in the Header of the display As a SingleSound does not only consist of User Pages but often holds a host of Plug in Pages the Control Mode also offers the use of those You can toggle between User and Plug in Pages by hitting the Control Button on your...

Page 212: ...hing is the same as already described for the User Pages except that you use the Left Right buttons of your hardware to step through the channels Hitting Control again toggles over to the User Pages of the MultiSound or Performance Again to sum it up If you have focused a SingleSound the Control Mode gives access to User Pages and Plug in Pages If a MultiSound or the Performance is in focus the Co...

Page 213: ...vely touch and massage the Sound Variations to produce an ever evolving sound On your KORE 2 Controller the Sound Variations are part of the Sound Mode To reach the Sound Variations of a KORE 2 component you have to focus it in Sound Mode on the hardware or with your mouse on the screen and hit the Sound button You will see something similar to the next picture The array of eight Sound Variations ...

Page 214: ...re Then move down the list of Options with the Down button until you reach the entry Morph Mode You can use the Left Right buttons or the Scrollwheel to choose between two Morph Modes Free which is the default lets you morph between the eight Sound Variations via the Knobs with complete freedom The eight Buttons directly jump to the respective Sound Variation With Sel Select Mode you must select a...

Page 215: ... Mode For example select Sound Variation B with Button 2 and turn the Control Knob for Sound Variation H You can only move between B and H If you use Control Knob 6 Sound Variation E you can only Morph between B and E This ensures reproducible results Both Morph Modes have their merits If you just want to explore and look for a maximum of possibilities use Free Mode If you need to land in defined ...

Page 216: ... to the Sound Variation you want to save the current state to That s it you are done 3 9 3 Browsing the Results List Of course you can also access your Search Results List via the KORE 2 Controller Hit F2 on the hardware and you will be presented with something along the lines of the following picture The contents of the list are the same as the contents of the Search Results List of the KORE 2 ap...

Page 217: ...e the Pre Listen mode with your KORE 2 Controller Hit the Escape button or the Pre Listen button to cancel the Pre Listen mode returning the focused Channel Insert to the state it was in before the activation of the Pre Listen mode Hit Enter on the Controller to exit the Pre Listen mode and keep the loaded KoreSound in the Channel Insert The Options By hitting F2 twice you can access the Options o...

Page 218: ...KORE 2 218 The Morph Mode option cannot be changed via the KORE 2 application it is only available on the hardware More on this in chapter 3 9 2 ...

Page 219: ... the latest updates for these products in order to be compatible with KORE 2 REAKTOR The KORE Update of the Reaktor Factory Library The Factory Content of Reaktor 5 has been updated for compatibility with KORE The updated Library is installed with KORE 2 It will also be part of all future updates of Reaktor 5 e g it is already included in the NI KOMPLETE 4 package Please check the Update Manager o...

Page 220: ...ginal parameter IDs that might be used in any given automation context If a parameter was ex cluded from automation by a checked Disable switch this was not changed The option was activated in the original Ensemble for technical reasons that did not change The KoreSound files don t contain the complete Ensembles They reference them relatively to the paths set within the Reaktor preferences If the ...

Page 221: ...tly All Ensembles within the Factory Content folder of Reaktor must not be changed to ensure proper interaction of KORE 2 and Reaktor The pre defined Control Pages are loaded when a plug in is loaded into KORE For nearly all applications this is the perfect solution FM8 for instance will present the same list of parameters every time it is loaded into KORE and thus this forms a stable fundament fo...

Page 222: ...d e g by using the Browser s Plug ins tab this information is not present and the pre defined Pages cannot be loaded If the Ensemble SoundSchool Analog in the given figure is then loaded manually within Reaktor Reaktor cannot tell this to KORE 2 due to limitations of the VST AU protocols So if a new KoreSound built from scratch with a Factory Content s Ensemble is meant to use the pre defined Cont...

Page 223: ...aring an Ensemble for Use with KORE The Ensembles that can be downloaded from the Reaktor User Library have not been optimized for KORE New Ensembles built from scratch are also not optimized for KORE automation of course With the techniques described above preparing an Ensemble for use in KORE is straightfor ward Imagine an Ensemble that has been downloaded from the User Library If its builder de...

Page 224: ...strument within the Ensemble use the Instrument Up and Instrument Down commands to position the instruments within the global list Perhaps it might be useful to use the Ensemble s signal flow as a template for the instrument s order within the global parameter list Finally check whether the most important parameters use GLOBAL ID values below 1000 as this is the maximum number of parameters suppor...

Page 225: ...g one of the hardware s Controllers move one of the Ensemble s controllers with the mouse This connects both elements within the User Page Continue linking controls or click the Learn button again to leave this mode A dialog with further options will open Please refer to chapter 3 5 3 for details on these options As mentioned above User Pages are saved with the KoreSound not with the Ensemble Make...

Page 226: ...al for more information You might also want to read the previous chapter It focuses on REAKTOR but discusses general questions The Presets of KONTAKT cannot be changed via the host software i e KORE 2 GUITAR RIG If you have the same module more than once in a GUITAR RIG stack only the one loaded first will be automatable by the VST host BATTERY BATTERY does not expose any of its parameters to the ...

Page 227: ...d its presets cannot be changed by the host either VOKATOR As VOKATOR is partially modular its parameters on the pre defined User Pages can only function when the respective VOKATOR part is active Presets cannot be changed for VOKATOR SPEKTRAL DELAY You cannot change Presets by the host ...

Page 228: ...e left and right mouse buttons are abbreviated with LMB and RMB respectively Global Keys Keyboard shortcut Function New Performance Ctrl N Open Performance Ctrl O Save Performance Ctrl S Save Performance as Shift Ctrl S Quit KORE 2 Cmd Q Mac Alt F4 Win Global Controller F1 Edit Area F2 Sound Manager F3 Browser F4 ...

Page 229: ...trl P Find KoreSound opens Browser to the Quick Search field Ctrl F Start Stop Space Stop and reset transport Ctrl Space Undo Ctrl Z Redo Ctrl Y Panic button Numeric 0 Reset parameter to default value Double click LMB Adjust a parameter in fine steps Shift Drag LMB ...

Page 230: ...n Select sound in Results List LMB Open context menu for selected sound RMB Select previous or next sound in Results List Cursor Up Down Add sound to current selection Ctrl LMB Multiple selection of adjacent sounds Shift LMB Load selected sounds Double click or Drag LMB to Global Controller Load selected sound to specific location Drag LMB to Edit Area Duplicate attribute in User Set Drag LMB to U...

Page 231: ...e columns 109 All 76 Amplitude Mod 134 AND 132 Arranging Performances 96 Attribute Header Area 109 Attributes 43 Attributes Area 109 Attributes List 108 Attributes Set 110 AU 55 Audio and MIDI Settings 43 Audio components 134 Audio Unit 55 Author 113 Auto Filter 136 Aux 74 Auxiliary Destination 75 Aux Remove 75 Aux Scroll 74 B Backlight 57 Bank 113 BATTERY 226 Beat Delay 138 Browser Columns 109 FX...

Page 232: ...b 12 Convert Performance to KoreSound 43 Create User Set 111 D Deactivate 68 Deleting KoreSounds 133 Distortion 141 E Easy Chorus 142 Easy Compressor 143 Easy Reverb 145 Edit Menu 44 Effects plug ins 134 ELEKTRIK PIANO 227 Enable plug in scan at startup 55 56 Ensemble 146 223 Exit 43 Expander 147 External MIDI Sync 43 F Factory Attributes Categories 111 File Menu New Performance 42 Open Performanc...

Page 233: ...able Sounds 55 I Ignore built in AudioUnits 56 Ignore System Aus 56 Ignore System VSTs 56 Input Gain 70 Input Level Meter 70 Input Menu 71 Input Source 70 75 Instruments 109 Invert Display 57 K Kensington Lock 11 KONTAKT 226 KORE Controller 10 Channel Pages 211 Footswitch 10 hardware elements 10 Kensington Lock 11 MIDI In 11 MIDI Out 11 Pedal 10 Plug in Pages 211 USB 2 port 10 User Pages 211 KoreS...

Page 234: ...11 MIDI Outputs 76 MIDI Output Scroll 76 MIDI plug ins 109 MIDI Remove 77 MIDI routing 76 MIDI Tab 75 Mod Delay 165 Modified 113 Multi Compressor 167 Multimode Filter 169 Multi Select 133 MultiSound 43 Mute 70 N Name 112 New Performance 42 None 72 Numbered outputs 72 O Open Manual 45 Open Performance 42 Options 111 Hardware 57 Plug ins 55 Options 43 OR 132 Output 71 Master 72 None 72 Output Destin...

Page 235: ... 58 Recent Performances 43 Redo 44 Refresh Rate 57 Remove 75 Remove from Database 133 Rescan 56 Rescan plug ins 55 resolution 12 Rooms 176 S Save Performance 42 Save Performance As 43 Save Performance As Sound 43 Save performance as Sound 131 Scan User Folders 54 Search modes 132 Search Options 133 Single Select 133 Smoothing 57 Solo 70 Sound Input 71 Sound Manager 96 Space Reverb 178 Spektral Del...

Page 236: ...ns 55 USB 2 port 10 Use as Master 69 User Categories 110 User Library 45 User Pages 211 V Validate Plug ins 56 Vendor 112 View Buttons 109 View Menu 44 Visit KORE on the web 45 VOKATOR 227 VST 55 W Windows XP Service Pack 2 15 ...

Reviews: