background image

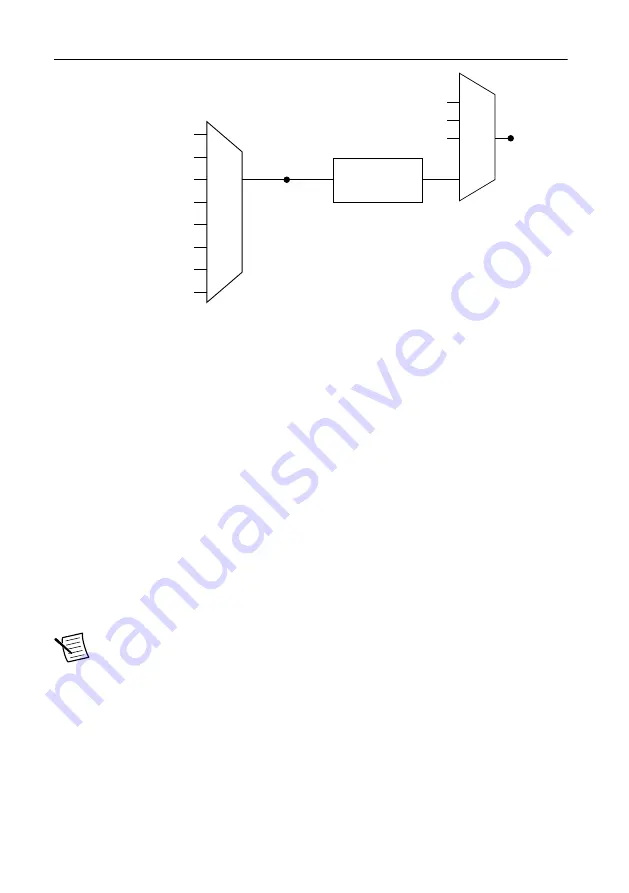
Figure 36. Analog Output Timing Options

Programmable

Clock

Divider

AO Sample Clock

Timebase

PFI

Analog Comparison Event

Ctr n Internal Output

Sample

Clock

Analog Comparison

Event

80 MHz Timebase

20 MHz Timebase

PFI

13.1072 MHz Timebase

12.8 MHz Timebase

10 MHz Timebase

100 kHz Timebase

Routing AO Sample Clock to an Output Terminal

You can route AO Sample Clock to any output PFI terminal. AO Sample Clock is active high
by default.

AO Sample Clock Timebase Signal

The AO Sample Clock Timebase signal is divided down to provide a source for AO Sample
Clock. AO Sample Clock Timebase can be generated from external or internal sources, and is
not available as an output from the controller.

Delta-Sigma Modules

The oversample clock is used as the AO Sample Clock Timebase. The cRIO controller
supplies 10 MHz, 12.8 MHz, and 13.1072 MHz timebases. When delta-sigma modules with
different oversample clock frequencies are used in an analog output task, the AO Sample
Clock Timebase can use any of the available frequencies; by default, the fastest available is
used. The update rate of all modules in the task is an integer divisor of the frequency of the
AO Sample Clock Timebase.

Note


DSA modules do not support HWTSP mode.

AO Start Trigger Signal

Use the AO Start Trigger signal to initiate a waveform generation. If you do not use triggers,
you can begin a generation with a software command. If you are using an internal sample
clock, you can specify a delay from the start trigger to the first sample. For more information,
refer to the 

NI-DAQmx Help

.

cRIO-904x User Manual

  | 

© National Instruments

  | 

57

Summary of Contents for cRIO-904 Series

Page 1: ...gurable FPGA This document describes the features of the cRIO 904x and contains information about mounting and operating the device In this document the cRIO 9040 cRIO 9041 cRIO 9042 cRIO 9043 cRIO 90...

Page 2: ...g Configurations 27 Mounting Requirements for the cRIO 904x 27 Dimensions 28 Mounting on a Flat Surface 29 Mounting on a Panel 32 Mounting on a DIN Rail 34 Mounting on a Rack 37 Mounting on a Desktop...

Page 3: ...tor and port locations Complete the following steps to connect the cRIO 904x to the host computer using the Dual Role USB C Port 1 Power on the host computer 2 Connect the cRIO 904x to the host comput...

Page 4: ...if it is unable to initiate a DHCP connection Finding the cRIO 904x on the Network DHCP Complete the following steps to find the cRIO 904x on a network using DHCP 1 Disable secondary network interfac...

Page 5: ...sion of the cRIO 904x Use a null modem cable to connect the RS 232 serial port to a computer Make sure that the serial port terminal program is configured to the following settings 115 200 bits per se...

Page 6: ...teract with the front panels of VIs running on the cRIO 904x using input and display devices connected directly to the cRIO 904x You can also browse and edit files on the cRIO 904x within a graphical...

Page 7: ...for configuration application deployment debugging and maintenance The role of the port is determined automatically based on the cable inserted into the port For example the port will automatically f...

Page 8: ...etention are available for the cRIO 904x Table 3 NI USB Type C Cables for cRIO 904x Cable Length Part Number USB Cable with Retention Type C Male to Type C Male USB 3 1 3A 0 3 m 143556 0R3 1 m 143556...

Page 9: ...V2 input The cRIO 904x has reverse voltage protection The following NI power supplies and accessories are available for the cRIO 904x Table 6 Power Accessories Accessory Part Number NI PS 15 Power Su...

Page 10: ...ertighten RS 232 Serial Port The cRIO 904x has an RS 232 serial port that is implemented with an RJ 50 10 position modular jack to which you can connect devices such as displays or input devices Use t...

Page 11: ...ssory Length Part Number RS 232 S8 Serial Cable 10 Position Modular Plug to 9 Pin DSUB 1 m 182845 01 2 m 182845 02 3 m 182845 03 RS 485 Serial Port The cRIO 904x has an RS 485 serial port that is impl...

Page 12: ...RS 485 Serial Port Accessory Accessory Length Part Number RS 485 S8 Serial Cable 10 Position Modular Plug to 9 Pin DSUB Isolated 1 m 184428 01 USB 2 0 Type A The USB 2 0 Type A port implements a USB 2...

Page 13: ...e RESET button to reset the processor in the same manner as cycling power The following figure shows the reset behavior of the cRIO 904x Figure 3 Reset Button Behavior Press and hold RESET button for...

Page 14: ...ot the controller into safe mode enable Console Out and reset network adapters to default settings CMOS Reset Button The cRIO 904x has a CMOS reset button that you can use to reset the CMOS and the BI...

Page 15: ...IO 904x is powered from the V2 input Off The cRIO 904x is powered off For more information about connecting the cRIO 904x to power refer to Connecting the Controller to Power in the cRIO 904x Getting...

Page 16: ...cRIO 904x is in install mode to indicate that software is currently being installed This pattern may also indicate that the user has forced the cRIO 904x to boot into safe mode by pressing the reset...

Page 17: ...persists contact NI Off The cRIO 904x is in run mode Software is installed and the operating system is running Ethernet LED Indicators The following table lists the Ethernet LED indicators Table 15 E...

Page 18: ...is Grounding Screw 1 1 Chassis Grounding Screw For information about grounding the cRIO 904x see Grounding the Controller in the cRIO 904x Getting Started Guide For more information about ground conne...

Page 19: ...ronize acquisitions and generations These signals can come from the following sources C Series modules programmed in Real Time NI DAQmx mode User input through the PFI terminals using parallel digital...

Page 20: ...72 MHz 12 8 MHz and 10 MHz Timebases and Carrier Clocks When programming C Series modules in Real Time NI DAQmx mode the 13 1072 MHz 12 8 MHz and 10 MHz timebases can be used to generate many of the a...

Page 21: ...E 802 1AS 2011 and IEEE 1588 2008 IEEE 802 1AS 2011 also known as the generalized precision time protocol gPTP is a profile of IEEE 1588 A cRIO 904x controller can be configured to use either the IEEE...

Page 22: ...y when power is applied to the cRIO 904x power connector The rate at which the CMOS battery drains when power is disconnected depends on the ambient storage temperature For longer battery life store t...

Page 23: ...Module Immobilization accessory Figure 7 4 slot cRIO 904x Module Immobilization Accessory Installation 5 1 3 4 2 1 The Module Immobilization accessory kit includes two sets of screws One set is a sta...

Page 24: ...e cRIO 904x using the appropriate Torx T20 driver Tighten the screw to a maximum torque of 1 3 N m 11 5 lb in 5 Install the two M3 x 0 5 flat head screws from the accessory kit in the top and bottom o...

Page 25: ...obtain the maximum ambient temperature you must mount the cRIO 904x in the reference mounting configuration shown in the following image Mounting the cRIO 904x in the reference mounting configuration...

Page 26: ...to a metallic surface that is at least 1 6 mm 0 062 in thick and extends a minimum of 101 6 mm 4 in beyond all edges of the device 3 Observe the cooling dimensions in the Mounting Requirements section...

Page 27: ...ating temperature and module accuracy Mounting Requirements for the cRIO 904x Use the following to ensure you meet the cooling and cabling clearance requirements for mounting cRIO 904x models Your ins...

Page 28: ...wn in the following figure Figure 14 Ambient Temperature Location 38 1 mm 1 50 in 63 5 mm 2 50 in 1 63 5 mm 2 50 in 1 38 1 mm 1 50 in 63 5 mm 2 50 in 1 63 5 mm 2 50 in 1 1 Measure the ambient temperat...

Page 29: ...34 in 88 1 mm 3 47 in 328 8 mm 12 95 in Figure 17 cRIO 904x Side Dimensions 44 0 mm 1 73 in 44 0 mm 1 73 in 44 0 mm 1 73 in 44 0 mm 1 73 in 53 4 mm 2 10 in 53 4 mm 2 10 in 53 4 mm 2 10 in 53 4 mm 2 10...

Page 30: ...crews user provided which must not exceed 8 mm of insertion into the cRIO 904x x4 for 4 slot models x6 for 8 slot models Figure 18 Mounting the 4 slot cRIO 904x Directly on a Flat Surface 1 2 3 30 ni...

Page 31: ...urface 3 Fasten the cRIO 904x to the surface using the M4 screws appropriate for the surface Screws must not exceed 8 mm of insertion into the cRIO 904x Tighten the screws to a maximum torque of 1 3 N...

Page 32: ...0 94 in 3 20 3 mm 0 80 in 3 20 3 mm 0 80 in 120 mm 4 72 in 9 ISO M4 0 7 Thread 8 mm Maximum Insertion Depth 120 mm 4 72 in 14 8 mm 0 59 in Mounting on a Panel You can use the NI panel mounting kit to...

Page 33: ...unting plate 2 Fasten the panel mounting plate to the cRIO 904x using the screwdriver and M4 x 10 screws Tighten the screws to a maximum torque of 1 3 N m 11 5 lb in You must use the screws provided w...

Page 34: ...nsions 108 8 mm 4 26 in 217 7 mm 8 57 in 199 4 mm 7 85 in 1 6 mm 0 06 in 11 1 mm 0 44 in 138 9 mm 5 47 in 114 3 mm 4 50 in 7 2 mm 0 29 in 25 4 mm 1 00 in Figure 25 8 slot cRIO 904x Panel Mounting Dime...

Page 35: ...2 NI DIN rail mounting kit 4 slot models 157254 01 DIN rail clip M4 x 10 screws x2 8 slot models 157268 01 DIN rail clip M4 x 10 screws x3 Figure 26 Mounting the 4 slot cRIO 904x on a DIN Rail 1 2 cRI...

Page 36: ...they are the correct depth and thread for the DIN rail clip Clipping the Controller on a DIN Rail Complete the following steps to clip the controller on a DIN rail Figure 28 Clipping the Controller on...

Page 37: ...1 Note You must use the appropriate NI DIN rail mounting kit for your model in addition to a rack mounting kit Mounting on a Desktop You can use the NI desktop mounting kit to mount the cRIO 904x on a...

Page 38: ...he mounting holes on the ends of the cRIO 904x 2 Use the screwdriver to tighten the captive screws on the end of the brackets Desktop Mounting Dimensions The following figures show the desktop mountin...

Page 39: ...ktop Mounting Dimensions 2 17 2 mm 0 68 in 39 1 mm 1 54 in 253 9 mm 10 00 in Figure 32 8 slot cRIO 904x Desktop Mounting Dimensions 2 17 2 mm 0 68 in 361 7 mm 14 24 in 39 1 mm 1 54 in cRIO 904x User M...

Page 40: ...Detected warning message appears onscreen Note If the CMOS battery is dead the CMOS reset button will not work Power On Self Test Warning Messages The cRIO 904x POST displays warning messages for spe...

Page 41: ...DVI to Type C adapter 2 Connect a USB keyboard to the USB 2 0 host port on the cRIO 904x 3 Power on or reboot the cRIO 904x 4 Hold down either the F10 key or the Del key until Please select boot devic...

Page 42: ...ocessor cores Total Memory This value indicates the size of system RAM detected by the BIOS The Main setup menu also includes the following settings System Date This setting controls the date which is...

Page 43: ...settings provide the most compatible and optimal configuration CPU Power Management The CPU Power Management submenu contains CPU power management configuration options The factory default settings p...

Page 44: ...ccesses the Boot Settings Configuration submenu Boot Option Priorities These settings specify the order in which the BIOS checks for bootable devices including the local hard disk drive removable devi...

Page 45: ...continues to be active Restore Defaults This option restores all BIOS settings to the factory default This option is useful if the controller exhibits unpredictable behavior due to an incorrect or in...

Page 46: ...r connector on the controller Real Time Scan IO Variables Enables you to use C Series modules directly from LabVIEW Real Time using I O variables C Series modules that you use in Scan Interface mode a...

Page 47: ...ramming mode for your task Table 18 Supported Programming Modes for Popular Tasks Task Real Time Real Time Scan IO Variables LabVIEW FPGA Control rates up to 1 kHz Control rates between 1 kHz and 5 kH...

Page 48: ...r actions C Series Parallel digital input modules and the controller s integrated PFI trigger line can be used in any controller slot to supply a digital trigger To find your module triggering options...

Page 49: ...4 AI Sample Clock Timing Options Programmable Clock Divider Sample Clock Timebase PFI Analog Comparison Event Ctr n Internal Output AI Sample Clock Sigma Delta Module Internal Output Analog Comparison...

Page 50: ...outing in MAX topic in the NI DAQmx Help or the LabVIEW Help for more information Using an Analog Source Some C Series modules can generate a trigger based on an analog signal In NI DAQmx this is call...

Page 51: ...until the buffer contains the number of posttrigger samples desired The figure below shows the final buffer Figure 35 Reference Trigger Final Buffer Reference Trigger Pretrigger Samples Complete Buffe...

Page 52: ...les and Slow Sample Rate Modules sections for information about the AI Convert Clock signal and C Series analog input modules Scanned Modules Scanned C Series analog input modules contain a single A D...

Page 53: ...les also provide the signal used as the AI Sample Clock This signal is used to cause A D conversion for other modules in the system just as the AI Sample Clock does when a delta sigma module is not be...

Page 54: ...number of channels to either a hardware timed task or a software timed single point task However you cannot assign some channels to a hardware timed task and other channels on the same module to a so...

Page 55: ...hardware timing If a read or write executes late it returns a warning Note DSA modules do not support HWTSP mode Buffered Analog Input A buffer is a temporary storage in computer memory for generated...

Page 56: ...g the acquisition of data When you configure a trigger you must decide how you want to produce the trigger and the action you want the trigger to cause The cRIO controller supports internal software t...

Page 57: ...a Sigma Modules The oversample clock is used as the AO Sample Clock Timebase The cRIO controller supplies 10 MHz 12 8 MHz and 13 1072 MHz timebases When delta sigma modules with different oversample c...

Page 58: ...d Time Triggering topics in the NI DAQmx Help for more information on accessing time based features in the NI DAQmx API AO Pause Trigger Signal Use the AO Pause Trigger signal to mask off samples in a...

Page 59: ...u can build a lowpass deglitching filter to remove some of these glitches depending on the frequency and nature of the output signal Go to ni com support for more information about minimizing glitches...

Page 60: ...r refer to the Software Support for CompactRIO CompactDAQ Single Board RIO R Series and EtherCAT document by going to ni com info and entering the Info Code rdcdaq Static DIO Each of the DIO lines can...

Page 61: ...n analog or digital trigger can initiate these three trigger actions C Series parallel digital input modules and the controller s integrated PFI trigger line can be used in any controller slot to supp...

Page 62: ...100 kHz Timebase Routing DI Sample Clock to an Output Terminal You can route DI Sample Clock to any output PFI terminal DI Sample Clock Timebase Signal The DI Sample Clock Timebase signal is divided...

Page 63: ...es a start trigger but not a reference trigger is sometimes referred to as a posttriggered acquisition That is samples are measured only after the trigger When you are using an internal sample clock y...

Page 64: ...ext sample This data can be accessed with some limitations before the cRIO controller discards it Refer to the Can a Pretriggered Acquisition be Continuous document for more information To access this...

Page 65: ...r onto the input signal In NI DAQmx the filter is programmed by setting the minimum pulse width Tp2 that will pass the filter and is selectable in 25 ns increments The appropriate Filter Clock is sele...

Page 66: ...blocks rather than one sample at a time Digital Output To generate digital output install a digital output C Series module in any slot on the cRIO controller The generation specifications such as the...

Page 67: ...are timed acquisitions can use hardware triggering Hardware Timed Single Point HWTSP Mode In HWTSP mode samples are acquired or generated continuously using hardware timing and no buffer You must use...

Page 68: ...New data must continually be written to the buffer If the program does not write new data to the buffer at a fast enough rate to keep up with the generation the buffer underflows and causes an error...

Page 69: ...is active high by default DO Sample Clock Timebase Signal The DO Sample Clock Timebase signal is divided down to provide a source for DO Sample Clock DO Sample Clock Timebase can be generated from ex...

Page 70: ...ause Trigger Signal Use the DO Pause Trigger signal to mask off samples in a DAQ sequence When DO Pause Trigger is active no samples occur but DO Pause Trigger does not stop a sample that is in progre...

Page 71: ...When you change the configuration of lines on a NI 9401 digital module between input and output NI DAQmx temporarily reserves all of the lines on the module for communication to send the module a line...

Page 72: ...d to the rest of the circuit The value of N depends on the filter setting as shown in the following table Table 19 Selectable PFI Filter Settings Filter Setting Filter Clock Jitter Min Pulse Width to...

Page 73: ...s although in most applications only a few inputs are used For information about connecting counter signals refer to the Default Counter Timer Routing section Each counter has a FIFO that can be used...

Page 74: ...t Timing Support Sample Clocked Timing Support Buffered Edge Count No Yes Buffered Pulse Width Yes Yes Buffered Pulse Yes Yes Buffered Semi Period Yes No Buffered Frequency Yes Yes Buffered Period Yes...

Page 75: ...ns For edge counting acquisitions the counter stops counting edges while the external trigger signal is low and resumes when the signal goes high or vice versa For continuous pulse generations the cou...

Page 76: ...f what it is accepting as shown in the figure below Figure 47 Prescaling External Signal Counter Value Prescaler Rollover Used as Source by Counter 0 1 Prescaling is intended to be used for frequency...

Page 77: ...elayed Source signal and counts on the following rising edge of the source as shown in the figure below Figure 49 External or Internal Source Less than 20 MHz Source Delayed Source Synchronize Count C...

Page 78: ...lso can use a pause trigger to pause or gate the counter When the pause trigger is active the counter ignores edges on its Source input When the pause trigger is inactive the counter counts edges norm...

Page 79: ...it is low For information about connecting counter signals refer to the Default Counter Timer Routing section Pulse Width Measurement In pulse width measurements the counter measures the width of a pu...

Page 80: ...width measurement Figure 53 Single Pulse Width Measurement SOURCE GATE Counter Value Latched Value 1 0 2 2 Implicit Buffered Pulse Width Measurement An implicit buffered pulse width measurement is si...

Page 81: ...er signals refer to the Default Counter Timer Routing section Pulse Measurement In pulse measurements the counter measures the high and low time of a pulse on its Gate input signal after the counter i...

Page 82: ...u can select whether to read the high pulse or low pulse first using the StartingEdge property in NI DAQmx The figure below shows an example of an implicit buffered pulse measurement Figure 57 Implici...

Page 83: ...Source input between two edges of the Gate signal You can calculate the semi period of the Gate input by multiplying the period of the Source signal by the number of edges returned by the counter Ref...

Page 84: ...data and returned in units of seconds or ticks In a pulse measurement each pair of high and low times is considered one point of data and returned as a paired sample in units of frequency and duty cyc...

Page 85: ...High Frequency with Two Counters For high frequency measurements with two counters you measure one pulse of a known width using your signal and derive the frequency of your signal from the result Not...

Page 86: ...o counters you generate a long pulse using the signal to measure You then measure the long pulse with a known timebase The cRIO controller can measure this long pulse more accurately than the faster i...

Page 87: ...by fx fk N J Sample Clocked Buffered Frequency Measurement Sample clocked buffered point frequency measurements can either be a single frequency measurement or an average between sample clocks Use CI...

Page 88: ...e Source Sample Clock Counter Armed Latched Values 6 6 4 6 4 6 4 6 6 With sample clocked frequency measurements ensure that the frequency to measure is twice as fast as the sample clock to prevent a m...

Page 89: ...r divide down of the signal An internal timebase is still used for the source frequency fk but the divide down means that the measurement time is the period of the divided down signal or N fx where N...

Page 90: ...uency error Hz 638 31 27 1 000 625 Max error 00128 0625 2 00125 From this you can see that while the measurement time for one counter is shorter the accuracy is best in the sample clocked and two coun...

Page 91: ...However the accuracy of the measurement decreases as the frequency increases High frequency measurements with two counters is accurate for high frequency signals However the accuracy decreases as the...

Page 92: ...d X4 angular encoders Linear position can be measured with two pulse encoders You can choose to do either a single point on demand position measurement or a buffered sample clock position measurement...

Page 93: ...el Z causes the counter to be reloaded with a specified value in a specified phase of the quadrature cycle You can program this reload to occur in any one of the four phases in a quadrature cycle Chan...

Page 94: ...bout connecting counter signals refer to the Default Counter Timer Routing section Buffered Sample Clock Position Measurement With buffered position measurement position measurement using a sample clo...

Page 95: ...he rising or falling edge of the Gate input to be the active edge Use this type of measurement to count events or measure the time that occurs between edges on two signals This type of measurement is...

Page 96: ...ing figure shows an example of an implicit buffered two signal edge separation measurement Figure 72 Implicit Buffered Two Signal Edge Separation Measurement SOURCE Counter Value Buffer AUX GATE 1 2 3...

Page 97: ...arious counter output applications available on the cRIO controller Simple Pulse Generation Pulse Train Generation Frequency Generation Frequency Division Pulse Generation for ETS Simple Pulse Generat...

Page 98: ...eginning of the pulse You also can specify the pulse width The delay is measured in terms of a number of active edges of the Source input You can specify a pulse width The pulse width is also measured...

Page 99: ...erated pulses appear on the Counter n Internal Output signal of the counter You can route the Start Trigger signal to the Gate input of the counter You can specify a delay from the Start Trigger to th...

Page 100: ...rammable frequency and duty cycle The pulses appear on the Counter n Internal Output signal of the counter You can specify a delay from when the counter is armed to the beginning of the pulse train Th...

Page 101: ...eneration on each sample clock edge Idle time and active time can also be defined in terms of frequency and duty cycle or idle ticks and active ticks Note On buffered implicit pulse trains the pulse s...

Page 102: ...Pulse Train Generation This function generates a predetermined number of pulse train updates Each point you write defines pulse specifications that are updated with each sample clock When a sample cl...

Page 103: ...traffic With non regeneration old data is not repeated New data must be continually written to the buffer If the program does not write new data to the buffer at a fast enough rate to keep up with the...

Page 104: ...rm of the frequency generator when the divider is set to 5 Figure 83 Frequency Generator Output Waveform Frequency Output Timebase FREQ OUT Divisor 5 Frequency Output can be routed out to any PFI term...

Page 105: ...it will be 120 the process will repeat in this manner until the counter is disarmed The counter ignores any Gate edge that is received while the pulse triggered by the previous Gate edge is in progres...

Page 106: ...lowing table lists how this terminal is used in various applications Table 27 Counter Applications and Counter n Source Application Purpose of Source Terminal Pulse Generation Counter Timebase One Cou...

Page 107: ...tart Trigger AO Sample Clock DI Sample Clock DI Reference Trigger DO Sample Clock Change Detection Event Analog Comparison Event In addition a counter s Internal Output or Source can be routed to a di...

Page 108: ...o an Output Terminal You can route Counter n Z out to any PFI terminal Counter n Up_Down Signal Counter n Up_Down is another name for the Counter n B signal Counter n HW Arm Signal The Counter n HW Ar...

Page 109: ...the host software Using an Internal Source To use Counter n Sample Clock with an internal source specify the signal source and the polarity of the signal The source can be any of the following signal...

Page 110: ...eceive important information updates from NI NI corporate headquarters is located at 11500 North Mopac Expressway Austin Texas 78759 3504 NI also has offices located around the world For support in th...

Reviews: