13
EN
www.napoleon.com
N415-0542CE-GB-DE OCt 03.19
WARNING!
Always wear protective gloves and safety glasses when cleaning your grill.
WARNING!
Turn off the gas at the source and disconnect the unit before servicing. To avoid the
possibility of burns, maintenance should be done only when the grill is cool. A leak test must be
performed annually and whenever any component of the gas train is replaced or gas smell is present.
Maintenance Instructions
We recommend this gas grill be thoroughly inspected and serviced annually by a qualified service person.
At all times keep the gas grill area free from combustible materials, gasoline and other flammable vapors
and liquids. Do not obstruct the flow of ventilation and combustion air. Keep the cylinder enclosure
ventilation openings (located on the cart sides and at the front and back of the bottom shelf) free and
clear from debris.
Burner
: the burner is made from heavy wall 304 stainless steel, but extreme heat and a corrosive
environment can cause surface corrosion to occur. this can be removed with a brass wire brush.
CAUTION!
Beware of Spiders.
Spiders and insects are attracted to the smell of propane and natural gas. The burner is equipped with an
insect screen on the air shutter, which reduces the likelihood of insects building nests inside the burner
but does not entirely eliminate the problem. A nest or web can cause the burner to burn with a soft yellow
or orange flame or cause a fire (flashback) at the air shutter underneath the control panel. To clean the
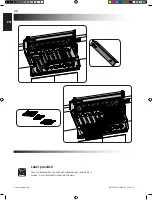
inside of the burner, it must be removed from the gas grill: Remove the screw (s) that attaches the burner
to the back wall. Slide the burner back and up wards to remove. Cleaning: Use a flexible venturi tube
brush to clean the inside of the burner. Shake any loose debris from the burner through the gas inlet.
Check the burner ports and valve orifices for blockages. Burner ports can close over time due to cooking
debris and corrosion, use an opened paperclip or the supplied port maintenance bit to clean them. Drill
out blocked ports using this drill bit in a small cordless drill. the ports are easier to clean if the burner is
removed from the grill, but it can also be done with the burner installed. Do not flex the drill bit when
drilling the ports, as this will cause the drill bit to break. this drill is for burner ports only, not for the brass
orifices (jets) which regulate the flow into the burner. Take care not to enlarge the holes. Ensure the insect
screen is clean, tight, and free of any lint or other debris.
Reinstallation
: Reverse the procedure to reinstall the burner. Check that the valve enters the burner when
installing. Replace sear plate mount and / or tighten screws to complete reinstallation.
WARNING!
Regulator Hose (when applicable): Check for abrasions’, melting, cuts, and cracks in the
hose. If any of these conditions exist, do not use the gas grill. Have the part replaced by your Napoleon
Gas Grill dealer or qualified gas installer.
WARNING!
When reinstalling the burner after cleaning it is very
important that the valve/orifice enters the burner tube before lighting your
gas grill. If the valve is not inside the burner tube a fire or explosion could
occur.
Aluminum Castings
: Clean castings periodically with warm soapy water. Aluminum will not rust, but high
temperatures and weathering can cause oxidation to occur on aluminum surfaces. This appears as white
spots on the castings. To refinish these areas, clean first and sand lightly with fine sandpaper. Wipe the
surface to remove any residue and paint with high temperature barbecue paint. Protect surrounding
areas from over-spray. Follow the manufacture’s directions for curing.
!
!
!
Summary of Contents for BIPRO 665-3
Page 21: ...21 EN www napoleon com N415 0542CE GB DE Oct 03 19 ...
Page 24: ...24 EN www napoleon com N415 0542CE GB DE Oct 03 19 COUNTER TOP REQD NOT INCLUDED IM UGC665 ...
Page 26: ...26 EN www napoleon com N415 0542CE GB DE Oct 03 19 x1 x1 x2 x1 5 LOCATED INSIDE CABINET 6 7 ...
Page 27: ...27 EN www napoleon com N415 0542CE GB DE Oct 03 19 3 1 2 Wind Deflector Assembly Instructions ...
Page 52: ...52 DE www napoleon com N415 0542CE GB DE Oct 03 19 ...
Page 57: ...57 DE www napoleon com N415 0542CE GB DE Oct 03 19 x1 x1 x2 x1 5 INSIDE Schrank 6 7 ...
Page 59: ...59 DE www napoleon com N415 0542CE GB DE Oct 03 19 Windschutz Montageanleitungen 3 1 2 ...
Page 67: ...67 www napoleon com EN N415 0542CE GB DE Oct 03 19 ...


