background image


51

DE

www.napoleon.com

N415-0542CE-GB-DE  OCt 03.19

POSITIONIERUNG KANN EIN 

TUPFER SILIKON AN JEDER 

SEITE DES RÜCKSEITIGEN 

ABSCHLUSSSTÜCKS 

AUFGEBRACHT WERDEN.

Summary of Contents for BIPRO 665-3

Page 1: ...lid If odor continues keep away from the appliance and immediately call your gas supplier or fire department APPLY SERIAL NUMBER LABEL FROM CARTON Serial No XXXXXX000000 MODEL NO This gas grill must be used only outdoors in a well ventilated space and must not be used inside a building garage screened in porch gazebo or any other enclosed area WARNING CABINET FRAME CABINET AND COUNTER TOP MUST BE ...

Page 2: ...idental consequential or indirect damages or for any transportation charges labor costs or export duties This Limited Warranty is provided in addition to any rights afforded to you by local laws Accordingly this Limited Warranty imposes no obligation upon NAPOLEON to keep parts in stock Based on the availability of parts NAPOLEON may at its discretion discharge all obligations by providing a custo...

Page 3: ... is connected to the appliance the gas grill and cylinder must be stored outdoors in a well ventilated space When the gas grill is to be stored indoors the connection between the propane cylinder and the gas grill must be disconnected and the cylinder removed and stored outdoors in a well ventilated space out of reach of children Disconnected cylinders must not be stored in a building garage or an...

Page 4: ...The increased temperature within the enclosure may cause the hose to melt Use the provided flexible metal connector to connect the gas grill to either approved rigid piping approved copper tubing or approved flexible metal connectors Ensure the installation conforms to all local and national codes The entire gas supply installation must be leak tested before operating the gas grill Refer to the ma...

Page 5: ...unit includes an internal regulator which stabilizes the gas pressure and improves grill performance This regulator cannot be adjusted There is a pressure tap located on the side of the regulator It can be used by a qualified service person when servicing the grill to determine if the regulator is functioning properly The screw within the pressure tap must always be kept tight except when performi...

Page 6: ... It must be connected with rigid pipe copper tube or an approved flexible metal connector which complies with national and regional codes The installation must comply with national and regional codes The gas supply pipe must be sufficiently sized to supply the kW input specified on the rating plate based on the length of the piping run If installing a side burner a separate line must be branched o...

Page 7: ... metal connector is included to simplify the installation of the unit Connect this connector to the flare fitting on the end of the manifold Connect the other end of the connector to the gas piping Ensure that the connector does not pass through a wall floor ceiling or partition and is protected from damage Do not use a hose to connect the unit It must be connected with rigid pipe copper tube or a...

Page 8: ...rds with a 3 prong grounding plug rated for the power of the equipment and approved for outdoor use with a W A marking Leak Testing Instructions WARNING A leak test must be performed annually and each time a cylinder is hooked up or if a part of the gas system is replaced WARNING Never use an open flame to check for gas leaks Be certain no sparks or open flames are in the area while you check for ...

Page 9: ...ronic igniter button until the burner lights or light with a match 4 If the pilot and burner will not ignite within 5 seconds turn the control knob to the off position and wait 5 minutes for any excess gas to dissipate Either repeat steps 2 and 3 or light with a match 4 If the burner will not ignite within 5 seconds turn the control knob to the off position and wait 5 minutes for any excess gas to...

Page 10: ...edium to high Search Grill Master Recipes at https www napoleon com en us grills recipes for rotisserie ATTENTION Barbecue sauce and salt can be corrosive and will cause rapid deterioration of the gas grill components unless cleaned regularly When finished cooking disassemble rotisserie components wash thoroughly with warm soapy water and store indoors Direct Cooking Place food to be cooked on the...

Page 11: ...r spectrum mode the knobs and the logo will slowly cycle through the color spectrum starting at green Quickly Press Twice to stop the spectrum at any color you choose Press twice again to let it continue changing colors Motion Sensor The knob and logo lights will remain ON as long as motion is detected within 1 meter of your grill They will turn off after 15 minutes of inactivity While the motion ...

Page 12: ...ting will gradually rub off Cleaning Inside The Gas Grill Remove the cooking grids Use a brass wire brush to clean loose debris from the casting sides and underneath the lid Scrape the sear plates with a putty knife or scraper and use a wire brush to remove the ash Remove the sear plates and brush debris from the burners with the brass wire brush Sweep all debris from inside the gas grill into the...

Page 13: ...o clean the inside of the burner Shake any loose debris from the burner through the gas inlet Check the burner ports and valve orifices for blockages Burner ports can close over time due to cooking debris and corrosion use an opened paperclip or the supplied port maintenance bit to clean them Drill out blocked ports using this drill bit in a small cordless drill The ports are easier to clean if th...

Page 14: ...at Low flame when valve turned to high For propane improper lighting procedure For natural gas undersized supply line For both gases improper preheating Ensure lighting procedure is followed carefully All gas grill valves must be in the off position when the tank valve is turned on Turn tank on slowly to allow pressure to equalize See lighting instructions Pipe must be sized according to installat...

Page 15: ...hards that flake off Regular cleaning will prevent this See cleaning instructions Burner output on high setting is too low Rumbling noise and fluttering blue flame at burner surface Lack of gas Supply hose is pinched Dirty or clogged orifice Spider webs or other matter in venturi tube Check gas level in propane cylinder Reposition supply hose as necessary Clean burner orifice Clean out venturi tub...

Page 16: ... not Ignitor oven and cabinet lights work but the knob lights don t illuminate when turning the power switch ON The motion sensor detector does not work properly The wire harness does not work properly Ensure the blue indicator is ON Turn the sensor ON by clicking the motion detector button If blue indicator is ON replace the motion sensor Replace the wire harness of the control panel Illumination...

Page 17: ... following information is required 1 Model and serial number of the unit 2 Part number and description 3 A concise description of the problem broken is not sufficient 4 Proof of purchase photocopy of the invoice In some cases Napoleon could request to have the parts returned to the factory for inspection before providing replacement parts Before contacting Napoleon dealer please note that the foll...

Page 18: ...or if there are damaged or missing parts please call our Customer Solutions Department at 1 866 820 8686 between 9 AM and 5 PM Eastern Standard Time CAUTION During unpacking and assembly we recommended you wear work gloves and safety glasses for your protection Although we make every effort to make the assembly process as problem free and safe as possible it is characteristic of fabricated steel p...

Page 19: ...on combustible materials certified class A to EN 13501 1 standard MINIMUM 65cm2 OF VENTILATION REQUIRED ON EACH END OF CABINET W H D W H D BUILT IN SIDEBURNER GAS INLET OPENING NON COMBUSTIBLE MATERIAL OUTDOOR GFI ELECTRICAL OUTLET RECOMMENDED LOCATE ON SAME SIDE OF GRILL AS ROTISSERIE BRACKET GAS INLET OPENING 127mm 44mm ELECTRICAL BOX OPENING IF THE COUNTER TOP IS OVERHANGING THE EDGE OF THE ENC...

Page 20: ...20 EN www napoleon com N415 0542CE GB DE Oct 03 19 APPLY A DAB OF SILICONE TO EACH FLANGE TO SECURE IN PLACE ...

Page 21: ...21 EN www napoleon com N415 0542CE GB DE Oct 03 19 ...

Page 22: ...ounted a minimum of 4 102 mm below the bottom of the grill as illustrated Fasten the electrical box to the inside of the enclosure making sure the ventilation holes are not obstructed Plug the power supply into a Ground Fault Interrupter GFI protected circuit Never remove the ground ing plug or use with an adapter of 2 prongs 4 102mm minimum bottom of the grill to top of the electrical panel 8 203...

Page 23: ...23 EN www napoleon com N415 0542CE GB DE Oct 03 19 x1 x1 x1 NON METALIC CABINET ONLY 4 3 5 LOCATED INSIDE CABINET ...

Page 24: ...24 EN www napoleon com N415 0542CE GB DE Oct 03 19 COUNTER TOP REQD NOT INCLUDED IM UGC665 ...

Page 25: ...25 EN www napoleon com N415 0542CE GB DE Oct 03 19 N570 0038 1 4 20 X 1 2 x2 N450 0008 1 4 20 x2 IM UGC665 1 2 3 4 ...

Page 26: ...26 EN www napoleon com N415 0542CE GB DE Oct 03 19 x1 x1 x2 x1 5 LOCATED INSIDE CABINET 6 7 ...

Page 27: ...27 EN www napoleon com N415 0542CE GB DE Oct 03 19 3 1 2 Wind Deflector Assembly Instructions ...

Page 28: ...28 EN www napoleon com N415 0542CE GB DE Oct 03 19 Label provided Peel the backing off the supplied warning label and apply it where it is visible when operating the grill ...

Page 29: ...serviced Do not smoke while performing this test and remove all sources of ignition See Leak Testing Diagram for areas to check Turn all burner controls to the off position Turn gas supply valve on Brush a half and half solution of liquid soap and water onto all joints and connections of the regulator hose manifolds and valves Bubbles will indicate a gas leak Either tighten the loose joint or have...

Page 30: ...0 EN www napoleon com N415 0542CE GB DE Oct 03 19 Rotisserie Kit Assembly Instruction optional Assemble rotisserie kit components as shown Ensure stop bushing is tightened on the inside of hood casting X ...

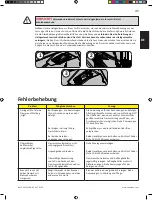
Page 31: ...es gilt auch für nicht angeschlossene Gasflaschen Ein Nichtbefolgen dieser Anleitung kann durch Brände oder Explosionen zu Sachschäden und Körperverletzungen auch zu tödlichen führen GEFAHR WENN ES NACH GAS RIECHT Gaszufuhr zum Gerät absperren Flammen löschen Haube öffnen Wenn es weiterhin nach Gas riechen sollte dem Gerät fernbleiben und unverzüglich den Gaslieferanten oder die Feuerwehr benachri...

Page 32: ...s für Neben Folge oder indirekte Schäden oder für Fracht Arbeitskosten oder Ausfuhrzölle Diese beschränkte Garantie gilt in Ergänzung zu jeglichen Rechten die Ihnen laut den örtlichen Gesetzen zustehen Folglich erlegt diese beschränkte Garantie NAPOLEON keine Verpflichtung dahingehend auf Einzelteile vorrätig zu halten Auf der Grundlage der Einzelteilverfügbarkeit kann sich NAPOLEON nach eigenem E...

Page 33: ...en Sie nicht eine Gasflasche zu verwenden die nicht mit einer Verbindung vom Typ QCC1 ausges tattet ist Wenn die Gasflasche an das Gerät angeschlossen ist dürfen Gasgrill und Gasflasche nur an einem gut belüfteten Ort im Freien aufgestellt werden Falls der Gasgrill im Innenbereich gelagert wird muss die Propangasflasche vom Grill entfernt und im Freien an einer gut belüfteten Stelle aufbewahrt wer...

Page 34: ...upferrohre oder zulässigen Flex Metallverbindungen anschließen Sicherstellen dass die Installation allen regional und überregional geltenden Installationsvorschriften entspricht Vor Inbetriebnahme des Gasgrills die gesamte Gasinstallation auf Gaslecks prüfen Vollständige Anweisungen zur Montage des Grills entnehmen Sie bitte der Bedienungsanleitung Gehören Schlauch und Regler nicht zum Lieferumfan...

Page 35: ...iese Einheit ist mit einem internen Druckregler ausgestattet der den Gasdruck stabilisiert und die Grillleistung verbessert Dieser Druckregler ist nicht anpassbar An der Seite des Druckreglers befindet sich ein Druckhahn Dieser kann von einem entsprechend ausgebildeten Kundendiensttechniker dazu verwendet werden die Funktion des Druckreglers zu überprüfen Die Schraube mit dem Druckhahn muss stets ...

Page 36: ...egional geltenden Installationsvorschriften entspricht Basierend auf der Länge der Rohrleitung muss die Gaszufuhrleitung ausreichend dimensioniert sein um die auf dem Leistungsschild vorgegebene Leistungsaufnahme kW zu erfüllen Bei Anschluss eines Seitenbrenners eine getrennte Leitung zur Seitenbrennereinheit abzweigen und am angegebenen Ort in die Öffnung für den Seitenbrenner einführen Falls ein...

Page 37: ... Diese Metallverbindung an der Überwurfmutter am Verteilerende anschließen Das andere Ende der Metallverbindung am Gasrohr anschließen Sicherstellen dass das Verbindungsstück nicht durch Wand Boden Decke oder Trennwände verlegt wird und vor Beschädigung geschützt ist Für den Anschluss des Geräts keine Schläuche verwenden Der Anschluss muss mit steifen Rohrverbindungen Kupferrohr oder einer zulässi...

Page 38: ... das Kabel oder die Stecker nicht in Wasser oder andere Flüssigkeiten Ziehen Sie den Netzstecker heraus wenn das Gerät nicht benutzt wird und bevor Sie den Grill reini gen Lassen das Gerät erst abkühlen bevor Sie Teile aufsetzen oder abnehmen Verwenden Sie einen Gasgrill für den Außengebrauch nicht mit einem beschädigten Kabel oder Stecker oder nachdem das Gerät nicht richtig funktionierte oder au...

Page 39: ...den Sie ihn mittels Streichholz 4 Leuchten weder Kontrollleuchte noch Brenner innerhalb von 5 Sekunden auf drehen Sie den Drehregler zurück in die Off Position und warten Sie 5 Minuten bis sich das ausgetretene Gas verflüchtigt hat Wiederholen Sie Schritt 2 und 3 oder entzünden Sie den Brenner mit einem Zündholz 4 Entzündet sich der Brenner nicht innerhalb von 5 Sekunden drehen Sie den Drehregler ...

Page 40: ...n es zum Aufflammen kommen Um Aufflammen zu verhindern können Sie Fett abschneiden oder mit niedrigerer Temperatur grillen Wenn es zum Aufflammen kommt legen Sie das Fleisch von der Flamme weg zur Seite und stellen die Temperatur herunter Lassen Sie die Haube offen Eine detaillierte Anleitung finden Sie in Napoleons Grill Kochbuch Direktes Garen Grillgut direkt über der Wärmequelle auf den Grill l...

Page 41: ... stets geschlossen halten um ein optimales Kochergebnis zu erzielen Braten und Geflügel erhalten eine knusprigbraune Kruste und das Fleisch bleibt zart und saftig Beispielsweise benötigt ein Brathuhn mit einem Gewicht von 1 5 kg mit dem Drehspieß ca 1 Stunden bei mittlerer bis hoher Flamme Weitere Anweisungen finden Sie im Napoleon Grillkochbuch mit exklusiven Rezepten für alle Gelegenheiten ACHTU...

Page 42: ...opf 2 mal drücken um die Farbe zu fixieren Nochmals 2 mal drücken um Wechselmodus zu starten Bewegungssensor Drehregler und Logoleuchten bleiben so lange Bewegung innerhalb 1 m des Grills detektiert wird brennen Nach 15 Minuten ohne Bewegung schalten sie ab So lange der Sensor eineschaltet ist blaue LED brennt können Sie die Grillkammer beleuchtung mit dem Schalter bedienen Taste drücken um den Se...

Page 43: ...eite der Haube mit einer weichen Messingdrahtbürste von losem Schmutz befreien Anbratplatten mit einem Spachtel oder Schaber abkratzen und die Asche mit einer Drahtbürste beseitigen Anbratplatten abnehmen und die Brenner mit einer Messingdrahtbürste reinigen Den Schmutz aus dem Inneren des Gasgrills in die Tropfpfanne fegen Anbratplatten wieder einsetzen und auf richtige Positionierung achten sieh...

Page 44: ...ist der Lufteinlass mit einem Insektengitter versperrt womit das Problem jedoch nicht 100 ig gelöst ist Ein Spinnennetz oder Nest verbrennt mit einer weichgelben oder orangefarbenen Flamme oder es kommt zu einem Feuer Flammenrückschlag an der Luftzufuhr unter dem Bedienbrett Damit das Innere eines Brenners gereinigt werden kann muss er aus dem Gasgrill ausgebaut werden Schraube in der Mitte des Br...

Page 45: ...und Grill auf hoher Stufe 10 bis 15 Minuten vorheizen Flammenschutzeinsätze und Auffangbehälter regelmäßig reinigen Auffangbehälter nicht mit Alufolie auslegen Siehe Anweisungen für das Reinigen des Grills Brenner brennt mit gelber Flamme mit wahrnehmbarem Gasgeruch Möglicherweise ist der Brenner durch ein Spinnennetz und etwas anderes verschmutzt Brenner entfernen und gründlich reinigen Siehe Anw...

Page 46: ... Defekt Die Hauben haben ein Porzellan Finish das nicht abblättern kann Das Abblättern wird durch hart gewordenes Fett hervorgerufen das zu farbähnlichen Splittern trocknet die abblättern können Dies kann durch regelmäßiges Reinigen verhindert werden Siehe Anweisungen für das Reinigen Brennerleistung auf Stufe High ist zu niedrig Rumpelnde Geräusche und flatternde blaue Flamme an der Brenneroberfl...

Page 47: ...r nicht vorhanden Schmutzige Pilotelektrode Zündflamme ist bereits gezündet Nachdem Sie den Zündknopf auf High gestellt haben warten Sie ca 20 30 Sekunden bei gedrücktem Zünder damit Luft aus der Gasversorgungsleitung entweichen kann Propangasflasche füllen Während der Ersteinrichtung oder nach einer Neubefüllung des Gasbehälters empfiehlt es sich einen der Rohrbrenner zu zünden bevor der Zündbren...

Page 48: ...mmen Um eine Reklamation einzureichen sind folgende Unterlagen erforderlich 1 Typenbezeichnung und Seriennummer des Geräts 2 Artikelnummer und Bezeichnung 3 Bündige Problembeschreibung defekt reicht nicht aus 4 Kaufbeleg Rechnungskopie Kopie des Kassenbons Napoleon behält sich das Recht vor als Voraussetzung für Ersatzteile den Rückversand reklamierter Teile zu beantragen Bitte beachten Sie vor Si...

Page 49: ... zum Betrieb des Grills oder bei beschädigten oder fehlenden Teilen wenden Sie sich an unseren Kundendienst unter 1 866 820 8686 zwischen 9 Uhr und 15 Uhr Eastern Standard Time ACHTUNG Wir empfehlen beim Entpacken des Geräts und bei der Montage Arbeitshandschuhe und eine Schutzbrille zu tragen Wir unternehmen alle Anstrengungen den Montageprozess so problemlos und sicher wie möglich zu machen doch...

Page 50: ...ndard eingebaut werden WARNUNG FÜR DIE SCHRANKRAHMEN SCHRÄNKE UND ARBEITSFLÄCHEN AUSSCHLIESSLICH NICHT BRENNBARE MATERIALIEN VERWENDEN ZUR KORREKTEN BELÜFTUNG MUSS EIN MINDESTQUERSCHNITT VON 65 cm2 AN ALLEN SCHRANKENDEN EINGEHALTEN WERDEN EINBAUSEITENBRENNER W H D W H D 44mm 127mm 44mm ELEKTRO GEHÄUSE ÖFFNUNG WENN DER ZÄHLER SPITZE IST ÜBER DEN RAND AM SCHALTSCHRANK DER ECKEN MÜSSEN AUSGEKLINKT WE...

Page 51: ...51 DE www napoleon com N415 0542CE GB DE Oct 03 19 POSITIONIERUNG KANN EIN TUPFER SILIKON AN JEDER SEITE DES RÜCKSEITIGEN ABSCHLUSSSTÜCKS AUFGEBRACHT WERDEN ...

Page 52: ...52 DE www napoleon com N415 0542CE GB DE Oct 03 19 ...

Page 53: ...ills befestigt werden muss wie dargestellt Befestigen Sie die Elektro Box an der Innenseite des Grillunterschranks und vergewissern Sie sich dass die Belüftungsöffnungen nicht blockiert sind Stecken Sie das Netzteil an eine Erdungs geschützte Steckdose Entfernen Sie niemals den Erdungsstecker und verwenden Sie nie einen Adapter mit nur zwei Stiften BIPRO665 BUILT IN INSTRUCTIONS x1 x2 1 2 178mm 24...

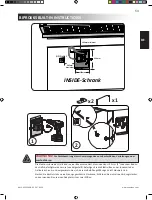
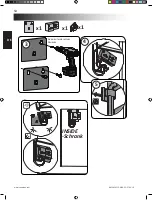
Page 54: ...54 DE www napoleon com N415 0542CE GB DE Oct 03 19 x1 x1 x1 Nur nichtmetallisches Gehäuse 4 3 5 INSIDE Schrank ...

Page 55: ...55 DE www napoleon com N415 0542CE GB DE Oct 03 19 ARBEITSPLATTE ERFORDERLICH NICHT ENTHALTEN IM UGC665 ...

Page 56: ...56 DE www napoleon com N415 0542CE GB DE Oct 03 19 N570 0038 1 4 20 X 1 2 x2 N450 0008 1 4 20 x2 IM UGC665 1 2 3 4 ...

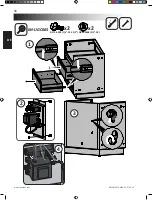
Page 57: ...57 DE www napoleon com N415 0542CE GB DE Oct 03 19 x1 x1 x2 x1 5 INSIDE Schrank 6 7 ...

Page 58: ...58 DE www napoleon com N415 0542CE GB DE Oct 03 19 Etikett zur verfügung gestellt Klebe den Warnhinweisaufkleber auf eine Fläche die während des Grillens sichtbar ist auf ...

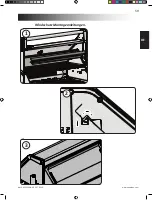
Page 59: ...59 DE www napoleon com N415 0542CE GB DE Oct 03 19 Windschutz Montageanleitungen 3 1 2 ...

Page 60: ...rboten Alle Zündquellen sind zu entfernen Die zu prüfenden Stellen sind auf der Leckageprüfzeichnung aufgeführt Alle Brenner abstellen Flaschenventil aufdrehen Seifenwasser halb Wasser halb Flüssigseife auf alle Anschlüsse und Verbindungen an Regler Schlauch Verteiler und Ventile auftragen Leckagen werden durch Blasenbildung angezeigt Leckage durch Festdrehen des Anschlusses oder Austausch des Tei...

Page 61: ...0542CE GB DE Oct 03 19 Sicherstellen dass die Anschlagbuchse an der Innenseite des Haubengussteils fest angezogen ist Anweisungen für die Montage des Drehspieß Sets optionale Komponenten des Drehspieß Sets wie gezeigt montieren X ...

Page 62: ...ITCHES KNOBS RESERVED FUSE 6 A HALOGEN LAMP 12VAC 10W KNOB LIGHT x9 12VDC 0 4 1 1W 34 95mA SWITCH IGNITION 12VDC 0 3 0 8W 22 65mA SWITCH LIGHT 12VDC 0 3 0 8W 22 65mA PROX SENSOR 3 3VDC 0 01W 5mA LOGO LIGHT 9VDC 1 0W 310mA HALOGEN LAMP 12VAC 10W IGNITER 12VAC DC 1 5W 120mA ELECTRODE REAR BURNER ELECTRODE SMOKE BURNER JUMPER Electrical Diagram Elektrischer Schaltplan ...

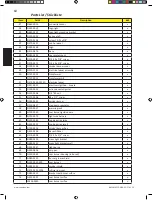
Page 63: ...x 15 N200 0110 light wire cover x 16 N570 0012 1 4 20 X 5 8 carriage bolt x 17 W735 0011 3 4 washer x 18 N450 0006 1 4 20 nut x 19 N350 0072 housing left light x 20 N402 0017 light x W387 0006 replacement bulb ac 21 N350 0073 housing right light x 22 N450 0009 10 24 nut x 23 N570 0112 10 24 x 5 8 screw x 24 N010 1175 SER control panel p N010 1176 SER control panel n 25 N010 1096 control panel wire...

Page 64: ... N750 0034 wire connector igniter x 54 N450 0008 1 4 20 nut x 55 N570 0008 8 x 1 2 screw x 56 N100 0049 smoker burner x 57 N010 0857 step down regulator x 58 N520 0037 warming rack x 59 N750 0040 rear burner ignition wire x 60 N750 0070 light wire harness x 61 N305 0085 cooking grids large x 62 N305 0092 cooking grids small x 63 N720 0056 smoker burner flex x 64 N655 0206 base stiffener x 65 N570 ...

Page 65: ...r ignition wire x 80 N080 0311 bracket igniter smoke burner x 81 N455 0016 smoker burner orifice p N455 0002 smoker burner orifice n 82 N240 0033 smoker burner igniter x 83 W160 0095 small wire clip x 84 N160 0039 large wire clip x 85 N190 0005 control box x 86 N750 0069 control box wire harness x 87 N475 0495 control box mount x 89 N585 0133 heat shield x 88 N240 0034 rear burner electrode x 90 N...

Page 66: ...15 23 20 17 16 18 22 19 21 41 42 40 32 36 35 29 34 33 28 30 31 27 26 7 8 45 46 11 10 12 13 1 9 50 51 52 53 55 54 78 56 57 59 71 65 66 60 67 47 80 75 72 76 62 70 58 61 64 82 47 74 81 77 63 73 47 48 79 83 84 85 86 87 39 38 37 69 68 14 24 25 44 49 77 90 89 43 88 ...

Page 67: ...67 www napoleon com EN N415 0542CE GB DE Oct 03 19 ...

Page 68: ...68 www napoleon com N415 0542CE GB DE Napoleon products are protected by one or more U S and Canadian and or foreign patents or patents pending ...

Reviews: