background image

4

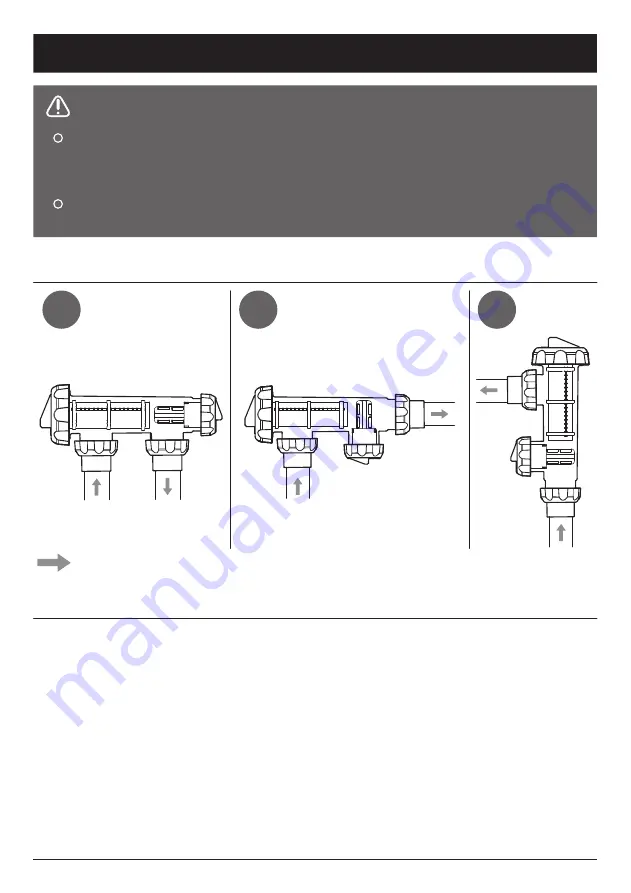
A

B

C

INSTALLATION | CELL HOUSING

INSTALLATION STEPS


(Refer to Typical System Installation diagram)

CELL HOUSING CONFIGURATION OPTIONS

Connect the Cell Housing horizontally (A or B) in the return line to the pool 

(use Reducing Bushes supplied if using 40mm PVC pipe) using high pressure 

PVC glue. The Cell Housing can be mounted vertically (C) but provision must 

be made for a gas trap.

Check that the O-ring is clean, greased with silicone grease (DO NOT use 

petroleum based jelly) and securely located in the Cell Housing.

Fit the OXI Cell and ensure the Locking Ring is firmly tightened by hand.

DO NOT USE A TOOL TO TIGHTEN

A Venturi Pipe is incorporated within the Cell Housing designed to eliminate any 

possible gas build up, although it is always recommended to ensure proper 

installation to eliminate this from happening. 
The Cell Housing must be installed in the RETURN pipework to the pool. It must 

always be installed AFTER the filter, gas heater, solar heating or heat pump.

Before you start:

VERTICAL

STEP 1

STEP 2

STEP 3

HORIZONTAL

HORIZONTAL

Indicates direction of water flow

Summary of Contents for NKD-R

Page 1: ...OPER INSTALLATION WILL VOID WARRANTY PRODUCT ONLY TO BE INSTALLED SERVICED BY A SUITABLY QUALIFIED PROFESSIONAL THIS MANUAL CONTAINS IMPORTANT INFORMATION ONCE INSTALLATION IS COMPLETE INSTALLER MUST...

Page 2: ...ed If the power cord is damaged then the manufacturer their agent or a similar qualified person in order to avoid a hazard should replace it The product shall be installed according to AS NZS 3000 wir...

Page 3: ...DER INSTALLER FOR THE CUSTOMER Hacksaw No 2 Phillips Head Screwdriver PVC Primer Glue Drill 6mm Drill Bit Control Unit with Weather Shield OXI ION Cell Housing with Unions Wall Mounting Bracket 50 40m...

Page 4: ...ty to ensure some form of flow control is installed in this instance and it disables the pump ALWAYS ensure that pipe work and equipment do not allow gases generated to collect and build up in any par...

Page 5: ...se DO NOT use petroleum based jelly and securely located in the Cell Housing Fit the OXI Cell and ensure the Locking Ring is firmly tightened by hand DO NOT USE A TOOL TO TIGHTEN A Venturi Pipe is inc...

Page 6: ...gulations require that the Control Unit shall be installed outside the pool zone The Control Unit shall be installed according to AS NZS 3000 wiring rules The Control Unit should be installed in a wel...

Page 7: ...pH 80 150ppm 80 120ppm Total Alkalinity 200 250ppm 150 190ppm Calcium Hardness Before starting the Naked System balance the pool water using the calculators in the Naked App download using the QR cod...

Page 8: ...of water in the pool determines the run times of the system for both initial startup injection of copper and automatically sets the pump run times on a daily basis Did you know Programming the Naked S...

Page 9: ...pumps need longer run times this screen allows you to adjust Timer 2 to extend run times ensuring adequate circulation Note that T2 is for circulation only Choose Variable or Single Speed Pump STEP 6...

Page 10: ...ON 2 For indoor or very small pools Timer 2 T2 ON TIME must be adjusted to the same as T1 OFF TIME and T2 OFF TIME must be adjusted to the same as T1 ON TIME Resulting in the system running in AUTO mo...

Page 11: ...sign Water Connection Water Flow Rate L min IP Rating Unit Shipping Dimensions mm Net Weight kg 220 265 0 88 209 5 8 5 15 15 800ppm TDS 50 60 8 0 202W x 332H x 164D 420L x 138D x 195H 165 9 Plate 200...

Page 12: ...Swimming as nature intended or visit your App Store and search Naked Pools 1800 625 331 support naked pools com www naked pools com SCAN THIS CODE T O G E T T H E NAKED APP...

Reviews: