background image

- 5 -

THINGS TO CHECK BEFORE USING YOUR BRUSHCUTTER

a. Before beginning work, look around carefully to get a feel for the shape of the land,

or grass to be trimmed and whether or not there are any obstacles which might get
in the way while working, and remove any obstacles, which can be cleared away.

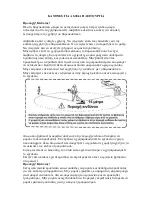
b. The area within a perimeter of 15m of the person using the brush cutter should be

considered a hazardous area into which no one should enter while the brush

cutter is in use, and when necessary yellow warning
rope, warning signs should be placed around the work
area. When work is to be performed simultaneously by
two or more persons, always check the presence and
locations of others so as to maintain a distance
sufficient to ensure the safety of each person.

c. Make sure that there are no loose screws or bolts, fuel

leaks, ruptures, dents, or any other problems which
might interfere with safe operation. Be especially
careful to check that there is nothing wrong with the
blades or with the joints by which the blades are
attached to the brush cutter.

d. Never use blades that are bent, warped, cracked,

broken or damaged in any way.

e. Always keep the blade sharp.
f.

Filling the cutting edges, keep the end corner sharp
and round the root of the edge.

g. Check the bolt that fastens the blade and be sure the

blade turns smoothly without abnormal noise.

NOTES ON STARTING THE ENGINE

1. Take a careful look around to make sure that no obstacles exist within a perimeter

of 15m or less around brush cutter.

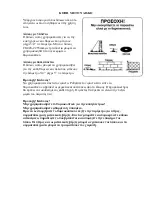
2. Place the body of the brush cutter onto the ground

in a flat clear area and hold it firmly in place to
ensure neither the blades nor the throttle come
into contact with any obstacles when the engine
starts up.

3. Place the throttle into the idling position when

starting the engine.

4. After starting up the engine, if the blades continue

to rotate even after the throttle has been moved fully back, turn off the engine and
check the throttle wire and other parts.

KICKBACK SAFETY PRECAUTIONS

"

A dangerous reaction may occur when the spinning blade contacts a solid object
in the critical area. It is called Kick back. As a result. The operator can lose control
of the unit, which can cause serious or fatal injury.

Avoid kickback; observe the safety precautions below strictly.

Summary of Contents for PB6500

Page 1: ...PB6500...

Page 2: ...1 2 3 4 5 6 7 8...

Page 3: ...9 10 11 12 13 14 15 16 17 18 19 20 b c 62 cc 1 9 kW 6500 min 1 3000 min 1 1200ml 25 1 99 7 db A 110 9 db A 113 db A 25 4 255mm x 1 4mm 3T...

Page 4: ......

Page 5: ...15...

Page 6: ......

Page 7: ...F1 1 2 3 2 4mm C D F2 1 2 1 3 2 4 3 F3 5x25 1 2 3 4...

Page 8: ...F4 1 2 B 3 5mm C 4 5 13mm D 1 1 2mm 2 F5 1 2...

Page 9: ...F6 1 2 3 4 5 1 2 3 4 5 6 7 8 9 F7 1 F6 2 10 3 1 2 3 4...

Page 10: ......

Page 11: ...3 3 4 CG420 2 255mm 3 4 3...

Page 12: ...3...

Page 13: ...89 25 1 25 1 25 1 2 25 1 89...

Page 14: ...1 2 3 4 5 6 1 2 3 4 5...

Page 15: ...1 start 2 7 10 3 4 5 6 7 1 2 3 2 3 7 stop...

Page 16: ......

Page 17: ......

Page 18: ...1 2 3...

Page 19: ...ccidents which could lead to serious bodily injury or death This mark indicates instructions which must be followed or it may lead to mechanical failure breakdown or damage This mark indicates hints o...

Page 20: ...ting this machine and follow all warnings and safety instructions 2 Wear head protection where there is a risk of falling objects wear eye and ear protection 3 Warning Attention 4 Beware of thrown obj...

Page 21: ...possibility exists that your judgment might be impaired or that you might not be able to operate the brush cutter properly and in a safe manner d Avoid running the engine indoors The exhaust gases con...

Page 22: ...et or saw for removal of obstacles C Never use your brush cutter when wearing pants with loose cuffs when wearing sandals or when barefoot WARNING HANDLING OF FUEL a The engine of this product is desi...

Page 23: ...the brush cutter d Never use blades that are bent warped cracked broken or damaged in any way e Always keep the blade sharp f Filling the cutting edges keep the end corner sharp and round the root of...

Page 24: ...ling position 2 Always be sure to maintain a steady even posture while working 3 Maintain the speed of the engine at the level required to perform cutting work and never raise the speed of the engine...

Page 25: ...ving or reattaching the blade use proper tools and equipment to prevent injury 5 When replacing blade or any other parts or when replacing the oil or any lubricants always be sure to use only products...

Page 26: ...ly 1 Bolt 2 Clamp 3 Main pile 4 Safety guard WHEEL ASSEMBLY F4 1 Insert the wheel axle A 2 Make sure the wheel axle bolt hole and axle tube hole are aligned B 3 Insert 5mm bolt and tighten nut C 4 Be...

Page 27: ...and match the hole of the blade to the projection of the inner holder correctly 3 Set the outer holder to the gear shaft with the hollowed face to the blade 4 Put the attached top metal cover on the...

Page 28: ...a regular grade gasoline leaded or unleaded alcohol free and a quality proven motor oil for air cooled 2 cycle engines RECOMMENDED MIXING RATIOGASOLINE 25 OIL 1 7 OPERATION STARTING THE ENGINE Before...

Page 29: ...e the throttle lever return to the idling position 1 While holding the unit firmly pull out the starter rope quickly 2 After the engine has started open the choke gradually 3 Allow the engine to run f...

Page 30: ...o become caught up the blades and also it makes the shaft and clutch wear down more quickly NYLON CUTTER USAGE Nylon cord consumes large amounts of power Please note that the engine rotation speed in...

Page 31: ...out the air filter or with a deformed filter element will quickly ruin the engine FUEL FILTER Take the filter out of the fueling port using a small wire hook Disconnect the filter assembly from the fu...

Page 32: ...um and if it has wipe it away using oil free lead free gasoline 4 Remove the float cabin of the carburetor and clean the inside ADJUSTING THE CARBURETOR An incorrect adjustment may cause damage to you...

Page 33: ...ition plug if necessary and dry it 3 Clean the plug check the thermal value and replace it if necessary Set to 0 6 0 7 mm 4 Clean the carburetor blow it off 5 Replace 6 Check short circuit knob the ca...

Page 34: ...ling speed min 1 3000 Max engine speed min 1 6500 Sound pressure level db A LpA 99 7 Measured Sound power level db A LwA 110 9 Guaranteed sound power level db A 113 Diameter of the metal blades mm 25...

Reviews: