background image

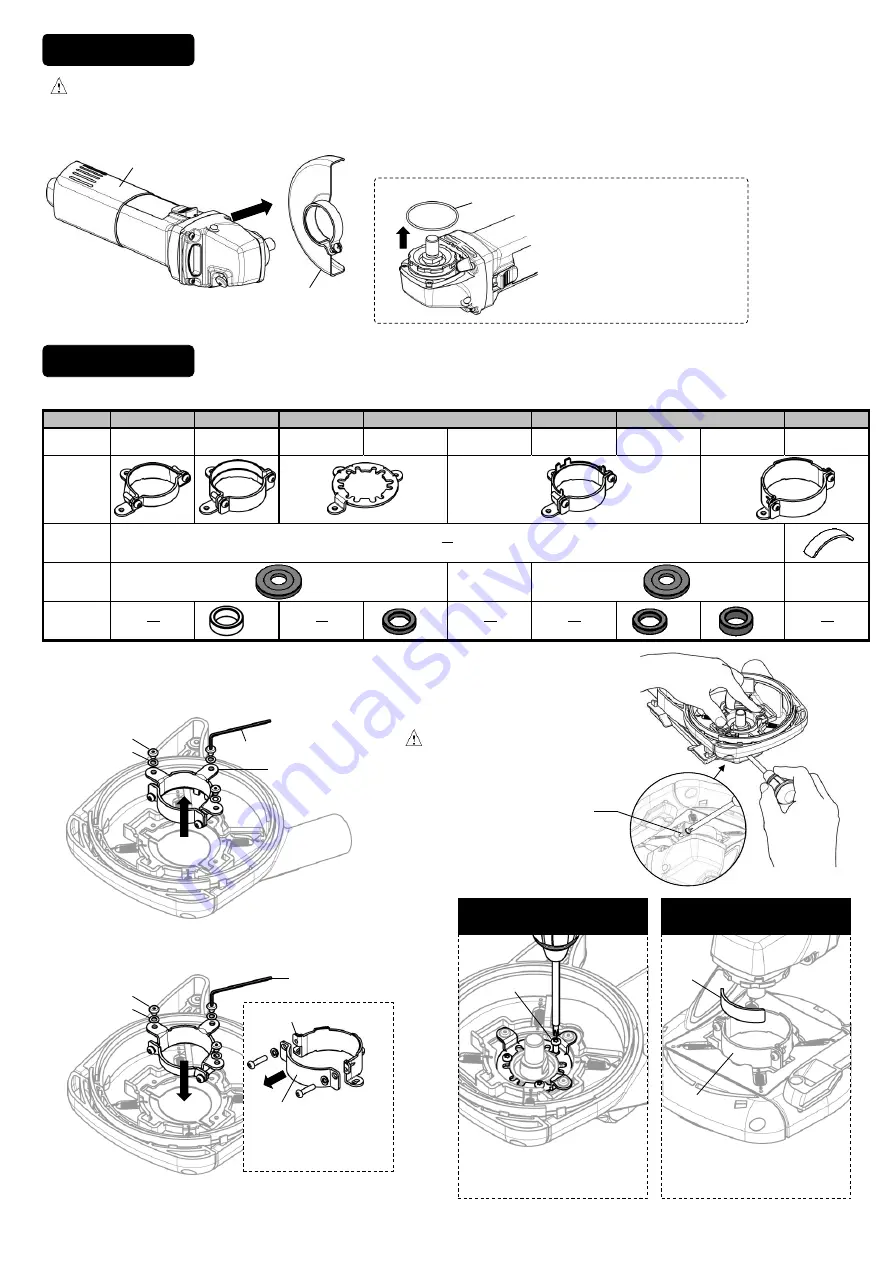
1. Choose the correct components for Angle Grinder to be used, according to the following table.

Brand

HITACHI

DEWALT

FLEX

MAKITA

METABO

Model

G13SR3/G13SB3

etc.

D28134 etc.

L3410FR etc.

AG8-125Q etc.

AG12-125X etc.

9558NB/9565CV/

GA4530 etc.

GWS8-125 etc.

GWS14-125CI etc.

WE14-125 Plus etc.

Connector

Collar

Flange

(Standard Flange)

(Standard Flange)

Spacer *

 * When using a diamond cup wheels with the height 21mm.

MILWAUKEE

BOSCH

PREPARATION 

WARNING 

Be sure to turn off the angle grinder and remove the plug from the electrical outlet in advance. 

If the connector is loose and cannot be securely attached on the angle grinder, do NOT use HURRICANE in this state.  

  otherwise it could lead to injury. 

GWS8-115/GWS8-125/GWS10-125/ 
GWS11-125CI/GWS14-125CI  

Remove O-Ring 
if it is equipped. 

O-Ring 

INSTALLATION 

-2- 

Grinder 

Guard 

Take the Guard off from the Grinder. 

T4.5 

[d] 

(Factory Preset) 

[e] 

[g] 

[h] 

[ f ] 

[ i ] 

[m] 

[m] 

T4.5 

T7.3 

(1) Loosen the screws  by [k] Wrench and 
remove the preset connector. 

(2) Set the correct Connector and tighten the 
screws. (Don't forget to fit the washers) 

Hold 3points of the Connector and tighten 
the fitting screws. (2pls.) 

When using [f] B-connector, 
take the Clamp Piece apart 
before setting. 

[ f ] 

Clamp Piece 

[ k ] 

[ k ] 

WARNING 

Make sure HURRICANE is securely 
attached, otherwise it may come loose, 
causing injury. 

Pre-set Connector 
( [d] M-Connector ) 

Fitting screw 

FLEX / 
Milwaukee 

(AG8/AG9 series) 

2. Change the Connector. (if needed) 

3. Fit on an Angle Grinder. 

T7.3 
iD16 

[p] 

[n] 

[n] 

[o] 

Metabo


Tighten 3pcs of TORX screws as 
fitted to the angle grinder. 

Put [ i ] Collar between a Clamp 
Piece and angle grinder. 

TORX screw 

Clamp Piece 

[ i ] 

Screw 

Washer 

Screw 

Washer 

Summary of Contents for Hurricane NKC-125

Page 1: ... FLEX L3309 125 L3309FR L3309FRG L3410FR L3410VR a Main Unit b Sub Cover c Half Cover d M Connector e H Connector f B Connector g D Connector h F Connector i Collar k Wrench m Base Flange n T4 5 Spacer o T7 3 Spacer p T7 3 x iD16 Spacer q Hose Adapter NKC 125 INSTRUCTION MANUAL WARNING SPECIFICATIONS Only use the correct connector for each angle grinder If any connector does not fit correctly then...

Page 2: ...GWS10 125 GWS11 125CI GWS14 125CI Remove O Ring if it is equipped O Ring INSTALLATION 2 Grinder Guard Take the Guard off from the Grinder T4 5 d Factory Preset e g h f i m m T4 5 T7 3 1 Loosen the screws by k Wrench and remove the preset connector 2 Set the correct Connector and tighten the screws Don t forget to fit the washers Hold 3points of the Connector and tighten the fitting screws 2pls Whe...

Page 3: ... using the flange spanner supplied with the angle grinder Choose correct Spacer which keep X and Y as below X 1 X 5 1 Y Y Spacer n o p m Base Flange Standard Flange Spindle Cup Wheel Wheel Nut Wrench GRINDING Vacuum Hose q Duct 1 Securely connect the Vacuum Hose to the port of a Main Unit using q Hose Adapter or other suitable joint between the port and Vacuum Hose 2 Securely hold the angle grinde...

Page 4: ... 1 Loosen the screws of a Main Unit and remove b Sub Cover and c Half Cover 2 Switch the position of b Sub Cover and c Half Cover then tighten screws to secure in position 3 Start the grinding work in the same process of Page 3 GRINDING c b Screw a c b Vacuum hose Keep the surface of c Half Cover in contact with the wall during work Wall c ...

Reviews: