


Page | 15
https://www.adafruit.com/products/2969
or by building a blade from 5mm NeoPixel individual straw-hat LEDs:
https://www.sparkfun.com/products/12999
To see how awesome these look, check out the release video here:
https://www.youtube.com/watch?v=nP17IWlQS6M
IMPORTANT
– Because the Pixels use a completely different driver system, the #2-#4 pins are used as simple
grounds when using a string blade. This means that if you want to wire a blade matching crystal chamber, you will
need to use a NeoPixel individual LED wired in parallel with the main blade. Rumble motors are thus not
supported.
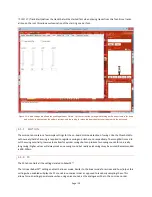
Figure 8 – Wiring of the NeoPixel string style blades. When using the triangular prism or doubled 144 led/meter strips, make sure to wire all
three in parallel.
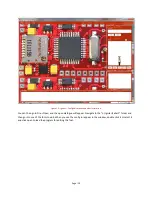
3.7.
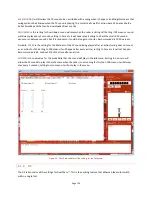
FULL WIRING WITH ACCENTS
The following diagram shows how to wire all accent LEDs and the recharge port, which will utilize every feature of
Igniter 3™ (except for C4-). This will be the typical diagram for most folks that are looking for a build that utilizes all
the great features of the board without overly complicated wiring. Note that the accent pads 4-8 are in the middle
of the bottom of the board and require 28-30 gauge wire and surface type soldering (strip a small bit of insulation
from a solid core wire and push it through the accent LED hole from the top side and apply solder on the top of the
pad on the bottom side to seal).


