background image

5. SPEAKERS A & SPEAKERS B

The NAD C 272 is equipped with two sets of speaker connectors
wired in parallel to facilitate connection of multiple pairs of
speakers or “Bi-Wiring”. Use the Speakers A connectors for the
‘main’ speakers and use the Speakers B connectors for a second
pair, for example, extension speakers located in another room.

Under normal operation, connect the right speaker to the
terminals market ‘R +’  and ‘R-’ ensuring that the ‘R+’ is connected
to the  ‘+’  terminal on your loudspeaker and the ‘R-’ is connected
to the loudspeaker’s  ‘-’ terminal. Connect the terminals marked
‘L+’ and ‘L-’  to the left speaker in the same way.

In Bridge Mode, connect the single speaker to the terminals
marked ‘R +’  and ‘L+’ ensuring that the ‘L+’ is connected to the
‘+’  terminal on your loudspeaker and the R+ is connected to the
loudspeaker’s  ‘-’ terminal. Refer also to section “Bridge Mode” in
this chapter (No. 6).

Always use heavy duty (16 gauge; 1.5mm, or thicker) stranded wire to
connect loudspeakers to your NAD C 272. The high-current binding
post terminals can be used as a screw terminal for cables terminating
in spade or pin sockets or for cables with bare wire ends.

BARE WIRES AND PIN CONNECTORS

Bare wires and pin sockets should be inserted into the hole in the
shaft of the terminal. Unscrew the speaker terminal’s plastic
bushing until the hole in the screw shaft is revealed. Insert the pin
or bare cable end into the hole and secure the cable by tightening
down the terminal’s bushing. Ensure bare wire from the speaker
cables does not touch the back panel or another socket . Ensure
that there is only 1/2” (1cm) of bare cable or pin and no loose
strands of speakers wire.

NOTE: 

Make sure the speaker impedance is 4 ohms or more when

connecting only one pair of speakers; make sure the speaker
impedance for all speakers is over 8 ohms when connecting two
sets of speakers. In Bridge Mode, the impedance of the
loudspeaker should also be 8 ohms or higher. 
Always turn the C 272 and other components in the system off
before connecting or disconnecting speakers.

6. BRIDGE MODE

The stereo NAD C 272 power amplifier can be configured to be
mono (Bridge Mode), more than doubling its output power: 2 x
120 vs. 1 x 300 Watt. This way, the NAD C 272 can be used as part
of a high power stereo or home-theatre system, by connecting
adding additional power amplifiers. 

Set the BRIDGE MODE switch to the “Bridge” position and
connect the speaker to the terminals marked ‘L +’ and ‘R+’
ensuring that the ‘L+’ is connected to the  ‘+’ terminal on your
loudspeaker and the ‘R+’ is connected to the loudspeaker’s  ‘-’
terminal. Connect the source to the Left FIXED, or VARIABLE input.

In Bridged Mode the NAD C 272 will produce approximately 300W
into an 8 ohm loudspeaker. In this mode, the amplifier sections will
react as though the speaker impedance has been halved. Low
impedance speakers (under 8 ohms) are not recommended when
using Bridge Mode, as these may cause the amplifier’s thermal cut-
out to operate if played at high levels. 

The Bridge Mode indicator on the front panel (Fig. 2; No. 6) will
illuminate when the amplifier is in Bridge mode.

NOTES: 

Do not connect anything to the Right “Fixed In” or Right

“Variable In” sockets when Bridge Mode is selected.

Always turn the C 272 and other components in the system off
before connecting or disconnecting anything to the “Fixed In” or
Variable In” sockets.

7. SOFT CLIPPING™

When an amplifier is driven beyond its specified power output, a
hard, distorted sound can be heard on very loud sounds. This is
caused by the amplifier cutting off or ‘hard clipping’ the peaks of
sound that it was not designed to reproduce. The NAD Soft
Clipping™ circuit gently limits the output of the system to
minimise audible distortion if the amplifier is overdriven.

If your listening involves moderate power levels you may leave the
Soft Clipping™ switch to Off. If you are likely to play at high levels,
that could stretch the amplifier’s power capability, then switch Soft
Clipping™ On.

The Soft Clipping™ indicator on the front panel will illuminate
when the amplifier is in Soft Clip mode.

8. 12V TRIGGER AUTO ON-OFF

The C 272’s 12V trigger input allows it to be switched to On and
Stand-by remotely by an external component. 

Set the 12V Trigger switch set to the “ON” position to activate the
12V Trigger input. When the switch is set to the Off position, the
12V trigger input is not active. Refer to section “12V Trigger In”
below for more information.

9. 12V TRIGGER IN

This input allows the C 272 to be switched remotely to stand-by
and on or by ancillary equipment such as a preamp, AV processor,
etc. which are also equipped with a 12V trigger output. 

For switching Stand-by/Power On of the C 272 by an external
component, connect the12V-trigger input of the C 272 to the
remote component’s DC output jack. The plug required is a
standard 3.5mm Mini-Jack plug (“mono”): The tip is the live or +
connection, the shaft of the input jack is the 12V-trigger - or
ground connection.

NOTES:

The C 272’s 12V Trigger will work within a range of 6 to

15 V DC level and typically draws less than 10mA of current.
Check the specifications of the Trigger output terminal on the
remote component to ensure it is compatible with the C 272’s
12V-trigger input. NAD components equipped with 12V output
triggers are fully compatible with the C 272’s 12V input trigger.

Before making any connections to any 12V trigger input or output,
make sure all components are disconnected from the AC mains.

Failure to observe the above may result in damage to the C 272 or
any ancillary components attached to it. If in doubt over the
connections, installation and operation of the 12V trigger output
consult your NAD dealer.

10. AC LINE CORD

Plug the AC power cord into a live AC wall socket. Make sure all
connections have been made before connecting to mains.

11. VACATION ON/OFF

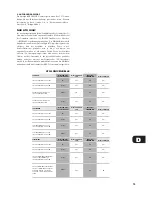
The 

VACATION

switch is the master on/off control for the amplifier.

When the switch is in the 

ON

state the amplifier is in standby as shown

GB

5

Summary of Contents for C 272

Page 1: ...C 272 Stereo Power Amplifier Owner s Manual GB Manuel d Installation F Bedienungsanleitung D Manual del Usuario E Manuale delle Istruzioni I Manual do Propriet rio P Bruksanvisning S...

Page 2: ...d into the unit or C The unit has been exposed to rain or liquids of any kind or D The unit does not appear to operate normally or exhibits a marked change in performance or E The device has been drop...

Page 3: ...OFF INPUT SELECT VAR FIX BRIDGE MODE OFF ON SOFT CLIPPING SPEAKERS A SPEAKERS B L R MONO INPUT LEVEL dB MIN MAX ON MONO LEFT CH OFF STEREO IN 100mA ON VACATION OFF SENSE DEFEAT SLEEP WAKE 10 AC IN 23...

Page 4: ...4 This can be useful for Level matching In a surround sound or system with more than one set of speakers differences in levels can occur due to variances in efficiency between these speakers In case y...

Page 5: ...Mode as these may cause the amplifier s thermal cut out to operate if played at high levels The Bridge Mode indicator on the front panel Fig 2 No 6 will illuminate when the amplifier is in Bridge mode...

Page 6: ...nd or check the speaker connections making sure the overall loudspeaker impedance doesn t go below 4 ohms or 8 ohms in Bridge Mode Once the cause for the protection circuitry to engage has been remove...

Page 7: ...switch Green SWITCH LED Green 12V TRIGGER LED Green SENSE LED OFF OFF OFF OFF VACATION switch set to OFF SWITCH 12V TRIGGER Amber LED over front power switch Green SWITCH LED Green 12V TRIGGER LED Gr...

Page 8: ...ers wired out of phase Bridge Mode selected when speakers are connected normally Check connections to all speakers in the system Disengage Bridge Mode POWER PROTECTION LED STAYS RED UPON TURNING POWER...

Page 9: ...GB 9...

Page 10: ...es Utilisez un c ble jumel RCA vers RCA pour brancher le connecteur de Sortie Audio Audio Output gauche et droit du pr amplificateur ou processeur aux prises d Entr e Variable Variable In NOTES Vous...

Page 11: ...re haut parleur et que la borne R est reli e la borne du haut parleur Reportez vous aussi la section Mode Pont de ce m me chapitre N 6 N utilisez que du fil torsad haute puissance calibre 16 1 5 mm ou...

Page 12: ...re revendeur NAD 10 CORDON ALIMENTATION SECTEUR Branchez le cordon secteur une prise de courant murale en tat de marche Veillez ce que tous les branchements aient t faits avant de brancher le cordon a...

Page 13: ...tr es reportez vous la rubrique Commandes et branchements sur le panneau arri re section VEILLE VEIL CAPTEUR INHIB SLEEP WAKE SENSE DEFEAT Apr s avoir mis l amplificateur sous tension via la logique d...

Page 14: ...UR SWITCH LED verte d ASSERVISSEMENT 12 V 12V TRIGGER LED verte CAPTEUR SENSE TEINTE TEINTE TEINTE TEINTE Interrupteur VACANCES VACATION en position OFF ORANGE TEINTE ARR T TEINTE Interrupteur VACANCE...

Page 15: ...connect s normalement V rifier le branchement de tous les haut parleurs de la cha ne D sactiver le Mode Pont LA LED D ALIMENTATION PROTECTION RESTE ROUGE LORS DE LA MISE SOUS TENSION Court circuit da...

Page 16: ...stellen Sie sicher da sich der Eingangswahlschalter INPUT SELECT Nr 2 in Stellung FIX befindet 2 EINGANGSWAHLSCHALTER INPUT SELECT Mit dem Eingangswahlschalter INPUT SELECT wird f r den C 272 der akt...

Page 17: ...Stellen Sie sicher da keine blanken Litzen von Lautsprecherleitungen die R ckwand oder andere Anschl sse ber hren Stellen Sie sicher da nur ca 1 cm blankes Kabel oder Endh lse und keine losen Litzen...

Page 18: ...lung SLEEP WAKE befinden In Stellung SENSE DEFEAT ist diese Kontrolle deaktiviert Steht der Schalter in Position SLEEP WAKE schaltet der NAD Verst rker der CI Serie sofort aus dem Bereitschaftsmodus e...

Page 19: ...mationen dazu finden Sie in R ckwandanschl sse Abschnitt 6 Bridge Modus Gelbe LED ber Front Netzschalter Gr ne SCHALTER LED Gr ne 12V TRIGGER LED Gr ne SENSE LED Gelbe LED ber Front Netzschalter Gr ne...

Page 20: ...ER KEIN STEREOKLANGBILD Lautsprecheranschl sse verpolt Aktiver Bridge Modus bei normal angeschlossenen Lautsprechern Alle Lautsprecheranschl sse im System berpr fen Bridge Modus deaktivieren POWER PRO...

Page 21: ...D 21...

Page 22: ...FIX para usarlo con Fixed In y en VAR para usarlo con Variable In Vea tambi n la secci n Variable In de este cap tulo para m s informaci n 3 VARIABLE IN Usando las entradas Variable es posible ajusta...

Page 23: ...tavoz de todos los altavoces sea de m s de 8 ohmios al conectar dos conjunto de altavoces En Modo Bridge la impedancia del altavoz ha de ser tambi n de 8 ohmios o mayor Ponga siempre en off el C 272 y...

Page 24: ...lantero del amplificador se produce ello por encima de una se al de entrada de 20mV de tensi n eficaz rms Si se hallan ausentes todas las se ales de audiofrecuencia durante aproximadamente 5 minutos e...

Page 25: ...CI TABLA DE ATO LOGIC LOGITR NICA ATO LED anaranjado encima int red LED verde SWITCH LED verde 12V TRIGGER LED verde SENSE OFF OFF OFF OFF Conmutador VACATION en OFF ANARANJADO OFF OFF OFF Conmutador...

Page 26: ...leados fuera de fase Bridge Mode seleccionado cuando se conectan los altavoces normalmente Compruebe conexiones con todo s los del sistema Desactive el Bridge Mode DIODO LED POWER PROTECTION PERMANECE...

Page 27: ...E 27...

Page 28: ...input Input Select No 2 sia nella posizione Fix 2 SELEZIONE DEGLI INPUT INPUT SELECT L interruttore per la selezione degli input Input Select stabilisce quale input del C 272 attivo Impostare su FIX p...

Page 29: ...collega solo una coppia di altoparlanti assicurarsi che l impedenza per tutti gli altoparlanti sia superiore ad 8 ohm quando si collegano due serie di altoparlanti Nel Bridge Mode l impedenza dell al...

Page 30: ...o master di acceso spento dell amplificatore Quando l interruttore acceso l amplificatore in stato standby cos come segnalato dal LED color ambra posto sopra l interruttore di alimentazione sul pannel...

Page 31: ...N VERDE ACCESO SPENTO SPENTO Premere l interruttore di alimentazione anteriore con l interruttore VACATION impostato su ON AMBRA SPENTO SPENTO SPENTO Premere l interruttore di alimentazione anteriore...

Page 32: ...e selezionato quando gli altoparlanti sono connessi nel modo normale Controllare le connessioni a tutti gli altoparlante dell impianto Disinserire il Bridge Mode IL LED ALIMENTAZIONE PROTEZIONE RIMANE...

Page 33: ...I 33...

Page 34: ...er equipamento s tomadas de Entradas fixas ou de Entradas vari veis Quando utilizar as tomadas de Entradas fixas certifique se de que o interruptor do Selector de Entrada Input Select No 2 est comutad...

Page 35: ...liga o de alta corrente podem ser utilizados como terminais de aperto para os cabos cujas extremidades possuam patilhas ou terminais de pinos ou para cabos com fios a descoberto nas extremidades CABO...

Page 36: ...NAD equipados com sa das de disparo de 12 V s o totalmente compat veis com as entradas de disparo de 12 V do C 272 Antes de efectuar qualquer liga o a qualquer entrada ou sa da de disparo de 12 V cer...

Page 37: ...TEC O O LED de DETEC O SENSE fica aceso com uma luz verde quando o amplificador detecta um sinal superior a 20mV RMS em qualquer das suas entradas queira por favor consultar a sec o Comandos e liga es...

Page 38: ...o interruptor de Alimenta o localizado no painel dianteiro com o interruptor de VACATION comutado para a posi o de ON LIGADO DESLIGADO DESLIGADO DESLIGADO Comute o interruptor de Alimenta o localizad...

Page 39: ...danificado O cabo de entrada est desligado ou danificado Coloque o bot o de controle do Balan o na posi o central Verifique as liga es e os altifalantes Verifique os cabos e as liga es BAIXOS FRACOS I...

Page 40: ...ngarna skall omkopplaren Input Select Nr 2 st i l ge FIXED 2 ING NGSV LJARE Denna omkopplare v ljer vilken ing ng p C 272 som skall anv ndas Se ven n sta avsnitt f r mer information 3 VARIABEL ING NG...

Page 41: ...riable ing ngen i bryggkopplat l ge T NK P ATT se till att apparaterna r avslagna innan n gra anslutningar g rs 7 SOFT CLIPPING N r en f rst rkare drivs s att den angivna effekten verskrids klipper f...

Page 42: ...en med POWER knappen och efter ett par sekunder lyser Stand By indikatorn Nr 1 och efter ett litet tag slocknar den f r att visa att apparaten r klar att anv nda 3 TRIGGER LYSDIODEN 12V TRIGGER lysdio...

Page 43: ...CATION Omkopplare inst lld p P AV P AV AV Tryck p av p knappen p fronten med VACATION omkopplaren inst lld p P P AV AV AV Tryck p av p knappen p fronten med VACATION omkopplaren inst lld p P AV AV AV...

Page 44: ...as F rst rkaren r bryggkopplad med h gtalare normalt anslutna Kontrollera anslutningarna p h gtalarna Koppla ur bryggkopplingen POWER SKYDDSL GESLYSDIODEN LYSER R TT VID ANV NDANDE F rst rkaren r verh...

Page 45: ...S 45...

Page 46: ...03 NAD ELECTRONICS All rights reserved No part of this publication may be reproduced stored or transmitted in any form without the written permission of NAD Electronics International C 272 Manual 10 2...

Reviews: