background image

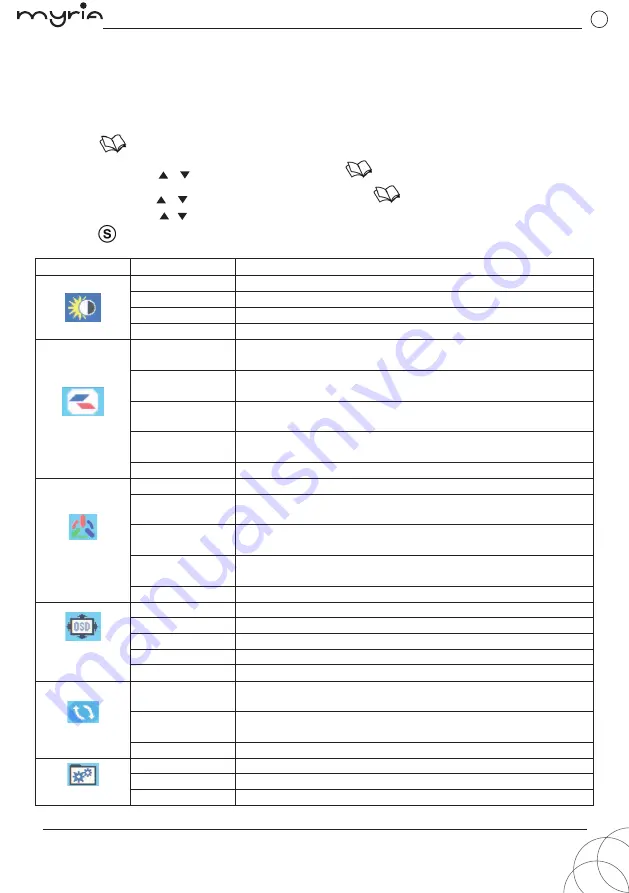
USING THE OSD MENU

Note: 

The following content is for general reference only.Your monitor is equipped with an 

on-screen display (OSD) menu for making various adjustments and settings.

EN-4

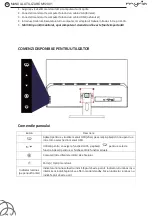
1. Press 

  to open the 

O

SD menu to adjust the general settings. 

2. Repeatedly press 

/

 to select a menu and press 

to enter this menu.   

3

. Repeatedly press

/

 to select an sub-menu and press 

.   

4

. Repeatedly press 

/

to adjust the settings. 

5

. Press 

  to go to the previous sub-menu.   


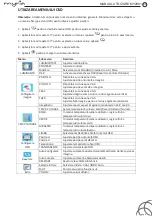
Menu 

Submenu


Description   


B

rightness           Adjust the brightness.


Contrast

Adjust the contrast.


Eco Mode            Select a mode: Standard/Internet/Game/Movie


DCR 

Enable or disable DCR (Dynamic Contrast Ratio) 


Image Setup

Luminance

H. Position

Available with VGA connection 
Adjust the picture hori

z

ontal position. 


V. 

P

osition

Available with VGA connection 
Adjust the picture vertical position.


Clock

Available with VGA connection 
Adjust the picture clock to reduce vertical noise.


Phase

Available with VGA connection 
Adjust the picture phase to reduce hori

z

ontal noise.


ImageRatio         Adjust the image aspect ratio as 16:9 or Wide screen mode .

.

.

.

Color Setup

Color Temp.  

LowBlue Mode

Set a color temperature: Warm

/

Cool

/

User

Set a LowBlue Mode: Off/Weak/Medium/Strong.

/

Normal 


RED 

In user color temperature mode, finely tune red color 
temperature. 

GREEN 

In user color temperature mode, finely tune green color 
temperature. 

B

LUE 

In user color temperature mode, finely tune blue color 
temperature. 

O

SD Setup


Language    

Select a desired language displayed on 

O

SD menu. 


H.Position     

Adjust 

O

SD hori

z

ontal position.   

V.Position   

Adjust 

O

SD vertical position.   

Timeout    

Adjust 

O

SD display timer.   

Transparence   Adjust 

O

SD transparency.   

Reset


Auto Config. 

Automatically adjust the hori

z

ontal

/

vertical position, focus 

and clock of the image.   

Auto Color

Automatically adjust the white balance.   

Reset  

Restore to factory settings.   


Extra

Input Select   Select input: VGA

/

HDMI/Auto.   

Mute  

Turn on or off the mute function.   

Volume  

Adjust the speaker volume.   


pag. 4

MY2901 USER MANUAL

GB

Summary of Contents for MY2901

Page 1: ...LED Monitor Users s Manual Monitor LED Manual de utilizare ...

Page 2: ... substanțe chimice Nu lăsați ambalajele din plastic la îndemâna copiilor Deconectați monitorul înainte de a îl curăța cu o cârpă ușor umedă Trageți întotdeauna de ștecăr și niciodată de cablu atunci când îl deconectați Asigurați vă că monitorul este așezat pe o suprafață plană stabilă de unde nu va cădea Nu îndepărtați niciodată carcasa din spate Monitorul conține componente de înaltă tensiune Put...

Page 3: ...GA Manual de utilizare Certificat de garanție ATAȘAREA BAZEI Observație Scoateți monitorul și baza monitorului din ambalaj Așezați cu atenție monitorul cu fața în jos pe o suprafață stabilă utilizați o cârpă pentru a evita zgârierea ecranului 1 Fixați brațul de sprijin pe monitor strângând cele 2 șuruburi furnizate 2 Atașați brațul de sprijin pe bază și blocați l strângând cele 2 șuruburi furnizat...

Page 4: ...omenzile panoului Buton Descriere Apăsați pentru a vizualiza meniul OSD afișaj pe ecran Apăsați din nou pentru a intra într o selecție din meniul OSD Utilizați pentru a naviga la funcția dorită și apăsați pentru a selecta funcția Apăsați pentru a schimba setările funcției actuale Comutați între diferitele intrări ale afișajului Porniți Opriți monitorul Indicator luminos pe panoul frontal Indicator...

Page 5: ...are imagine ceas pentru a reduce zgomotul vertical FAZĂ Disponibil cu conexiune VGA Ajustare fază imagine pentru a reduce zgomotul orizontal ImageRatio Ajustare raport aspect imagine în modul ecran 16 9 sau 4 3 TEMP CULOARE TEMP CULOARE Setare temperatură culoare Cald Rece Utilizator Normal ROȘU În modul temperatură culoare utilizator reglare fină a temperaturii culorii roșu VERDE În modul tempera...

Page 6: ...afișajului în sistem În cazul unei imagini lipsă vă rugăm să selectați o altă rezoluție sau alt vertical refresh CURĂȚARE ȘI ÎNTREȚINERE Opriți și scoateți monitorul din priză înainte de curățare Ștergeți carcasa cu o cârpă moale umedă Ștergeți orice urme de praf de pe monitor în mod periodic utilizând o cârpă moale curată și uscată Nu utilizați niciun lichid deoarece acesta ar putea deteriora ecr...

Page 7: ...contribui la conservarea resurselor naturale și la asigurarea faptului că materialele sunt reciclate într un mod care protejează sănătatea și mediul Trebuie să respectați legislația și reglementările privind eliminarea Deșeurile de produse electrice și bateriile trebuie eliminate separat de deșeurile casnice atunci când produsul ajunge la sfârșitul duratei de viață Contactați magazinul de unde ați...

Page 8: ...d Model Monitor calculator Myria MY2900 sunt conforme cu Directivele 2014 30 EU directiva EMC 2014 35 EU directiva LVD 2011 65 EU RoHS si standardele Europene Categorie Tip Produs Standarde applicate EMC Monitor calculator EN 55032 2015 EN 55024 2010 EN 61000 3 2 2014 EN 61000 3 3 2013 LVD Monitor calculator EN 60950 1 2006 A11 2009 A1 2010 A12 2011 A2 2013 Aparatul poarta marcajul CE respectand t...

Page 9: ...pag 8 LED Monitor Users s Manual ...

Page 10: ...osed to chemical substances Keep all plastic packaging materials out of children s reach Unplug the monitor before cleaning it with a slightly damp cloth Always grip the plug and never pull on the cord when unplugging Ensure the monitor is positioned on a flat stable surface where it will not fall Never remove the rear cover This monitor contains high voltage parts You may be seriously injured if y...

Page 11: ...nual Warranty Card Note Remove the monitor and monitor base from the packaging Carefully place the monitor face down on a stable surface use a cloth to avoid scratching the screen 1 Secure the stand arm to the monitor by tightening the 2 supplied screws 2 Attach the monitor stand arm to the base and lock it onto the base by tightening the 2 supplied screws HDMI D SUB AUDIO IN AUDIO OUT DC HDMI D S...

Page 12: ... the computer This sequence is very important EN 3 Button Description Press to view the OSD on screen display menu Press it again to enter a selection in the OSD menu Used to navigate to the desired function and press to select the function Press to change the settings of the current function Switch between the different inputs of the display Turn the monitor on off Indicator light on the front pane...

Page 13: ...clock to reduce vertical noise Phase Available with VGA connection Adjust the picture phase to reduce horizontal noise ImageRatio Adjust the image aspect ratio as 16 9 or Wide screen mode Color Setup Color Temp LowBlue Mode Set a color temperature Warm Cool User Set a LowBlue Mode Off Weak Medium Strong Normal RED In user color temperature mode finely tune red color temperature GREEN In user color t...

Page 14: ... display setting on your system In case of a missing image please select another resolution or vertical refresh rate CLEANING AND MAINTENANCE Switch off and unplug the monitor from the mains socket before cleaning Wipe the housing with a soft damp cloth Wipe any dust off the screen periodically with a soft clean and dry cloth Do not use any fluid as this may damage the screen Do not immerse the monit...

Page 15: ...nserve natural resources and ensure that the materials are recycled in a manner that protects health and the environment You must follow laws and regulations about disposal Waste electrical products and batteries must be disposed of separately from household waste when the product reaches the end of its life Contact the store where you bought the product and your local authority to learn about dis...

Page 16: ......

Reviews: