MYIRO myiro-9 Instruction Manual Download Page 9

Unpacking

Unpacking the Optional Auto Sheet Feeder FD-A09

Packing Materials

Keep all packing materials (cardboard box, cushioning materials, plastic bags, etc.) in a safe place. In the event that the FD-A09 needs to 
be shipped to an authorized service facility, the packing materials can be used to protect the product from impact and vibration during 
shipment. If the original packing materials are lost or damaged, please contact your retailer.

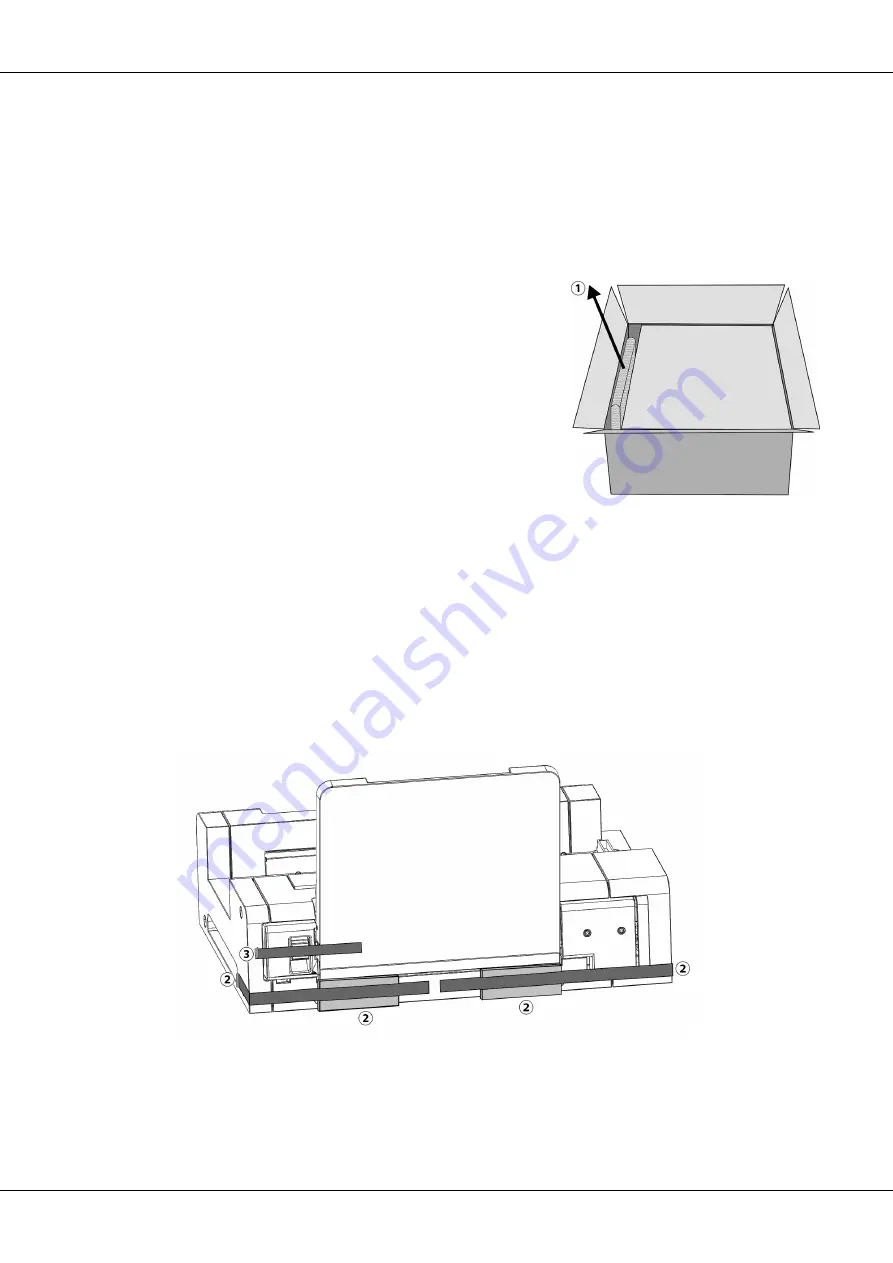
Removing FD-A09 from Box

After opening the box of the FD-A09, remove the output tray as indicated by 

 at right before removing any of the other materials.

Remove the cardboard inserts and cushioning materials, and then carefully lift the FD-A09 
out of the box and place it where it will be used.

Removing Tapes

To protect some parts of the FD-A09 and prevent their movement during shipment, spacers have been taped to the FD-A09 or parts have 
been taped in place. The tapes and spacers must be removed before use. After placing the FD-A09 where it will be used, remove the tapes 
and spacers in the order specified below.

Remove the two spacers under the supply tray and the tapes holding them in place (

 below) and then remove the tape 

 from the 

supply tray.

Remove the two tapes 

 holding the supply tray closed against the FD-A09, remove the tape 

 holding the extension tray closed, and 

7

Summary of Contents for myiro-9

Page 1: ...AUTO SCAN SPECTROPHOTOMETER En INSTRUCTION MANUAL Before using this instrument please read this manual...

Page 2: ...d Denotes an instruction This instruction must be strictly adhered to Denotes a prohibited action Never disassemble the instrument Denotes an instruction Be sure to disconnect the AC adapter from the...

Page 3: ...d if it is damaged or the AC adapter is damaged or if smoke or odd smells occur Doing so may cause a fire In such situations turn the power off immediately disconnect the AC adapter plug from the AC o...

Page 4: ...ltitudes higher than 2 000 m The MYIRO 9 and the AC adapter supplied as a standard accessory have been designed exclusively for indoor use They should never be used outdoors because rain or other fact...

Page 5: ...s where dust cigarette smoke or chemical gases are present Doing so may cause deterioration in performance or a breakdown Entry of dust into the instrument will hinder accurate measurement When the in...

Page 6: ...7 Removing Tapes 7 Standard Accessories 9 Software 9 Optional Accessories 10 System Diagram 11 Names and Functions of Parts 12 Preparations 13 Setting up MYIRO 9 14 Necessary space 14 Attaching Remov...

Page 7: ...rts when using the MYIRO 9 alone 28 Feeding test charts when using optional Auto Sheet Feeder FD A09 28 Settings screen 29 Opening closing settings screen 29 Settings screen layout 29 Setting items 30...

Page 8: ...s of the MYIRO 9 have been taped in position to avoid movement during shipment The tapes must be removed before use After unpacking the MYIRO 9 and placing it in its final location remove the tape str...

Page 9: ...emoving any of the other materials Remove the cardboard inserts and cushioning materials and then carefully lift the FD A09 out of the box and place it where it will be used Removing Tapes To protect...

Page 10: ...Unpacking then remove the two tapes holding the cover closed Open the supply tray by tilting it down and remove the tape and cushion indicated by below 8...

Page 11: ...de the test chart into the instrument when feeding test charts manually Software Measurement Utility Software FD S2w Used to control the instrument from a computer Available for free download from the...

Page 12: ...utomatically feed test charts into the instrument Recommended maximum number of loaded sheets Normal paper 80 g m2 100 sheets Heavy paper 130 g m2 70 sheets Paper size Paper width 90 to 320 mm Paper l...

Page 13: ...Computer commerciallyavailable AC Adapter Auto Sheet Feeder FD A09 Measurement Utility Software FD S2w free download Standard accessories Optional accessories Auto Scan Spectrophotometer MYIRO 9 MYIR...

Page 14: ...r connecting to the AC adapter 9 LAN connection terminal For connecting the instrument to a wired network 10 USB connection terminal For connecting the instrument to a computer via USB 11 Auto Sheet F...

Page 15: ...Preparations 13...

Page 16: ...y extend from the MYIRO 9 without obstacles See below If the MYIRO 9 is set up on a rough surface or a surface which is not level measurement accuracy may suffer Obstacles may cause the color chart to...

Page 17: ...per Guide with the paper guide mounting slots of the MYIRO 9 and insert the hooks fully 2 Slide the Paper Guide straight down until the Paper Guide clicks in place Be careful to slide the Paper Guide...

Page 18: ...by one to be scanned The FD A09 should be set up on a flat level surface with sufficient space for both the supply tray and the output tray to be fully opened There should be enough space for the colo...

Page 19: ...put Tray to Auto Sheet Feeder FD A09 To attach the output tray to the FD A09 hold the tray tilted upward and insert the two tabs at the base of the tray into the corresponding slots on the back of the...

Page 20: ...k side 3 Push down on the tab of the Auto Sheet Feeder connector cover pull the cover open and remove it Please store the cover carefully so that it will not be lost or broken 4 Return the MYIRO 9 to...

Page 21: ...A09 1 Switch off the power of the MYIRO 9 2 Unplug all cords and cables AC adapter power cord USB cable LAN cable from the MYIRO 9 3 Lift the MYIRO 9 straight up off of the Auto Sheet Feeder 4 Replace...

Page 22: ...pter with wet hands Doing so may cause electric shock Be sure to insert plugs fully and securely Incomplete insertion may cause fire or electric shock Do not disassemble or modify the AC adapter or co...

Page 23: ...will start up The MYIRO logo will be displayed for a few seconds followed by the initialization display When initialization has been completed after about 25 seconds the Please connect display will be...

Page 24: ...e powered via the USB cable The AC adapter must be used Make sure that the USB connector plugs are properly oriented and connected securely Check the shapes of the receptacle and plug and insert the p...

Page 25: ...will appear in the list followed by the assigned COM port in parentheses On Windows 8 Windows 8 1 or Windows 10 1 Point to the lower left corner of the screen and then right click in the window that...

Page 26: ...s will be disabled if DHCP is set to ON To change the setting to OFF see p 26 3 Press or repeatedly to set the desired value for the first number Holding or pressed will cause the value to change cont...

Page 27: ...the lowest or highest value has been reached the number will change to the highest or lowest value 12 Press to move to the next number 13 Repeat steps 3 and 4 until all numbers have been set for the d...

Page 28: ...ing the DHCP setting 1 Press to open the settings screen 2 Press or repeatedly to select DHCP and press 3 Press or to change the setting to the desired setting ON Network settings are performed automa...

Page 29: ...lowing test charts should not be fed into the MYIRO 9 or loaded in the optional Auto Sheet Feeder FD A09 Doing so may cause jams or may damage the MYIRO 9 and or the FD A09 Wrinkled folded or torn cha...

Page 30: ...the test chart in straight If the paper guide positions are too narrow or if the test chart goes in at an angle the test chart may ride up onto the paper guides which may cause measurement accuracy to...

Page 31: ...shown press to close the settings screen and cancel any incomplete settings Settings screen layout The settings screen is divided into 4 main parts Selection area for selecting the item to view or set...

Page 32: ...is set to ON Changes made using the buttons are not applied until SAVE DATA is performed Subnet mask See p 24 Subnet mask xxx xxx xxx xxx set on MYIRO 9 It can be set using the and buttons or from so...

Page 33: ...to open the settings screen 2 Press or repeatedly to select Display language and press A list of the language selections will appear with the current setting highlighted 3 Press or repeatedly to selec...

Page 34: ...en switch it back on If the error continues to occur note the Error code and Warning code numbers and contact your retailer Clearing paper jams If the paper becomes jammed during measurement follow th...

Page 35: ...he MYIRO 9 within the MYIRO 9 or where the paper feeds from the MYIRO 9 through the Auto Sheet Feeder into the exit tray To clear paper jams check each section 1 Switch off the MYIRO 9 2 Disconnect al...

Page 36: ...the panel If there is paper there remove it 8 Close the top cover and inner cover and then swing the supply tray mechanism closed again 9 If there is paper jammed on the exit tray side remove it 10 Re...

Page 37: ...The base should stay flat 7 Wipe the surface of the white calibration plate with a clean dry soft lint free cloth or lens cleaning tissue If the white calibration plate is stained lens cleaning fluid...

Page 38: ...asp the ends of the MYIRO 9 and tilt the MYIRO 9 body backward as shown The base should stay flat 7 Clean the cover glass of the line sensor and the white backing and other plastic surfaces with a cle...

Page 39: ...m patch size 6 6 mm Maximum number of patches per page A4 size paper 1394 A3 size paper 2928 Positioning markers are not necessary 1 When using optional Auto Sheet Feeder FD A09 the maximum recommende...

Page 40: ...Dimensions Auto Scan Spectrophotometer MYIRO 9 Auto Sheet Feeder FD A09 mm 156 173 200 245 121 108 1158 339 461 235 225 601 343 205 175 337 716 457 251 159 39 199 38...

Page 41: ...33 mm Left right sides 4 mm each Output item Spectral reflectance Illumination conditions 2 M0 A M1 D50 M2 A UV filter C ID50 D65 ID65 F2 F6 F7 F8 F9 F10 F11 F12 User defined illuminant Backing condi...

Page 42: ......

Page 43: ...RESULTING FROM THE MISUSE MISHANDLING UNAUTHORIZED MODIFICATION ETC OF THIS PRODUCT OR FOR ANY INDIRECT OR INCIDENTAL DAMAGES INCLUDING BUT NOT LIMITED TO LOSS OF BUSINESS PROFITS INTERRUPTION OF BUS...

Page 44: ...9222 A8AN 31 CAIADX En...

Reviews: