Mvix Wireless Hi-Def Multimedia Player User Manual Download Page 21

Chapter 3: Basic Setup

To access a password-protected folder:
1. Using the arrow-buttons on the Mvix Remote, navigate to the 

folder and press ENTER / SELECT.

2. An Enter-Password prompt will popup. Enter the folder 

password to access the folder contents.

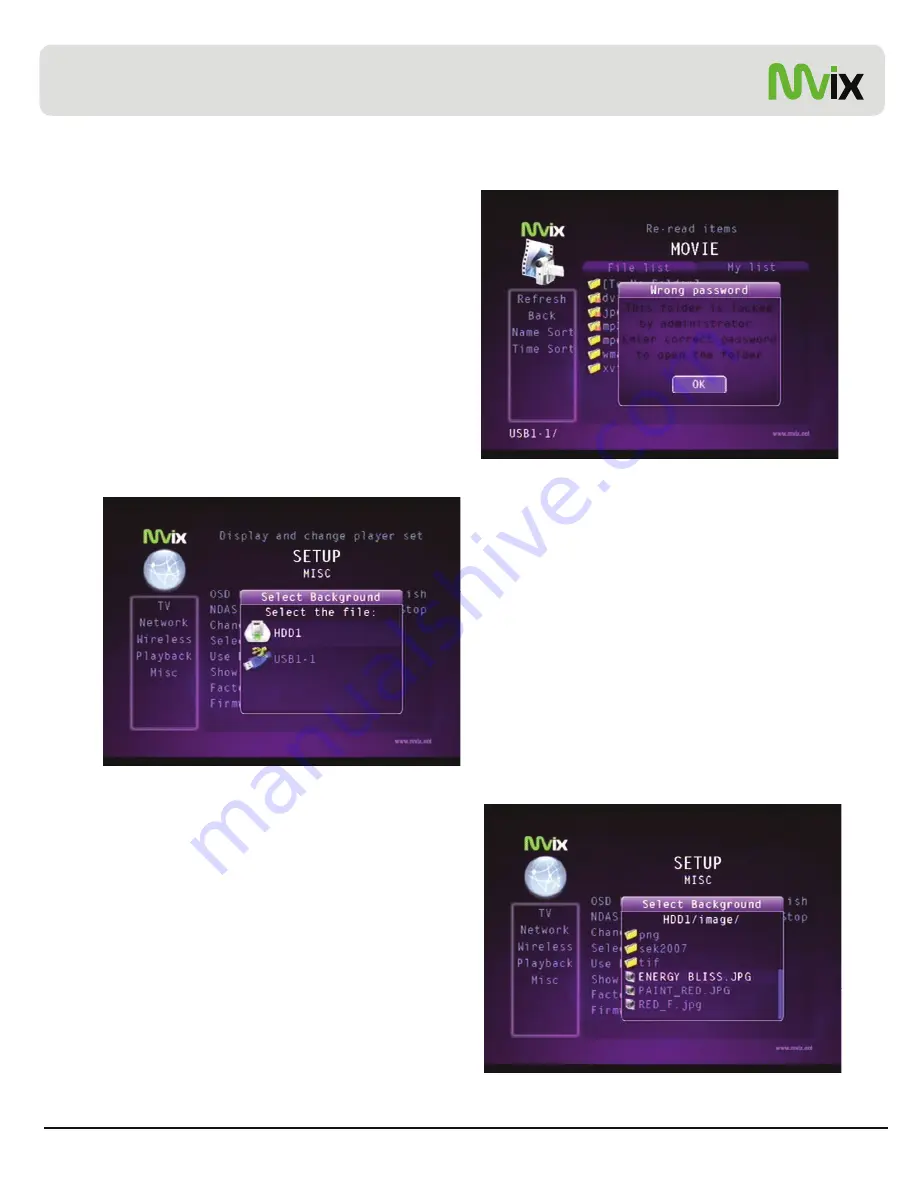
3.Inputting an incorrect password displays the warning as 

shown.

NOTE: Folder Passwords are CASE SENSITIVE

MODIFY BACKGROUND WALLPAPER

:

Background wallpaper of the setup menu and playback screens 
can be changed as per user preference

can be changed as per user preference.

Under MISC setup, navigate and choose “Select Background”. 
A Select Background file popup allows browsing and choosing a 
JPEG/JPG, BMP, PNG file. Any of these digital image files can 
be applied as a wallpaper

The wallpaper files can be selected from the local Mvix-HDD, 
USB-Host Storage or Network-Shared folder on the PC.

Maximum resolution of a digital image file that can be used as a 
Background Wallpaper: 1920 x 1080

Browse, select and press ENTER / SELECT the image file. 
The Background Wallpaper will be applied.

Unicorn Information System

21

In order to revert to the Default Background, choose “Use Def. 
Background” under MISC setup.

Summary of Contents for Wireless Hi-Def Multimedia Player

Page 1: ...MVIX Wireless Hi Def Multimedia Player Unicorn Information System 1 Users Manual...

Page 2: ...in a product of the highest long term aesthetic and commercial value We hope you will find the Mvix player to be a rewarding experience and a worthy investment We have made this manual as short as po...

Page 3: ...r PC through a Network 4 1 Setting up Network Sharing using Windows XP on your PC 23 4 2 Wired Network Connections 29 4 2 Wired Network Connections 29 4 3 Wireless Network 30 Chapter 5 Media Playback...

Page 4: ...the power and then wipe the unit with a soft piece of dry cloth Do not use any chemicals or sprays for cleaning Visit mvixusa com for additional product information for troubleshooting Don ts Don t ex...

Page 5: ...changing the setting to SLAVE or CS Do not forget to format and partition your HDD after installing it in the Mvix player Primary Partition is recommended when creating two or more partitions within...

Page 6: ...g of multiple files within a folder Audio Jukebox A perfect music jukebox that supports multiple audio formats MP3 AC3 WMA DTS with digital audio output and down mixing capability Digital Photo Album...

Page 7: ...0 1080 Hi Def Decoding HD COMPONENT Y Pb Pr 480 720 1080 HD HDMI 480 720 1080 1080 WMV ASF AVI and MP4 formats Audio Decoding MPEG 1 and MPEG 2 Layers I II and III MP3 MPEG 2 BC multi channel layers I...

Page 8: ...Chapter 2 Introduction 2 3 Package Contents MX 780HD Remote Control Stand 5dBi Antenna A V Cable Power Adaptor Power Cable USB Cable User Manual Driver CD Unicorn Information System 8...

Page 9: ...hapter 2 Introduction 2 3 Getting Familiar with your unit Front View 1 Navigation Toggle Switch 2 Power Button 3 Select OK Button Unicorn Information System 9 4 Stop Button 5 Setup Button 6 LCD Screen...

Page 10: ...video Port 2 Optical Audio Port 10 HDMI Port 3 10 100 Mbps RJ45 LAN 11 High Velocity Fan 4 USB 2 0 Host A Type 2 12 USB 2 0 Slot Unicorn Information System 10 5 Stereo RCA Port 13 Power 6 Component P...

Page 11: ...ack p y PLAY PAUSE Play Continuous Sequential Play Pause Playback VOL Volume Increase Decrease FF End Fast Forward Playback Scroll to end of File List FB Home Fast Backwards Rewind Playback Scroll to...

Page 12: ...ons MX 780HD TV 3 11 Audio Video Connection Setup Y Pb Pr Y Pb Pr Video Video S Video S Video R L R L HDMI HDMI Video Connection Options MX 780HD to Home Theater Audio Connections MX 780HD Home Theate...

Page 13: ...Gently lift the slide panel cover as shown 3 Gently lift the slide panel cover as shown 4 Gently press the enclosure bracket 5 Slide the Hard Drive in the space so as to snugly fit the HDD in the enc...

Page 14: ...drive when you open disk management and start the wizard 1 Right click on My Computer Choose Manage from g y p g the pop up menu and Computer Management window will appear Under Storage choose the Dis...

Page 15: ...full Partition Size is not used right click on the remaining free space once the wizard has completed to partition that space Repeat the Partition Wizard until the drive is how you want it Remember F...

Page 16: ...leted detailed information will appear as shown Click the FINISH button to complete the work 9 Once the drive has been initialized partitioned and formatted it will display as a healthy drive with the...

Page 17: ...NGLE jumper setting CABLE SELECT CS jumper setting SLAVE jumper setting Complete Remove all jumpers USB Host Functionality The Mvix player also provides a USB host port built upon a full speed USB 2 0...

Page 18: ...omponent HDMI etc TV Standard PAL versus NTSC USA customers use NTSC TV Type 4 3 versus 16 9 If using Widescreen Display TV use 16 9 Use the left arro b tton on the M i Remote to na igate Use the left...

Page 19: ...w keys and press ENTER SELECT on the Mvix Remote Video Display Original Letterbox Expand Pan Scan Full Screen Modify display size Sub Position Top Middle Bottom Select the display position of subtitle...

Page 20: ...ired for Factory Reset operation Perform a Hardware Reboot if Admin Password is lost In order to password protect individual folders 1 Using navigation button on the Mvix Remote select the folder to p...

Page 21: ...ference can be changed as per user preference Under MISC setup navigate and choose Select Background A Select Background file popup allows browsing and choosing a JPEG JPG BMP PNG file Any of these di...

Page 22: ...ted 3 Select YES Press ENTER SELECT CAUTION Factory Reset Function cannot be performed without the correct ADMIN PASSWORD Remember to store the ADMIN PASSWORD if changed Original Default Admin Passwor...

Page 23: ...and Select PROPERTIES Alternatively if the MY NETWORK PLACES icon is visible on Alternatively if the MY NETWORK PLACES icon is visible on your Desktop simply right click on the Icon and Select Proper...

Page 24: ...p as shown here Click the NWLink IPX SPX NetBIOS Compatible Transport Protocol and click OK Two NWLink items are added to the connection s Properties As shown two NWLink items are added to the connect...

Page 25: ...ure Windows has disabled remote access to this computer Click the Network Setup Wizard link and follow the instructions If you are sharing a Drive under the the Sharing tab click If you understand the...

Page 26: ...rs to change files over the network Click on APPLY and then select OK A hand will appear under the folder icon indicating that the folder is shared In Windows XP Pro you may also need to define the us...

Page 27: ...d by Microsoft Disable the Windows Firewall at your own Risk Troubleshooting In certain Win XP setups installations the Network Sharing procedure may not work correctly According to Microsoft to run N...

Page 28: ...P IP and click INSTALL Select Protocol and Click ADD Select HAVE DISK Click BROWSE note NetBEUI is not on the list yet Insert the Win XP Professional CD into the CDROM Browse to CD drive VALUEADD MSFT...

Page 29: ...pears in If the network is setup correctly the word Success appears in front of Wire Apply ADDRESS SETUP Default Setup Auto Assign IP from DHCP server Manual Setup Manually enter the IP address to be...

Page 30: ...ly your preferred setting the system will try to acquire the IP address automatically from the router and The Advanced WIRELESS settings menu as shown under will be automatically displayed for modifyi...

Page 31: ...rectly matches the WEP key set on the network router ENTERING WEP KEY Using the Mvix Remote navigate to WEP and press ENTER SELECT A Key Panel Window pops up on the TV Screen On the Key Panel Window n...

Page 32: ...the left side navigation column a list of all available video files is displayed If the device or folder does not appear or cannot be located navigate to the left menu see screen select REFRESH and p...

Page 33: ...ch as Video Audio Format File Size Subtitle Time etc Press the GOTO button and enter the time to jump to a desired time stamp of the video file During Video playback press the A B button to mark a sta...

Page 34: ...edia Playback Changing Subtitle Display Position Choosing Subtitle Language Choosing Subtitle File Unicorn Information System 34 INFO BUTTON Display Basic File Information GOTO BUTTON Jump to desired...

Page 35: ...played sequentially If you navigate to File4 and press PLAY then all files from File4 through File10 are played sequentially However if you navigate to FILE4 and press ENTER SELECT then only FILE4 is...

Page 36: ...dly Toggle the button to remove repetition This is a easy way to play a audio image file in LOOP To adjust volume click the VOLUME button on the Mvix Remote Control A vertical slider is displayed Use...

Page 37: ...avigate to the previous screen folder or device press the RETURN button on the Mvix Remote Control O th di it l i fil i ibl th di l Once the digital image files are visible on the display screen e g T...

Page 38: ...DD or Network Shared folder or USB host You can sort ascend descend your media files by NAME and TIME Navigate to the desired file on the main panel select the file and press PLAY Some media files may...

Page 39: ...and or folder s that you will like to include in MY LIST and press the ADD button on the Mvix Remote The file folder will be added to MY LIST The ADD icon will be visible on the main panel to confirm...

Page 40: ...layed The list is divided so as to enable easy navigation between the different genres If the device or folder does not appear or cannot be located navigate to the left menu see screen select REFRESH...

Page 41: ...n performance It may take a while to recognize MX 780HD as a local hard disk in My Computer window depending on your network system After the use of NDAS remove or dismount MX 780HD safely Similarly t...

Page 42: ...N D i Chapter 6 How to setup NDAS 2 Follow the procedure from NDAS software setup wizard Register a New Device 2 Click Next in NDAS Device Registration wizard 3 Click Finish to get the setup complete...

Page 43: ...can select wire or wireless to get it online e g wire is online white and wireless is offline black in the figure below Caution Backup NDAS ID and Write key It will not be issued again offline black i...

Page 44: ...S as in the figure below Or by clicking the NDAS icon select Dismount option 2 Click yes to dismount your device 3 After dismounting you can see the current status as shown in the figure Unicorn Infor...

Page 45: ...g the Mvix Remote navigate to the folder containing audio files that you will like to use for background music Using the Mvix Remote Press JUKEBOX button select and start audio playback Press JUKEBOX...

Page 46: ...ard drive 4 Transfer the Mvix Firmware Upgrade to the Mvix HDD For firmware updates or news login to your account at http support mvixusa com Signup on the Mvix Newsletter http www mvixusa com to be a...

Page 47: ...rive HDD 2 Check to ensure that the HDD has been correctly partitioned and formatted 3 Try changing the jumper settings to MASTER or SINGLE If that does not work try SLAVE or CABLE SELECT CS jumpers j...

Page 48: ...ceive warranty service please be sure to have your proof of purchase and a barcode from the product s packaging Warranty requests cannot be processed without proof of purchase In no event shall Unicor...

Page 49: ...NCIDENTAL INDIRECT OR CONSEQUENTIAL DAMAGES OF ANY KIND OR ANY DAMAGES WHATSOEVER INCLUDING WITHOUT LIMITATION THOSE RESULTING FROM LOSS OF USE DATA OR PROFITS WHETHER OR NOT AHDMISED OF THE POSSIBILI...

Page 50: ...for normal range speakers which include Right front Center Left Front Right Rear and Left Rear as well as one channel for the subwoofer Mono and Stereo usages are also supported by this format Digital...

Reviews: