


VJ1638UH2E-I-02
6
VJ-1638UH Mark
Ⅱ
INSTALLATION MANUAL
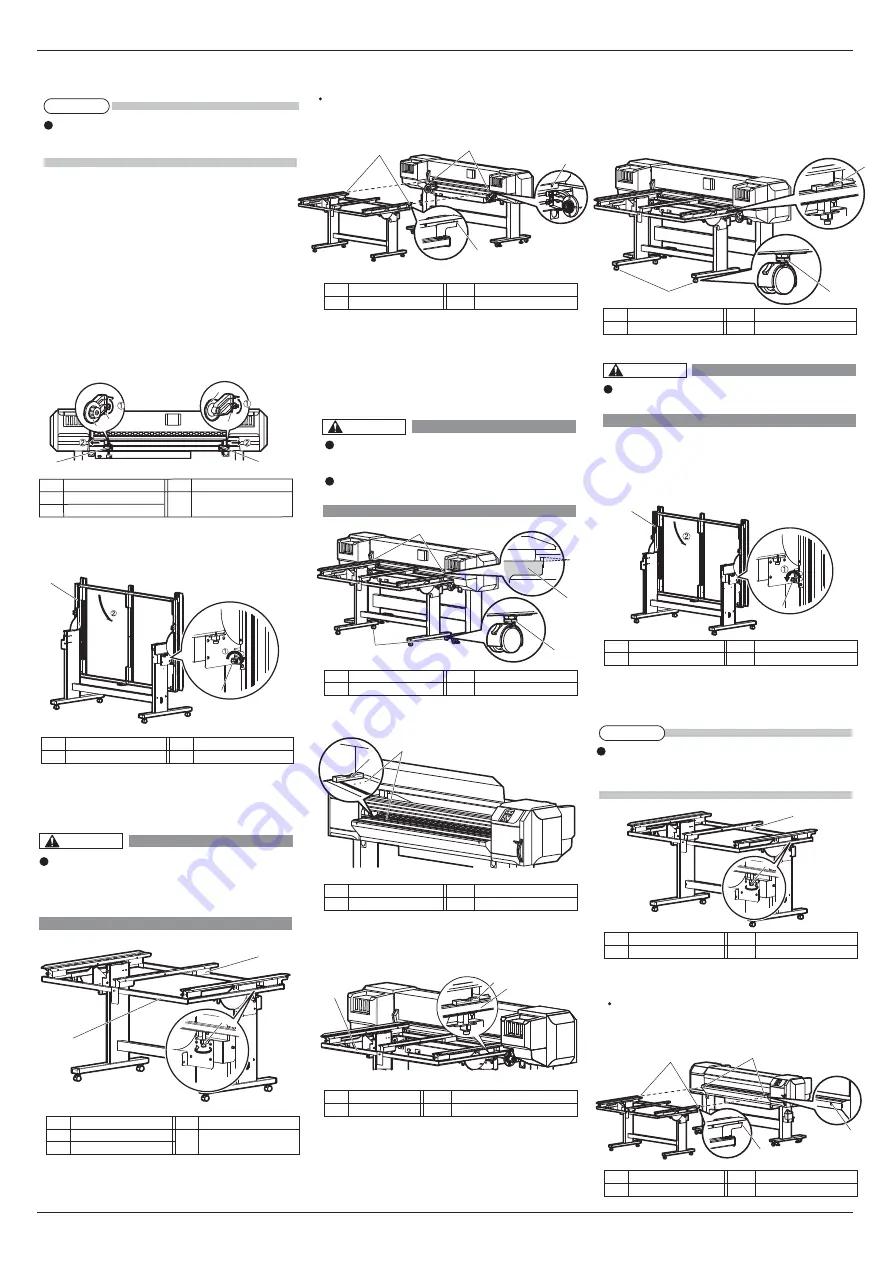
4.2.2
Installing the media-feed tables
(optional)
When Using the roll media for “10 Checking the
print condition”, you do not need to install
media-feed table.
When using rigid media on this printer, use
media-feed table (optional).
Follow the procedure below to install Media-feed
table.
The following items are required for installing
media-feed table:
4. Insert the positioning guide of media-feed table
into the square hole of Paper guide R.
8. Turn the screw of media-feed table’s caster (the
one further from the printer) with a spanner, and
adjust the slant.
9. Adjust the slant on the other side in the same way.
1. Loosen retaining screws of media-feed table, and
slowly level the table.
2. Tighten the leveling screws of media-feed table
(2 places, both sides), and fix the table.
3. Insert the positioning guide of media-feed table
into the square hole of Paper guide F.
If the height of the positioning guide does not
match the square hole, turn the screw of
Mediafeed table’s caster, and adjust the height.
(See step 4.)
When fixing the leveling screws, hold the frame
while pressuring the rubber foot, and then turn the
screw until it doesn’t turn any further.
If media-feed table’s slanted, media may
touch Print head, and Print head may break.
If the height of the positioning guide does not match
the square hole, turn the screw of Mediafeed table’s
caster, and adjust the height. (See step 5.)
Make sure that the position of the level’s air
bubble is at the same position as when you place
it on the printer.
(2)
Front side
5.
Turn the screws on the caster of media-feed table
(2 places, ones closer to the printer) with a spanner.
6.
Place the level at the edge of printer’s platen, and
check the position of the air bubble.
7.
Place the level on the frame of media-feed table.
Place the level on the same side as when you
placed it on the printer.
Adjust so that there is a 6 mm gap between the top
side of the square hole of Paper guide R and the top
side of the positioning guide.
Caster of media-feed table has 2 types
of screws.Turn the bottom screw.
Turn the screw clockwise to raise
Media-feed table.
• Spanner: Accessories for media-feed table
• Level: provided with the printer
(1)
Rear side
1. Loosen the fixing levers on the right and left side
of the rear. Set the distance between the roll media
holders wider than the roll media width.
2. Loosen retaining screws of media-feed table, and
slowly level the table.
3. Tighten the leveling screws of media-feed table
(2 places, both sides), and fix the table.
When fixing the leveling screws, hold
the frame while pressuring the rubber
foot, and then turn the screw until it
doesn’t turn any further.
Roll media holder
(
L)
Name
Roll media holder
(
R)
No.
Name
No.
Name
No.
Name
No.
Name
No.
Name
No.
Name
No.
Name
No.
1
2
Fixing Lever
3
Media-feed table
Leveling screw
1
2
Frame
3
Media-feed table
1
Leveling screw
2
Level
1
Frame of media-feed table
2
Name
No.
Name
No.
Level
1
Platen
2
Name
No.
Name
No.
Screw on the casters
1
Positioning guide
2
Name
No.
Name
No.
Media-feed table
1
Leveling screw
2
Name
No.
Name
No.
Media-feed table
1
Leveling screw
2
Name
No.
Name
No.
Positioning guide
1
Square hole
2
Name
No.
Name
No.
Positioning guide
1
Square hole
2
1
2
1
1
2
1
2
NOTE
CAUTION
1
2
2
1
1
2
1
2
3
NOTE
1
3
1
2
3
2
1
2
2
1
2
1
6mm
2
1
1
2
1
2
1
Name
No.
Name
No.
Scrwews on Casters
1
Level
2
CAUTION
CAUTION


