MUTOH VJ-1638UH Mark II Installation Manual Download Page 12

VJ-1638UH Mark

 INSTALLATION MANUAL 

VJ1638UH2E-I-02 

12 

• 

The procedure for setting the rigid media is 
complete.

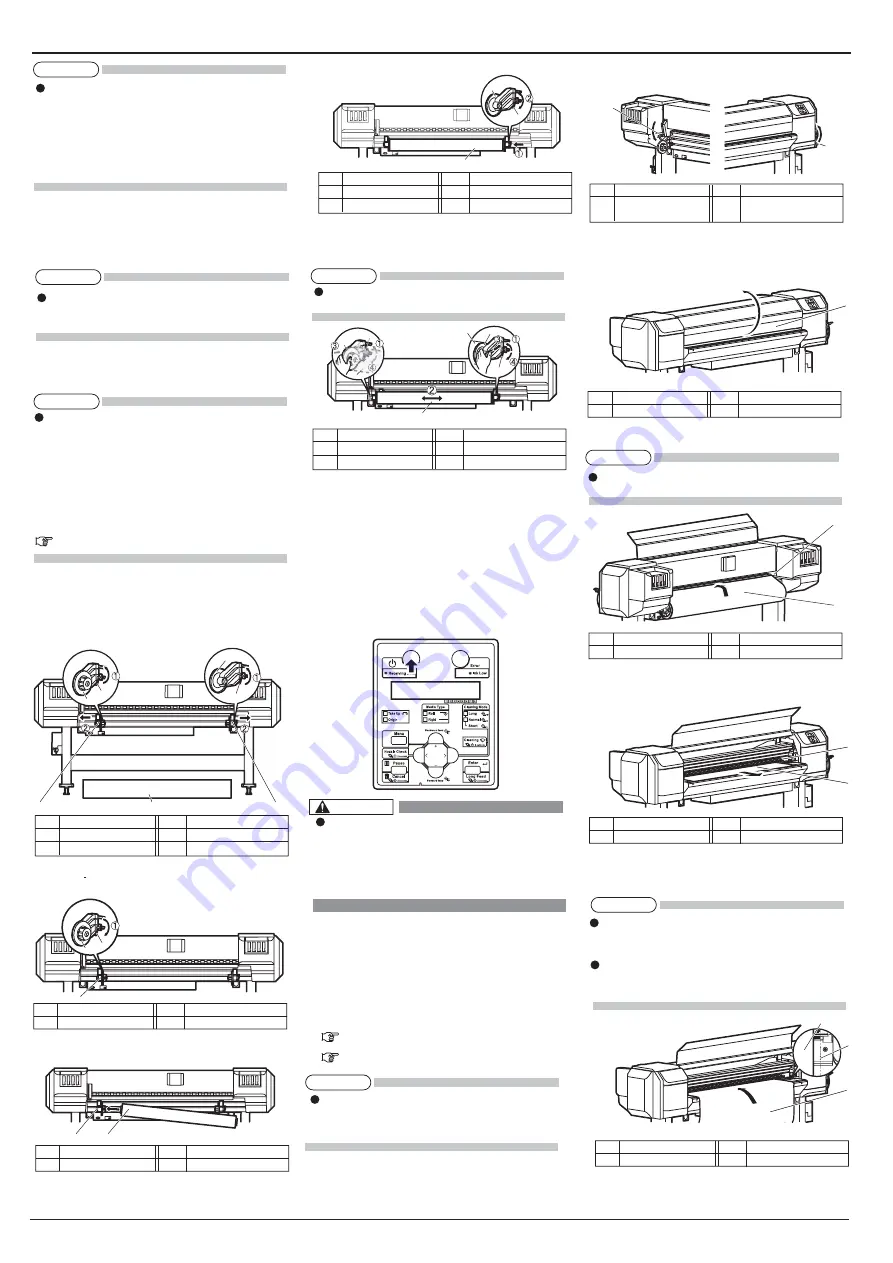
1.  Loosen the fixing levers on the right and left side 

of  the rear. Set the distance between the roll 
media holders wider than the roll media width.

2.  Tighten the fixing lever on the left of Roll media 

holder, and fix the Roll media holder (Left).

3.  Set the roll media to the roll media holder (Left).

• 

Printer has not been moved

• 

Media type has not been changed

• 

Outer diameter: 150 mm or less

• 

Tube diameter: 2 or 3 inch.

• 

Weight: 30 kg or less

• 

Length: 50 m or less

• 

Width: 1,625 mm or less

After fixing the caster height, even when 
Media-feed table is removed, you do not need to 
adjust Media-feed table’s height in the following 
situation.

9.2  Loading roll media

The following roll media can be attached to the 
scroller supplied with this unit.

Follow the procedure below to load roll media.

Operation Manual “8.1.1 Printer specifications”

For removing Media-feed table, read Operation 
Manual “3.5.3 Removing Media-feed table 
(optional)”

This section explains how to load roll media.

Place the roll paper on the side of the product origin.

Roll media holder (Left)

1

Roll media

2

Name

No.

Name

No.

Roll media holder (Left)

1

Fixing lever

2

Name

No.

Name

No.

Roll media holder (Left)

1

Roll media holder (Right)

2

Roll media

3

Fixing lever

4

Name

No.

Name

No.

NOTE

2

1

1

1

3

2

4

1

4

2

1

2

NOTE

NOTE

4.  Set the roll media to the roll media holder (Right) 

and fixed the fixing lever.

3.  Raise Front media loading lever (lower Rear media 

loading lever).

• 

“Lever Up” is displayed on the operation panel.

4.  Open the front cover.

5.  Set the roll media to the media feed slot.

6.  Pull the roll media out about 1 m from the front 

media feed slot which is located inside of the front 
cover.

7.  Rewind the roll media a little by rolling the flange 

on the roll media holder while holding the edge of 
the media, and eliminate any slack or slant.

If you rewind the roll media too much, the roll 
media may come off from Media feed slot and 
may fall on the rear side of the printer.

If the right edge of the roll media is placed further 
right of the loading mark, media detection may 
fail, possibly affecting print quality.

If the end of the roll media is not wound tightly, 
wind it tightly again, and then load it.

5.  Loosen the fixing levers of the right and left roll 

media holders, move the roll paper toward the 
product origin and tighten the fixing lever.

• 

The procedure for loading the roll media is 
complete.

• 

Set the roll media to the printer continuously 
as shown below.

• 

The printer starts the initializing operation.

• 

“Media End” is displayed on the operation panel.

Operation manual “4.3.2 Menu setup procedure”

Operation manual “5.2.2.10 MediaType menu”

If the type of the media you have loaded differs 
from that of the user type you have set, the media 
may not be detected properly.

2.  In Panel setup menu, check if the “media type” for 

the User type you’re going to use is appropriately 
set.

9.3  Setting roll media

This section explains how to set roll media.

Follow the procedure below to set roll media.

1. Turn the unit ON.

Do not operate the media loading lever 
during initial operation and printing.

The print head portion may touch the 
pressurizing roller portion, and cause a 
malfunction.

Fix the roll media holders by pressing the 
holders to the printer.

Name

No.

Name

No.

Name

No.

Name

No.

Name

No.

Name

No.

Name

No.

Name

No.

Name

No.

Name

No.

Name

No.

Name

No.

Name

No.

Name

No.

Roll media holder (Left)

1

Front cover

1

Roll media

1

Roll media holder (Right)

Roll media holder (Right)

2

Roll media

Roll media

Front media loading 
Lever

1

Rear media loading lever

2

3

Media feed slot

2

1

2

3

Fixing lever

Fixing lever

4

Roll media

1

Media feed slot

2

Roll media

1

Media loading mark

2

1

1

2

1

2

1

2

1

2

1

NOTE

NOTE

1

3

4

3

3

4

2

NOTE

CAUTION

NOTE

3

1

2

Summary of Contents for VJ-1638UH Mark II

Page 1: ...Installation environment 4 2 Installation procedure 2 Confirming bundled items 2 1 Items in the printer box 2 2 Items in the accessory box 2 3 Items in the stand box 2 4 Items in the Media feed table optional box 1 1 Unpacking the printer box 1 2 Unpacking the stand box and the Media feed table F and R boxes Thank you for purchasing a MUTOH product This manual explains the steps for unpacking moun...

Page 2: ...ard Outer board Center board Side board A Side board B 1 2 10 7 15 12 13 14 11 No Name No 1 2 3 Cushion Left Cushion Right Accessory box Printer main body 7 8 9 4 Installation Manual this manual 10 Request for User Registration Download 11 5 6 12 No Q ty 1 each 1 1 set Name Installation Manual this manual Japanese English French Accessory box Printer main body 1 2 3 1 each Request for User Registr...

Page 3: ...rew holes in the base part are at the front b Tighten two hexagon socket head cap screws using a hexagonal wrench This section explains how to assemble the printer 4 Fasten the connector bar to the left stand in the same way as in Step 3 3 Remove the two transfer stays and fasten the printer to the stand using eight butterfly screws Assemble this printer with four persons or more Leg part Right Na...

Page 4: ...taching fastening materials This printer has fastening materials in the place shown below 1 Remove all tapes from each cover 2 Open the front cover and remove all protection materials fixed with tape 3 Remove the tape and move the media holder plates to the left and the right edge 4 Open the right Maintenance cover and remove all the packing materials that are fixed with tape Media holder plates N...

Page 5: ...ncreased illumination or direct air for example from an air conditioner To keep the temperature and humidity constant install this product in a location where the air condition is adjustable Install this product to the appropriate place with reference to the following Do not install the printer in the following places where there is a possibility that the printer may be damaged or might fall or be...

Page 6: ...he caster of media feed table 2 places ones closer to the printer with a spanner 6 Place the level at the edge of printer s platen and check the position of the air bubble 7 Place the level on the frame of media feed table Place the level on the same side as when you placed it on the printer Adjust so that there is a 6 mm gap between the top side of the square hole of Paper guide R and the top sid...

Page 7: ...be established or if the earth connection is not given When the power supply of the printer is ON do not pull out the power cable from the power socket Whenever the plug is pulled out from the power socket allow one minute or more before inserting the plug in the power socket again Gas pipe There is a possibility of ignition and explosion Earth wire of telephone cables and lightning rods Heavy cur...

Page 8: ...he Normal condition The ink amount is at a sufficient level Front cover and maintenance cover are closed Media loading lever is lowered Media loading lever on the rear side is raised Front cover or Maintenance cover is open Front media loading lever is raised Rear media loading lever is lowered Waste fluid tank is full The ink cartridges has been removed Not genuine ink cartridges are inserted etc...

Page 9: ...a M Yellow Y and Black K Ink Comb 6Color Cyan C Magenta M Yellow Y Black K Vernish VA and White WH Empty WasteInk E is displayed on Operation panel If this message is displayed during operation check Waste fluid tank and remove any waste fluid If there is waste fluid inside the tank the cleaning liquid is wasted Start Ink Charge E is displayed on Operation panel Insert CleaningCart is displayed on...

Page 10: ...he following rigid media on this printer This section explains how to set media Move the media toward the origin of the printer and place it there For the roll media that can be attached to the scroller supplied with this unit refer to 4 2 1 Loadable media in the Operation Manual Do not turn OFF the printer Do not unplug the power cord set of the printer Do not open Front cover Do not open Mainten...

Page 11: ...o adjust the position for smoother feeding 16 Lower Front media loading lever raise Rear media loading lever The height of the caster is fixed Media feed table is excluded from the illustration for simplicity 15 Raise Front media loading lever lower Rear media loading lever and put the rigid media back to the original position 17 Use a spanner and tighten the hexagon nuts of the caster s height ad...

Page 12: ...the flange on the roll media holder while holding the edge of the media and eliminate any slack or slant If you rewind the roll media too much the roll media may come off from Media feed slot and may fall on the rear side of the printer If the right edge of the roll media is placed further right of the loading mark media detection may fail possibly affecting print quality If the end of the roll me...

Page 13: ... and load the media 2 Confirm that the printer functions normally Operation Manual 4 4 3 Cutting media 9 Loading media 3 Press the key on the operation panel for two seconds or more 7 Perform nozzle check again and check the condition of the print head If one time of head cleaning was not enough to remove blurred or missing parts in the check pattern perform Long cleaning If those problems above w...

Page 14: ...VJ 1638UH MarkⅡ INSTALLATION MANUAL VJ1638UH2E I 02 14 MEMO ...

Page 15: ...VJ 1638UH MarkⅡ INSTALLATION MANUAL 15 VJ1638UH2E I 02 MEMO ...

Page 16: ......

Reviews: