background image


Operation Instructions ValueJet 1604W

Chapter 6 : Handling the printer


76 

AP-77300 – Rev 1.1 -17/09/2009, 


6.2  MENU SETUP ON THE OPERATION PANEL. 

6.2.1 Menu setup procedure 


Be sure to read and understand the safety warnings before handling the printer. 


Step 1 : 

Confirm that the operation panel is in the Normal mode. 


Step 2 : 

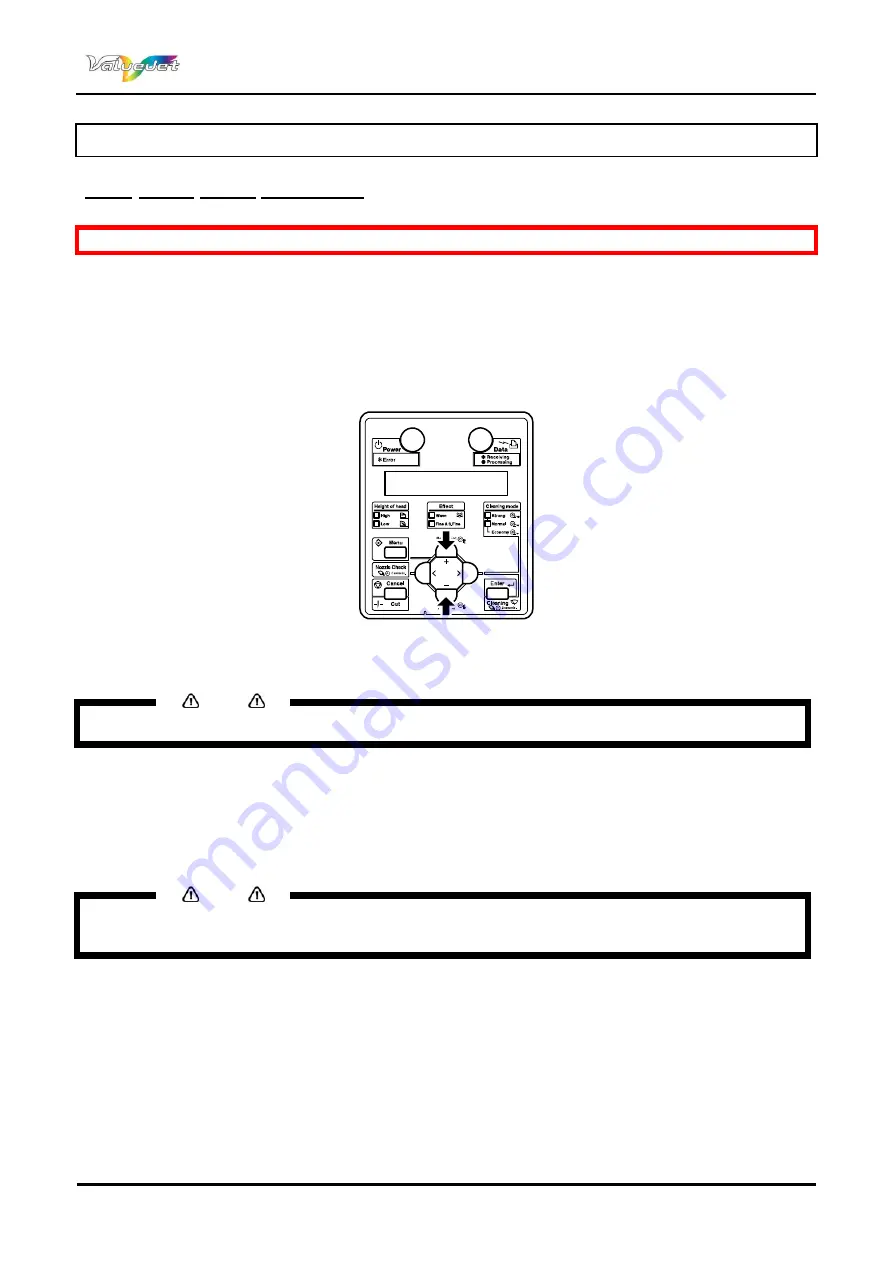
Press the [menu] key. 


The operation panel displays “Menu 1: Setup. 


Step 3 : 

Press the [+] key or the [-] key to select a setup item and press the [ENTER] key. 


  The settings will be confirmed. 

  When setup items have a submenu, the display shifts to the next menu. 


Notes


  When a setup item has a submenu the LCD displays, “>” on the right end.


Step 4 : 

The setting in the blinking part on the LCD monitor of the operation panel can be changed. Press 
the [+] key or the [-] key to change the setting. 


Step 5 : 

To save the changed setting, press the [ENTER] key. 


  Saves the setting and displays the next setup item. 


Notes


  If you press the [CANCEL] key, [+] key or the [-] key without pressing the [ENTER] key after changing a 

setting, the change will not be saved.


Step 6 : 

Press the [CANCEL] key to exit from the setup. 


The previous setup menu is displayed. 


When it displays the main menu, the screen turns to Normal. 

Summary of Contents for ValueJet VJ-1604W

Page 1: ...Operation Instructions VJ 1604W FOR EUROPE ONLY ...

Page 2: ...Operation Instructions ValueJet 1604W 2 AP 77300 Rev 1 1 17 09 2009 This page is left blank intentionally ...

Page 3: ...t is given assumes its custody and control and agrees to the following The information herein contained is given in confidence and any part thereof shall not be copied or reproduced without written consent of Mutoh Europe nv This document or the contents herein under no circumstances shall be used in the manufacture or reproduction of the article shown and the delivery of this document shall not c...

Page 4: ...Operation Instructions ValueJet 1604W 4 AP 77300 Rev 1 1 17 09 2009 This page is left blank intentionally ...

Page 5: ...1 SWITCHING THE POWER ON OFF 26 3 2 HANDLING AND INSTALLING MEDIA 28 3 3 REPLACING INK CASSETTES 37 3 4 REPLACING CUTTING BLADE 38 3 5 DISPOSAL OF WASTE FLUIDS 42 3 6 TRANSFER AND TRANSPORTATION 43 4 PERIODICAL MAINTENANCE 47 4 1 DONE BY END USER 48 4 2 DONE BY AUTHORIZED MUTOH TECHNICIAN 53 5 PREPARATIONS BEFORE PRINTING 55 5 1 GENERAL INFO ON USABLE MEDIA 56 5 2 TEST PRINT 58 5 3 ADJUST PRINT 62...

Page 6: ...Operation Instructions ValueJet 1604W 6 AP 77300 Rev 1 1 17 09 2009 This page is left blank intentionally ...

Page 7: ...7300 Rev 1 1 17 09 2009 1 GENERAL SAFETY INSTRUCTIONS 1 1 REGULATIONS 8 1 2 HANDLING INKS WASTE 9 1 3 WARNINGS CAUTIONS AND NOTES 9 1 4 SAFETY INSTRUCTIONS 10 1 5 WARNING LABELS 12 1 5 1 Handling the operation procedure labels 12 1 5 2 Locations and types of warning labels 12 ...

Page 8: ...pplicable EU directives and that the applicable conformity assessment procedures have been applied Your product is designed and manufactured with high quality materials and components which can be recycled and reused When this crossed out wheeled bin symbol is attached to a product it means the product is covered by the European Directive 2002 96 EC WEEE regulation Please inform yourself about the...

Page 9: ... correctly o Any problems caused by using an ink holder other than those recommended above will not be covered by the warranty and repair expenses will be paid by the customer For handling waste see section 13 on the MSDS sheet Inks Waste o General advice wear safety glasses and gloves especially when handling the waste ink o After spill remove contaminated clothing o After inhalation if difficult...

Page 10: ... other electrical devices o Make sure that no foreign substances such as dust etc are stuck to the power plug o Make sure that the power plug is firmly inserted to the edge of the power socket Do not disable any safety precautions systems Do not operate the unit unless all parts are mounted Do not place the machine in the following areas Doing so may result in the machine tipping or falling over a...

Page 11: ... machine place it against a wall or turn it upside down Doing so may cause ink to leak inside the machine Movement after transport is also not covered by the warranty When cutting roll media be careful of the following Incorrect handling can result in injury to the hands and fingers from the razor blade o When holding the media do not place fingers over the media cut groove o Move the razor blade ...

Page 12: ...each label before operating the printer 1 5 1 Handling the operation procedure labels 1 5 2 Locations and types of warning labels 4 3 2 1 5 6 6 8 9 Notes Check whether all the warning labels can be read If the letters or illustrations on the label are not clear remove the dirt from the label Use cloth water and neutral detergent to remove dirt from the warning label Avoid either organic solvents o...

Page 13: ...Operation instructions ValueJet 1604W Chapter 1 Safety Instructions 13 AP 77300 Rev 1 1 17 09 2009 N Types of warning labels 1 2 3 4 5 ...

Page 14: ...Operation instructions ValueJet 1604W Chapter 2 Product overview 14 AP 77300 Rev 1 1 17 09 2009 This page is intentionally left blank ...

Page 15: ... NAME OF THE PARTS AND FUNCTIONS 16 2 1 1 Front section 16 2 1 2 Rear section 17 2 1 3 Operation panel 18 2 2 PRINTER MODE 21 2 2 1 Normal mode 21 2 2 2 Setup menu display 21 2 2 3 Changing the printer mode 21 2 3 INSTALLATION ENVIRONMENT 22 2 3 1 Environmental conditions for installation 22 2 3 2 Installation space 23 ...

Page 16: ...ned and closed when media is set or jammed It is normally closed 4 Waste fluid tank Used for collecting waste ink discharged from the printer 5 Stand To install the printer on a levelled floor 6 Media guide Used to feed the media smoothly 7 platen Installed inside of the front cover 8 pressure rollers Installed inside of the front cover Press and hold the media when printing 9 Media cut groove Ins...

Page 17: ... through media when the media is set or printed 5 AC inlet Used to connect the power cables 6 USB connector Not used for this printer 7 Network interface connector Connects a network interface cable Notes There are two optional winding systems available for the ValueJet 1604W o Unwinder Winder 100 o Motorized winding system with tensioning T winder Please refer to the User Guide of the chosen syst...

Page 18: ...Operation instructions ValueJet 1604W Chapter 2 Product overview 18 AP 77300 Rev 1 1 17 09 2009 2 1 3 Operation panel 8 9 3 15 17 16 6 5 11 12 1 13 14 10 2 7 4 ...

Page 19: ...p menu display to the normal display Cut key Before data receiving when roll media is set cut the roll media at that position 4 key This menu changes the set value Origin menu Nozzle Check key Hold this key for two seconds or more to perform a Nozzle Check printing 5 key Sets Cleaning Mode The lamp of the Cleaning Mode that you set lights up green With this key you can go down in the menu level of...

Page 20: ... or Fuzz Lamp OFF Sets the Effect menu to None 14 Fine S Fine lamp Green Lamp ON Sets the Effect menu to Fine or Super Fine Lamp OFF The effect menu is set to Wave or Fuzz When the wave lamp is OFF the Effect menu is set to None 15 Strong lamp Green Lamp ON Sets the cleaning Mode to Strong When the Normal lamp is ON Cleaning Mode is set to Economy Lamp OFF Sets the cleaning Mode to strong 16 Norma...

Page 21: ...setup items IP address etc can be set on the operation panel 2 2 3 Changing the printer mode 1 Changing from Normal mode to Menu mode Press the Menu key on the operation panel when the printer is normal The operation panel displays Menu 1 Setup and the display shifts to the setup menu 2 Changing from Menu mode to Normal mode When the printer is at the setup menu display perform either of the follo...

Page 22: ...emperature 20 C to 32 C Humidity 40 to 60 No condensation Guaranteed range of printing accuracy Temperature 22 C to 30 C Humidity 40 to 60 Change rate Temperature within 2 C per hour Humidity within 5 per hour Archiving environment Temperature 20 C to 60 C Humidity 20 to 80 No condensation Ink unfilled Notes Concerning temperature and humidity avoid o Places where temperature or humidity may rapid...

Page 23: ...roduct overview 23 AP 77300 Rev 1 1 17 09 2009 2 3 2 Installation space Install the printer on a levelled floor which has enough strength to support the weight of the entire machine A 650 mm B 1000 mm C 1000 mm D 1000 mm E 1550 mm F 3800 mm G 2700 mm ...

Page 24: ...Operation instructions ValueJet 1604W Chapter 2 Product overview 24 AP 77300 Rev 1 1 17 09 2009 This page is intentionally left blank ...

Page 25: ...e power OFF 27 3 2 HANDLING AND INSTALLING MEDIA 28 3 2 1 Loading roll media 28 3 2 2 Setting roll media 31 3 2 3 Setting media type 33 3 2 4 Head height adjustment 34 3 2 5 Replacing roll media 35 3 3 REPLACING INK CASSETTES 37 3 4 REPLACING CUTTING BLADE 38 3 5 DISPOSAL OF WASTE FLUIDS 42 3 6 TRANSFER AND TRANSPORTATION 43 3 6 1 Transferring the printer 43 3 6 2 Transporting the printer 45 ...

Page 26: ... key to switch ON the printer The Power indication light on the operation panel lights green The printer starts initializing When completing the initialization the printer enters the normal status Notes If there is a problem during initial operation the printer displays a message on the operation panel and may stop operating In the case the operation stops refer to Troubleshooting ...

Page 27: ... or the power indication light lights up green the power is ON Press the key once again and switch OFF the power The printer starts the power OFF procedure The operation panel displays Power OFF Notes If the head height is set to high it displays Change Head Gap Low The procedure to power OFF stops To restart the procedure return the head height to low All the indication lights on the operation pa...

Page 28: ...the User Guide of the chosen system to know how to correctly load media Refer to the pricing sheet for more details of these systems If you do not use one of the above winding systems You have to use the scroller which is supplied with the printer For media with a three inch core three inch core adapters have to be used Notes Set the roll media on a flat and levelled surface If the roll media and ...

Page 29: ... fixing levers at the rear right and left side Set the distance between the roll media holders wider than the roll media width 1 3 4 1 2 2 4 N Name 1 Roll media holder left 2 Roll media holder Right 3 Roll media 4 Fixing lever Step 2 Fix the left roll media holder 1 1 2 N Name 1 Roll media holder left 2 Fixing lever ...

Page 30: ...ll media Step 4 Set the roll to the right roll media holder and fix the fixing lever Step 5 Loosen the fixing levers of the right and left roll media holders move the roll media to the centre and tighten the levers Notes Fix the roll media holders by pressing the holders to the printer 2 3 3 1 2 1 3 4 4 N Name 1 Roll media holder left 2 Roll media holder right 3 Roll media 4 Fixing lever ...

Page 31: ...ls of these systems If you do not use one of the above winding systems You have to use the scroller supplied with the printer Be sure to read and understand the safety warnings before handling the printer Step 1 Switch ON the printer The printer starts the initializing operation The operation panel displays Media End Notes Do not operation the media loading lever during the initial operation The p...

Page 32: ...dge of the media eliminate any slack or slant Notes If you set the roll media free while rewinding the roll media will fall out from the media feed slot on the rear of the product Confirm that the right edge of the roll media does not go beyond the loading mark If it does it may affect print quality Step 7 Lower the media loading lever Notes When loading the new roll media cut the front edge of th...

Page 33: ...Step 3 Press the ENTER key The media type is set The operation panel displays Media Initial and the media initial operation starts Notes The printer starts the media initialization without setting the media type when Pressing the Cancel key No key operations are performed for 10 seconds After media initial operation is complete the operation panel displays Ready to print and the display shifts to ...

Page 34: ...will not be guaranteed Do not open the front cover nor change the head height during printing If the head height is changed the head alignment will be changed and high print quality will no longer be guaranteed Procedure Step 1 Open the front cover Step 2 Move the head height adjustment lever orange to change the head height Notes Do not raise the head height adjustment lever higher than the follo...

Page 35: ...teps Notes There are two optional winding systems available for the ValueJet 1604W o Unwinder Winder 100 o Motorized winding system with tensioning T winder Please refer to the User Guide of the chosen system to know how to correctly replace roll media Refer to the pricing sheet for more details of these systems 1 Remove the installed roll media Step 1 Verify that the printer has been switched ON ...

Page 36: ... Roll media Step 5 Remove the roll media from the left roll media holder 2 1 3 1 3 N name 1 Roll media holder left 2 Fixing lever 3 Roll media To load another roll media refer to Setting media Notes To load another roll media refer to Setting media Store the roll media you do not use according to Notes on storing media Attach the movable flange to the scroller when you do not set roll media this t...

Page 37: ...assette If there is no cassette for replacement at hand leave the empty ink cassette in the printer Leaving the printer without an ink cassette may result in a clogging head 2 Replacement steps Notes Do not shake ink cassettes Doing so may cause ink leakage Do not disassemble the ink cassette A disassembled ink cassette cannot be used When you move the ink cassette from a cold place to a warm plac...

Page 38: ...cutting the operation panel displays Media Cut Error If fuzz etc appears on the cut section 2 Replacing steps Follow the procedure below to replace the razor blade Step 1 If the printer is switched ON make sure that o Printing are other operations are not in progress o The operation panel display is normal Step 2 Display the CR Maintanence menu on the operation panel Press the MENU key o The opera...

Page 39: ...nel displays CR Mainte END Step 4 Open the front cover Notes Perform the cutter replacement in a short time Leaving the print head for a long time at the cutter change position result in head clogging Step 5 Gently push the knob of the razor blade and simultaneously rotate the cutter holder in the direction illustrated Notes Do not strongly press or suddenly release the razor blade Spring is inser...

Page 40: ...should be put in a vinyl bag etc and dispose of it in compliance with local ordinance and instructions of local authorities 1 N name 1 Razor blade Step 7 Attach the new razor blade as shown in the illustration Notes Gently insert the blade so that the spring in the cutter compartment does not get lost 1 2 N name 1 Razor blade 2 Cutter compartment ...

Page 41: ...push the razor blade all the way down Razor blade may damage inside the product Correctly install the cutter holder referring to the illustration below Incorrect installation may generate errors If an error occurs check that the cutter holder is attached correctly 1 3 2 N name 1 Razor blade 2 Cutter holder 3 Cutter compartment Step 9 Close the front cover Step 10 Press the ENTER key o The print he...

Page 42: ... container such as a supply waste fluid bottle to contain the waste fluid Step 2 Lay a protective material on the floor under the waste fluid tank Step 3 Open the waste fluid valve and transfer the waste fluid to the container Notes When transferring the waste fluid to the empty container put the container close to the waste fluid valve so it could not splash 1 2 N Name 1 Waste fluid valve 2 Empty...

Page 43: ... read and understand the safety warnings before handling the printer 1 Pre transfer steps Step 1 Verify that the printer has been switched OFF Step 2 Dispose all waste fluid Step 3 Remove all the cables such as power cables Step 4 Loosen the 4 adjusters of the stand 1 2 1 2 1 Step 5 Verify that the butterfly bolts attaching the stand with the printer are well fixed Step 6 Verify that the printer h...

Page 44: ...tep differences then move the stand and printer separately For further details please refer to the Installation guide 2 Steps after transfer Step 1 Choose a suitable place to install the printer Refer to Installation guide Step 2 Verify that the butterfly bolts fixing the stand with the printer are well fixed Step 3 Connect all cables Step 4 Perform a nozzle check and verify that there is no clogg...

Page 45: ...ult The operation panel displays Transport Mode and the printer starts the ink rejecting operation The ink rejecting operation takes about 2 minutes Step 5 Verify that the power light faints when the ink rejection operations has been finished Step 6 Remove the scroller or the optional winding system Step 7 Remove all cables Step 8 Attach the protective material metal plate to the head unit and fix...

Page 46: ...Operation Instructions ValueJet 1604W Chapter 3 Installing the Unit 46 AP 77300 Rev 1 1 17 09 2009 This page is intentionally left blank ...

Page 47: ...E BY END USER 48 4 1 1 Cleaning the printer 48 4 1 2 Cleaning the outer case 48 4 1 3 Cleaning inside the printer 48 4 1 4 Replacing the spitting box sponges 49 4 1 5 Head cleaning 50 4 1 6 Cleaning the wiper 51 4 2 DONE BY AUTHORIZED MUTOH TECHNICIAN 53 4 2 1 Periodical replacement of parts 53 4 2 2 Periodical inspection part list 53 ...

Page 48: ... good condition 4 1 2 Cleaning the outer case Be sure to read and understand the safety warnings before handling the printer Instruction Wipe off the dust and possible dirt from the outer case by using a soft cloth 4 1 3 Cleaning inside the printer Be sure to read and understand the safety warnings before handling the printer Step 1 Open the front cover Step 2 Remove paper powder and dust from the...

Page 49: ...tact your local Mutoh dealer 3 Replacing steps Step 1 If the printer is ON make sure that Printing or other operations are not in progress The operation panel display is Normal Step 2 Open the front cover Step 3 Remove the spitting box sponge from each spitting box by using forceps 1 1 1 2 N Name 1 spitting boxes 2 spitting box sponge Notes Do not drop waste fluid when replacing the spitting box s...

Page 50: ... the media hold lever is lowered Step 3 Press the key to select the cleaning mode Step 4 Press the Cleaning key for at least 2 seconds The operation panel displays Cleaning After performing the head cleaning operation the operation panel shifts to Normal Notes Pressing the Cleaning key again after the 1st head cleaning performs a strong cleaning If you fail to remove blurs or incompleteness of pri...

Page 51: ...state Step 2 Display the CR Maintenance menu Step 3 Press the Menu key The operation panel displays Menu 1 Setup The operation panel shifts to the setup menu display Step 4 Press the key The operation panel displays Set1 MediaType Step 5 Press the key or key to select Set20 CR Maintenance Step 6 Press the ENTER key The operation panel displays CR Mainte Start The display enters the CR Maintenance ...

Page 52: ...ck 3 Head cap unit Cleaning wiper backside Wipe vertically 3 1 3 2 N Name 1 Cleaning wiper 2 Cleaning stick 3 Head cap unit Step 10 Close the right maintenance cover so it is firmly locked Step 11 Press the ENTER key The print head returns to its original position The cleaning wiper returns to its original position The operation panel displays CR Mainte Start Step 12 Press the Cancel key several t...

Page 53: ...technician and are necessary to ensure the best printing quality output Part Timing Maintenance station Once a year Wiper Once a year Damper Once a year 4 2 2 Periodical inspection part list Perform periodical inspections according to the table Periodical Inspection Part List and perform cleaning and part replacement as necessary Part Timing Check point Media guide Sub platen front surface Once a ...

Page 54: ...Operation Instructions ValueJet 1604W Chapter 4 Periodical maintenance 54 AP 77300 Rev 1 1 17 09 2009 This page is intentionally left blank ...

Page 55: ...Media compatibility 56 5 1 2 Printing area 56 5 1 3 Notes on handling media 57 5 1 4 Notes on storing media 57 5 2 TEST PRINT 58 5 2 1 Overview and functions of the test prints 58 5 2 2 Performing a test print 58 5 2 3 Nozzle check 59 5 2 4 Mode Print 59 5 2 5 Setup print 60 5 2 6 Palette print 61 5 3 ADJUST PRINT 62 5 4 STEP ADJUSTMENT 65 5 5 MAKING THE PRINTER READY TO PRINT 69 ...

Page 56: ...ww mutoh be or contact your local MUTOH dealer If printer failures or malfunctions occur by using non compatible media o The printer will not be covered by the warranty and repair expenses will have to be paid by the customer o For details refer to Periodical Maintenance Troubleshooting If repair is necessary contact your local MUTOH dealer Notes When tested and compatible media is used the print ...

Page 57: ...y caused by media expansion or contraction Media has a printable side and a non printable side Printing on the non print side can cause blurs and blots Always handle media with dry and clean hands to avoid bad print quality When the printer will be unused for more than 24 hours remove the media to prevent media floating media jams and degradation of the print quality Avoid using media in cold plac...

Page 58: ...hed ON and that media more than A3 size has been loaded See Installing roll media and Loading roll media Step 2 Verify that the printer is in Normal mode Step 3 Press the Menu key The operation panel displays Menu1 Test Print The operation panel shifts to the setup menu display Press the or key to select Menu2 Test Print Step 4 Press the key Result The operation panel displays Test1 Nozzle Check T...

Page 59: ...s If the nozzle check result indicates that the checked points are blurred or missing clean the head See Head cleaning Perform the nozzle check once again after the head has been cleaned Notes For the printing procedure refer to Performing a test print 5 2 4 Mode Print Used to confirm the following printing conditions Print mode Effect Adjustment value Notes For the printing procedure refer to Per...

Page 60: ...ype10 G raphi cs 2 G raphi cs 2 G raphi cs 2 G raphi cs 2 G raphi cs 2 G raphi cs 2 G raphi cs 2 G raphi cs 2 G raphi cs 2 G raphi cs 2 250 0 250m m 250 0 250m m 250 0 250m m 250 0 250m m 250 0 250m m 250 0 250m m 250 0 250m m 250 0 250m m 250 0 250m m 250 0 250m m 0pul se 0pul se 0pul se 0pul se 0pul se 0pul se 0pul se 0pul se 0pul se 0pul se 0pul se 0pul se 0pul se 0pul se 0pul se 0pul se 0pul s...

Page 61: ...t Used to compare pen colours used on the computer to the printing colours Notes When Banner 1 or Banner 2 is set in the Print Mode menu PalettePrint is not displayed on the Test Print menu For the printing procedure refer to Performing a test print Be sure to read and understand the safety warnings before handling the printer ...

Page 62: ...tion panel displays Menu 1 Setup Shifts to the Setup menu display Step 5 Press the key The operation panel displays Set1 MediaType Step 6 Press the ENTER key The operation panel displays Media Type 1 Step 7 Press the or key to select the media type to use Step 8 Press the Enter key The operation panel displays 1 PrintMode Press the Enter key The operation panel displays Mode Graphics 1 The display...

Page 63: ...1B 2A 3A 4A 2B 3B 4B 1A 1B 2A 1A 1B 2A After printing the confirmation pattern the operation panel returns to normal Step 15 Check that the confirmation pattern printing result is as follows 1A 1B 2A 3A 4A 2B 3B 4B 1A 1B 2A 3A 4A 2B 3B 4B Q 1A 1B 2A 3A 4A 2B 3B 4B 1A 1B 2A 1A 1B 2A When the printing result is You do not to need perform an Alignment When the printing result is You need to perform a...

Page 64: ...ng and select the number corresponding to the lines that are most closely aligned 4 is selected in the next printing sample Step 18 Press the or key to set the number that you have selected Step 19 Press the Enter key Registers the set value for BI D Quality The operation panel displays Adjust5 BI D quality Register the setting for Bi D Normal two way printing normal mode in the same way as in pre...

Page 65: ...pensation value Step 1 Display the Media feed compensation menu on the operation panel Step 2 Press the Menu key Shift to the Setup menu display The operation panel displays Menu 1 Setup Step 3 Press the key The operation panel displays Set1 MediaType Step 4 Press the Enter key The operation panel displays Media Type 1 Step 5 Press the key or key to select the media type you wish to use Step 6 Pre...

Page 66: ...alue Press the Enter key o The operation panel displays Printing o Start Initial adjustment printing 2 1 1 N Name 1 Feed length 2 Media feeding direction o When the initial adjustment printing is complete the printer enters the normal status After the initial adjustment printing cut the media See Cutting media Step 8 Measure the distance between two signs in the initial adjustment print Step 9 Set...

Page 67: ... If you want to change the feeding length press the key or key and change the set value Press the Enter key o The operation panel displays Printing o Start Confirmation adjustment printing 2 1 1 N Name 1 Feed length 2 Media feeding direction After the confirmation adjustment printing cut the media For more information please refer to Cutting media Step 11 Measure the distance between two pluses in...

Page 68: ... After completing the micro adjustment printing the operation panel displays PF4 Micro Adj Print Step 13 Refer to the illustrations below and check the printing result Input the adjustment value Step 14 Set up the Micro Adjustment Change Press the key or key to select PF5 Micro Adj Change Press the Enter key o The operation panel displays Micro 0pulse Press the key or key and enter the micro adjus...

Page 69: ...he appropriate media General info on usable media 2 Install and load the media Installing roll media Loading roll media 3 Set the media type Setting media type 4 OPTIONAL Adjust the head height Head Height Adjustment 5 Set the printing conditions Menu setup on the operation panel 6 OPTIONAL Perform a test plot s and perform adjusting cleaning and replacing actions when needed Test Print Result REA...

Page 70: ...Operation Instructions ValueJet 1604W Chapter 5 Preparations before printing 70 AP 77300 Rev 1 1 17 09 2009 This page is intentionally left blank ...

Page 71: ... printing 73 6 1 3 Cutting media 73 6 1 4 Manually cutting the media 74 6 1 5 Changing and confirming settings while printing 75 6 1 5 1 Procedure for changing and confirming settings while printing 75 6 1 5 2 Settings that can be changed or confirmed while printing 75 6 1 6 Pause printing 75 6 2 MENU SETUP ON THE OPERATION PANEL 76 6 2 1 Menu setup procedure 76 6 2 2 Panel setup menu overview 77 ...

Page 72: ...nderstand the safety warnings before handling the printer 6 1 1 Feeding media You can feed roll media at any position you want Follow the procedure below to feed media Step 1 Confirm that the operation panel is Normal Step 2 Check that the media loading lever is down Step 3 Press Forward key or the backward key Feeds Media forward or backward Step 4 Release the Backward key or the Forward key afte...

Page 73: ...ete the received analyzed data and the remaining incoming data Notes If saving a large amount of data on the printer the operation panel may not return to Normal by a single Cancel operation In such cases wait a few seconds and press the Cancel key again 6 1 3 Cutting media If you have on 2steps or on 3steps selected in the media cut menu the printer will automatically cut the media when printing ...

Page 74: ...Ready to print Step 2 If changing the roll media cut position refer to Feeding media and advance the roll media to the desired cut position Step 3 Open the front cover Step 4 Place a razor blade on the media cut groove on the media guide and cut the roll media 1 2 3 N Name 1 Media guide 2 Media cut groove 3 Razor blade Cutting roll media is complete Notes When loading the new roll media cut the fr...

Page 75: ...es The Print start menu is displayed only when the printer is warming up When you change a setting during operation be sure to select Backup to save the setting that you changed If the printer returns to Normal without selecting Backup the changed setting is not saved Setup Item Setting Description PF Adjust 20 pulse to 0 to 20 pulse Change the feed adjustment value Backup ENTER key Save the chang...

Page 76: ...nfirmed When setup items have a submenu the display shifts to the next menu Notes When a setup item has a submenu the LCD displays on the right end Step 4 The setting in the blinking part on the LCD monitor of the operation panel can be changed Press the key or the key to change the setting Step 5 To save the changed setting press the ENTER key Saves the setting and displays the next setup item No...

Page 77: ...lity 2 Quality 3 Quality 4 1 2 PF Adjust 1 3 Vacuum Fan Effect Wave 1 Wave 2 WOW 1 WOW 2 Fine Wave 1 Fine Wave 2 Fine Wave 3 Fine Wave 4 A S Fine Wave B S Fine Wave None 1 None 2 Spitting Origin On Media Side Margin 5 25mm Media Initial OFF Width Top Width Media Width Width Confirm mm Take Up Origin Prev Stick ON OFF Media cut OFF 2steps OFF 3steps ON 2steps ON 3steps Distance Data Machine Strike ...

Page 78: ...oll 2 Roll 3 Longstore Start Remove cassettes CR maintenance Start end Initialization All Media type Except Media Type Life Time Head E F Pump E F CR motor E F PF motor E F IP Address 0 0 0 0 255 255 255 255 Subnet Mask 0 0 0 0 255 255 255 255 Gate Way 0 0 0 0 255 255 255 255 temporary Menu2 Test Print Nozzle Check Mode Print Setup List All setup List Palette ...

Page 79: ...ime Long Time Little Charge Menu5 Menu option 1 Media Type 2 Effect 3 Spitting 4 Side Margin 5 Media Initial 6 Media Width 7 Take Up 8 Feed 9 Origin 10 Prev Stick 11 Media cut 12 CR Movement 13 Overwrite Cnt 14 Overwrite Wait 15 Slant Check 16 Auto Cleaning 17 Ink Status 18 Roll Length 19 Longstore 20 CR maintenance 21 Initialization 22 Life Time 23 IP Address 24 Subnet Mask 25 Gate Way 26 ALL ON ...

Reviews: